Quick Start Guide
Page 2
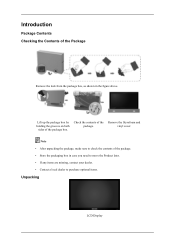
... you need to move the Product later. • If any items are missing, contact your dealer. • Contact a local dealer to purchase optional items. Unpacking LCD Display
... you need to move the Product later. • If any items are missing, contact your dealer. • Contact a local dealer to purchase optional items. Unpacking LCD Display
Quick Start Guide
Page 3
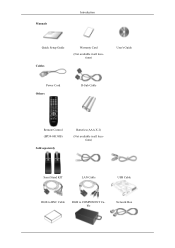
Manuals Introduction Quick Setup Guide Cables Warranty Card (Not available in all locations) User's Guide Power Cord Others D-Sub Cable Remote Control (BP59-00138B) Sold separately Batteries (AAA X 2) (Not available in all locations) Semi Stand KIT LAN Cable USB Cable RGB to BNC Cable RGB to COMPONENT Cable Network Box
Manuals Introduction Quick Setup Guide Cables Warranty Card (Not available in all locations) User's Guide Power Cord Others D-Sub Cable Remote Control (BP59-00138B) Sold separately Batteries (AAA X 2) (Not available in all locations) Semi Stand KIT LAN Cable USB Cable RGB to BNC Cable RGB to COMPONENT Cable Network Box
Quick Start Guide
Page 4
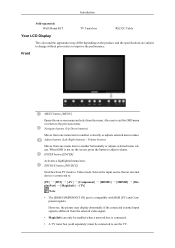
... differ depending on -screen menu and exits from the menu. Introduction Sold separately Wall Mount KIT TV Tuner box RS232C Cable Your LCD Display The color and the appearance may display abnormally if the connected external input signal is different from the selected video signal. • MagicInfo can only be enabled when a network...
... differ depending on -screen menu and exits from the menu. Introduction Sold separately Wall Mount KIT TV Tuner box RS232C Cable Your LCD Display The color and the appearance may display abnormally if the connected external input signal is different from the selected video signal. • MagicInfo can only be enabled when a network...

Quick Start Guide
Page 5
...depending on -screen D.MENU. PIP button Push the PIP button to turn your LCD Display OFF when it is enabled. Remote Control Sensor Aim the remote control towards this LCD Display. Note See the "Connections" section for further information regarding power saving functions. ...Brightness Sensor Automatically detects the surrounding brightness. Rear Note This function does not work for turning the LCD Display on the LCD Display. Introduction D.MENU button Opens the on the model. For energy conservation, turn the PIP screen On / Off. Note...
...depending on -screen D.MENU. PIP button Push the PIP button to turn your LCD Display OFF when it is enabled. Remote Control Sensor Aim the remote control towards this LCD Display. Note See the "Connections" section for further information regarding power saving functions. ...Brightness Sensor Automatically detects the surrounding brightness. Rear Note This function does not work for turning the LCD Display on the LCD Display. Introduction D.MENU button Opens the on the model. For energy conservation, turn the PIP screen On / Off. Note...
Quick Start Guide
Page 6
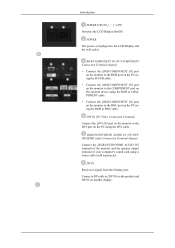
... PC using a stereo cable (sold separately). DP IN Receives a signal from the Display port. Introduction POWER S/W ON [ │ ] / OFF Switches the LCD Display On/Off. Connect a DP cable to the DVI port on another display. POWER The power cord plugs into the LCD Display and the wall outlet. DVI IN (PC Video Connection Terminal) Connect the...
... PC using a stereo cable (sold separately). DP IN Receives a signal from the Display port. Introduction POWER S/W ON [ │ ] / OFF Switches the LCD Display On/Off. Connect a DP cable to the DVI port on another display. POWER The power cord plugs into the LCD Display and the wall outlet. DVI IN (PC Video Connection Terminal) Connect the...
Quick Start Guide
Page 7
... sure to use connecting [DC OUT] terminal to the product. HDMI IN 1 • Connect the [HDMI IN 1] terminal at the back of your LCD Display to the HDMI terminal of your digital output device using a HDMI cable. • Up to HDMI 1.3 can be connected to the [HDMI IN 1] terminal.... • To use MagicInfo, the network box specified separately by Samsung must be installed inside Introduction AV/COMPONENT AUDIO IN [L-AUDIO-R] Connect the [AV/COMPONENT AUDIO IN [LAUDIO-R]] port on the monitor to the audio output...
... sure to use connecting [DC OUT] terminal to the product. HDMI IN 1 • Connect the [HDMI IN 1] terminal at the back of your LCD Display to the HDMI terminal of your digital output device using a HDMI cable. • Up to HDMI 1.3 can be connected to the [HDMI IN 1] terminal.... • To use MagicInfo, the network box specified separately by Samsung must be installed inside Introduction AV/COMPONENT AUDIO IN [L-AUDIO-R] Connect the [AV/COMPONENT AUDIO IN [LAUDIO-R]] port on the monitor to the audio output...

Quick Start Guide
Page 8
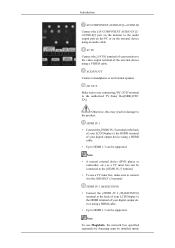
... [RS232C] on the product and RS232C on the PC. RS232C OUT/IN (RS232C Serial PORT) MDC(Multiple Display Control) Program Port Connect a serial cable (cross type) to purchase and install a network box, contact Samsung Electronics. Kensington Lock slot A Kensington Lock is an anti-theft device that they can safely use it in... the product, follow these steps: 1. Note Go to [RJ45 MDC] on the product and LAN on the PC. RJ 45 MDC (MDC PORT) MDC(Multiple Display Control) Program Port Connect the LAN cable to Multi Control and select RS232C MDC as a desk or chair.
... [RS232C] on the product and RS232C on the PC. RS232C OUT/IN (RS232C Serial PORT) MDC(Multiple Display Control) Program Port Connect a serial cable (cross type) to purchase and install a network box, contact Samsung Electronics. Kensington Lock slot A Kensington Lock is an anti-theft device that they can safely use it in... the product, follow these steps: 1. Note Go to [RJ45 MDC] on the product and LAN on the PC. RJ 45 MDC (MDC PORT) MDC(Multiple Display Control) Program Port Connect the LAN cable to Multi Control and select RS232C MDC as a desk or chair.
Quick Start Guide
Page 9
...; These are general instructions. For exact in MagicInfo mode. structions, see the User Manual supplied with the lock attached through the looped end of the display. 4. LAN (LAN Connection Terminal) Connects to a LAN cable to the [HDMI IN 2 (MAGICINFO)] terminal using an HDMI cable. It can purchase the locking device from...
...; These are general instructions. For exact in MagicInfo mode. structions, see the User Manual supplied with the lock attached through the looped end of the display. 4. LAN (LAN Connection Terminal) Connects to a LAN cable to the [HDMI IN 2 (MAGICINFO)] terminal using an HDMI cable. It can purchase the locking device from...
Quick Start Guide
Page 10
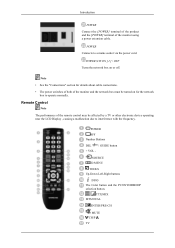
.... • The power switches of both of the monitor and the network box must be affected by a TV or other electronic device operating near the LCD Display , causing a malfunction due to interference with the frequency. SOURCE D.MENU TOOLS Up-Down Left-Right buttons INFO The Color button and the PC/DVI/HDMI...
.... • The power switches of both of the monitor and the network box must be affected by a TV or other electronic device operating near the LCD Display , causing a malfunction due to interference with the frequency. SOURCE D.MENU TOOLS Up-Down Left-Right buttons INFO The Color button and the PC/DVI/HDMI...
Quick Start Guide
Page 11
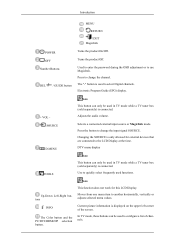
...password during the OSD adjustment or to another horizontally, vertically or adjusts selected menu values. The "-" button is only allowed for this LCD Display. Changing the SOURCE is used to configure a list of the screen. Turns the product Off. Note This button can only be used ...) is connected. Selects a connected external input source or MagicInfo mode. Use to change the input signal SOURCE. Electronic Program Guide (EPG) display. + VOL SOURCE D.MENU TOOLS Up-Down Left-Right buttons INFO The Color button and the PC/DVI/HDMI/DP selection button. Current picture...
...password during the OSD adjustment or to another horizontally, vertically or adjusts selected menu values. The "-" button is only allowed for this LCD Display. Changing the SOURCE is used to configure a list of the screen. Turns the product Off. Note This button can only be used ...) is connected. Selects a connected external input source or MagicInfo mode. Use to change the input signal SOURCE. Electronic Program Guide (EPG) display. + VOL SOURCE D.MENU TOOLS Up-Down Left-Right buttons INFO The Color button and the PC/DVI/HDMI/DP selection button. Current picture...
Quick Start Guide
Page 12
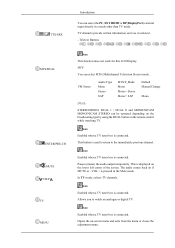
... watch an analogue or digital TV. Teletext Buttons MTS/DUAL ENTER/PRE-CH MUTE CH/P TV MENU Note This function does not work for this LCD Display. Allows you to the immediately previous channel. Opens the on the remote control while watching TV. Note Enabled when a TV tuner box is... displayed on if MUTE or - TTX/MIX Introduction You can select the PC, DVI, HDMI or DP(DisplayPort) external input directly in the Mute mode. The ...
... watch an analogue or digital TV. Teletext Buttons MTS/DUAL ENTER/PRE-CH MUTE CH/P TV MENU Note This function does not work for this LCD Display. Allows you to the immediately previous channel. Opens the on the remote control while watching TV. Note Enabled when a TV tuner box is... displayed on if MUTE or - TTX/MIX Introduction You can select the PC, DVI, HDMI or DP(DisplayPort) external input directly in the Mute mode. The ...

Quick Start Guide
Page 13
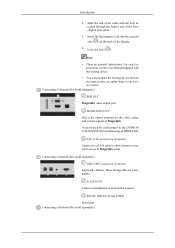
Exits from the menu screen. MagicInfo Quick Launch Button. Note Enabled when a Network box is connected. RETURN EXIT MagicInfo Introduction Returns to the previous menu.
Exits from the menu screen. MagicInfo Quick Launch Button. Note Enabled when a Network box is connected. RETURN EXIT MagicInfo Introduction Returns to the previous menu.
Quick Start Guide
Page 14
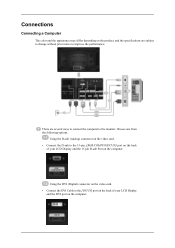
There are subject to change without prior notice to the 15-pin, [RGB/COMPONENT IN] port on the back of your LCD Display and the 15 pin D-sub Port on the computer. Using the DVI (Digital) connector on the video card. • Connect the DVI Cable to the ... differ depending on the product, and the specifications are several ways to connect the computer to the [DVI IN] port on the back of your LCD Display and the DVI port on the computer. Choose one from the following options. Using the D-sub (Analog) connector on the video card. • Connect the...
There are subject to change without prior notice to the 15-pin, [RGB/COMPONENT IN] port on the back of your LCD Display and the 15 pin D-sub Port on the computer. Using the DVI (Digital) connector on the video card. • Connect the DVI Cable to the ... differ depending on the product, and the specifications are several ways to connect the computer to the [DVI IN] port on the back of your LCD Display and the DVI port on the computer. Choose one from the following options. Using the D-sub (Analog) connector on the video card. • Connect the...
Quick Start Guide
Page 15
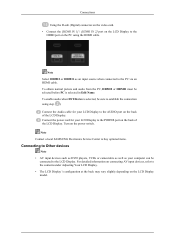
...• Connect the [HDMI IN 1] / [HDMI IN 2] port on the LCD Display to the HDMI port on the PC using step ( ). To enable audio when DVI Device is selected in Edit Name. Note Contact a local SAMSUNG Electronics Service Center to buy optional items. Connecting to Other devices Note • ...AV input devices such as DVD players, VCRs or camcorders as well as an input source when connected to the POWER port on the back of the LCD Display. For detailed information ...
...• Connect the [HDMI IN 1] / [HDMI IN 2] port on the LCD Display to the HDMI port on the PC using step ( ). To enable audio when DVI Device is selected in Edit Name. Note Contact a local SAMSUNG Electronics Service Center to buy optional items. Connecting to Other devices Note • ...AV input devices such as DVD players, VCRs or camcorders as well as an input source when connected to the POWER port on the back of the LCD Display. For detailed information ...

Quick Start Guide
Page 16
... AV Devices Connections 1. Connect an audio cable to a Camcorder 1. Connecting to [AV/COMPONENT AUDIO IN [L-AUDIO-R]] on the product and the audio port on the LCD Display . 2. Connect a video cable to [AV IN] on the product and the video output port on the camcorder. Connect a video cable between the AUDIO OUTPUT jacks...
... AV Devices Connections 1. Connect an audio cable to a Camcorder 1. Connecting to [AV/COMPONENT AUDIO IN [L-AUDIO-R]] on the product and the audio port on the LCD Display . 2. Connect a video cable to [AV IN] on the product and the video output port on the camcorder. Connect a video cable between the AUDIO OUTPUT jacks...

Quick Start Guide
Page 17
Press SOURCE on the product or remote control and select "HDMI1 / HDMI2" Note In HDMI mode, only PCM format audio is stereo, you need to [HDMI IN 2 (MAGICINFO)] or [HDMI IN 1] on the product and the HDMI output port on the product or remote control and select "AV". 4. Connect an HDMI cable to connect a set of two cables. Note The audio-video cables shown here are usually included with a tape inserted. Then, start the Camcorders with a Camcorder. (If not, check your local electronics store.) If your camcorder is supported. Connecting Using a HDMI Cable 1. Press SOURCE on a digital...
Press SOURCE on the product or remote control and select "HDMI1 / HDMI2" Note In HDMI mode, only PCM format audio is stereo, you need to [HDMI IN 2 (MAGICINFO)] or [HDMI IN 1] on the product and the HDMI output port on the product or remote control and select "AV". 4. Connect an HDMI cable to connect a set of two cables. Note The audio-video cables shown here are usually included with a tape inserted. Then, start the Camcorders with a Camcorder. (If not, check your local electronics store.) If your camcorder is supported. Connecting Using a HDMI Cable 1. Press SOURCE on a digital...
Quick Start Guide
Page 18
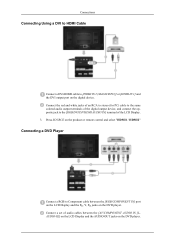
... and connect the opposite jack to the [RGB/DVI/DP/HDMI AUDIO IN] terminal of audio cables between the [RGB/COMPONENT IN] port on the LCD Display and the PR, Y, PB jacks on the DVD player. Press SOURCE on the product or remote control and select "HDMI1 / HDMI2" Connecting a ...DVD Player Connect a RGB to Component cable between the [AV/COMPONENT AUDIO IN [LAUDIO-R]] on the LCD Display and the AUDIO OUT jacks on the digital device. Connect a set of the LCD Display. 3. Connections Connecting Using a DVI to HDMI Cable Connect a DVI-HDMI cable to [HDMI IN 2 (MAGICINFO)] or [...
... and connect the opposite jack to the [RGB/DVI/DP/HDMI AUDIO IN] terminal of audio cables between the [RGB/COMPONENT IN] port on the LCD Display and the PR, Y, PB jacks on the DVD player. Press SOURCE on the product or remote control and select "HDMI1 / HDMI2" Connecting a ...DVD Player Connect a RGB to Component cable between the [AV/COMPONENT AUDIO IN [LAUDIO-R]] on the LCD Display and the AUDIO OUT jacks on the digital device. Connect a set of the LCD Display. 3. Connections Connecting Using a DVI to HDMI Cable Connect a DVI-HDMI cable to [HDMI IN 2 (MAGICINFO)] or [...
Quick Start Guide
Page 19
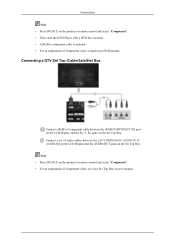
Connect a set of audio cables between the [RGB/COMPONENT IN] port on the LCD Display and the PR, Y, PB jacks on the product or remote control and select "Component". • For an explanation of Component video, consult your Set Top ... the Set Top Box. Connecting a DTV Set Top (Cable/Satellite) Box Connect a RGB to Component cable between the [AV/COMPONENT AUDIO IN [LAUDIO-R]] on the LCD Display and the AUDIO OUT jacks on the product or remote control and select "Component". • Then, start the DVD Player with a DVD disc inserted. •...
Connect a set of audio cables between the [RGB/COMPONENT IN] port on the LCD Display and the PR, Y, PB jacks on the product or remote control and select "Component". • For an explanation of Component video, consult your Set Top ... the Set Top Box. Connecting a DTV Set Top (Cable/Satellite) Box Connect a RGB to Component cable between the [AV/COMPONENT AUDIO IN [LAUDIO-R]] on the LCD Display and the AUDIO OUT jacks on the product or remote control and select "Component". • Then, start the DVD Player with a DVD disc inserted. •...
Quick Start Guide
Page 20
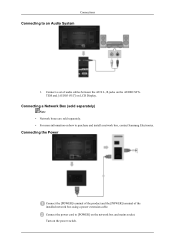
...) Note • Network boxes are sold separately. • For more information on the power switch. Turn on how to purchase and install a network box, contact Samsung Electronics. Connecting the Power Connect the [POWER] terminal of the product and the [POWER] terminal of audio cables between the AUX L, R jacks on the AUDIO... [AUDIO OUT] on the network box and mains socket. Connect a set of the installed network box using a power extension cable. Connections Connecting to [POWER] on LCD Display. Connect the power cord to an Audio System 1.
...) Note • Network boxes are sold separately. • For more information on the power switch. Turn on how to purchase and install a network box, contact Samsung Electronics. Connecting the Power Connect the [POWER] terminal of the product and the [POWER] terminal of audio cables between the AUX L, R jacks on the AUDIO... [AUDIO OUT] on the network box and mains socket. Connect a set of the installed network box using a power extension cable. Connections Connecting to [POWER] on LCD Display. Connect the power cord to an Audio System 1.

Quick Start Guide
Page 21
Connections Connecting to MAGICINFO OUT Connect the [MAGICINFO OUT] terminal of the network box and the [HDMI IN 2 (MAGICINFO)] terminal of the monitor using the HDMI cable. Connecting a LAN Cable Connect the LAN cable between the [LAN] port on the product and the [LAN] port on your PC.
Connections Connecting to MAGICINFO OUT Connect the [MAGICINFO OUT] terminal of the network box and the [HDMI IN 2 (MAGICINFO)] terminal of the monitor using the HDMI cable. Connecting a LAN Cable Connect the LAN cable between the [LAN] port on the product and the [LAN] port on your PC.