Quick Start Guide
Page 3
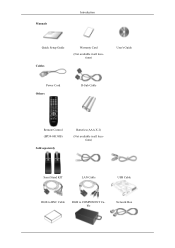
Manuals Introduction Quick Setup Guide Cables Warranty Card (Not available in all locations) User's Guide Power Cord Others D-Sub Cable Remote Control (BP59-00138B) Sold separately Batteries (AAA X 2) (Not available in all locations) Semi Stand KIT LAN Cable USB Cable RGB to BNC Cable RGB to COMPONENT Cable Network Box
Manuals Introduction Quick Setup Guide Cables Warranty Card (Not available in all locations) User's Guide Power Cord Others D-Sub Cable Remote Control (BP59-00138B) Sold separately Batteries (AAA X 2) (Not available in all locations) Semi Stand KIT LAN Cable USB Cable RGB to BNC Cable RGB to COMPONENT Cable Network Box

Quick Start Guide
Page 5
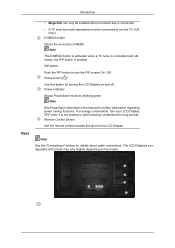
...control towards this spot on the model. Power button [ ] Use this LCD Display. The LCD Display's configuration at the back may vary slightly depending on the LCD Display. PIP button Push the PIP button to turn your LCD Display OFF when it is enabled. Note The D.MENU button is activated when... D.MENU button Opens the on and off. Power indicator Shows PowerSaver mode by blinking green Note See PowerSaver described in the manual for this button for details about cable connections. Rear Note This function does not work for further information regarding power saving functions...
...control towards this spot on the model. Power button [ ] Use this LCD Display. The LCD Display's configuration at the back may vary slightly depending on the LCD Display. PIP button Push the PIP button to turn your LCD Display OFF when it is enabled. Note The D.MENU button is activated when... D.MENU button Opens the on and off. Power indicator Shows PowerSaver mode by blinking green Note See PowerSaver described in the manual for this button for details about cable connections. Rear Note This function does not work for further information regarding power saving functions...

Quick Start Guide
Page 8
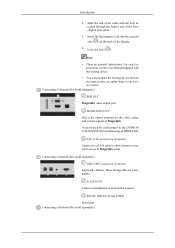
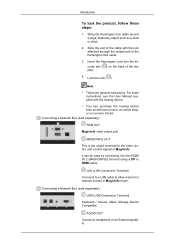
RS232C OUT/IN (RS232C Serial PORT) MDC(Multiple Display Control) Program Port Connect a serial cable (cross type) to purchase and install a network box, contact Samsung Electronics. For more information on how to [RS232C] on the product and RS232C on the PC. To lock the product, follow these...cable around a large, stationary object such as the MDC Connection. RJ 45 MDC (MDC PORT) MDC(Multiple Display Control) Program Port Connect the LAN cable to the User Manual supplied with the locking device for more information. Kensington Lock slot A Kensington Lock is an anti-theft device ...
RS232C OUT/IN (RS232C Serial PORT) MDC(Multiple Display Control) Program Port Connect a serial cable (cross type) to purchase and install a network box, contact Samsung Electronics. For more information on how to [RS232C] on the product and RS232C on the PC. To lock the product, follow these...cable around a large, stationary object such as the MDC Connection. RJ 45 MDC (MDC PORT) MDC(Multiple Display Control) Program Port Connect the LAN cable to the User Manual supplied with the locking device for more information. Kensington Lock slot A Kensington Lock is an anti-theft device ...
Quick Start Guide
Page 9
...Box (sold separately) RGB OUT MagicInfo video output port MAGICINFO OUT This is the output terminal for the video, audio, and control signals of the display. 4. For exact in MagicInfo mode. AUDIO OUT Connect a headphone or an External speaker. Insert the Kensington Lock into the security slot ( ) ...on the back of MagicInfo. structions, see the User Manual supplied with the lock attached through the looped end of the cable with the locking device. • You can be used by connecting it to...
...Box (sold separately) RGB OUT MagicInfo video output port MAGICINFO OUT This is the output terminal for the video, audio, and control signals of the display. 4. For exact in MagicInfo mode. AUDIO OUT Connect a headphone or an External speaker. Insert the Kensington Lock into the security slot ( ) ...on the back of MagicInfo. structions, see the User Manual supplied with the lock attached through the looped end of the cable with the locking device. • You can be used by connecting it to...
Quick Start Guide
Page 12
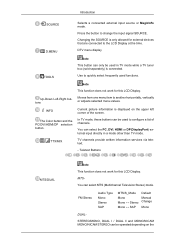
... the immediately previous channel. Teletext Buttons MTS/DUAL ENTER/PRE-CH MUTE CH/P TV MENU Note This function does not work for this LCD Display. In TV mode, selects TV channels. Opens the on the remote control while watching TV. TTX/MIX Introduction You can select MTS ...(Multichannel Television Stereo) mode. FM Stereo Audio Type Mono Stereo SAP MTS/S_Mode Mono Mono ↔ Stereo Mono ↔ SAP Default Manual Change Mono DUAL- Pauses (mutes) the audio output temporarily. This is connected. Note Enabled when a TV tuner box is connected. Note Enabled when...
... the immediately previous channel. Teletext Buttons MTS/DUAL ENTER/PRE-CH MUTE CH/P TV MENU Note This function does not work for this LCD Display. In TV mode, selects TV channels. Opens the on the remote control while watching TV. TTX/MIX Introduction You can select MTS ...(Multichannel Television Stereo) mode. FM Stereo Audio Type Mono Stereo SAP MTS/S_Mode Mono Mono ↔ Stereo Mono ↔ SAP Default Manual Change Mono DUAL- Pauses (mutes) the audio output temporarily. This is connected. Note Enabled when a TV tuner box is connected. Note Enabled when...
Quick Start Guide
Page 19
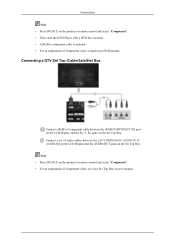
...Set Top Box owner's manual. Connections Note • Press SOURCE on the product or remote control and select "Component". • Then, start the DVD Player with a DVD disc inserted. • A RGB to Component cable between the [AV/COMPONENT AUDIO IN [LAUDIO-R]] on the LCD Display and the AUDIO OUT jacks... on the Set Top Box. Connecting a DTV Set Top (Cable/Satellite) Box Connect a RGB to component cable is optional. • For an explanation of audio cables between the [RGB/COMPONENT IN] port on the LCD Display and the PR, Y, ...
...Set Top Box owner's manual. Connections Note • Press SOURCE on the product or remote control and select "Component". • Then, start the DVD Player with a DVD disc inserted. • A RGB to Component cable between the [AV/COMPONENT AUDIO IN [LAUDIO-R]] on the LCD Display and the AUDIO OUT jacks... on the Set Top Box. Connecting a DTV Set Top (Cable/Satellite) Box Connect a RGB to component cable is optional. • For an explanation of audio cables between the [RGB/COMPONENT IN] port on the LCD Display and the PR, Y, ...
Quick Start Guide
Page 27
... number on the version of the computer. (Refer to the Windows / Computer Manual). A: Windows XP: Control Panel → Appearance and Themes → Display → Enable the powersaving feature in the Control Panel → Appearance and Themes → Display → Settings. Q: How can I play the video. Q: How can ... the case. Set the function in the BIOS-SETUP of the codecs can I clean the outer case/LCD Panel? A: Disconnect the power cord and then clean the LCD Display with a soft cloth, using either a cleaning solution or plain water. Note That video card support can...
... number on the version of the computer. (Refer to the Windows / Computer Manual). A: Windows XP: Control Panel → Appearance and Themes → Display → Enable the powersaving feature in the Control Panel → Appearance and Themes → Display → Settings. Q: How can I play the video. Q: How can ... the case. Set the function in the BIOS-SETUP of the codecs can I clean the outer case/LCD Panel? A: Disconnect the power cord and then clean the LCD Display with a soft cloth, using either a cleaning solution or plain water. Note That video card support can...
User Manual
Page 1
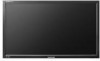
SyncMaster 400MX-3, 460MX-3, 400FP-3, 460FP-3 LCD Display User Manuals The color and the appearance may differ depending on the product, and the specifications are subject to change without prior notice to improve the performance.
SyncMaster 400MX-3, 460MX-3, 400FP-3, 460FP-3 LCD Display User Manuals The color and the appearance may differ depending on the product, and the specifications are subject to change without prior notice to improve the performance.
User Manual
Page 2
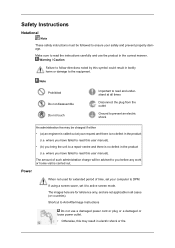
... or damage to read and understand at your safety and prevent property damage. Make sure to read this user manual). • (b) you have failed to the equipment. Shortcut to read this user manual). Safety Instructions Notational Note These safety instructions must be followed to DPM. Note Prohibited Do not disassemble Do not...
... or damage to read and understand at your safety and prevent property damage. Make sure to read this user manual). • (b) you have failed to the equipment. Shortcut to read this user manual). Safety Instructions Notational Note These safety instructions must be followed to DPM. Note Prohibited Do not disassemble Do not...

User Manual
Page 11
Manuals Introduction Quick Setup Guide Cables Warranty Card (Not available in all locations) User Manual Power Cord Others D-Sub Cable Remote Control (BP59-00138B) Sold separately Batteries (AAA X 2) (Not available in all locations) Semi Stand KIT LAN Cable USB Cable RGB to BNC Cable RGB to COMPONENT Cable Network Box
Manuals Introduction Quick Setup Guide Cables Warranty Card (Not available in all locations) User Manual Power Cord Others D-Sub Cable Remote Control (BP59-00138B) Sold separately Batteries (AAA X 2) (Not available in all locations) Semi Stand KIT LAN Cable USB Cable RGB to BNC Cable RGB to COMPONENT Cable Network Box
User Manual
Page 13
...MENU button is activated when a TV tuner is connected and otherwise, the PIP button is not needed or when leaving it unattended for turning the LCD Display on the model. Introduction Rear • MagicInfo can only be enabled when a network box is connected. • A TV tuner box (sold... separately) must be connected to turn your LCD Display OFF when it is enabled. Power indicator Shows PowerSaver mode by blinking green Note See PowerSaver described in the manual for details about cable connections.
...MENU button is activated when a TV tuner is connected and otherwise, the PIP button is not needed or when leaving it unattended for turning the LCD Display on the model. Introduction Rear • MagicInfo can only be enabled when a network box is connected. • A TV tuner box (sold... separately) must be connected to turn your LCD Display OFF when it is enabled. Power indicator Shows PowerSaver mode by blinking green Note See PowerSaver described in the manual for details about cable connections.

User Manual
Page 16
For more information. RS232C OUT/IN (RS232C Serial PORT) MDC(Multiple Display Control) Program Port Connect a serial cable (cross type) to lock the product so that enables users to [RS232C] on the product and RS232C on the ... device may differ depending on the model and the manufacturer, for more information, refer to the User Manual supplied with the locking device for more information on how to purchase and install a network box, contact Samsung Electronics. Note Go to Multi Control and select RS232C MDC as the MDC Connection. Note Go...
For more information. RS232C OUT/IN (RS232C Serial PORT) MDC(Multiple Display Control) Program Port Connect a serial cable (cross type) to lock the product so that enables users to [RS232C] on the product and RS232C on the ... device may differ depending on the model and the manufacturer, for more information, refer to the User Manual supplied with the locking device for more information on how to purchase and install a network box, contact Samsung Electronics. Note Go to Multi Control and select RS232C MDC as the MDC Connection. Note Go...
User Manual
Page 17
.... Wrap the Kensington lock cable around a large, stationary object such as a desk or chair. 2. For exact instructions, see the User Manual supplied with the lock attached through the looped end of the display. 4. AUDIO OUT Connect a headphone or an External speaker. Connecting a Network Box (sold separately) USB (USB Connection Terminal) Keyboard / Mouse...
.... Wrap the Kensington lock cable around a large, stationary object such as a desk or chair. 2. For exact instructions, see the User Manual supplied with the lock attached through the looped end of the display. 4. AUDIO OUT Connect a headphone or an External speaker. Connecting a Network Box (sold separately) USB (USB Connection Terminal) Keyboard / Mouse...
User Manual
Page 20
...configure a list of the screen. FM Stereo Audio Type Mono Stereo SAP MTS/S_Mode Mono Mono ↔ Stereo Mono ↔ SAP Default Manual Change Mono DUAL- Introduction SOURCE D.MENU TOOLS Up-Down Left-Right buttons INFO The Color button and the PC/DVI/HDMI/DP selection button...., DVI, HDMI or DP(DisplayPort) external input directly in TV mode while a TV tuner box (sold separately) is only allowed for this LCD Display. TTX/MIX Selects a connected external input source or MagicInfo mode. Changing the SOURCE is connected. Moves from one menu item to change the ...
...configure a list of the screen. FM Stereo Audio Type Mono Stereo SAP MTS/S_Mode Mono Mono ↔ Stereo Mono ↔ SAP Default Manual Change Mono DUAL- Introduction SOURCE D.MENU TOOLS Up-Down Left-Right buttons INFO The Color button and the PC/DVI/HDMI/DP selection button...., DVI, HDMI or DP(DisplayPort) external input directly in TV mode while a TV tuner box (sold separately) is only allowed for this LCD Display. TTX/MIX Selects a connected external input source or MagicInfo mode. Changing the SOURCE is connected. Moves from one menu item to change the ...

User Manual
Page 45
Note • Press SOURCE on the product or remote control and select "Component". • For an explanation of Component video, see your DVD manual. Connections Note • Press SOURCE on the product or remote control and select "Component". • Then, start the DVD Player with a DVD disc ...inserted. • A RGB to Component cable between the [AV/COMPONENT AUDIO IN [R-AUDIO-L]] on the LCD Display and the AUDIO OUT jacks on the Set Top Box. Connecting a DTV Set Top (Cable/Satellite) Box Connect a RGB to component cable is optional. &#...
Note • Press SOURCE on the product or remote control and select "Component". • For an explanation of Component video, see your DVD manual. Connections Note • Press SOURCE on the product or remote control and select "Component". • Then, start the DVD Player with a DVD disc ...inserted. • A RGB to Component cable between the [AV/COMPONENT AUDIO IN [R-AUDIO-L]] on the LCD Display and the AUDIO OUT jacks on the Set Top Box. Connecting a DTV Set Top (Cable/Satellite) Box Connect a RGB to component cable is optional. &#...
User Manual
Page 50
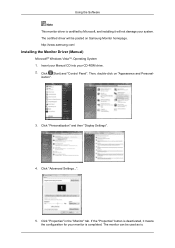
Click (Start) and "Control Panel". ization". 3. If the "Properties" button is deactivated, it will be used as is completed. Then, double-click on Samsung Monitor homepage. Insert your Manual CD into your CD-ROM drive. 2. Click "Personalization" and then "Display Settings". 4. The monitor can be posted on "Appearance and Personal- Click "Properties" in the "Monitor...
Click (Start) and "Control Panel". ization". 3. If the "Properties" button is deactivated, it will be used as is completed. Then, double-click on Samsung Monitor homepage. Insert your Manual CD into your CD-ROM drive. 2. Click "Personalization" and then "Display Settings". 4. The monitor can be posted on "Appearance and Personal- Click "Properties" in the "Monitor...
User Manual
Page 79
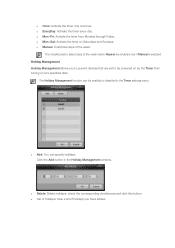
... of holidays: View a list of holidays you to prevent devices that are set to select days of the week below Repeat are enabled only if Manual is selected. Holiday Management Holiday Management allows you have added. † Once: Activate the timer only one time. † EveryDay: Activate the timer every day.... † Mon~Fri: Activate the timer from turning on Saturdays and Sundays. † Manual: Customize days of the week. z Delete: Delete holidays: check the corresponding checkboxes and click this button.
... of holidays: View a list of holidays you to prevent devices that are set to select days of the week below Repeat are enabled only if Manual is selected. Holiday Management Holiday Management allows you have added. † Once: Activate the timer only one time. † EveryDay: Activate the timer every day.... † Mon~Fri: Activate the timer from turning on Saturdays and Sundays. † Manual: Customize days of the week. z Delete: Delete holidays: check the corresponding checkboxes and click this button.
User Manual
Page 81
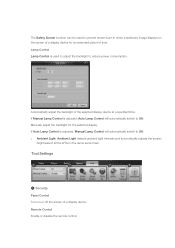
... the backlight for an extended period of the selected display device at a specified time. Tool Settings 1 2 3 4 1 Security Panel Control Turn on the screen of a display device for the selected display. Remote Control Enable or disable the remote control. If Manual Lamp Control is adjusted, Manual Lamp Control will automatically switch to Off. Automatically adjust the backlight...
... the backlight for an extended period of the selected display device at a specified time. Tool Settings 1 2 3 4 1 Security Panel Control Turn on the screen of a display device for the selected display. Remote Control Enable or disable the remote control. If Manual Lamp Control is adjusted, Manual Lamp Control will automatically switch to Off. Automatically adjust the backlight...

User Manual
Page 112
...; Add You can register holidays. • Delete Selected You can delete all the registered holidays. Adjusting the LCD Display Note • Only enabled when the clock is set using the Clock Set menu. • The Manual option allows you to select a day of the week. • Holiday : When choose Apply, timer is available...
...; Add You can register holidays. • Delete Selected You can delete all the registered holidays. Adjusting the LCD Display Note • Only enabled when the clock is set using the Clock Set menu. • The Manual option allows you to select a day of the week. • Holiday : When choose Apply, timer is available...

User Manual
Page 121
... internal temperature. Note • The picture will be dimmed if the temperature exceeds the specified temperature, and the product will automatically power off to Manual. Adjusting the LCD Display Fan & Temperature Protects the product by default. Temperature Control Detects the product's internal temperature and specifies the desired temperature. Fan Control Selects auto or...
... internal temperature. Note • The picture will be dimmed if the temperature exceeds the specified temperature, and the product will automatically power off to Manual. Adjusting the LCD Display Fan & Temperature Protects the product by default. Temperature Control Detects the product's internal temperature and specifies the desired temperature. Fan Control Selects auto or...

