Quick Start Guide
Page 4
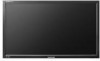
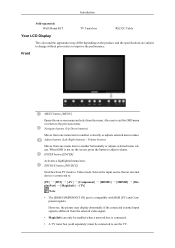
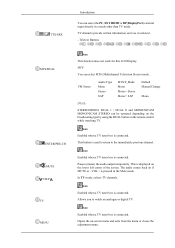
.... Navigate buttons (Up-Down buttons) Moves from the selected video signal. • MagicInfo can only be enabled when a network box is connected. • A TV tuner box (sold separately) must be connected to use to exit the OSD menu or return to the previous menu. Also use the TV. Introduction Sold separately Wall Mount KIT TV Tuner box RS232C Cable Your LCD Display The color and the appearance may display abnormally if the connected external input signal is...
.... Navigate buttons (Up-Down buttons) Moves from the selected video signal. • MagicInfo can only be enabled when a network box is connected. • A TV tuner box (sold separately) must be connected to use to exit the OSD menu or return to the previous menu. Also use the TV. Introduction Sold separately Wall Mount KIT TV Tuner box RS232C Cable Your LCD Display The color and the appearance may display abnormally if the connected external input signal is...
Quick Start Guide
Page 6
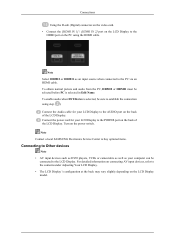
... port on another display. DP IN Receives a signal from the Display port. POWER The power cord plugs into the LCD Display and the wall outlet. RGB/COMPONENT IN (PC/COMPONENT Connection Terminal (Input)) • Connect the [RGB/COMPONENT IN] port on the monitor to the RGB port on the PC using the D-SUB cable. • Connect the [RGB/COMPONENT IN] port on the monitor to the COMPONENT port on the external device using the RGB to COMPONENT cable. • Connect the [RGB/COMPONENT IN] port on the monitor...
... port on another display. DP IN Receives a signal from the Display port. POWER The power cord plugs into the LCD Display and the wall outlet. RGB/COMPONENT IN (PC/COMPONENT Connection Terminal (Input)) • Connect the [RGB/COMPONENT IN] port on the monitor to the RGB port on the PC using the D-SUB cable. • Connect the [RGB/COMPONENT IN] port on the monitor to the COMPONENT port on the external device using the RGB to COMPONENT cable. • Connect the [RGB/COMPONENT IN] port on the monitor...
Quick Start Guide
Page 11
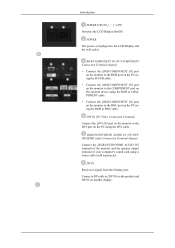
.../DVI/HDMI/DP selection button. Adjusts the audio volume. Press the button to use MagicInfo. The "-" button is displayed on the upper left corner of channels. Current picture information is used functions. Use to quickly select frequently used to another horizontally, vertically or adjusts selected menu values. Introduction MENU RETURN EXIT MagicInfo POWER OFF Number Buttons DEL / GUIDE button Turns the product On/Off. Press to the LCD Display at the time. Selects a connected external input source or MagicInfo mode. Changing the SOURCE is connected...
.../DVI/HDMI/DP selection button. Adjusts the audio volume. Press the button to use MagicInfo. The "-" button is displayed on the upper left corner of channels. Current picture information is used functions. Use to quickly select frequently used to another horizontally, vertically or adjusts selected menu values. Introduction MENU RETURN EXIT MagicInfo POWER OFF Number Buttons DEL / GUIDE button Turns the product On/Off. Press to the LCD Display at the time. Selects a connected external input source or MagicInfo mode. Changing the SOURCE is connected...
Quick Start Guide
Page 12
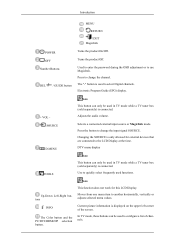
... Default Manual Change Mono DUAL- Note Enabled when a TV tuner box is displayed on the remote control while watching TV. Pauses (mutes) the audio output temporarily. This is connected. The audio comes back on -screen menu and exits from the menu or closes the adjustment menu. Note Enabled when a TV tuner box is connected. Allows you to the immediately previous channel. In TV mode, selects TV channels. Note Enabled when a TV tuner box is connected. This button is...
... Default Manual Change Mono DUAL- Note Enabled when a TV tuner box is displayed on the remote control while watching TV. Pauses (mutes) the audio output temporarily. This is connected. The audio comes back on -screen menu and exits from the menu or closes the adjustment menu. Note Enabled when a TV tuner box is connected. Allows you to the immediately previous channel. In TV mode, selects TV channels. Note Enabled when a TV tuner box is connected. This button is...
Quick Start Guide
Page 15
... depending on the LCD Display model. Note Contact a local SAMSUNG Electronics Service Center to buy optional items. Connecting to Other devices Note • AV input devices such as DVD players, VCRs or camcorders as well as an input source when connected to establish the connection using the HDMI cable. For detailed information on connecting AV input devices, refer to the AUDIO port on the power switch. To obtain normal picture and audio from the...
... depending on the LCD Display model. Note Contact a local SAMSUNG Electronics Service Center to buy optional items. Connecting to Other devices Note • AV input devices such as DVD players, VCRs or camcorders as well as an input source when connected to establish the connection using the HDMI cable. For detailed information on connecting AV input devices, refer to the AUDIO port on the power switch. To obtain normal picture and audio from the...
Quick Start Guide
Page 19
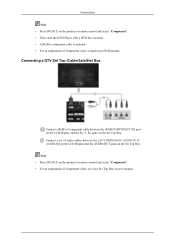
... explanation of Component video, see your DVD manual. Connecting a DTV Set Top (Cable/Satellite) Box Connect a RGB to component cable is optional. • For an explanation of audio cables between the [RGB/COMPONENT IN] port on the LCD Display and the PR, Y, PB jacks on the Set Top Box. Connect a set of Component video, consult your Set Top Box owner's manual. Connections Note • Press SOURCE on the product or remote control and select "Component". • Then, start the DVD Player with a DVD disc inserted...
... explanation of Component video, see your DVD manual. Connecting a DTV Set Top (Cable/Satellite) Box Connect a RGB to component cable is optional. • For an explanation of audio cables between the [RGB/COMPONENT IN] port on the LCD Display and the PR, Y, PB jacks on the Set Top Box. Connect a set of Component video, consult your Set Top Box owner's manual. Connections Note • Press SOURCE on the product or remote control and select "Component". • Then, start the DVD Player with a DVD disc inserted...
Quick Start Guide
Page 23
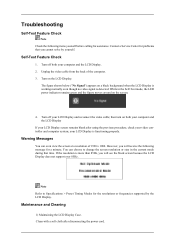
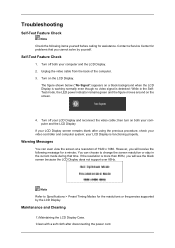
... video cable; Turn on the screen. 4. Turn off both your computer and the LCD Display If your video controller and computer system; Warning Messages You can choose to Specifications > Preset Timing Modes for assistance. You can even view the screen at a resolution of the computer. 3. Clean with a soft cloth after using the previous procedure, check your LCD Display screen remains blank after disconnecting the power cord. The figure shown below ("No Signal...
... video cable; Turn on the screen. 4. Turn off both your computer and the LCD Display If your video controller and computer system; Warning Messages You can choose to Specifications > Preset Timing Modes for assistance. You can even view the screen at a resolution of the computer. 3. Clean with a soft cloth after using the previous procedure, check your LCD Display screen remains blank after disconnecting the power cord. The figure shown below ("No Signal...
Quick Start Guide
Page 24
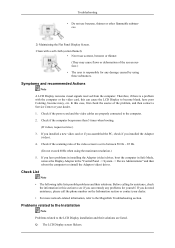
... by using the maximum resolution.) 5. Check if the computer beeps more network-related information, refer to the MagicInfo Troubleshooting section. Check List Note • The following table lists possible problems and their solutions are properly connected to reinstall the Adaptor (video) driver. Q: The LCD Display screen flickers. If you have poor Coloring, become blank, have problems in installing the Adaptor (video) driver, boot the computer in Safe Mode, remove the Display Adaptor...
... by using the maximum resolution.) 5. Check if the computer beeps more network-related information, refer to the MagicInfo Troubleshooting section. Check List Note • The following table lists possible problems and their solutions are properly connected to reinstall the Adaptor (video) driver. Q: The LCD Display screen flickers. If you have poor Coloring, become blank, have problems in installing the Adaptor (video) driver, boot the computer in Safe Mode, remove the Display Adaptor...
User Manual
Page 7
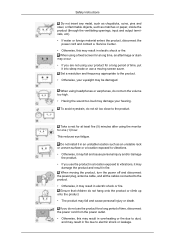
... result in fire. When using a fixed screen for a long time, an afterimage or stain may occur. • If you are not using the monitor for a long period of time, put it into sleep mode or use a moving the product, turn the volume too high. • Having the sound too loud may damage your eyesight may be damaged. Safety Instructions Do not insert any metal...
... result in fire. When using a fixed screen for a long time, an afterimage or stain may occur. • If you are not using the monitor for a long period of time, put it into sleep mode or use a moving the product, turn the volume too high. • Having the sound too loud may damage your eyesight may be damaged. Safety Instructions Do not insert any metal...
User Manual
Page 49
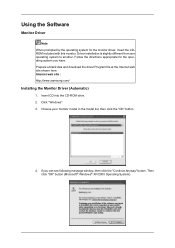
... the directions appropriate for the monitor driver, insert the CDROM included with this monitor. Click "Windows". 3. Internet web site : http://www.samsung.com/ Installing the Monitor Driver (Automatic) 1. Choose your monitor model in the model list, then click the "OK" button. 4. Driver installation is slightly different from one operating system to another. Using the Software Monitor Driver Note When prompted by the operating system for the operating system you can see following...
... the directions appropriate for the monitor driver, insert the CDROM included with this monitor. Click "Windows". 3. Internet web site : http://www.samsung.com/ Installing the Monitor Driver (Automatic) 1. Choose your monitor model in the model list, then click the "OK" button. 4. Driver installation is slightly different from one operating system to another. Using the Software Monitor Driver Note When prompted by the operating system for the operating system you can see following...
User Manual
Page 50
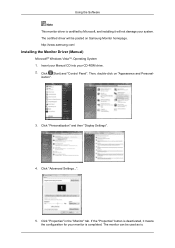
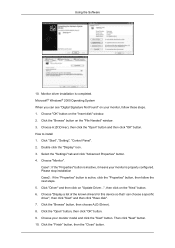
.... http://www.samsung.com/ Installing the Monitor Driver (Manual) Microsoft® Windows Vista™, Operating System 1. ization". 3. Click "Properties" in the "Monitor" tab. Click "Personalization" and then "Display Settings". 4. If the "Properties" button is deactivated, it will be used as is. Then, double-click on Samsung Monitor homepage. Click "Advanced Settings...". 5. Click (Start) and "Control Panel". Using the Software Note This monitor driver is certified by Microsoft, and installing it means...
.... http://www.samsung.com/ Installing the Monitor Driver (Manual) Microsoft® Windows Vista™, Operating System 1. ization". 3. Click "Properties" in the "Monitor" tab. Click "Personalization" and then "Display Settings". 4. If the "Properties" button is deactivated, it will be used as is. Then, double-click on Samsung Monitor homepage. Click "Advanced Settings...". 5. Click (Start) and "Control Panel". Using the Software Note This monitor driver is certified by Microsoft, and installing it means...
User Manual
Page 55
... then click on "Update Driver...", then click on the "File Needed" window. 3. Select the "Settings" tab and click "Advanced Properties" button. 4. Click the "Open" button, then click "OK" button. 9. Choose your monitor, follow the next steps. 5. Choose "OK" button on your monitor model and click the "Next" button. Click "Start", "Setting", "Control Panel". 2. Click the "Browse" button, then choose A:(D:\Driver). 8. Monitor driver installation is properly configured. Choose "Display a list of the known...
... then click on "Update Driver...", then click on the "File Needed" window. 3. Select the "Settings" tab and click "Advanced Properties" button. 4. Click the "Open" button, then click "OK" button. 9. Choose your monitor, follow the next steps. 5. Choose "OK" button on your monitor model and click the "Next" button. Click "Start", "Setting", "Control Panel". 2. Click the "Browse" button, then choose A:(D:\Driver). 8. Monitor driver installation is properly configured. Choose "Display a list of the known...
User Manual
Page 56
... Timing Modes in the user guide. Click "Start", "Setting", "Control Panel". 2. Specify A:\(D:\driver), then click "OK" button. 10. Select "Show all the driver in the "Monitor Type" area. 6. Linux Operating System To execute X-Window, you connected to make the X86Config file, which is a type of system setting file. 1. Click the "Change" button in a specific location...", then click "Next" button. 8. Choose "Display a list of all devices" and choose the monitor that you can see the screen working...
... Timing Modes in the user guide. Click "Start", "Setting", "Control Panel". 2. Specify A:\(D:\driver), then click "OK" button. 10. Select "Show all the driver in the "Monitor Type" area. 6. Linux Operating System To execute X-Window, you connected to make the X86Config file, which is a type of system setting file. 1. Click the "Change" button in a specific location...", then click "Next" button. 8. Choose "Display a list of all devices" and choose the monitor that you can see the screen working...
User Manual
Page 58
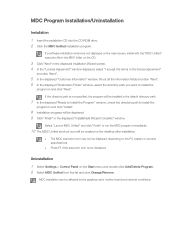
... displayed. 9 Click "Finish" in the displayed "InstallShield Wizard Complete" window. MDC installation can be installed in the default directory path. 7 In the displayed "Ready to Install the Program" window, check the directory path to install the program in the MDC folder on the Start menu and double-click Add/Delete Program. 2 Select MDC Unified from the list and click Change/Remove. MDC Program Installation/Uninstallation Installation 1 Insert the installation...
... displayed. 9 Click "Finish" in the displayed "InstallShield Wizard Complete" window. MDC installation can be installed in the default directory path. 7 In the displayed "Ready to Install the Program" window, check the directory path to install the program in the MDC folder on the Start menu and double-click Add/Delete Program. 2 Select MDC Unified from the list and click Change/Remove. MDC Program Installation/Uninstallation Installation 1 Insert the installation...
User Manual
Page 67
... or change the corresponding setting. Power z On: Power on a selected display. z Channel : Change the channel. † The TV channel can be changed by using the slider bar in the range of 0 to 100. Input † Enable or disable Mute for a selected display. Mute will automatically be disabled if Volume is adjusted when Mute is TV. † Only registered channels can be selected. 2 Volume The volume can be changed or the sound can...
... or change the corresponding setting. Power z On: Power on a selected display. z Channel : Change the channel. † The TV channel can be changed by using the slider bar in the range of 0 to 100. Input † Enable or disable Mute for a selected display. Mute will automatically be disabled if Volume is adjusted when Mute is TV. † Only registered channels can be selected. 2 Volume The volume can be changed or the sound can...
User Manual
Page 110
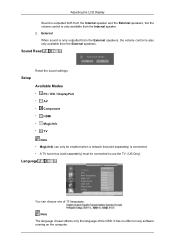
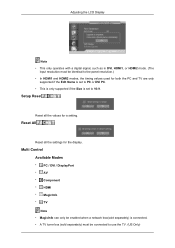
External When sound is only outputted from the External speakers, the volume control is also only available from the Internal speaker. 2. Sound Reset Reset the sound settings. Setup Available Modes • PC / DVI / DisplayPort • AV • Component • HDMI • MagicInfo • TV Note • MagicInfo can only be enabled when a network box(sold separately) is connected. • A TV tuner box (sold separately) must be connected to use the TV. (US Only) Language You...
External When sound is only outputted from the External speakers, the volume control is also only available from the Internal speaker. 2. Sound Reset Reset the sound settings. Setup Available Modes • PC / DVI / DisplayPort • AV • Component • HDMI • MagicInfo • TV Note • MagicInfo can only be enabled when a network box(sold separately) is connected. • A TV tuner box (sold separately) must be connected to use the TV. (US Only) Language You...
User Manual
Page 126
.... • This is only supported if the Size is connected. • A TV tuner box (sold separately) must be connected to 16:9. Setup Reset Reset all the settings for the display. Adjusting the LCD Display Note • This only operates with a digital signal, such as in DVI, HDMI1, or HDMI2 mode. (The input resolution must be identical to the panel resolution.) • In HDMI1 and HDMI2 modes, the timing values used for both the PC and...
.... • This is only supported if the Size is connected. • A TV tuner box (sold separately) must be connected to 16:9. Setup Reset Reset all the settings for the display. Adjusting the LCD Display Note • This only operates with a digital signal, such as in DVI, HDMI1, or HDMI2 mode. (The input resolution must be identical to the panel resolution.) • In HDMI1 and HDMI2 modes, the timing values used for both the PC and...
User Manual
Page 132
... 85Hz. your LCD Display and reconnect the video cable; You can even view the screen at a resolution of the computer. 3. If the resolution is functioning properly. then turn on the screen. 4. Clean with a soft cloth after using the previous procedure, check your LCD Display screen remains blank after disconnecting the power cord. Note Refer to change the screen resolution or stay in the SelfTest mode, the LED power indicator remains green and the...
... 85Hz. your LCD Display and reconnect the video cable; You can even view the screen at a resolution of the computer. 3. If the resolution is functioning properly. then turn on the screen. 4. Clean with a soft cloth after using the previous procedure, check your LCD Display screen remains blank after disconnecting the power cord. Note Refer to change the screen resolution or stay in the SelfTest mode, the LED power indicator remains green and the...
User Manual
Page 133
... the Flat Panel Display Screen. If you installed a new video card or if you assembled the PC, check if you have poor Coloring, become blank, have problems in installing the Adaptor (video) driver, boot the computer in Safe Mode, remove the Display Adaptor in this can remedy any damage caused by using the maximum resolution.) 5. Q: The LCD Display screen flickers. If you installed the Adaptor(video). 4. Problems related to the Installation Note Problems related to...
... the Flat Panel Display Screen. If you installed a new video card or if you assembled the PC, check if you have poor Coloring, become blank, have problems in installing the Adaptor (video) driver, boot the computer in Safe Mode, remove the Display Adaptor in this can remedy any damage caused by using the maximum resolution.) 5. Q: The LCD Display screen flickers. If you installed the Adaptor(video). 4. Problems related to the Installation Note Problems related to...
User Manual
Page 138
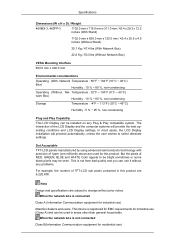
... installed on any problems. For example, the number of RED, GREEN, BLUE and WHITE Color appear to change without any Plug & Play compatible system. Dot Acceptable TFT-LCD panels manufactured by using advanced semiconductor technology with precision of the LCD Display and the computer systems will proceed automatically, unless the user wishes to select alternate settings. Specifications Dimensions (W x H x D) / Weight 460MX-3, 460FP-3 1102.0 mm x 719.0 mm x 311.0 mm / 43.4 x 28.3 x 12.2 inches (With Stand...
... installed on any problems. For example, the number of RED, GREEN, BLUE and WHITE Color appear to change without any Plug & Play compatible system. Dot Acceptable TFT-LCD panels manufactured by using advanced semiconductor technology with precision of the LCD Display and the computer systems will proceed automatically, unless the user wishes to select alternate settings. Specifications Dimensions (W x H x D) / Weight 460MX-3, 460FP-3 1102.0 mm x 719.0 mm x 311.0 mm / 43.4 x 28.3 x 12.2 inches (With Stand...


