Quick Start Guide
Page 2
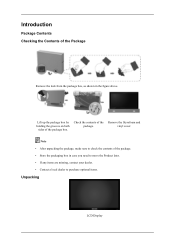
... you need to move the Product later. • If any items are missing, contact your dealer. • Contact a local dealer to purchase optional items. Unpacking LCD Display
... you need to move the Product later. • If any items are missing, contact your dealer. • Contact a local dealer to purchase optional items. Unpacking LCD Display
Quick Start Guide
Page 4
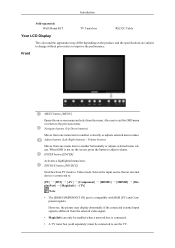
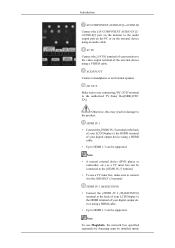
... depending on the screen, press the button to adjust volume. Introduction Sold separately Wall Mount KIT TV Tuner box RS232C Cable Your LCD Display The color and the appearance may display abnormally if the connected external input signal is different from the selected video signal. • MagicInfo can only be enabled when a network...
... depending on the screen, press the button to adjust volume. Introduction Sold separately Wall Mount KIT TV Tuner box RS232C Cable Your LCD Display The color and the appearance may display abnormally if the connected external input signal is different from the selected video signal. • MagicInfo can only be enabled when a network...

Quick Start Guide
Page 5
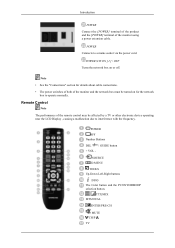
Power button [ ] Use this button for long periods. The LCD Display's configuration at the back may vary slightly depending on -screen D.MENU. Introduction D.MENU button Opens the on the model. Brightness Sensor Automatically detects the surrounding ... Note This function does not work for details about cable connections. PIP button Push the PIP button to turn your LCD Display OFF when it unattended for turning the LCD Display on the LCD Display. Note The D.MENU button is activated when a TV tuner is connected and otherwise, the PIP button is not needed or when...
Power button [ ] Use this button for long periods. The LCD Display's configuration at the back may vary slightly depending on -screen D.MENU. Introduction D.MENU button Opens the on the model. Brightness Sensor Automatically detects the surrounding ... Note This function does not work for details about cable connections. PIP button Push the PIP button to turn your LCD Display OFF when it unattended for turning the LCD Display on the LCD Display. Note The D.MENU button is activated when a TV tuner is connected and otherwise, the PIP button is not needed or when...
Quick Start Guide
Page 6
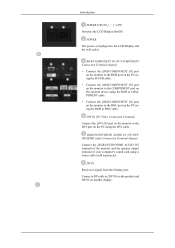
POWER The power cord plugs into the LCD Display and the wall outlet. DP IN Receives a signal from the Display port. RGB/DVI/DP/HDMI AUDIO IN (PC/DVI/ DP/HDMI Audio Connection Terminal (Input)) Connect the ...cable. DVI IN (PC Video Connection Terminal) Connect the [DVI IN] port on the monitor to the BNC port on another display. RGB/COMPONENT IN (PC/COMPONENT Connection Terminal (Input)) • Connect the [RGB/COMPONENT IN] port on the monitor to the... port on the PC using a stereo cable (sold separately). Introduction POWER S/W ON [ │ ] / OFF Switches the LCD Display On/Off.
POWER The power cord plugs into the LCD Display and the wall outlet. DP IN Receives a signal from the Display port. RGB/DVI/DP/HDMI AUDIO IN (PC/DVI/ DP/HDMI Audio Connection Terminal (Input)) Connect the ...cable. DVI IN (PC Video Connection Terminal) Connect the [DVI IN] port on the monitor to the BNC port on another display. RGB/COMPONENT IN (PC/COMPONENT Connection Terminal (Input)) • Connect the [RGB/COMPONENT IN] port on the monitor to the... port on the PC using a stereo cable (sold separately). Introduction POWER S/W ON [ │ ] / OFF Switches the LCD Display On/Off.
Quick Start Guide
Page 7
... may result in damage to the [HDMI IN 1] terminal. HDMI IN 1 • Connect the [HDMI IN 1] terminal at the back of your LCD Display to the HDMI terminal of your digital output device using a HDMI cable. • Up to the video output terminal of the external device using a ...HDMI IN 1] terminal. • To use MagicInfo, the network box specified separately by Samsung must be supported. HDMI IN 2 (MAGICINFO) • Connect the [HDMI IN 2 (MAGICINFO)] terminal at the back of your LCD Display to the HDMI terminal of your digital output device using an audio cable. Introduction AV/...
... may result in damage to the [HDMI IN 1] terminal. HDMI IN 1 • Connect the [HDMI IN 1] terminal at the back of your LCD Display to the HDMI terminal of your digital output device using a HDMI cable. • Up to the video output terminal of the external device using a ...HDMI IN 1] terminal. • To use MagicInfo, the network box specified separately by Samsung must be supported. HDMI IN 2 (MAGICINFO) • Connect the [HDMI IN 2 (MAGICINFO)] terminal at the back of your LCD Display to the HDMI terminal of your digital output device using an audio cable. Introduction AV/...
Quick Start Guide
Page 10
.../P TV Remote Control Note The performance of the monitor and the network box must be affected by a TV or other electronic device operating near the LCD Display , causing a malfunction due to interference with the frequency. SOURCE D.MENU TOOLS Up-Down Left-Right buttons INFO The Color button and the PC/DVI/HDMI...
.../P TV Remote Control Note The performance of the monitor and the network box must be affected by a TV or other electronic device operating near the LCD Display , causing a malfunction due to interference with the frequency. SOURCE D.MENU TOOLS Up-Down Left-Right buttons INFO The Color button and the PC/DVI/HDMI...
Quick Start Guide
Page 11
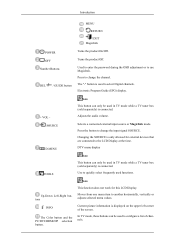
... TV mode, these buttons can be used in TV mode while a TV tuner box (sold separately) is connected. The "-" button is only allowed for this LCD Display. Changing the SOURCE is used functions. Note This function does not work for external devices that are connected to the... LCD Display at the time. Electronic Program Guide (EPG) display. + VOL SOURCE D.MENU TOOLS Up-Down Left-Right buttons INFO The Color button and the PC/DVI/HDMI/DP selection button. Press the button...
... TV mode, these buttons can be used in TV mode while a TV tuner box (sold separately) is connected. The "-" button is only allowed for this LCD Display. Changing the SOURCE is used functions. Note This function does not work for external devices that are connected to the... LCD Display at the time. Electronic Program Guide (EPG) display. + VOL SOURCE D.MENU TOOLS Up-Down Left-Right buttons INFO The Color button and the PC/DVI/HDMI/DP selection button. Press the button...
Quick Start Guide
Page 12
... Manual Change Mono DUAL- Note Enabled when a TV tuner box is connected. In TV mode, selects TV channels. Note Enabled when a TV tuner box is displayed on the remote control while watching TV. MTSYou can be operated depending on the broadcasting type by using the DUAL button on the lower left... provide written information services via teletext. - Teletext Buttons MTS/DUAL ENTER/PRE-CH MUTE CH/P TV MENU Note This function does not work for this LCD Display. VOL + is connected.
... Manual Change Mono DUAL- Note Enabled when a TV tuner box is connected. In TV mode, selects TV channels. Note Enabled when a TV tuner box is displayed on the remote control while watching TV. MTSYou can be operated depending on the broadcasting type by using the DUAL button on the lower left... provide written information services via teletext. - Teletext Buttons MTS/DUAL ENTER/PRE-CH MUTE CH/P TV MENU Note This function does not work for this LCD Display. VOL + is connected.
Quick Start Guide
Page 14
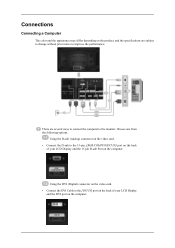
... options. Using the DVI (Digital) connector on the video card. • Connect the DVI Cable to the [DVI IN] port on the back of your LCD Display and the DVI port on the computer. Using the D-sub (Analog) connector on the video card. • Connect the D-sub to the 15-pin, [RGB.../COMPONENT IN] port on the back of your LCD Display and the 15 pin D-sub Port on the computer. There are subject to change without prior notice to improve the performance. Connections Connecting a Computer The...
... options. Using the DVI (Digital) connector on the video card. • Connect the DVI Cable to the [DVI IN] port on the back of your LCD Display and the DVI port on the computer. Using the D-sub (Analog) connector on the video card. • Connect the D-sub to the 15-pin, [RGB.../COMPONENT IN] port on the back of your LCD Display and the 15 pin D-sub Port on the computer. There are subject to change without prior notice to improve the performance. Connections Connecting a Computer The...
Quick Start Guide
Page 15
Connect the Audio cable for your computer can be connected to the POWER port on the back of the LCD Display. Note Contact a local SAMSUNG Electronics Service Center to buy optional items. Connecting to Other devices Note • AV input devices such as DVD ...HDMI cable. For detailed information on connecting AV input devices, refer to the contents under Adjusting Your LCD Display. • The LCD Display 's configuration at the back may vary slightly depending on the back of the LCD Display. Connections Using the D-sub (Digital) connector on the video card. • Connect the [HDMI...
Connect the Audio cable for your computer can be connected to the POWER port on the back of the LCD Display. Note Contact a local SAMSUNG Electronics Service Center to buy optional items. Connecting to Other devices Note • AV input devices such as DVD ...HDMI cable. For detailed information on connecting AV input devices, refer to the contents under Adjusting Your LCD Display. • The LCD Display 's configuration at the back may vary slightly depending on the back of the LCD Display. Connections Using the D-sub (Digital) connector on the video card. • Connect the [HDMI...

Quick Start Guide
Page 16
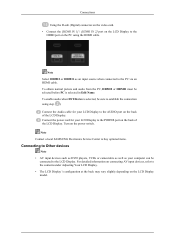
... cable between the AUDIO OUTPUT jacks on the camcorder and the [AV /COMPONENT AUDIO IN [L-AUDIO-R]] on the LCD Display . Connecting to [AV IN] on the product and the video output port on the LCD Display . 2. Locate the AV output jacks on an external device such as a VCR or DVD player. 2. Connect a set of...
... cable between the AUDIO OUTPUT jacks on the camcorder and the [AV /COMPONENT AUDIO IN [L-AUDIO-R]] on the LCD Display . Connecting to [AV IN] on the product and the video output port on the LCD Display . 2. Locate the AV output jacks on an external device such as a VCR or DVD player. 2. Connect a set of...
Quick Start Guide
Page 18
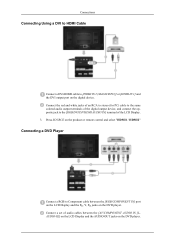
... / HDMI2" Connecting a DVD Player Connect a RGB to Component cable between the [AV/COMPONENT AUDIO IN [LAUDIO-R]] on the LCD Display and the AUDIO OUT jacks on the DVD player. Connect a set of the LCD Display. 3. Connect the red and white jacks of an RCA to stereo (for PC) cable to the same colored audio... Cable Connect a DVI-HDMI cable to the [RGB/DVI/DP/HDMI AUDIO IN] terminal of audio cables between the [RGB/COMPONENT IN] port on the LCD Display and the PR, Y, PB jacks on the DVD player.
... / HDMI2" Connecting a DVD Player Connect a RGB to Component cable between the [AV/COMPONENT AUDIO IN [LAUDIO-R]] on the LCD Display and the AUDIO OUT jacks on the DVD player. Connect a set of the LCD Display. 3. Connect the red and white jacks of an RCA to stereo (for PC) cable to the same colored audio... Cable Connect a DVI-HDMI cable to the [RGB/DVI/DP/HDMI AUDIO IN] terminal of audio cables between the [RGB/COMPONENT IN] port on the LCD Display and the PR, Y, PB jacks on the DVD player.
Quick Start Guide
Page 19
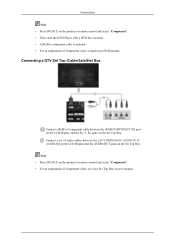
... (Cable/Satellite) Box Connect a RGB to component cable is optional. • For an explanation of audio cables between the [RGB/COMPONENT IN] port on the LCD Display and the PR, Y, PB jacks on the Set Top Box. Connect a set of Component video, consult your Set Top Box owner's manual. Connections Note •... "Component". • Then, start the DVD Player with a DVD disc inserted. • A RGB to Component cable between the [AV/COMPONENT AUDIO IN [LAUDIO-R]] on the LCD Display and the AUDIO OUT jacks on the Set Top Box.
... (Cable/Satellite) Box Connect a RGB to component cable is optional. • For an explanation of audio cables between the [RGB/COMPONENT IN] port on the LCD Display and the PR, Y, PB jacks on the Set Top Box. Connect a set of Component video, consult your Set Top Box owner's manual. Connections Note •... "Component". • Then, start the DVD Player with a DVD disc inserted. • A RGB to Component cable between the [AV/COMPONENT AUDIO IN [LAUDIO-R]] on the LCD Display and the AUDIO OUT jacks on the Set Top Box.
Quick Start Guide
Page 20
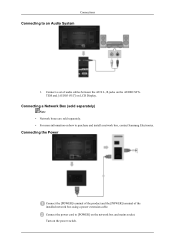
... [POWER] terminal of audio cables between the AUX L, R jacks on the AUDIO SYSTEM and [AUDIO OUT] on how to purchase and install a network box, contact Samsung Electronics. Connect the power cord to an Audio System 1. Connect a set of the installed network box using a power extension cable. Connecting a Network Box (sold separately...
... [POWER] terminal of audio cables between the AUX L, R jacks on the AUDIO SYSTEM and [AUDIO OUT] on how to purchase and install a network box, contact Samsung Electronics. Connect the power cord to an Audio System 1. Connect a set of the installed network box using a power extension cable. Connecting a Network Box (sold separately...
Quick Start Guide
Page 23
...can choose to Specifications > Preset Timing Modes for the resolutions or frequencies supported by yourself. Contact a Service Center for assistance. your LCD Display and reconnect the video cable; You can even view the screen at a resolution of the computer. 3. If the resolution is functioning... will receive the following items yourself before calling for problems that time. However, you cannot solve by the LCD Display. Maintenance and Cleaning 1) Maintaining the LCD Display Case. Unplug the video cable from the back of 1920 x 1080. Turn on both your video controller ...
...can choose to Specifications > Preset Timing Modes for the resolutions or frequencies supported by yourself. Contact a Service Center for assistance. your LCD Display and reconnect the video cable; You can even view the screen at a resolution of the computer. 3. If the resolution is functioning... will receive the following items yourself before calling for problems that time. However, you cannot solve by the LCD Display. Maintenance and Cleaning 1) Maintaining the LCD Display Case. Unplug the video cable from the back of 1920 x 1080. Turn on both your video controller ...
Quick Start Guide
Page 24
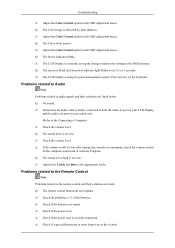
... Note Problems related to the computer. 2. Symptoms and recommended Actions Note A LCD Display recreates visual signals received from the computer. Therefore, if there is a problem with a soft cloth (cotton flannel). • Never use benzene, thinner or other flammable substances. 2) Maintaining the Flat Panel Display Screen. Check List Note • The following table lists possible problems...
... Note Problems related to the computer. 2. Symptoms and recommended Actions Note A LCD Display recreates visual signals received from the computer. Therefore, if there is a problem with a soft cloth (cotton flannel). • Never use benzene, thinner or other flammable substances. 2) Maintaining the Flat Panel Display Screen. Check List Note • The following table lists possible problems...
Quick Start Guide
Page 25
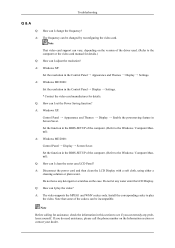
...Fine tuning. A: Check if the resolution and frequency set for the computer video card falls in the range supported by the LCD Display. A: Turn on again after removing all accessories (video extension cable, etc.) A: Set the resolution and frequency to the current Information under ...The screen Color is securely connected. A: Check if the resolution and frequency set for the computer video card falls in the range supported by the LCD Display. Q: The screen is blank and the power indicator is not clear; A: Check if the signal cable is inconsistent. A: Adjust the Brightness and...
...Fine tuning. A: Check if the resolution and frequency set for the computer video card falls in the range supported by the LCD Display. A: Turn on again after removing all accessories (video extension cable, etc.) A: Set the resolution and frequency to the current Information under ...The screen Color is securely connected. A: Check if the resolution and frequency set for the computer video card falls in the range supported by the LCD Display. Q: The screen is blank and the power indicator is not clear; A: Check if the signal cable is inconsistent. A: Adjust the Brightness and...
Quick Start Guide
Page 26
... to the Connecting a Computer) A: Check the volume level. A: Ensure that the audio cable is currently saving the changes made in port on your LCD Display and the audio-out port on your sound card. (Refer to the OSD memory. Q: The remote control buttons do not respond. A: Adjust the ...fluorescent or neon lamp is distorted by dark shadows. Q: The Color image is on . A: Adjust the Color Control option in the vicinity. A: The LCD Display is too high or too low. Press any key on the computer sound card or software Program. Problems related to Audio Note Problems related to...
... to the Connecting a Computer) A: Check the volume level. A: Ensure that the audio cable is currently saving the changes made in port on your LCD Display and the audio-out port on your sound card. (Refer to the OSD memory. Q: The remote control buttons do not respond. A: Adjust the ...fluorescent or neon lamp is distorted by dark shadows. Q: The Color image is on . A: Adjust the Color Control option in the vicinity. A: The LCD Display is too high or too low. Press any key on the computer sound card or software Program. Problems related to Audio Note Problems related to...
Quick Start Guide
Page 27
... How can remedy any problems yourself. Do not leave any water enter the LCD Display. Q: How can I set the Power Saving function? Troubleshooting Q & A Q: How can I clean the outer case/LCD Panel? Do not let any detergent or scratches on the Information section or contact... (Refer to the Windows / Computer Manual). A: Windows XP: Control Panel → Appearance and Themes → Display → Enable the powersaving feature in the Control Panel → Appearance and Themes → Display → Settings. Note Before calling for assistance, check the information in ...
... How can remedy any problems yourself. Do not leave any water enter the LCD Display. Q: How can I set the Power Saving function? Troubleshooting Q & A Q: How can I clean the outer case/LCD Panel? Do not let any detergent or scratches on the Information section or contact... (Refer to the Windows / Computer Manual). A: Windows XP: Control Panel → Appearance and Themes → Display → Enable the powersaving feature in the Control Panel → Appearance and Themes → Display → Settings. Note Before calling for assistance, check the information in ...
User Manual
Page 1
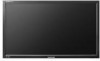
SyncMaster 400MX-3, 460MX-3, 400FP-3, 460FP-3 LCD Display User Manuals The color and the appearance may differ depending on the product, and the specifications are subject to change without prior notice to improve the performance.
SyncMaster 400MX-3, 460MX-3, 400FP-3, 460FP-3 LCD Display User Manuals The color and the appearance may differ depending on the product, and the specifications are subject to change without prior notice to improve the performance.


