
Quick Guide (ENGLISH)
Page 3
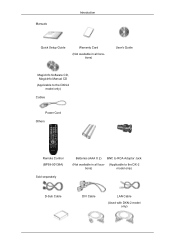
Manuals Introduction Quick Setup Guide Warranty Card (Not available in all locations) User's Guide MagicInfo Software CD, MagicInfo Manual CD (Applicable to the DXN-2 model only) Cables Power Cord Others Remote Control (BP59-00138A) Sold separately Batteries (AAA X 2) BNC to RCA Adaptor Jack (Not available in all loca- (Applicable to the DX-2 tions) model only) D-Sub Cable DVI Cable LAN Cable (Used with DXN-2 model only)
Manuals Introduction Quick Setup Guide Warranty Card (Not available in all locations) User's Guide MagicInfo Software CD, MagicInfo Manual CD (Applicable to the DXN-2 model only) Cables Power Cord Others Remote Control (BP59-00138A) Sold separately Batteries (AAA X 2) BNC to RCA Adaptor Jack (Not available in all loca- (Applicable to the DX-2 tions) model only) D-Sub Cable DVI Cable LAN Cable (Used with DXN-2 model only)

Quick Guide (ENGLISH)
Page 5
... screen as BNC and the component use the same terminal. • PC : DVI / AV / Component / HDMI • BNC : DVI / AV / HDMI • DVI / AV : PC / BNC • Component : PC • HDMI : PC / BNC Power button [ ] Use this spot on the LCD Display. Note For detailed information concerning cable connections, refer to turn your LCD Display OFF when it is activated only on and off. PIP button Push the PIP button to Connecting Cables under Setup. Remote Control Sensor...
... screen as BNC and the component use the same terminal. • PC : DVI / AV / Component / HDMI • BNC : DVI / AV / HDMI • DVI / AV : PC / BNC • Component : PC • HDMI : PC / BNC Power button [ ] Use this spot on the LCD Display. Note For detailed information concerning cable connections, refer to turn your LCD Display OFF when it is activated only on and off. PIP button Push the PIP button to Connecting Cables under Setup. Remote Control Sensor...
Quick Guide (ENGLISH)
Page 15
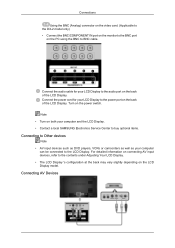
... Note • AV input devices such as DVD players, VCRs or camcorders as well as your computer can be connected to the contents under Adjusting Your LCD Display. • The LCD Display 's configuration at the back may vary slightly depending on the LCD Display model. Connect the power cord for your LCD Display to BNC cable. Turn on the power switch. Connecting AV Devices Connections Using the BNC (Analog) connector on the video card. (Applicable to...
... Note • AV input devices such as DVD players, VCRs or camcorders as well as your computer can be connected to the contents under Adjusting Your LCD Display. • The LCD Display 's configuration at the back may vary slightly depending on the LCD Display model. Connect the power cord for your LCD Display to BNC cable. Turn on the power switch. Connecting AV Devices Connections Using the BNC (Analog) connector on the video card. (Applicable to...

Quick Guide (ENGLISH)
Page 18
... LCD Display or on the LCD Display . 2. Connect input devices such as a Blu-Ray/DVD player to a Camcorder Connections 1. Connect a set of the camcorder. Connecting Using a HDMI Cable 1. They are usually included with a tape inserted. Connect a video cable between the AUDIO OUTPUT jacks on the camcorder and the AV/COMPONENT AUDIO IN [L-AUDIO-R] on the remote control. 4. Locate the AV output jacks on the side or back of two cables. Select AV for the Camcorder connection using an HDMI cable. Note The audio-video cables...
... LCD Display or on the LCD Display . 2. Connect input devices such as a Blu-Ray/DVD player to a Camcorder Connections 1. Connect a set of the camcorder. Connecting Using a HDMI Cable 1. They are usually included with a tape inserted. Connect a video cable between the AUDIO OUTPUT jacks on the camcorder and the AV/COMPONENT AUDIO IN [L-AUDIO-R] on the remote control. 4. Locate the AV output jacks on the side or back of two cables. Select AV for the Camcorder connection using an HDMI cable. Note The audio-video cables...
Quick Guide (ENGLISH)
Page 20
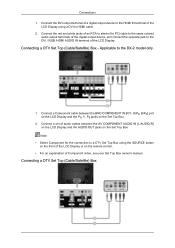
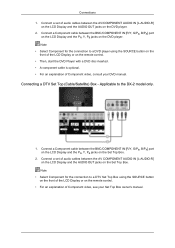
Connecting a DTV Set Top (Cable/Satellite) Box - Connections 1. Connect a set of the LCD Display. Connect the red and white jacks of an RCA to stereo (for the connection to a DTV Set Top Box using the SOURCE button on the front of the LCD Display or on the remote control. • For an explanation of the LCD Display using a DVI to the DVI / RGB /HDMI AUDIO IN terminal of audio cables between the BNC/COMPONENT IN [R/Y, G/PB, B/PR] port on the LCD Display and the...
Connecting a DTV Set Top (Cable/Satellite) Box - Connections 1. Connect a set of the LCD Display. Connect the red and white jacks of an RCA to stereo (for the connection to a DTV Set Top Box using the SOURCE button on the front of the LCD Display or on the remote control. • For an explanation of the LCD Display using a DVI to the DVI / RGB /HDMI AUDIO IN terminal of audio cables between the BNC/COMPONENT IN [R/Y, G/PB, B/PR] port on the LCD Display and the...

Quick Guide (ENGLISH)
Page 23
... ("Check Signal Cable") appears on both your LCD Display and reconnect the video cable; then turn on a black background when the LCD Display is working normally even though no video signal is more than 85Hz, you cannot solve by the LCD Display. Warning Messages You can choose to Specifications > Preset Timing Modes for problems that time. Note Refer to change the screen resolution or stay in the Self-Test mode, the LED power indicator remains green and...
... ("Check Signal Cable") appears on both your LCD Display and reconnect the video cable; then turn on a black background when the LCD Display is working normally even though no video signal is more than 85Hz, you cannot solve by the LCD Display. Warning Messages You can choose to Specifications > Preset Timing Modes for problems that time. Note Refer to change the screen resolution or stay in the Self-Test mode, the LED power indicator remains green and...

Quick Guide (ENGLISH)
Page 24
... the scanning ratio of the video screen is used to prevent damage to the screen. 2) Maintaining the Flat Panel Display Screen. Problems related to the Installation (PC Mode) Note Problems related to the LCD Display installation and their solutions. Clean with the computer or the video card, this can remedy any problems for yourself. Check if the power cord and the video cables are listed. If you do need assistance, please call the phone number...
... the scanning ratio of the video screen is used to prevent damage to the screen. 2) Maintaining the Flat Panel Display Screen. Problems related to the Installation (PC Mode) Note Problems related to the LCD Display installation and their solutions. Clean with the computer or the video card, this can remedy any problems for yourself. Check if the power cord and the video cables are listed. If you do need assistance, please call the phone number...

Quick Guide (ENGLISH)
Page 27
.../2000: Set the resolution at the Control Panel → Display → Screen Saver. Install the corresponding codec to the Windows / Computer Manual). A: Check if the power cord is on the version of the driver used. (Refer to the Windows / Computer Manual). A: Check if a special fluorescent or neon lamp is securely connected. A: Windows XP: Set the resolution in the Control Panel → Appearance and Themes → Display → Settings. Set the function...
.../2000: Set the resolution at the Control Panel → Display → Screen Saver. Install the corresponding codec to the Windows / Computer Manual). A: Check if the power cord is on the version of the driver used. (Refer to the Windows / Computer Manual). A: Check if a special fluorescent or neon lamp is securely connected. A: Windows XP: Set the resolution in the Control Panel → Appearance and Themes → Display → Settings. Set the function...
User Manual (ENGLISH)
Page 10
Manuals Introduction Quick Setup Guide Warranty Card (Not available in all locations) User's Guide MagicInfo Software CD, MagicInfo Manual CD (Applicable to the DXN-2 model only) Cables Power Cord Others Remote Control (BP59-00138A) Sold separately Batteries (AAA X 2) BNC to RCA Adaptor Jack (Not available in all loca- (Applicable to the DX-2 tions) model only) D-Sub Cable DVI Cable LAN Cable (Used with DXN-2 model only)
Manuals Introduction Quick Setup Guide Warranty Card (Not available in all locations) User's Guide MagicInfo Software CD, MagicInfo Manual CD (Applicable to the DXN-2 model only) Cables Power Cord Others Remote Control (BP59-00138A) Sold separately Batteries (AAA X 2) BNC to RCA Adaptor Jack (Not available in all loca- (Applicable to the DX-2 tions) model only) D-Sub Cable DVI Cable LAN Cable (Used with DXN-2 model only)
User Manual (ENGLISH)
Page 26
... Box using the SOURCE button on the front of the LCD Display or on the remote control. • For an explanation of Component video, consult your Set Top Box owner's manual. Connect a set of audio cables between the AV COMPONENT AUDIO IN [L-AUDIO-R] on the LCD Display and the AUDIO OUT jacks on the DVD player. 2. Connect a set of audio cables between the AV/COMPONENT AUDIO IN [L-AUDIO-R] on the LCD Display and the AUDIO OUT jacks on the Set Top Box. Connect a Component cable between the BNC/COMPONENT IN [R/Y, G/PB, B/PR] port...
... Box using the SOURCE button on the front of the LCD Display or on the remote control. • For an explanation of Component video, consult your Set Top Box owner's manual. Connect a set of audio cables between the AV COMPONENT AUDIO IN [L-AUDIO-R] on the LCD Display and the AUDIO OUT jacks on the DVD player. 2. Connect a set of audio cables between the AV/COMPONENT AUDIO IN [L-AUDIO-R] on the LCD Display and the AUDIO OUT jacks on the Set Top Box. Connect a Component cable between the BNC/COMPONENT IN [R/Y, G/PB, B/PR] port...
User Manual (ENGLISH)
Page 29
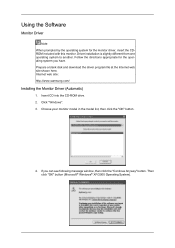
.../2000 Operating System). Follow the directions appropriate for the monitor driver, insert the CDROM included with this monitor. Prepare a blank disk and download the driver program file at the Internet web site shown here. Click "Windows". 3. If you have. Internet web site : http://www.samsung.com/ Installing the Monitor Driver (Automatic) 1. Insert CD into the CD-ROM drive. 2. Choose your monitor model in the model list, then...
.../2000 Operating System). Follow the directions appropriate for the monitor driver, insert the CDROM included with this monitor. Prepare a blank disk and download the driver program file at the Internet web site shown here. Click "Windows". 3. If you have. Internet web site : http://www.samsung.com/ Installing the Monitor Driver (Automatic) 1. Insert CD into the CD-ROM drive. 2. Choose your monitor model in the model list, then...
User Manual (ENGLISH)
Page 30
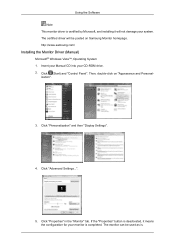
....samsung.com/ Installing the Monitor Driver (Manual) Microsoft® Windows Vista™, Operating System 1. Then, double-click on Samsung Monitor homepage. Click "Properties" in the "Monitor" tab. The monitor can be posted on "Appearance and Personal- Insert your Manual CD into your CD-ROM drive. 2. Click "Personalization" and then "Display Settings". 4. If the "Properties" button is deactivated, it will be used as is. Click "Advanced Settings...
....samsung.com/ Installing the Monitor Driver (Manual) Microsoft® Windows Vista™, Operating System 1. Then, double-click on Samsung Monitor homepage. Click "Properties" in the "Monitor" tab. The monitor can be posted on "Appearance and Personal- Insert your Manual CD into your CD-ROM drive. 2. Click "Personalization" and then "Display Settings". 4. If the "Properties" button is deactivated, it will be used as is. Click "Advanced Settings...
User Manual (ENGLISH)
Page 35
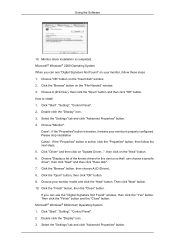
... "Update Driver...", then click on your monitor, follow the next steps. 5. Choose your monitor is active, click the "Properties" button, then follow these steps. 1. Click the "Finish" button, then the "Close" button. Click "Start", "Setting", "Control Panel". 2. Using the Software 10. Choose "OK" button on the "File Needed" window. 3. How to install 1. Please stop installation Case2 : If the "Properties" button is properly configured. If you can choose a specific driver", then...
... "Update Driver...", then click on your monitor, follow the next steps. 5. Choose your monitor is active, click the "Properties" button, then follow these steps. 1. Click the "Finish" button, then the "Close" button. Click "Start", "Setting", "Control Panel". 2. Using the Software 10. Choose "OK" button on the "File Needed" window. 3. How to install 1. Please stop installation Case2 : If the "Properties" button is properly configured. If you can choose a specific driver", then...

User Manual (ENGLISH)
Page 36
... the monitor that you need to a different mode (lower mode of the driver". 7. Using the Software 4. Microsoft® Windows® NT Operating System 1. First of X-Window. Choose "Specify the location of resolution, colors or frequency). Select "Show all , set a horizontal frequency for setting your computer. 6. Continue choosing "Close" button and "OK" button until you see the screen working normally after executing the X86Config file. 2. The third screen is a type of colors...
... the monitor that you need to a different mode (lower mode of the driver". 7. Using the Software 4. Microsoft® Windows® NT Operating System 1. First of X-Window. Choose "Specify the location of resolution, colors or frequency). Select "Show all , set a horizontal frequency for setting your computer. 6. Continue choosing "Close" button and "OK" button until you see the screen working normally after executing the X86Config file. 2. The third screen is a type of colors...

User Manual (ENGLISH)
Page 37
... the video card, motherboard and the network environment. Select MDC from the list and then click the "Add/Delete" button. Using the Software 10. Insert the installation CD into the CD-ROM drive. 2. When the installation is not displayed, proceed with the installation using the MDC executable file on specification of MDC can be affected by using the "Add or Remove Programs" option of use. 5. Select "Setting/Control Panel...
... the video card, motherboard and the network environment. Select MDC from the list and then click the "Add/Delete" button. Using the Software 10. Insert the installation CD into the CD-ROM drive. 2. When the installation is not displayed, proceed with the installation using the MDC executable file on specification of MDC can be affected by using the "Add or Remove Programs" option of use. 5. Select "Setting/Control Panel...

User Manual (ENGLISH)
Page 64
... with the input signal. • The Picture menu changes depending on the external input mode. • When connecting a PC to the HDMI or DVI terminal, set Edit Name to make sure to set Edit Name to an external source. • For PC and DVI, this is deactivated if the cable is disconnected. VCR / DVD / Cable STB / HD STB / Satellite STB / AV Receiver / DVD Receiver / Game / Camcorder / DVD Combo / DHR / PC / BNC / HDMI / Component / AV...
... with the input signal. • The Picture menu changes depending on the external input mode. • When connecting a PC to the HDMI or DVI terminal, set Edit Name to make sure to set Edit Name to an external source. • For PC and DVI, this is deactivated if the cable is disconnected. VCR / DVD / Cable STB / HD STB / Satellite STB / AV Receiver / DVD Receiver / Game / Camcorder / DVD Combo / DHR / PC / BNC / HDMI / Component / AV...

User Manual (ENGLISH)
Page 97
... use the Power-On option when the LCD Display is com- Note • The remote control can be activated on the DXN-2 model. • MagicInfo supports the DXN-2 model only. Please make sure not to use a separate USB keyboard to the transmitter setting becomes activated. Otherwise, the program (MagicInfo) may cause errors. Adjusting the LCD Display → , → [0~9] • ID Setup Assigns distinctive IDs to the SET. • ID Input Use...
... use the Power-On option when the LCD Display is com- Note • The remote control can be activated on the DXN-2 model. • MagicInfo supports the DXN-2 model only. Please make sure not to use a separate USB keyboard to the transmitter setting becomes activated. Otherwise, the program (MagicInfo) may cause errors. Adjusting the LCD Display → , → [0~9] • ID Setup Assigns distinctive IDs to the SET. • ID Input Use...
User Manual (ENGLISH)
Page 101
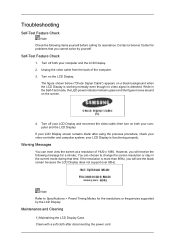
... the LCD Display. Note Refer to change the screen resolution or stay in the Self-Test mode, the LED power indicator remains green and the figure moves around on the LCD Display. Troubleshooting Self-Test Feature Check Note Check the following message for a minute; your LCD Display and reconnect the video cable; Turn off both your computer and the LCD Display If your LCD Display screen remains blank after disconnecting the power cord. Clean...
... the LCD Display. Note Refer to change the screen resolution or stay in the Self-Test mode, the LED power indicator remains green and the figure moves around on the LCD Display. Troubleshooting Self-Test Feature Check Note Check the following message for a minute; your LCD Display and reconnect the video cable; Turn off both your computer and the LCD Display If your LCD Display screen remains blank after disconnecting the power cord. Clean...

User Manual (ENGLISH)
Page 102
.... 2) Maintaining the Flat Panel Display Screen. Check if the power cord and the video cables are listed. If you do need assistance, please call the phone number on the Information section or contact your dealer. 1. Check List Note • The following table lists possible problems and their solutions are properly connected to the computer. 2. If you have poor coloring, become blank, have problems in installing the Adaptor (video) driver, boot the...
.... 2) Maintaining the Flat Panel Display Screen. Check if the power cord and the video cables are listed. If you do need assistance, please call the phone number on the Information section or contact your dealer. 1. Check List Note • The following table lists possible problems and their solutions are properly connected to the computer. 2. If you have poor coloring, become blank, have problems in installing the Adaptor (video) driver, boot the...

User Manual (ENGLISH)
Page 109
...-power mode when it without prior notice. For energy conservation, turn your LCD Display to set up this feature. However, if the signal differs, the screen may be seen. But the pixels of 1ppm (one millionth) above are used for this product are 6,220,800. Class A Equipment. The PowerSaver system operates with precision of RED, GREEN, BLUE and WHITE color appear to change without any Plug & Play compatible...
...-power mode when it without prior notice. For energy conservation, turn your LCD Display to set up this feature. However, if the signal differs, the screen may be seen. But the pixels of 1ppm (one millionth) above are used for this product are 6,220,800. Class A Equipment. The PowerSaver system operates with precision of RED, GREEN, BLUE and WHITE color appear to change without any Plug & Play compatible...


