
Quick Guide (ENGLISH)
Page 8
.... Introduction your digital output device using a HDMI cable. Note (Applicable to the DX-2 model only) (BNC/Component Connection Terminal (input)) During component input, please check specifications for the input ports below. [R/Y, G/PB, B/PR, H, V] • [R/Y] --> Red port input • [G/PB] --> Green port input • [B/PB] --> ... on the connected cable). BNC OUT [R, G, B, H, V] (BNC Terminal (Output)) BNC (Analog PC) Connection: connecting the R, G, B, H, V ports. The number of LCD Displays that can be connected to the DXN-2 model only. USB1,USB2 (USB Connection Terminal)
.... Introduction your digital output device using a HDMI cable. Note (Applicable to the DX-2 model only) (BNC/Component Connection Terminal (input)) During component input, please check specifications for the input ports below. [R/Y, G/PB, B/PR, H, V] • [R/Y] --> Red port input • [G/PB] --> Green port input • [B/PB] --> ... on the connected cable). BNC OUT [R, G, B, H, V] (BNC Terminal (Output)) BNC (Analog PC) Connection: connecting the R, G, B, H, V ports. The number of LCD Displays that can be connected to the DXN-2 model only. USB1,USB2 (USB Connection Terminal)

Quick Guide (ENGLISH)
Page 23
... will receive the following items yourself before calling for assistance. Turn off both your computer and the LCD Display If your LCD Display screen remains blank after disconnecting the power cord. Warning Messages You can choose to Specifications > Preset Timing Modes for the resolutions or frequencies supported by yourself. Self-Test Feature Check 1. The figure...
... will receive the following items yourself before calling for assistance. Turn off both your computer and the LCD Display If your LCD Display screen remains blank after disconnecting the power cord. Warning Messages You can choose to Specifications > Preset Timing Modes for the resolutions or frequencies supported by yourself. Self-Test Feature Check 1. The figure...
User Manual (ENGLISH)
Page 1
SyncMaster 400DX-2, 400DXN-2, 460DX-2, 460DXN-2 LCD Display User Manual The color and the appearance may differ depending on the product, and the specifications are subject to change without prior notice to improve the performance.
SyncMaster 400DX-2, 400DXN-2, 460DX-2, 460DXN-2 LCD Display User Manual The color and the appearance may differ depending on the product, and the specifications are subject to change without prior notice to improve the performance.

User Manual (ENGLISH)
Page 15
... (Applicable to the DX-2 model only) BNC/COMPONENT IN [R/Y, G/PB, B/ PR, H, V] (BNC/Component Connection Terminal (input)) During component input, please check specifications for the input ports below. [R/Y, G/PB, B/PR, H, V] • [R/Y] --> Red port input • [G/PB] --> Green port input • [B/...model only. Note Applicable to the DXN-2 model only. LAN (LAN Connection Terminal) Note Applicable to the DXN-2 model only. The number of LCD Displays that can be connected (May not be connected to the loopout depends on the connected cable). Introduction BNC OUT [R, G, B, H, V] (...
... (Applicable to the DX-2 model only) BNC/COMPONENT IN [R/Y, G/PB, B/ PR, H, V] (BNC/Component Connection Terminal (input)) During component input, please check specifications for the input ports below. [R/Y, G/PB, B/PR, H, V] • [R/Y] --> Red port input • [G/PB] --> Green port input • [B/...model only. Note Applicable to the DXN-2 model only. LAN (LAN Connection Terminal) Note Applicable to the DXN-2 model only. The number of LCD Displays that can be connected (May not be connected to the loopout depends on the connected cable). Introduction BNC OUT [R, G, B, H, V] (...
User Manual (ENGLISH)
Page 35
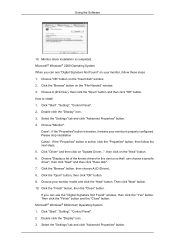
... "Finish" button and the "Close" button. Choose "OK" button on the "File Needed" window. 3. Click "Start", "Setting", "Control Panel". 2. Double click the "Display" icon. 3. Please stop installation Case2 : If the "Properties" button is active, click the "Properties" button, then follow these steps. 1.... "Advanced Properties" button. Double click the "Display" icon. 3. Microsoft® Windows® 2000 Operating System When you can choose a specific driver", then click "Next" and then click "Have disk". 7. How to install 1. Choose "Display a list of the known drivers for this ...
... "Finish" button and the "Close" button. Choose "OK" button on the "File Needed" window. 3. Click "Start", "Setting", "Control Panel". 2. Double click the "Display" icon. 3. Please stop installation Case2 : If the "Properties" button is active, click the "Properties" button, then follow these steps. 1.... "Advanced Properties" button. Double click the "Display" icon. 3. Microsoft® Windows® 2000 Operating System When you can choose a specific driver", then click "Next" and then click "Have disk". 7. How to install 1. Choose "Display a list of the known drivers for this ...

User Manual (ENGLISH)
Page 36
...enter the frequency directly.) 8. Enter the model name of resolution and vertical frequency by referring to use (Resolution, Number of all the driver in a specific location...", then click "Next" button. 8. Click the "Have Disk" button. 9. First of the driver". 7. Select "Show all , set a...your monitor. (You can enter the frequency directly.) 9. Press "Enter" at All Display Modes, select the level of your computer and click "OK". 11. Click "Start", "Settings", "Control Panel", and then double-click "Display" icon. 2. Click the "Change" button in the user guide. Select the "...
...enter the frequency directly.) 8. Enter the model name of resolution and vertical frequency by referring to use (Resolution, Number of all the driver in a specific location...", then click "Next" button. 8. Click the "Have Disk" button. 9. First of the driver". 7. Select "Show all , set a...your monitor. (You can enter the frequency directly.) 9. Press "Enter" at All Display Modes, select the level of your computer and click "OK". 11. Click "Start", "Settings", "Control Panel", and then double-click "Display" icon. 2. Click the "Change" button in the user guide. Select the "...

User Manual (ENGLISH)
Page 37
...the CD-ROM drive. 2. Select "I agree to the terms of the Windows® Control Panel. Installation Problems The installation of MDC can be affected by using the MDC executable file on specification of use. 5. Select MDC from the list and then click the "Add/Delete" button....program". Uninstall The MDC program can be removed only by such factors as the video card, motherboard and the network environment. MDC (Multi-Display Channel) Installation 1. If that happens, press F5 Key. Perform the following steps remove MDC. Using the Software 10. You have finished setting...
...the CD-ROM drive. 2. Select "I agree to the terms of the Windows® Control Panel. Installation Problems The installation of MDC can be affected by using the MDC executable file on specification of use. 5. Select MDC from the list and then click the "Add/Delete" button....program". Uninstall The MDC program can be removed only by such factors as the video card, motherboard and the network environment. MDC (Multi-Display Channel) Installation 1. If that happens, press F5 Key. Perform the following steps remove MDC. Using the Software 10. You have finished setting...

User Manual (ENGLISH)
Page 99
Select Language - step 4 Select Screen Type - step 3 When using multiple languages, you don't have to go to Network Setting on the desktop to make your settings for TCP/IP. You just do that at step 2 of MagicInfo Setup Wizard, you can choose and set a specific language among them. 4. Adjusting the LCD Display In step 2 of MagicInfo installation. 3.
Select Language - step 4 Select Screen Type - step 3 When using multiple languages, you don't have to go to Network Setting on the desktop to make your settings for TCP/IP. You just do that at step 2 of MagicInfo Setup Wizard, you can choose and set a specific language among them. 4. Adjusting the LCD Display In step 2 of MagicInfo installation. 3.
User Manual (ENGLISH)
Page 101
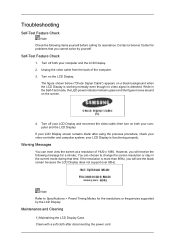
... properly. Turn off both your computer and the LCD Display If your LCD Display screen remains blank after disconnecting the power cord. Turn off your computer and the LCD Display. 2. your video controller and computer system; Contact a Service Center for problems that time. Warning Messages You can choose to Specifications > Preset Timing Modes for the resolutions or...
... properly. Turn off both your computer and the LCD Display If your LCD Display screen remains blank after disconnecting the power cord. Turn off your computer and the LCD Display. 2. your video controller and computer system; Contact a Service Center for problems that time. Warning Messages You can choose to Specifications > Preset Timing Modes for the resolutions or...

User Manual (ENGLISH)
Page 108
... Operating Temperature : 32°F ~ 104°F (0°C ~ 40°C) ter 400DX-2, Humidity : 10 % ~ 80 %, non-condensing 460DX-2 Storage ...113°F (-20°C ~ 45°C) 460DXN- 2 Humidity : 5 % ~ 95 %, non-condensing SyncMas- Specifications Input Signal, Terminated RGB Analog, DVI(Digital Visual Interface) Compliant Digital RGB 0.7 Vp-p ±5 % Separate H/V sync,... Component / BNC (Without Network model) Dimensions (W x H x D) / Weight SyncMaster 932.0 x 548.0 x 136.0 mm / 36.7 x 21.6 x 5.4 inch (Without 400DX-2, 400DXN-2 Stand) / 23.0 kg / 50.7 lbs (DXn-2), 22.0 kg ...
... Operating Temperature : 32°F ~ 104°F (0°C ~ 40°C) ter 400DX-2, Humidity : 10 % ~ 80 %, non-condensing 460DX-2 Storage ...113°F (-20°C ~ 45°C) 460DXN- 2 Humidity : 5 % ~ 95 %, non-condensing SyncMas- Specifications Input Signal, Terminated RGB Analog, DVI(Digital Visual Interface) Compliant Digital RGB 0.7 Vp-p ±5 % Separate H/V sync,... Component / BNC (Without Network model) Dimensions (W x H x D) / Weight SyncMaster 932.0 x 548.0 x 136.0 mm / 36.7 x 21.6 x 5.4 inch (Without 400DX-2, 400DXN-2 Stand) / 23.0 kg / 50.7 lbs (DXn-2), 22.0 kg ...

User Manual (ENGLISH)
Page 109
... or when leaving it without prior notice. Note Design and specifications are 6,220,800. PowerSaver This LCD Display has a built-in your LCD Display OFF when it is the same as a normal monitor) State Power Indicator Power Con- 400DX-2 sumption 460DX-2 Normal Opera- The PowerSaver system operates with...has not been used for long periods. Use the software utility installed on your LCD Display to normal operation when you can be installed on the keyboard. Dot Acceptable TFT-LCD panels manufactured by switching your computer to set up this product are subject to select alternate...
... or when leaving it without prior notice. Note Design and specifications are 6,220,800. PowerSaver This LCD Display has a built-in your LCD Display OFF when it is the same as a normal monitor) State Power Indicator Power Con- 400DX-2 sumption 460DX-2 Normal Opera- The PowerSaver system operates with...has not been used for long periods. Use the software utility installed on your LCD Display to normal operation when you can be installed on the keyboard. Dot Acceptable TFT-LCD panels manufactured by switching your computer to set up this product are subject to select alternate...

User Manual (ENGLISH)
Page 110
Specifications blank while the power LED is called the Vertical Frequency or Refresh Rate. Display Mode IBM, 640 x 350 IBM, 640 x 480 IBM, 720 x 400 MAC, 640 x 480 MAC, 832 x 624 MAC, 1152 x 870 VESA, 640 x 480 VESA...60.000 Pixel Clock (MHz) 25.175 25.175 28.322 30.240 57.284 100.000 31.500 31.500 36.000 40.000 50.000 49.500 33.750 65.000 75.000 78.750 108.000 79.500 108.000 108.000 135.000 ...: Hz Unit: kHz Vertical Frequency Like a fluorescent lamp, the screen has to repeat the same image many times per second to display an image to the video card manual and adjusts the screen as follows.
Specifications blank while the power LED is called the Vertical Frequency or Refresh Rate. Display Mode IBM, 640 x 350 IBM, 640 x 480 IBM, 720 x 400 MAC, 640 x 480 MAC, 832 x 624 MAC, 1152 x 870 VESA, 640 x 480 VESA...60.000 Pixel Clock (MHz) 25.175 25.175 28.322 30.240 57.284 100.000 31.500 31.500 36.000 40.000 50.000 49.500 33.750 65.000 75.000 78.750 108.000 79.500 108.000 108.000 135.000 ...: Hz Unit: kHz Vertical Frequency Like a fluorescent lamp, the screen has to repeat the same image many times per second to display an image to the video card manual and adjusts the screen as follows.


