
Quick Guide (ENGLISH)
Page 6
...)) • Use a D-Sub Cable (15 pin D-Sub) - POWER The power cord plugs into the LCD Display and the wall outlet. Applicable to BNC cable. PC mode (Analog PC) • Connect the RGB/COMPONENT IN port on the monitor to the COMPONENT port on the external device using the D-SUB to COMPONENT cable. •...; Connect the RGB/COMPONENT IN port on the monitor to the BNC port on the PC using the D-SUB to the DXN-2 model only. Introduction Note Applicable to the DX-2 model only. POWER S/W ON [ &#...
...)) • Use a D-Sub Cable (15 pin D-Sub) - POWER The power cord plugs into the LCD Display and the wall outlet. Applicable to BNC cable. PC mode (Analog PC) • Connect the RGB/COMPONENT IN port on the monitor to the COMPONENT port on the external device using the D-SUB to COMPONENT cable. •...; Connect the RGB/COMPONENT IN port on the monitor to the BNC port on the PC using the D-SUB to the DXN-2 model only. Introduction Note Applicable to the DX-2 model only. POWER S/W ON [ &#...
Quick Guide (ENGLISH)
Page 7
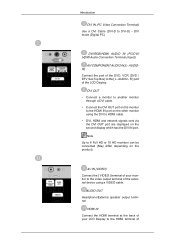
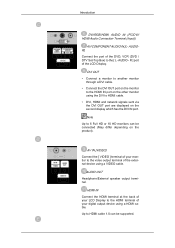
...terminal. Introduction DVI IN (PC Video Connection Terminal) Use a DVI Cable (DVI-D to 6 Full HD or 10 HD monitors can be connected (May differ depending on the product). AUDIOR] Connect the port of the LCD Display. R ] port of the DVD, VCR (DVD / DTV Set-Top Box) to HDMI cable. • DVI, HDMI... IN [VIDEO] Connect the [ VIDEO ] terminal of your LCD Display to the HDMI terminal of the external device using the DVI to the [ L- HDMI IN Connect the HDMI terminal at the back of your monitor to the HDMI IN port on the monitor to the video output terminal of DVI mode (Digital PC...
...terminal. Introduction DVI IN (PC Video Connection Terminal) Use a DVI Cable (DVI-D to 6 Full HD or 10 HD monitors can be connected (May differ depending on the product). AUDIOR] Connect the port of the LCD Display. R ] port of the DVD, VCR (DVD / DTV Set-Top Box) to HDMI cable. • DVI, HDMI... IN [VIDEO] Connect the [ VIDEO ] terminal of your LCD Display to the HDMI terminal of the external device using the DVI to the [ L- HDMI IN Connect the HDMI terminal at the back of your monitor to the HDMI IN port on the monitor to the video output terminal of DVI mode (Digital PC...
Quick Guide (ENGLISH)
Page 13
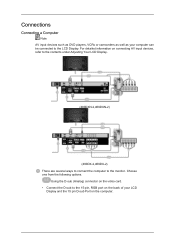
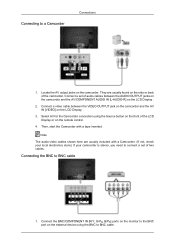
...AV input devices, refer to the contents under Adjusting Your LCD Display. (400DXN-2,460DXN-2) (400DX-2,460DX-2) There are several ways to connect the computer to the 15-pin, RGB port on the back of your computer can be connected to the LCD Display. Using the D-sub (Analog) connector on the computer.... Choose one from the following options. Connections Connecting a Computer Note AV input devices such as DVD players, VCRs or camcorders as well as your LCD Display and the 15 pin D-sub Port on...
...AV input devices, refer to the contents under Adjusting Your LCD Display. (400DXN-2,460DXN-2) (400DX-2,460DX-2) There are several ways to connect the computer to the 15-pin, RGB port on the back of your computer can be connected to the LCD Display. Using the D-sub (Analog) connector on the computer.... Choose one from the following options. Connections Connecting a Computer Note AV input devices such as DVD players, VCRs or camcorders as well as your LCD Display and the 15 pin D-sub Port on...
Quick Guide (ENGLISH)
Page 14
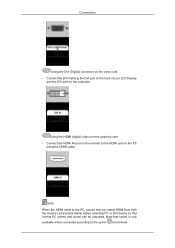
... selecting PC or DVI device so that follows. Using the HDMI (digital) output on the graphics card. • Connect the HDMI IN port on the monitor to the HDMI port on the computer. Note that sound is only available when connected according to the option that normal PC screen and sound... outputted. Connections Using the DVI (Digital) connector on the video card. • Connect the DVI Cable to the DVI port on the back of your LCD Display and the DVI port on the PC using the HDMI cable.
... selecting PC or DVI device so that follows. Using the HDMI (digital) output on the graphics card. • Connect the HDMI IN port on the monitor to the HDMI port on the computer. Note that sound is only available when connected according to the option that normal PC screen and sound... outputted. Connections Using the DVI (Digital) connector on the video card. • Connect the DVI Cable to the DVI port on the back of your LCD Display and the DVI port on the PC using the HDMI cable.
Quick Guide (ENGLISH)
Page 15
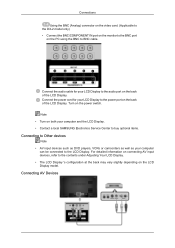
... and the LCD Display. • Contact a local SAMSUNG Electronics Service Center to buy optional items. Connecting to Other devices Note • AV input devices such as DVD players, VCRs or camcorders as well as your LCD Display to the power port on the back of the LCD Display. Connect the power cord for your LCD Display to the... Using the BNC (Analog) connector on the video card. (Applicable to the DX-2 model only) • Connect the BNC/COMPONENT IN port on the monitor to the BNC port on the back of the LCD Display. Connect the audio cable for your computer can be connected to the...
... and the LCD Display. • Contact a local SAMSUNG Electronics Service Center to buy optional items. Connecting to Other devices Note • AV input devices such as DVD players, VCRs or camcorders as well as your LCD Display to the power port on the back of the LCD Display. Connect the power cord for your LCD Display to the... Using the BNC (Analog) connector on the video card. (Applicable to the DX-2 model only) • Connect the BNC/COMPONENT IN port on the monitor to the BNC port on the back of the LCD Display. Connect the audio cable for your computer can be connected to the...
Quick Guide (ENGLISH)
Page 16
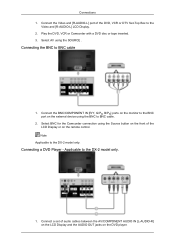
...BNC/COMPONENT IN [R/Y, G/PB, B/PR] ports on the monitor to the BNC port on the external device using the BNC to the DX-2 model only. 1. Applicable to BNC cable. 2. Select AV using the Source button on the front of the LCD Display or on the DVD player. Connections 1. Play the DVD... a DVD disc or tape inserted. 3. Note Applicable to the Video and [R-AUDIO-L] LCD Display. 2. Connect the Video and [R-AUDIO-L] port of audio cables between the AV/COMPONENT AUDIO IN [L-AUDIO-R] on the LCD Display and the AUDIO OUT jacks on the remote control. Select BNC for the Camcorder connection using...
...BNC/COMPONENT IN [R/Y, G/PB, B/PR] ports on the monitor to the BNC port on the external device using the BNC to the DX-2 model only. 1. Applicable to BNC cable. 2. Select AV using the Source button on the front of the LCD Display or on the DVD player. Connections 1. Play the DVD... a DVD disc or tape inserted. 3. Note Applicable to the Video and [R-AUDIO-L] LCD Display. 2. Connect the Video and [R-AUDIO-L] port of audio cables between the AV/COMPONENT AUDIO IN [L-AUDIO-R] on the LCD Display and the AUDIO OUT jacks on the remote control. Select BNC for the Camcorder connection using...
Quick Guide (ENGLISH)
Page 17
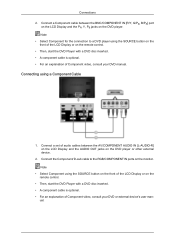
... man- Connections 2. Connect a Component cable between the AV/COMPONENT AUDIO IN [L-AUDIO-R] on the LCD Display and the AUDIO OUT jacks on the monitor. Connect a set of audio cables between the BNC/COMPONENT IN [R/Y, G/PB, B/PR] port on the LCD Display and the PR, Y, PB jacks on the remote control. • Then, start the DVD...
... man- Connections 2. Connect a Component cable between the AV/COMPONENT AUDIO IN [L-AUDIO-R] on the LCD Display and the AUDIO OUT jacks on the monitor. Connect a set of audio cables between the BNC/COMPONENT IN [R/Y, G/PB, B/PR] port on the LCD Display and the PR, Y, PB jacks on the remote control. • Then, start the DVD...

Quick Guide (ENGLISH)
Page 19
Note DVI OUT does not support HDCP. Select DVI using a stereo cable. 3. Connecting Using a DVI Cable 1. Connect between the DVI OUT port on the LCD Display and the input port on the remote control. Connect between the AUDIO OUT port on the LCD Display and the audio input port on another monitor using the SOURCE button on the front of the LCD Display or on another monitor using a DVI cable. 2. Connecting Using a DVI to HDMI Cable Connections Note In HDMI mode, only PCM format audio is supported.
Note DVI OUT does not support HDCP. Select DVI using a stereo cable. 3. Connecting Using a DVI Cable 1. Connect between the DVI OUT port on the LCD Display and the input port on the remote control. Connect between the AUDIO OUT port on the LCD Display and the audio input port on another monitor using the SOURCE button on the front of the LCD Display or on another monitor using a DVI cable. 2. Connecting Using a DVI to HDMI Cable Connections Note In HDMI mode, only PCM format audio is supported.
Quick Guide (ENGLISH)
Page 21
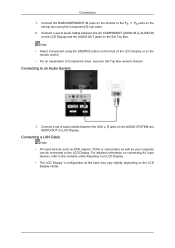
... such as DVD players, VCRs or camcorders as well as your Set Top Box owner's manual. Connect the RGB/COMPONENT IN ports on the monitor to the LCD Display. Connect a set of Component video, see your computer can be connected to the PR, Y, PB ports on the set-top box using ...connecting AV input devices, refer to an Audio System 1. Connections 1. Connect a set of audio cables between the AV COMPONENT AUDIO IN [L-AUDIO-R] on the LCD Display and the AUDIO OUT jacks on the remote control. • For an explanation of audio cables between the AUX L, R jacks on the AUDIO SYSTEM and...
... such as DVD players, VCRs or camcorders as well as your Set Top Box owner's manual. Connect the RGB/COMPONENT IN ports on the monitor to the LCD Display. Connect a set of Component video, see your computer can be connected to the PR, Y, PB ports on the set-top box using ...connecting AV input devices, refer to an Audio System 1. Connections 1. Connect a set of audio cables between the AV COMPONENT AUDIO IN [L-AUDIO-R] on the LCD Display and the AUDIO OUT jacks on the remote control. • For an explanation of audio cables between the AUX L, R jacks on the AUDIO SYSTEM and...

User Manual (ENGLISH)
Page 3
... the product in a location with heavy dust, high or low temperatures, high humidity, and exposed to contact an authorized Service Center when installing your monitor. To disconnect the apparatus from the mains, the plug must be pulled out from the mains socket, therefore the mains plug shall be dropped and... the product due to the product. Do not disconnect the power cord while using the product. • Otherwise, this may cause fire due to your monitor in a cabinet or rack, make sure that the front end of the bottom of the product does not project out. • Otherwise, it may...
... the product in a location with heavy dust, high or low temperatures, high humidity, and exposed to contact an authorized Service Center when installing your monitor. To disconnect the apparatus from the mains, the plug must be pulled out from the mains socket, therefore the mains plug shall be dropped and... the product due to the product. Do not disconnect the power cord while using the product. • Otherwise, this may cause fire due to your monitor in a cabinet or rack, make sure that the front end of the bottom of the product does not project out. • Otherwise, it may...

User Manual (ENGLISH)
Page 4
...this may result in the discoloration and distortion of your product in damage to the screen display. Ensure that the packaging vinyl is adjustable, do not place any object or part of... it with a slightly moistened, soft cloth. ternal temperature. Do not place the front of the TFT-LCD screen, wipe with a dry cloth. • Otherwise, it . Install your body on the floor.... may result in a well ventilated location. Do not spray cleaner directly onto the surface of your monitor is kept away from children. • Otherwise, it may result in serious harm (suffocation) if...
...this may result in the discoloration and distortion of your product in damage to the screen display. Ensure that the packaging vinyl is adjustable, do not place any object or part of... it with a slightly moistened, soft cloth. ternal temperature. Do not place the front of the TFT-LCD screen, wipe with a dry cloth. • Otherwise, it . Install your body on the floor.... may result in a well ventilated location. Do not spray cleaner directly onto the surface of your monitor is kept away from children. • Otherwise, it may result in serious harm (suffocation) if...

User Manual (ENGLISH)
Page 6
... may occur. • If you are not using headphones or earphones, do not sit too close to the product. Do not lift or move the monitor by a table or curtain. • Otherwise, it may result in fire due to an increase in electric shock or fire. Make sure that the ventilating...
... may occur. • If you are not using headphones or earphones, do not sit too close to the product. Do not lift or move the monitor by a table or curtain. • Otherwise, it may result in fire due to an increase in electric shock or fire. Make sure that the ventilating...

User Manual (ENGLISH)
Page 7
.... • If you do not use a new battery and a used or rechargeable batteries for returning the used battery at least five (5) minutes after using the monitor for a long period of time, disconnect the power cord from the remote control. The batteries (and rechargeable batteries) are not ordinary refuse and must be...
.... • If you do not use a new battery and a used or rechargeable batteries for returning the used battery at least five (5) minutes after using the monitor for a long period of time, disconnect the power cord from the remote control. The batteries (and rechargeable batteries) are not ordinary refuse and must be...

User Manual (ENGLISH)
Page 13
RS232C OUT/IN (RS232C Serial PORT) MDC(Multiple Display Control) Program Port RGB IN (PC Connection Terminal (Input)) • Use a D-Sub Cable (15 pin D-Sub) - PC mode (Analog PC) • Connect the RGB IN port on the monitor to the BNC port on the PC using the RGB to the DXN-2 model only.... POWER The power cord plugs into the LCD Display and the wall outlet. POWER S/W ON [ │ ] / OFF [O] Switches the LCD Display On/Off. Applicable to BNC cable. DVI mode (Digital...
RS232C OUT/IN (RS232C Serial PORT) MDC(Multiple Display Control) Program Port RGB IN (PC Connection Terminal (Input)) • Use a D-Sub Cable (15 pin D-Sub) - PC mode (Analog PC) • Connect the RGB IN port on the monitor to the BNC port on the PC using the RGB to the DXN-2 model only.... POWER The power cord plugs into the LCD Display and the wall outlet. POWER S/W ON [ │ ] / OFF [O] Switches the LCD Display On/Off. Applicable to BNC cable. DVI mode (Digital...
User Manual (ENGLISH)
Page 14
... to 6 Full HD or 10 HD monitors can be connected (May differ depending on the second display which has the DVI IN port. HDMI IN Connect the HDMI terminal at the back of your LCD Display to the [ L- DVI OUT • Connect a monitor to another monitor through a DVI cable. • Connect... the DVI OUT port on the monitor to the HDMI IN port on the other monitor using a HDMI cable. Note Up to HDMI cable. •...
... to 6 Full HD or 10 HD monitors can be connected (May differ depending on the second display which has the DVI IN port. HDMI IN Connect the HDMI terminal at the back of your LCD Display to the [ L- DVI OUT • Connect a monitor to another monitor through a DVI cable. • Connect... the DVI OUT port on the monitor to the HDMI IN port on the other monitor using a HDMI cable. Note Up to HDMI cable. •...

User Manual (ENGLISH)
Page 20
Using the D-sub (Analog) connector on the video card. • Connect the D-sub to the monitor. Connections Connecting a Computer (400DXN-2,460DXN-2) (400DX-2,460DX-2) There are several ways to connect the computer to the 15-pin, RGB port on the back of your LCD Display and the 15 pin D-sub Port on the computer. Choose one from the following options.
Using the D-sub (Analog) connector on the video card. • Connect the D-sub to the monitor. Connections Connecting a Computer (400DXN-2,460DXN-2) (400DX-2,460DX-2) There are several ways to connect the computer to the 15-pin, RGB port on the back of your LCD Display and the 15 pin D-sub Port on the computer. Choose one from the following options.

User Manual (ENGLISH)
Page 21
...the video card. (Applicable to the DX-2 model only) • Connect the BNC/COMPONENT IN port on the monitor to the BNC port on the PC using the HDMI cable. Using the HDMI (digital) output on the graphics... card. • Connect the HDMI IN port on the monitor to the HDMI port on the PC using the BNC to the option that follows. Note When the HDMI... cable to the DVI port on the back of your LCD Display and the DVI port on the computer. Connections Using the DVI (Digital) connector on the video card. ...
...the video card. (Applicable to the DX-2 model only) • Connect the BNC/COMPONENT IN port on the monitor to the BNC port on the PC using the HDMI cable. Using the HDMI (digital) output on the graphics... card. • Connect the HDMI IN port on the monitor to the HDMI port on the PC using the BNC to the option that follows. Note When the HDMI... cable to the DVI port on the back of your LCD Display and the DVI port on the computer. Connections Using the DVI (Digital) connector on the video card. ...
User Manual (ENGLISH)
Page 23
They are usually included with a tape inserted. Connect the BNC/COMPONENT IN [R/Y, G/PB, B/PR] ports on the monitor to the BNC port on the side or back of two cables. Connect a set of the camcorder. Then, start the Camcorder with a Camcorder. (If not,... cable between the AUDIO OUTPUT jacks on the camcorder and the AV/COMPONENT AUDIO IN [L-AUDIO-R] on the LCD Display . 3. Select AV for the Camcorder connection using the BNC to connect a set of the LCD Display or on the camcorder. Locate the AV output jacks on the remote control. 4. Connecting to BNC cable 1. ...
They are usually included with a tape inserted. Connect the BNC/COMPONENT IN [R/Y, G/PB, B/PR] ports on the monitor to the BNC port on the side or back of two cables. Connect a set of the camcorder. Then, start the Camcorder with a Camcorder. (If not,... cable between the AUDIO OUTPUT jacks on the camcorder and the AV/COMPONENT AUDIO IN [L-AUDIO-R] on the LCD Display . 3. Select AV for the Camcorder connection using the BNC to connect a set of the LCD Display or on the camcorder. Locate the AV output jacks on the remote control. 4. Connecting to BNC cable 1. ...

User Manual (ENGLISH)
Page 24
...to the DX-2 model only. Connect between the DVI OUT port on the LCD Display and the input port on the remote control. Connections 2. Note Applicable to the HDMI IN terminal of the LCD Display or on another monitor using a DVI cable. 2. Select BNC for the Camcorder connection using an... HDMI cable. Select DVI using the SOURCE button on the front of the LCD Display or on the front of the LCD Display using the Source button on the ...
...to the DX-2 model only. Connect between the DVI OUT port on the LCD Display and the input port on the remote control. Connections 2. Note Applicable to the HDMI IN terminal of the LCD Display or on another monitor using a DVI cable. 2. Select BNC for the Camcorder connection using an... HDMI cable. Select DVI using the SOURCE button on the front of the LCD Display or on the front of the LCD Display using the Source button on the ...
User Manual (ENGLISH)
Page 29
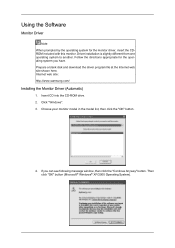
... then click the "OK" button. 4. Driver installation is slightly different from one operating system to another. Internet web site : http://www.samsung.com/ Installing the Monitor Driver (Automatic) 1. Prepare a blank disk and download the driver program file at the Internet web site shown here. If you have. ...Using the Software Monitor Driver Note When prompted by the operating system for the operating system you can see following message window, then click the "Continue Anyway" ...
... then click the "OK" button. 4. Driver installation is slightly different from one operating system to another. Internet web site : http://www.samsung.com/ Installing the Monitor Driver (Automatic) 1. Prepare a blank disk and download the driver program file at the Internet web site shown here. If you have. ...Using the Software Monitor Driver Note When prompted by the operating system for the operating system you can see following message window, then click the "Continue Anyway" ...

