Quick Guide (ENGLISH)
Page 13
... the computer. Connections Connecting a Computer Note AV input devices such as DVD players, VCRs or camcorders as well as your LCD Display and the 15 pin D-sub Port on connecting AV input devices, refer to the contents under Adjusting Your LCD Display. (400DXN-2,460DXN-2) (400DX-2,460DX-2) There are several ways to connect the computer to the...
... the computer. Connections Connecting a Computer Note AV input devices such as DVD players, VCRs or camcorders as well as your LCD Display and the 15 pin D-sub Port on connecting AV input devices, refer to the contents under Adjusting Your LCD Display. (400DXN-2,460DXN-2) (400DX-2,460DX-2) There are several ways to connect the computer to the...
User Manual (ENGLISH)
Page 1
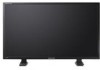
SyncMaster 400DX-2, 400DXN-2, 460DX-2, 460DXN-2 LCD Display User Manual The color and the appearance may differ depending on the product, and the specifications are subject to change without prior notice to improve the performance.
SyncMaster 400DX-2, 400DXN-2, 460DX-2, 460DXN-2 LCD Display User Manual The color and the appearance may differ depending on the product, and the specifications are subject to change without prior notice to improve the performance.

User Manual (ENGLISH)
Page 20
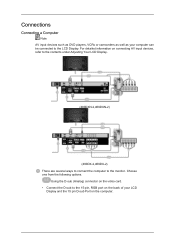
Connections Connecting a Computer (400DXN-2,460DXN-2) (400DX-2,460DX-2) There are several ways to connect the computer to the 15-pin, RGB port on the back of your LCD Display and the 15 pin D-sub Port on the computer. Choose one from the following options. Using the D-sub (Analog) connector on the video card. • Connect the D-sub to the monitor.
Connections Connecting a Computer (400DXN-2,460DXN-2) (400DX-2,460DX-2) There are several ways to connect the computer to the 15-pin, RGB port on the back of your LCD Display and the 15 pin D-sub Port on the computer. Choose one from the following options. Using the D-sub (Analog) connector on the video card. • Connect the D-sub to the monitor.

User Manual (ENGLISH)
Page 108
...OUT (With Network model), Component / BNC (Without Network model) Dimensions (W x H x D) / Weight SyncMaster 932.0 x 548.0 x 136.0 mm / 36.7 x 21.6 x 5.4 inch (Without 400DX-2, 400DXN-2 Stand) / 23.0 kg / 50.7 lbs (DXn-2), 22.0 kg / 48.5 lbs (DX-2) 932....0 x 604.0 x 311.0 mm / 36.7 x 23.8 x 12.2 inch (With Stand) SyncMaster 1068.0 x 624.0 x 130.0 mm / 42.0 x 24.6 x 5.1 inch (Without 460DX-2, 460DXN-2 Stand) / 2 .0 kg / 6. Operating Temperature : 50°F ~ 104°F (10°C ~ 40°C) ter 400DXN...
...OUT (With Network model), Component / BNC (Without Network model) Dimensions (W x H x D) / Weight SyncMaster 932.0 x 548.0 x 136.0 mm / 36.7 x 21.6 x 5.4 inch (Without 400DX-2, 400DXN-2 Stand) / 23.0 kg / 50.7 lbs (DXn-2), 22.0 kg / 48.5 lbs (DX-2) 932....0 x 604.0 x 311.0 mm / 36.7 x 23.8 x 12.2 inch (With Stand) SyncMaster 1068.0 x 624.0 x 130.0 mm / 42.0 x 24.6 x 5.1 inch (Without 460DX-2, 460DXN-2 Stand) / 2 .0 kg / 6. Operating Temperature : 50°F ~ 104°F (10°C ~ 40°C) ter 400DXN...

User Manual (ENGLISH)
Page 109
... LCD Display automatically returns to normal operation when you can be seen. But the pixels of TFT-LCD sub pixels contained in this product are used as a normal monitor) State Power Indicator Power Con- 400DX-2...transferred from bad quality and you press a key on the keyboard. Dot Acceptable TFT-LCD panels manufactured by switching your computer to low-power mode when it unattended for this feature.... Indicator Power Con- 400DXN-2 sumption 460DXN-2 Normal Opera- However, if the signal differs, the screen may be installed on your LCD Display to set up this product.
... LCD Display automatically returns to normal operation when you can be seen. But the pixels of TFT-LCD sub pixels contained in this product are used as a normal monitor) State Power Indicator Power Con- 400DX-2...transferred from bad quality and you press a key on the keyboard. Dot Acceptable TFT-LCD panels manufactured by switching your computer to low-power mode when it unattended for this feature.... Indicator Power Con- 400DXN-2 sumption 460DXN-2 Normal Opera- However, if the signal differs, the screen may be installed on your LCD Display to set up this product.