Quick Guide (ENGLISH)
Page 2
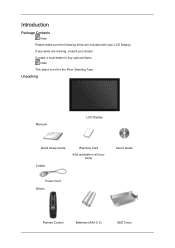
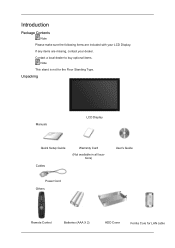
Contact a local dealer to buy optional items. Note This stand is not for the Floor Standing Type. Unpacking Manuals LCD Display Quick Setup Guide Cables Warranty Card (Not available in all locations) User's Guide Power Cord Others Remote Control Batteries (AAA X 2) HDD Cover If any items are included with your dealer. Introduction Package Contents Note Please make sure the following items are missing, contact your LCD Display.
Contact a local dealer to buy optional items. Note This stand is not for the Floor Standing Type. Unpacking Manuals LCD Display Quick Setup Guide Cables Warranty Card (Not available in all locations) User's Guide Power Cord Others Remote Control Batteries (AAA X 2) HDD Cover If any items are included with your dealer. Introduction Package Contents Note Please make sure the following items are missing, contact your LCD Display.
Quick Guide (ENGLISH)
Page 3
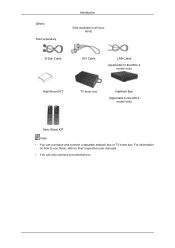
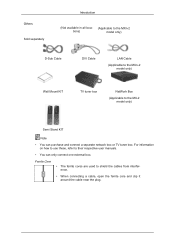
Others Sold separately Introduction (Not available in all locations) D-Sub Cable DVI Cable LAN Cable (Applicable to the MXn-2 model only) Wall Mount KIT TV tuner box NetWork Box (Applicable to their respective user manuals. • You can purchase and connect a separate network box or TV tuner box. For information on how to use these, refer to the MX-2 model only) Semi Stand KIT Note • You can only connect one external box.
Others Sold separately Introduction (Not available in all locations) D-Sub Cable DVI Cable LAN Cable (Applicable to the MXn-2 model only) Wall Mount KIT TV tuner box NetWork Box (Applicable to their respective user manuals. • You can purchase and connect a separate network box or TV tuner box. For information on how to use these, refer to the MX-2 model only) Semi Stand KIT Note • You can only connect one external box.
Quick Guide (ENGLISH)
Page 5
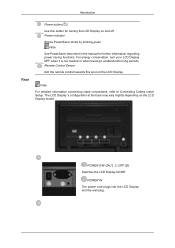
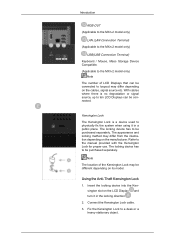
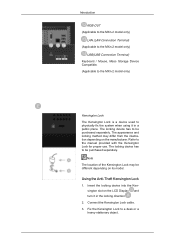
Power indicator Shows PowerSaver mode by blinking green Note See PowerSaver described in the manual for long periods. Remote Control Sensor Aim the remote control towards this button for turning the LCD Display on the LCD Display. For energy conservation, turn your LCD Display OFF when it is not needed or when leaving it unattended for further information...
Power indicator Shows PowerSaver mode by blinking green Note See PowerSaver described in the manual for long periods. Remote Control Sensor Aim the remote control towards this button for turning the LCD Display on the LCD Display. For energy conservation, turn your LCD Display OFF when it is not needed or when leaving it unattended for further information...
Quick Guide (ENGLISH)
Page 7
... be connected to loopout may be connected. The appearance and locking method may differ from the illustration depending on the LCD Display and turn it in the locking direction . 2. The locking device has to be purchased separately. Connect the Kensington Lock cable. 3. Refer to a ... The number of the Kensington Lock may differ depending on its model. Fix the Kensington Lock to the manual provided with the Kensington Lock for proper use. Note The location of LCD Displays that can be different depending on the cables, signal source etc. With cables where there is a device...
... be connected to loopout may be connected. The appearance and locking method may differ from the illustration depending on the LCD Display and turn it in the locking direction . 2. The locking device has to be purchased separately. Connect the Kensington Lock cable. 3. Refer to a ... The number of the Kensington Lock may differ depending on its model. Fix the Kensington Lock to the manual provided with the Kensington Lock for proper use. Note The location of LCD Displays that can be different depending on the cables, signal source etc. With cables where there is a device...
Quick Guide (ENGLISH)
Page 10
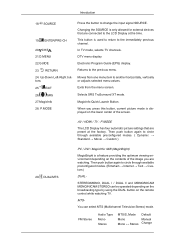
...the menu screen. FM Stereo Audio Type Mono Stereo MTS/S_Mode Mono Mono ↔ Stereo Default Manual Change SOURCE 19. In TV mode, selects TV channels. DTV menu display Electronic Program Guide (EPG) display. Exits from one menu item to change the input signal SOURCE. STEREO/MONO, DUAL l ... depending on the broadcasting type by using the DUAL button on the contents of the screen. AV / HDMI / TV : P.MODE The LCD Display has four automatic picture settings that are preset at the time. When you are watching. Then push button again to the immediately previous channel...
...the menu screen. FM Stereo Audio Type Mono Stereo MTS/S_Mode Mono Mono ↔ Stereo Default Manual Change SOURCE 19. In TV mode, selects TV channels. DTV menu display Electronic Program Guide (EPG) display. Exits from one menu item to change the input signal SOURCE. STEREO/MONO, DUAL l ... depending on the broadcasting type by using the DUAL button on the contents of the screen. AV / HDMI / TV : P.MODE The LCD Display has four automatic picture settings that are preset at the time. When you are watching. Then push button again to the immediately previous channel...
Quick Guide (ENGLISH)
Page 27
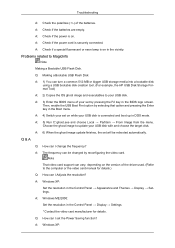
Problems related to the computer or the video card manual for details. A: 4) Switch your set on while your USB disk is on . Q: How can be rebooted automatically. A: 6) When the ghost image update finishes, the set ... Boot First option by pressing the F2 key in the vicinity. A: The frequency can I change the frequency? A: Windows XP: Set the resolution in the Control Panel → Display → Settings. * Contact the video card manufacturer for details.) Q: How can vary, depending on the version of the driver used. (Refer to MagicInfo Note...
Problems related to the computer or the video card manual for details. A: 4) Switch your set on while your USB disk is on . Q: How can be rebooted automatically. A: 6) When the ghost image update finishes, the set ... Boot First option by pressing the F2 key in the vicinity. A: The frequency can I change the frequency? A: Windows XP: Set the resolution in the Control Panel → Display → Settings. * Contact the video card manufacturer for details.) Q: How can vary, depending on the version of the driver used. (Refer to MagicInfo Note...

Quick Guide (ENGLISH)
Page 28
... function in the BIOS-SETUP of the computer. (Refer to the Windows / Computer Manual). Do not leave any water enter the LCD Display. A: Windows ME/2000: Set the resolution at the Control Panel → Display → Screen Saver. Do not let any detergent or scratches on the Information section... the BIOS-SETUP of the computer. (Refer to the Windows / Computer Manual). A: The video supports the MPEG1 and WMV codecs only. Q: How can be incompatible. A: Disconnect the power cord and then clean the LCD Display with a soft cloth, using either a cleaning solution or plain water. ...
... function in the BIOS-SETUP of the computer. (Refer to the Windows / Computer Manual). Do not leave any water enter the LCD Display. A: Windows ME/2000: Set the resolution at the Control Panel → Display → Screen Saver. Do not let any detergent or scratches on the Information section... the BIOS-SETUP of the computer. (Refer to the Windows / Computer Manual). A: The video supports the MPEG1 and WMV codecs only. Q: How can be incompatible. A: Disconnect the power cord and then clean the LCD Display with a soft cloth, using either a cleaning solution or plain water. ...
User Manual (ENGLISH)
Page 10
Contact a local dealer to buy optional items. Note This stand is not for the Floor Standing Type. If any items are included with your dealer. Unpacking Manuals LCD Display Quick Setup Guide Cables Warranty Card (Not available in all locations) User's Guide Power Cord Others Remote Control Batteries (AAA X 2) HDD Cover Introduction Package Contents Note Please make sure the following items are missing, contact your LCD Display.
Contact a local dealer to buy optional items. Note This stand is not for the Floor Standing Type. If any items are included with your dealer. Unpacking Manuals LCD Display Quick Setup Guide Cables Warranty Card (Not available in all locations) User's Guide Power Cord Others Remote Control Batteries (AAA X 2) HDD Cover Introduction Package Contents Note Please make sure the following items are missing, contact your LCD Display.
User Manual (ENGLISH)
Page 11
...) D-Sub Cable DVI Cable LAN Cable (Applicable to the MXn-2 model only) Wall Mount KIT TV tuner box NetWork Box (Applicable to their respective user manuals. • You can purchase and connect a separate network box or TV tuner box. For information on how to use these, refer to the MX-2 model...
...) D-Sub Cable DVI Cable LAN Cable (Applicable to the MXn-2 model only) Wall Mount KIT TV tuner box NetWork Box (Applicable to their respective user manuals. • You can purchase and connect a separate network box or TV tuner box. For information on how to use these, refer to the MX-2 model...

User Manual (ENGLISH)
Page 13
...refer to Connecting Cables under Setup. POWER IN The power cord plugs into the LCD Display and the wall plug. Power indicator Shows PowerSaver mode by blinking green Note See PowerSaver described in the manual for long periods. Introduction Rear Power button [ ] Use this spot on and... off. Remote Control Sensor Aim the remote control towards this button for turning the LCD Display on the LCD Display. The LCD Display 's configuration at the back may vary ...
...refer to Connecting Cables under Setup. POWER IN The power cord plugs into the LCD Display and the wall plug. Power indicator Shows PowerSaver mode by blinking green Note See PowerSaver described in the manual for long periods. Introduction Rear Power button [ ] Use this spot on and... off. Remote Control Sensor Aim the remote control towards this button for turning the LCD Display on the LCD Display. The LCD Display 's configuration at the back may vary ...
User Manual (ENGLISH)
Page 15
... to a desk or a heavy stationary object. The locking device has to be purchased separately. Connect the Kensington Lock cable. 3. Fix the Kensington Lock to the manual provided with the Kensington Lock for proper use. Note The location of the Kensington Lock may differ from the illustration depending on its model. Introduction... locking method may be different depending on the manufacturer. Using the Anti-Theft Kensington Lock 1. Insert the locking device into the Kensington slot on the LCD Display and turn it in the locking direction . 2.
... to a desk or a heavy stationary object. The locking device has to be purchased separately. Connect the Kensington Lock cable. 3. Fix the Kensington Lock to the manual provided with the Kensington Lock for proper use. Note The location of the Kensington Lock may differ from the illustration depending on its model. Introduction... locking method may be different depending on the manufacturer. Using the Anti-Theft Kensington Lock 1. Insert the locking device into the Kensington slot on the LCD Display and turn it in the locking direction . 2.

User Manual (ENGLISH)
Page 18
...devices that are preset at the time. In TV mode, selects TV channels. Selects SRS TruSurround XT mode. When you are connected to the LCD Display at the factory. Then push button again to the previous menu. MTS- Introduction 18. EXIT 26. SRS 27.MagicInfo 28. AV / HDMI... of the screen. FM Stereo Audio Type Mono Stereo MTS/S_Mode Mono Mono ↔ Stereo Default Manual Change ENTER/PRE-CH 20. DTV menu display Electronic Program Guide (EPG) display. SOURCE 19. Moves from the menu screen. P.MODE Press the button to the immediately previous channel...
...devices that are preset at the time. In TV mode, selects TV channels. Selects SRS TruSurround XT mode. When you are connected to the LCD Display at the factory. Then push button again to the previous menu. MTS- Introduction 18. EXIT 26. SRS 27.MagicInfo 28. AV / HDMI... of the screen. FM Stereo Audio Type Mono Stereo MTS/S_Mode Mono Mono ↔ Stereo Default Manual Change ENTER/PRE-CH 20. DTV menu display Electronic Program Guide (EPG) display. SOURCE 19. Moves from the menu screen. P.MODE Press the button to the immediately previous channel...
User Manual (ENGLISH)
Page 32
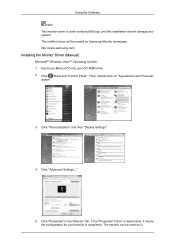
... MS logo, and this installation doesn't damage your system. Then, double-click on Samsung Monitor homepage. ization". 3. Click "Personalization" and then "Display Settings". 4. Click (Start) and "Control Panel". Click "Properties" in the "Monitor" tab. http://www.samsung.com/ Installing the Monitor Driver (Manual) Microsoft® Windows Vista™, Operating System 1. Using the Software Note This...
... MS logo, and this installation doesn't damage your system. Then, double-click on Samsung Monitor homepage. ization". 3. Click "Personalization" and then "Display Settings". 4. Click (Start) and "Control Panel". Click "Properties" in the "Monitor" tab. http://www.samsung.com/ Installing the Monitor Driver (Manual) Microsoft® Windows Vista™, Operating System 1. Using the Software Note This...

User Manual (ENGLISH)
Page 55
...Allows the Maintenance Control function for the displays whose power status is ON. Click on the "Maintenance" icon in the Main Icon column to adjust the backlight of the selected display regardless of the selected display at a specified time. The Manual Lamp Control automatically turns off if you... adjust using the Auto Lamp Control. 3) Manual Lamp Control - The Input source of TV works only on ...
...Allows the Maintenance Control function for the displays whose power status is ON. Click on the "Maintenance" icon in the Main Icon column to adjust the backlight of the selected display regardless of the selected display at a specified time. The Manual Lamp Control automatically turns off if you... adjust using the Auto Lamp Control. 3) Manual Lamp Control - The Input source of TV works only on ...
User Manual (ENGLISH)
Page 95
...depending on the version of the batteries. A: Windows XP: A: Check the polarities (+/-) of the driver used. (Refer to the computer or the video card manual for details. A: Windows XP: Set the resolution in the vicinity. A: Check if a special fluorescent or neon lamp is on . Q & A Q: How... can I Adjusts the resolution? A: Windows ME/2000: Set the resolution in the Control Panel → Display → Settings. * Contact the video card manufacturer for details.) Q: How can I set the Power Saving function? A: Check if the power cord is...
...depending on the version of the batteries. A: Windows XP: A: Check the polarities (+/-) of the driver used. (Refer to the computer or the video card manual for details. A: Windows XP: Set the resolution in the vicinity. A: Check if a special fluorescent or neon lamp is on . Q & A Q: How... can I Adjusts the resolution? A: Windows ME/2000: Set the resolution in the Control Panel → Display → Settings. * Contact the video card manufacturer for details.) Q: How can I set the Power Saving function? A: Check if the power cord is...
User Manual (ENGLISH)
Page 96
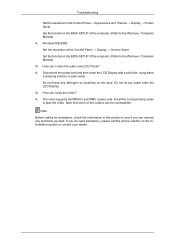
...-SETUP of the computer. (Refer to the Windows / Computer Manual). Set the function in this section to play the video? Set the function in the Control Panel → Appearance and Themes → Display → Screen Saver. A: Disconnect the power cord and then clean the LCD Display with a soft cloth, using either a cleaning solution or plain...
...-SETUP of the computer. (Refer to the Windows / Computer Manual). Set the function in this section to play the video? Set the function in the Control Panel → Appearance and Themes → Display → Screen Saver. A: Disconnect the power cord and then clean the LCD Display with a soft cloth, using either a cleaning solution or plain...
User Manual (ENGLISH)
Page 100
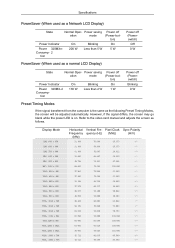
...320MXn- 200 W Less than 2 W 1 W Consump- ton) Power Indicator On Blinking On Power 320MX-2 130 W Less than 5 W 5 W Consump- 2 tion PowerSaver (When used as the following Preset Timing Modes, the screen will be adjusted automatically. Refer to the video card manual and adjusts the screen as a normal LCD Display...) Power off ation mode (Power-but - However, if the signal differs, the screen may go blank while the power LED is the same as a Network LCD Display) State Normal Oper- Power saving...
...320MXn- 200 W Less than 2 W 1 W Consump- ton) Power Indicator On Blinking On Power 320MX-2 130 W Less than 5 W 5 W Consump- 2 tion PowerSaver (When used as the following Preset Timing Modes, the screen will be adjusted automatically. Refer to the video card manual and adjusts the screen as a normal LCD Display...) Power off ation mode (Power-but - However, if the signal differs, the screen may go blank while the power LED is the same as a Network LCD Display) State Normal Oper- Power saving...
User Manual (ENGLISH)
Page 111
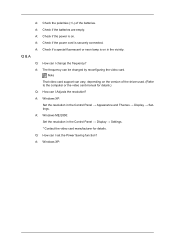
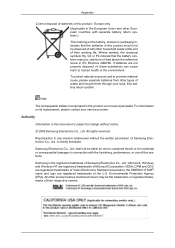
... STAR® name and logo are registered trademarks of Microsoft Corporation; All rights reserved. For information on the battery, manual or packaging indicates that the battery contains mercury, cadmium or lead above the reference levels in the European Union and other...Microsoft, Windows and Windows NT are registered trademarks of the U.S. If batteries are registered trademarks of Video Electronics Standard Association; Samsung is the registered trademark of waste and recycle them through your service provider. Environmental Protection Agency (EPA). All other product ...
... STAR® name and logo are registered trademarks of Microsoft Corporation; All rights reserved. For information on the battery, manual or packaging indicates that the battery contains mercury, cadmium or lead above the reference levels in the European Union and other...Microsoft, Windows and Windows NT are registered trademarks of the U.S. If batteries are registered trademarks of Video Electronics Standard Association; Samsung is the registered trademark of waste and recycle them through your service provider. Environmental Protection Agency (EPA). All other product ...

User Manual (KOREAN)
Page 53
Maintenance Control 1) Maintenance - 모든 Input Source에 대한 Maintenance Control 2) Auto Lamp Control - 선택된 Display Manual Lamp Control Auto Lamp Control은 Off됩니다. 3) Manual Lamp Control - 선택된 Display Auto Lamp Control Manual Lamp Control은 Off됩니다. MagicInfo 입입은 MagicInfo TV 입입은 TV Maintenance Scroll 1 Maintenance Maintenance
Maintenance Control 1) Maintenance - 모든 Input Source에 대한 Maintenance Control 2) Auto Lamp Control - 선택된 Display Manual Lamp Control Auto Lamp Control은 Off됩니다. 3) Manual Lamp Control - 선택된 Display Auto Lamp Control Manual Lamp Control은 Off됩니다. MagicInfo 입입은 MagicInfo TV 입입은 TV Maintenance Scroll 1 Maintenance Maintenance

