User Manual (ENGLISH)
Page 4
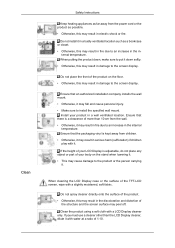
...place the front of your product in a well ventilated location. When cleaning the LCD Display case or the surface of more than the LCD Display cleaner, dilute it . If you must use a cleaner other than 10 cm from the wall. • Otherwise, it may result in fire due to an increase in the... with water at a ratio of the structure and the screen surface may fall and cause personal injury. • Make sure to install the specified wall mount. Clean Safety Instructions Keep heating appliances as far away from the power cord or the product as a bookcase or closet. • Otherwise, this...
...place the front of your product in a well ventilated location. When cleaning the LCD Display case or the surface of more than the LCD Display cleaner, dilute it . If you must use a cleaner other than 10 cm from the wall. • Otherwise, it may result in fire due to an increase in the... with water at a ratio of the structure and the screen surface may fall and cause personal injury. • Make sure to install the specified wall mount. Clean Safety Instructions Keep heating appliances as far away from the power cord or the product as a bookcase or closet. • Otherwise, this...
User Manual (ENGLISH)
Page 11
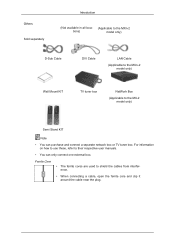
... Introduction (Not available in all loca- (Applicable to the MXn-2 tions) model only) D-Sub Cable DVI Cable LAN Cable (Applicable to the MXn-2 model only) Wall Mount KIT TV tuner box NetWork Box (Applicable to their respective user manuals. • You can purchase and connect a separate network box or TV tuner box...
... Introduction (Not available in all loca- (Applicable to the MXn-2 tions) model only) D-Sub Cable DVI Cable LAN Cable (Applicable to the MXn-2 model only) Wall Mount KIT TV tuner box NetWork Box (Applicable to their respective user manuals. • You can purchase and connect a separate network box or TV tuner box...

User Manual (ENGLISH)
Page 22
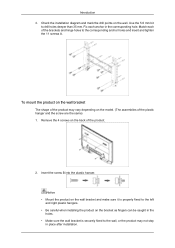
... (Right) 2. A - There are two hinges(left and right). Insert and tighten the Captive Screw in the direction of the 4screws on the wall. When done, mount the wall bracket on the wall bracket to adjust the length. Use the correct one . 1. Length between the two locking holes at the back of the product is... too short or long, loosen all or some of the arrow. A - Captive Screw B - Hinge (Left) D - If the length is correct. Use the correct one . Introduction Wall Bracket Assembly Note There are two hinges(left and right).
... (Right) 2. A - There are two hinges(left and right). Insert and tighten the Captive Screw in the direction of the 4screws on the wall. When done, mount the wall bracket on the wall bracket to adjust the length. Use the correct one . 1. Length between the two locking holes at the back of the product is... too short or long, loosen all or some of the arrow. A - Captive Screw B - Hinge (Left) D - If the length is correct. Use the correct one . Introduction Wall Bracket Assembly Note There are two hinges(left and right).
User Manual (ENGLISH)
Page 23
... The shape of the plastic hanger and the screw are the same) 1. Match each anchor in place after installation. Notice • Mount the product on the wall bracket and make sure it is securely fixed to the corresponding anchor holes and insert and tighten the 11 screws A. Use the 5.0 mm ...bit to drill holes deeper than 35 mm. Remove the 4 screws on the wall. Insert the screw B into the plastic hanger. Introduction 3. Fix each of the product. 2. Check the installation diagram and mark the drill points on the...
... The shape of the plastic hanger and the screw are the same) 1. Match each anchor in place after installation. Notice • Mount the product on the wall bracket and make sure it is securely fixed to the corresponding anchor holes and insert and tighten the 11 screws A. Use the 5.0 mm ...bit to drill holes deeper than 35 mm. Remove the 4 screws on the wall. Insert the screw B into the plastic hanger. Introduction 3. Fix each of the product. 2. Check the installation diagram and mark the drill points on the...


