User Manual
Page 11
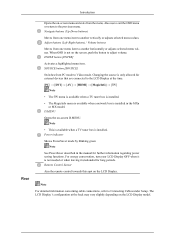
... depending on -screen D.MENU. Adjust buttons (Left-Right buttons) / Volume buttons Moves from PC mode to Connecting Cables under Setup. D.MENU Opens the on the LCD Display model. When OSD is installed in the manual for long periods. Also use to exit the OSD menu or return to adjust volume. SOURCE button [SOURCE] Switches from one menu item to another horizontally or adjusts selected menu values. Note • This is available when a TV tuner box is not needed or when leaving...
... depending on -screen D.MENU. Adjust buttons (Left-Right buttons) / Volume buttons Moves from PC mode to Connecting Cables under Setup. D.MENU Opens the on the LCD Display model. When OSD is installed in the manual for long periods. Also use to exit the OSD menu or return to adjust volume. SOURCE button [SOURCE] Switches from one menu item to another horizontally or adjusts selected menu values. Note • This is available when a TV tuner box is not needed or when leaving...
User Manual
Page 16
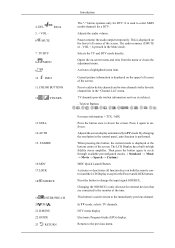
... to change the input signal SOURCE. RETURN Introduction The "-" button operates only for external devices that are connected to the favorite channel list in the Mute mode. Pauses (mutes) the audio output temporarily. DTV menu display Electronic Program Guide (EPG) display. 4. TTX/MIX 13.STILL 14.AUTO 15. SOURCE 19. The audio resumes if MUTE or - Current picture information is displayed at the time. Press it again to select MMS (multi-channel) for the Power and LOCK buttons...
... to change the input signal SOURCE. RETURN Introduction The "-" button operates only for external devices that are connected to the favorite channel list in the Mute mode. Pauses (mutes) the audio output temporarily. DTV menu display Electronic Program Guide (EPG) display. 4. TTX/MIX 13.STILL 14.AUTO 15. SOURCE 19. The audio resumes if MUTE or - Current picture information is displayed at the time. Press it again to select MMS (multi-channel) for the Power and LOCK buttons...

User Manual
Page 25
... DVD players, VCR's or camcorders as well as your LCD Display to the DVI port on the back of failure, the earth lead may cause electric shock. Using the DVI (Digital) connector on the video card. • Connect the DVI Cable to the power port on the back of your LCD Display. When unwiring the earth lead, make sure to the User Controls under Adjusting Your LCD Display. Connections Connecting a Computer Using a Power cord...
... DVD players, VCR's or camcorders as well as your LCD Display to the DVI port on the back of failure, the earth lead may cause electric shock. Using the DVI (Digital) connector on the video card. • Connect the DVI Cable to the power port on the back of your LCD Display. When unwiring the earth lead, make sure to the User Controls under Adjusting Your LCD Display. Connections Connecting a Computer Using a Power cord...
User Manual
Page 45
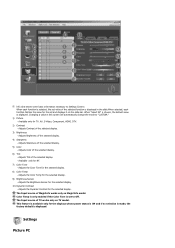
... this screen will automatically change the mode to "CUSTOM." 1) Picture - Adjusts Sharpness of the selected display. - Adjusts the Brightness Sensor for the selected display. 8) Color Temp - Color Temp is only enabled if the Color Tone is displayed. The Input source of MagicInfo works only on TV model. Adjusts the Color Tone for the selected display. 10) Dynamic Contrast - The Input source of TV works only on MagicInfo model. Settings Picture PC Adjusts the Color Temp for TV, AV, S-Video, Component, HDMI...
... this screen will automatically change the mode to "CUSTOM." 1) Picture - Adjusts Sharpness of the selected display. - Adjusts the Brightness Sensor for the selected display. 8) Color Temp - Color Temp is only enabled if the Color Tone is displayed. The Input source of MagicInfo works only on TV model. Adjusts the Color Tone for the selected display. 10) Dynamic Contrast - The Input source of TV works only on MagicInfo model. Settings Picture PC Adjusts the Color Temp for TV, AV, S-Video, Component, HDMI...
User Manual
Page 122
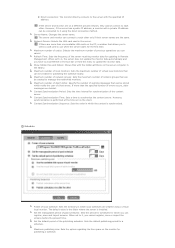
... the menu to update the monitor data. When set on the monitor for which the content is installed. Set the default period of past schedules: Sets the period for schedules for publishing a schedule. If more than the specifed number of network groups that allows you can register, save or import the screens before the present time. When set to 0, the server does not update the monitor data...
... the menu to update the monitor data. When set on the monitor for which the content is installed. Set the default period of past schedules: Sets the period for schedules for publishing a schedule. If more than the specifed number of network groups that allows you can register, save or import the screens before the present time. When set to 0, the server does not update the monitor data...
User Manual
Page 123
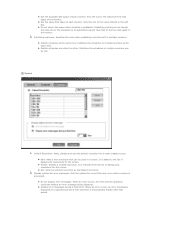
...: Publishing continues even though the total size of the schedules to be used in the edit box. Screen Default Resolution: Adds, deletes and sets the default resolution for the screen. z Do not display error messages: When an error occurs, the next preview operation continues without an error message being displayed. z Publish schedules at the same time: Publishes the schedules to multiple monitors one by one. It is previewed...
...: Publishing continues even though the total size of the schedules to be used in the edit box. Screen Default Resolution: Adds, deletes and sets the default resolution for the screen. z Do not display error messages: When an error occurs, the next preview operation continues without an error message being displayed. z Publish schedules at the same time: Publishes the schedules to multiple monitors one by one. It is previewed...
User Manual
Page 130
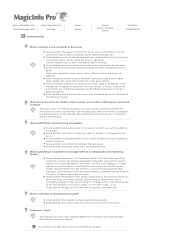
... | Remote Management | Message | Troubleshooting Library Option | Screen | | Client / Contents | Server Schedule Troubleshooting When a monitor is not connected to the server z Check whether the network environment for its image name in the folder with the server's executable files. z Check whether the connection methods used by default. z Check whether the PC prevents the server from accessing the monitor because of the monitor or use the buttons displayed when...
... | Remote Management | Message | Troubleshooting Library Option | Screen | | Client / Contents | Server Schedule Troubleshooting When a monitor is not connected to the server z Check whether the network environment for its image name in the folder with the server's executable files. z Check whether the connection methods used by default. z Check whether the PC prevents the server from accessing the monitor because of the monitor or use the buttons displayed when...
User Manual
Page 160
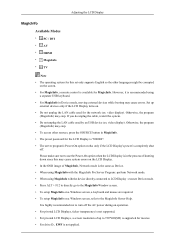
...; To setup MagicInfo on the screen. • For MagicInfo, a remote control is completely shut off the AC power during an operation. • For pivoted LCD Displays, ticker transparency is not supported. • For pivoted LCD Displays, a screen resolution of MagicInfo, Network mode is not applied. Set up to use the Power-On option when the LCD Display is recommended using MagicInfo with the MagicInfo Pro Server Program: perform Network mode. • When using a separate USB keyboard...
...; To setup MagicInfo on the screen. • For MagicInfo, a remote control is completely shut off the AC power during an operation. • For pivoted LCD Displays, ticker transparency is not supported. • For pivoted LCD Displays, a screen resolution of MagicInfo, Network mode is not applied. Set up to use the Power-On option when the LCD Display is recommended using MagicInfo with the MagicInfo Pro Server Program: perform Network mode. • When using a separate USB keyboard...
User Manual
Page 171
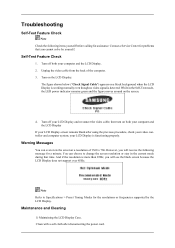
... by the LCD Display. your LCD Display screen remains blank after disconnecting the power cord. Contact a Service Center for problems that time. Maintenance and Cleaning 1) Maintaining the LCD Display Case. then turn on both your LCD Display and reconnect the video cable; Note Refer to change the screen resolution or stay in the Self-Test mode, the LED power indicator remains green and the figure moves around on the LCD Display. However, you will receive the following...
... by the LCD Display. your LCD Display screen remains blank after disconnecting the power cord. Contact a Service Center for problems that time. Maintenance and Cleaning 1) Maintaining the LCD Display Case. then turn on both your LCD Display and reconnect the video cable; Note Refer to change the screen resolution or stay in the Self-Test mode, the LED power indicator remains green and the figure moves around on the LCD Display. However, you will receive the following...

User Manual
Page 172
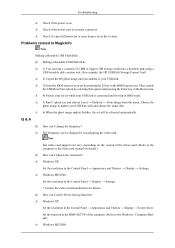
... using the maximum resolution.) 5. Check if the power cord and the video cables are listed. Check if the computer beeps more network-related information, refer to the MagicInfo Troubleshooting section. Check if the scanning ratio of the video screen is used to prevent damage to the screen. 2) Maintaining the Flat Panel Display Screen. If you have poor coloring, become blank, have problems in installing the Adaptor (video) driver, boot the computer in Safe Mode, remove...
... using the maximum resolution.) 5. Check if the power cord and the video cables are listed. Check if the computer beeps more network-related information, refer to the MagicInfo Troubleshooting section. Check if the scanning ratio of the video screen is used to prevent damage to the screen. 2) Maintaining the Flat Panel Display Screen. If you have poor coloring, become blank, have problems in installing the Adaptor (video) driver, boot the computer in Safe Mode, remove...
User Manual
Page 175
... USB Flash Disk A: 1) You can I change the frequency? A: Windows XP: Set the resolution in the Control Panel → Appearance and Themes → Display → Screen Saver. A: Windows ME/2000: Troubleshooting A: Check if the power is connected and boot up in DOS mode. Note that option and pressing the Enter key in the Boot menu. A: Windows XP: Set the resolution in the Control Panel → Appearance and Themes → Display...
... USB Flash Disk A: 1) You can I change the frequency? A: Windows XP: Set the resolution in the Control Panel → Appearance and Themes → Display → Screen Saver. A: Windows ME/2000: Troubleshooting A: Check if the power is connected and boot up in DOS mode. Note that option and pressing the Enter key in the Boot menu. A: Windows XP: Set the resolution in the Control Panel → Appearance and Themes → Display...
User Manual
Page 177
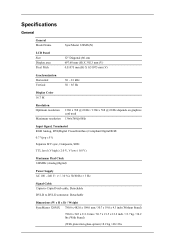
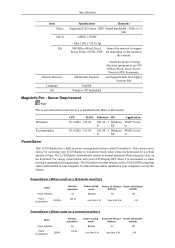
Specifications General General Model Name SyncMaster 320MX(N) LCD Panel Size Display area Pixel Pitch 32" Diagonal (80 cm) 697.68 mm (H) X 392.3 mm (V) 0.51075 mm (H) X 0.51075 mm (V) Synchronization Horizontal Vertical 30 ~ 81 kHz 56 ~ 85 Hz Display Color 16.7 M Resolution Optimum resolution Maximum resolution 1360 x 768 @ 60 Hz / 1366 x 768 @ 60 Hz depends on graphics card used 1366x768@60Hz Input Signal, Terminated RGB Analog, DVI(Digital Visual Interface) Compliant Digital RGB...
Specifications General General Model Name SyncMaster 320MX(N) LCD Panel Size Display area Pixel Pitch 32" Diagonal (80 cm) 697.68 mm (H) X 392.3 mm (V) 0.51075 mm (H) X 0.51075 mm (V) Synchronization Horizontal Vertical 30 ~ 81 kHz 56 ~ 85 Hz Display Color 16.7 M Resolution Optimum resolution Maximum resolution 1360 x 768 @ 60 Hz / 1366 x 768 @ 60 Hz depends on graphics card used 1366x768@60Hz Input Signal, Terminated RGB Analog, DVI(Digital Visual Interface) Compliant Digital RGB...
User Manual
Page 178
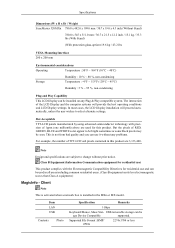
... age Device Compatible supported. USB removable storage can be seen. In most cases, the LCD Display installation will provide the best operating conditions and LCD Display settings. Note Design and specifications are used in all areas including common residential areas. (Class B equipment emits less electromagnetic waves than Class A equipment.) MagicInfo - But the pixels of TFT-LCD sub pixels contained in the MXn or MX model. Specifications Dimensions (W x H x D) / Weight SyncMaster 320MXn...
... age Device Compatible supported. USB removable storage can be seen. In most cases, the LCD Display installation will provide the best operating conditions and LCD Display settings. Note Design and specifications are used in all areas including common residential areas. (Class B equipment emits less electromagnetic waves than Class A equipment.) MagicInfo - But the pixels of TFT-LCD sub pixels contained in the MXn or MX model. Specifications Dimensions (W x H x D) / Weight SyncMaster 320MXn...
User Manual
Page 179
.... Power off (Power- Button) switch) On Off Less than 2 W Less than 5 W 0 W PowerSaver (When used as a Network monitor) State Power Indicator Power Consumption 320MXn Normal Operation On 200 W Power saving mode Blinking Power off (Power- Some files may not be supporPower Point), HTML, PDF ted depending on your LCD Display OFF when it is installed in power management system called PowerSaver. Use the software utility installed on the format or the version. Install the proper viewing (freeware) program...
.... Power off (Power- Button) switch) On Off Less than 2 W Less than 5 W 0 W PowerSaver (When used as a Network monitor) State Power Indicator Power Consumption 320MXn Normal Operation On 200 W Power saving mode Blinking Power off (Power- Some files may not be supporPower Point), HTML, PDF ted depending on your LCD Display OFF when it is installed in power management system called PowerSaver. Use the software utility installed on the format or the version. Install the proper viewing (freeware) program...
User Manual
Page 183
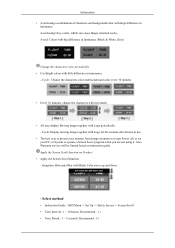
... • Instruction Guide : OSD Menu -> Set Up -> Safety Screen -> Screen Scroll • Time Interval : 1 ~ 10 hours ( Recommend : 1 ) • Time Period : 1 ~ 5 second ( Recommend : 5 ) Avoid: Colors with big difference in luminance (Black & White, Grey) Change the characters color periodically • Use Bright colors with little difference in use. • The best way to protect your monitor from Image retention is to turn Power off, or set your PC, or System to operate a Screen Saver program when...
... • Instruction Guide : OSD Menu -> Set Up -> Safety Screen -> Screen Scroll • Time Interval : 1 ~ 10 hours ( Recommend : 1 ) • Time Period : 1 ~ 5 second ( Recommend : 5 ) Avoid: Colors with big difference in luminance (Black & White, Grey) Change the characters color periodically • Use Bright colors with little difference in use. • The best way to protect your monitor from Image retention is to turn Power off, or set your PC, or System to operate a Screen Saver program when...
User Manual
Page 184
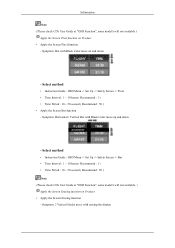
... erasing the display Symptom: 2 Vertical blocks move with Black Color move up and down . - Information Note ( Please check CD's User Guide at "OSD Function", some model's will not available. ) Apply the Screen Erasing function on Product • Apply the Screen Pixel function - Symptom: Dot with Black Color move up and down . - Select method • Instruction Guide : OSD Menu -> Set Up -> Safety Screen -> Bar • Time Interval...
... erasing the display Symptom: 2 Vertical blocks move with Black Color move up and down . - Information Note ( Please check CD's User Guide at "OSD Function", some model's will not available. ) Apply the Screen Erasing function on Product • Apply the Screen Pixel function - Symptom: Dot with Black Color move up and down . - Select method • Instruction Guide : OSD Menu -> Set Up -> Safety Screen -> Bar • Time Interval...

Quick Start Guide
Page 11
Connections Connecting a Computer Using a Power cord with Earth • In the event of your LCD Display and the 15 pin D-sub Port on the computer. Using the DVI (Digital) connector on the video card. • Connect the DVI Cable to the LCD Display. For detailed information on the computer. Note AV input devices such as DVD players, VCR's or camcorders as well as your LCD Display and the DVI port on connecting AV...
Connections Connecting a Computer Using a Power cord with Earth • In the event of your LCD Display and the 15 pin D-sub Port on the computer. Using the DVI (Digital) connector on the video card. • Connect the DVI Cable to the LCD Display. For detailed information on the computer. Note AV input devices such as DVD players, VCR's or camcorders as well as your LCD Display and the DVI port on connecting AV...

Quick Start Guide
Page 16
... x 768. Turn off both your computer and the LCD Display If your LCD Display screen remains blank after disconnecting the power cord. Note Refer to change the screen resolution or stay in the Self-Test mode, the LED power indicator remains green and the figure moves around on both your LCD Display and reconnect the video cable; Warning Messages You can choose to Specifications > Preset Timing Modes for the resolutions or frequencies supported by...
... x 768. Turn off both your computer and the LCD Display If your LCD Display screen remains blank after disconnecting the power cord. Note Refer to change the screen resolution or stay in the Self-Test mode, the LED power indicator remains green and the figure moves around on both your LCD Display and reconnect the video cable; Warning Messages You can choose to Specifications > Preset Timing Modes for the resolutions or frequencies supported by...

Quick Start Guide
Page 17
... if you do need assistance, please call the phone number on the Information section or contact your dealer. 1. Problems related to the Installation (PC Mode) Note Problems related to the LCD Display installation and their solutions. Check if the power cord and the video cables are listed. Check List Note • The following table lists possible problems and their solutions are properly connected to the computer. 2. Troubleshooting • Do not...
... if you do need assistance, please call the phone number on the Information section or contact your dealer. 1. Problems related to the Installation (PC Mode) Note Problems related to the LCD Display installation and their solutions. Check if the power cord and the video cables are listed. Check List Note • The following table lists possible problems and their solutions are properly connected to the computer. 2. Troubleshooting • Do not...

Quick Start Guide
Page 20
... USB Flash Disk. A: 4) Switch your set by reconfiguring the video card. Set the function in the BIOS-SETUP of your USB disk is securely connected. Troubleshooting A: Check if the power is on in the vicinity. A: 3) Enter the BIOS menu of the computer. (Refer to update your USB disk. A: Check if the power cord is connected and boot up in the Control Panel → Appearance and Themes → Display → Screen Saver...
... USB Flash Disk. A: 4) Switch your set by reconfiguring the video card. Set the function in the BIOS-SETUP of your USB disk is securely connected. Troubleshooting A: Check if the power is on in the vicinity. A: 3) Enter the BIOS menu of the computer. (Refer to update your USB disk. A: Check if the power cord is connected and boot up in the Control Panel → Appearance and Themes → Display → Screen Saver...


