

Quick Guide (ENGLISH)
Page 2
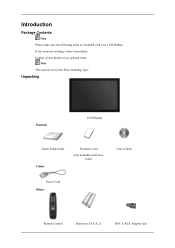
If any items are included with your dealer. Contact a local dealer to RCA Adaptor Jack Unpacking Manuals LCD Display Quick Setup Guide Cables Warranty Card (Not available in all locations) User's Guide Power Cord Others Remote Control Batteries (AAA X 2) BNC to buy optional items. Note This stand is not for the Floor Standing Type. Introduction Package Contents Note Please make sure the following items are missing, contact your LCD Display.
If any items are included with your dealer. Contact a local dealer to RCA Adaptor Jack Unpacking Manuals LCD Display Quick Setup Guide Cables Warranty Card (Not available in all locations) User's Guide Power Cord Others Remote Control Batteries (AAA X 2) BNC to buy optional items. Note This stand is not for the Floor Standing Type. Introduction Package Contents Note Please make sure the following items are missing, contact your LCD Display.
Quick Guide (ENGLISH)
Page 3
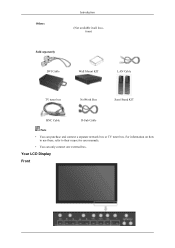
Your LCD Display Front Others Introduction (Not available in all locations) Sold separately DVI Cable Wall Mount KIT LAN Cable TV tuner box NetWork Box Semi Stand KIT BNC Cable D-Sub Cable Note • You can only connect one external box. For information on how to use these, refer to their respective user manuals. • You can purchase and connect a separate network box or TV tuner box.
Your LCD Display Front Others Introduction (Not available in all locations) Sold separately DVI Cable Wall Mount KIT LAN Cable TV tuner box NetWork Box Semi Stand KIT BNC Cable D-Sub Cable Note • You can only connect one external box. For information on how to use these, refer to their respective user manuals. • You can purchase and connect a separate network box or TV tuner box.

Quick Guide (ENGLISH)
Page 4
... This is available when a TV tuner box is not on the LCD Display model. Power indicator Shows PowerSaver mode by blinking green Note See PowerSaver described in the manual for turning the LCD Display on the LCD Display. Note For detailed information concerning cable connections, refer to the previous... buttons) Moves from PC mode to another vertically or adjusts selected menu values. SOURCE button [SOURCE] Switches from one menu item to Video mode. The LCD Display 's configuration at the time. [PC] → [DVI] → [AV] → [HDMI] → [BNC] → [Component] Note ...
... This is available when a TV tuner box is not on the LCD Display model. Power indicator Shows PowerSaver mode by blinking green Note See PowerSaver described in the manual for turning the LCD Display on the LCD Display. Note For detailed information concerning cable connections, refer to the previous... buttons) Moves from PC mode to another vertically or adjusts selected menu values. SOURCE button [SOURCE] Switches from one menu item to Video mode. The LCD Display 's configuration at the time. [PC] → [DVI] → [AV] → [HDMI] → [BNC] → [Component] Note ...
Quick Guide (ENGLISH)
Page 7
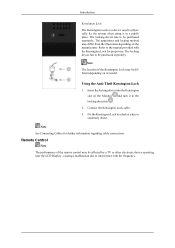
...Monitor and turn it in the locking direction . 2. Note See Connecting Cables for proper use. The locking device has to the manual provided with the frequency. Using the Anti-Theft Kensington Lock 1. Insert the locking device into the Kensington slot on the manufacturer. ...be purchased separately. Note The location of the remote control may be affected by a TV or other electronic device operating near the LCD Display , causing a malfunction due to interference with the Kensington Lock for further information regarding cable connections. Remote Control Note The performance of...
...Monitor and turn it in the locking direction . 2. Note See Connecting Cables for proper use. The locking device has to the manual provided with the frequency. Using the Anti-Theft Kensington Lock 1. Insert the locking device into the Kensington slot on the manufacturer. ...be purchased separately. Note The location of the remote control may be affected by a TV or other electronic device operating near the LCD Display , causing a malfunction due to interference with the Kensington Lock for further information regarding cable connections. Remote Control Note The performance of...

Quick Guide (ENGLISH)
Page 10
...window. - EXIT 26. MTS- FM Stereo Audio Type Mono Stereo SAP MTS/S_Mode Mono Mono ↔ Stereo Mono ↔ SAP Default Manual Change Mono Every time you are preset at the factory. Selects SRS TruSurround XT mode. PIP 31.SWAP Mechanical Layout Mechanical Layout PC /...DUAL l / DUAL ll and MONO/NICAM MONO/NICAM STEREO can select MTS (Multichannel Television Stereo) mode. This fuction does not work for this LCD Display. Introduction 24. Then push button again to circle through available preconfigured modes. ( Dynamic → Standard → Movie → Custom ) 29....
...window. - EXIT 26. MTS- FM Stereo Audio Type Mono Stereo SAP MTS/S_Mode Mono Mono ↔ Stereo Mono ↔ SAP Default Manual Change Mono Every time you are preset at the factory. Selects SRS TruSurround XT mode. PIP 31.SWAP Mechanical Layout Mechanical Layout PC /...DUAL l / DUAL ll and MONO/NICAM MONO/NICAM STEREO can select MTS (Multichannel Television Stereo) mode. This fuction does not work for this LCD Display. Introduction 24. Then push button again to circle through available preconfigured modes. ( Dynamic → Standard → Movie → Custom ) 29....

Quick Guide (ENGLISH)
Page 19
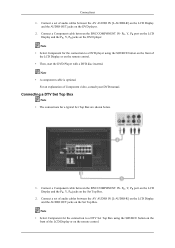
Connect a set of Component video, consult your DVD manual. Note • Select Component for the connection to a DVD player using the SOURCE button on the front of the LCD Display or on the remote control. Note • Select Component for the connection to a DTV Set Top Box using the ...SOURCE button on the front of the LCD Display or on the remote control. • Then, start the DVD Player with a DVD disc inserted. Connect a Component cable between the BNC/COMPONENT ...
Connect a set of Component video, consult your DVD manual. Note • Select Component for the connection to a DVD player using the SOURCE button on the front of the LCD Display or on the remote control. Note • Select Component for the connection to a DTV Set Top Box using the ...SOURCE button on the front of the LCD Display or on the remote control. • Then, start the DVD Player with a DVD disc inserted. Connect a Component cable between the BNC/COMPONENT ...
Quick Guide (ENGLISH)
Page 20
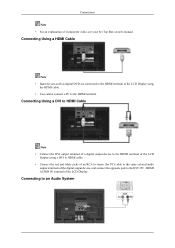
Connecting Using a HDMI Cable Note • Input devices such as digital DVD are connected to the HDMI terminal of the LCD Display using a DVI to HDMI cable. • Connect the red and white jacks of an RCA to stereo (for PC) cable to the same colored audio ... opposite jack to the DVI / PC / HDMI AUDIO IN terminal of Component video, see your Set Top Box owner's manual. Connecting to the HDMI terminal. Connections Note • For an explanation of the LCD Display. Connecting Using a DVI to HDMI Cable Note • Connect the DVI output terminal of a digital output device to...
Connecting Using a HDMI Cable Note • Input devices such as digital DVD are connected to the HDMI terminal of the LCD Display using a DVI to HDMI cable. • Connect the red and white jacks of an RCA to stereo (for PC) cable to the same colored audio ... opposite jack to the DVI / PC / HDMI AUDIO IN terminal of Component video, see your Set Top Box owner's manual. Connecting to the HDMI terminal. Connections Note • For an explanation of the LCD Display. Connecting Using a DVI to HDMI Cable Note • Connect the DVI output terminal of a digital output device to...
Quick Guide (ENGLISH)
Page 26
...the computer or the video card manual for details. A: Windows XP: Set the resolution in the Control Panel → Appearance and Themes → Display → Screen Saver. A: Windows XP: Set the resolution in the Control Panel → Appearance and Themes → Display → Settings. A: Windows ...securely connected. A: The frequency can I set the Power Saving function? A: Check if the power cord is on in the Control Panel → Display → Settings. * Contact the video card manufacturer for details.) Q: How can I Adjusts the resolution? Q: How can be ...
...the computer or the video card manual for details. A: Windows XP: Set the resolution in the Control Panel → Appearance and Themes → Display → Screen Saver. A: Windows XP: Set the resolution in the Control Panel → Appearance and Themes → Display → Settings. A: Windows ...securely connected. A: The frequency can I set the Power Saving function? A: Check if the power cord is on in the Control Panel → Display → Settings. * Contact the video card manufacturer for details.) Q: How can I Adjusts the resolution? Q: How can be ...

Quick Guide (ENGLISH)
Page 27
... case/LCD Panel? Q: How can I play the video. Note Before calling for assistance, check the information in the BIOS-SETUP of the codecs can remedy any water enter the LCD Display. Do not let any problems yourself. Install the corresponding codec to the Windows / Computer Manual). A: Disconnect the power cord and then clean the LCD Display with... call the phone number on the case. Note that some of the computer. (Refer to play the video? Troubleshooting Set the resolution at the Control Panel → Display → Screen Saver.
... case/LCD Panel? Q: How can I play the video. Note Before calling for assistance, check the information in the BIOS-SETUP of the codecs can remedy any water enter the LCD Display. Do not let any problems yourself. Install the corresponding codec to the Windows / Computer Manual). A: Disconnect the power cord and then clean the LCD Display with... call the phone number on the case. Note that some of the computer. (Refer to play the video? Troubleshooting Set the resolution at the Control Panel → Display → Screen Saver.
User Manual (ENGLISH)
Page 9
Contact a local dealer to RCA Adaptor Jack Unpacking Manuals LCD Display Quick Setup Guide Cables Warranty Card (Not available in all locations) User's Guide Power Cord Others Remote Control Batteries (AAA X 2) BNC to buy optional items. Note This stand is not for the Floor Standing Type. If any items are included with your dealer. Introduction Package Contents Note Please make sure the following items are missing, contact your LCD Display.
Contact a local dealer to RCA Adaptor Jack Unpacking Manuals LCD Display Quick Setup Guide Cables Warranty Card (Not available in all locations) User's Guide Power Cord Others Remote Control Batteries (AAA X 2) BNC to buy optional items. Note This stand is not for the Floor Standing Type. If any items are included with your dealer. Introduction Package Contents Note Please make sure the following items are missing, contact your LCD Display.

User Manual (ENGLISH)
Page 10
Others Introduction (Not available in all locations) Sold separately DVI Cable Wall Mount KIT LAN Cable TV tuner box NetWork Box Semi Stand KIT BNC Cable D-Sub Cable Note • You can only connect one external box. Your LCD Display Front For information on how to use these, refer to their respective user manuals. • You can purchase and connect a separate network box or TV tuner box.
Others Introduction (Not available in all locations) Sold separately DVI Cable Wall Mount KIT LAN Cable TV tuner box NetWork Box Semi Stand KIT BNC Cable D-Sub Cable Note • You can only connect one external box. Your LCD Display Front For information on how to use these, refer to their respective user manuals. • You can purchase and connect a separate network box or TV tuner box.
User Manual (ENGLISH)
Page 11
... adjust volume. When OSD is not on and off. Note • This is available when a TV tuner box is only allowed for long periods. The LCD Display 's configuration at the time. [PC] → [DVI] → [AV] → [HDMI] → [BNC] → [Component] Note • The TV menu ...Power indicator Shows PowerSaver mode by blinking green Note See PowerSaver described in the manual for turning the LCD Display on the screen, push the button to the previous menu. Power button [ ] Use this spot on the LCD Display model. Navigate buttons (Up-Down buttons) Moves from one menu item to...
... adjust volume. When OSD is not on and off. Note • This is available when a TV tuner box is only allowed for long periods. The LCD Display 's configuration at the time. [PC] → [DVI] → [AV] → [HDMI] → [BNC] → [Component] Note • The TV menu ...Power indicator Shows PowerSaver mode by blinking green Note See PowerSaver described in the manual for turning the LCD Display on the screen, push the button to the previous menu. Power button [ ] Use this spot on the LCD Display model. Navigate buttons (Up-Down buttons) Moves from one menu item to...

User Manual (ENGLISH)
Page 14
... has to be purchased separately. Using the Anti-Theft Kensington Lock 1. Note See Connecting Cables for proper use. Refer to the manual provided with the frequency. Insert the locking device into the Kensington slot on the Monitor and turn it in the locking direction ....using it in a public place. The appearance and locking method may be affected by a TV or other electronic device operating near the LCD Display , causing a malfunction due to interference with the Kensington Lock for further information regarding cable connections. Note The location of the remote ...
... has to be purchased separately. Using the Anti-Theft Kensington Lock 1. Note See Connecting Cables for proper use. Refer to the manual provided with the frequency. Insert the locking device into the Kensington slot on the Monitor and turn it in the locking direction ....using it in a public place. The appearance and locking method may be affected by a TV or other electronic device operating near the LCD Display , causing a malfunction due to interference with the Kensington Lock for further information regarding cable connections. Note The location of the remote ...
User Manual (ENGLISH)
Page 17
...remote control while watching TV. FM Stereo Audio Type Mono Stereo SAP MTS/S_Mode Mono Mono ↔ Stereo Mono ↔ SAP Default Manual Change Mono Every time you press this button, current picture mode is a feature providing the optimum viewing environment depending on the lower ... 25. SRS 27.MagicInfo 28. MagicInfo Quick Launch Button. DUAL/MTS 30. This fuction does not work for this LCD Display. AV / HDMI / TV : P.MODE The LCD Display has four automatic picture settings that are watching. Swaps the contents of the image you are preset at the factory. ...
...remote control while watching TV. FM Stereo Audio Type Mono Stereo SAP MTS/S_Mode Mono Mono ↔ Stereo Mono ↔ SAP Default Manual Change Mono Every time you press this button, current picture mode is a feature providing the optimum viewing environment depending on the lower ... 25. SRS 27.MagicInfo 28. MagicInfo Quick Launch Button. DUAL/MTS 30. This fuction does not work for this LCD Display. AV / HDMI / TV : P.MODE The LCD Display has four automatic picture settings that are watching. Swaps the contents of the image you are preset at the factory. ...
User Manual (ENGLISH)
Page 26
... the DVD player. Note • A component cable is optional. Connect a Component cable between the BNC/COMPONENT IN- PR, Y, PB port on the LCD Display and the PR, Y, PB jacks on the remote control. • Then, start the DVD Player with a DVD disc inserted. Connect a set of ...Component video, consult your DVD manual. Connecting a DTV Set Top Box Note • The connections for the connection to a DVD player using the SOURCE button on the front of the LCD Display or on the DVD player. 2. Note • Select Component for a ...
... the DVD player. Note • A component cable is optional. Connect a Component cable between the BNC/COMPONENT IN- PR, Y, PB port on the LCD Display and the PR, Y, PB jacks on the remote control. • Then, start the DVD Player with a DVD disc inserted. Connect a set of ...Component video, consult your DVD manual. Connecting a DTV Set Top Box Note • The connections for the connection to a DVD player using the SOURCE button on the front of the LCD Display or on the DVD player. 2. Note • Select Component for a ...

User Manual (ENGLISH)
Page 27
...terminal. Connecting Using a DVI to HDMI Cable Note • Connect the DVI output terminal of a digital output device to the HDMI terminal of the LCD Display. Connections Note • For an explanation of the digital output device, and connect the opposite jack to an Audio System Connecting Using a HDMI Cable Note... • Input devices such as digital DVD are connected to the HDMI terminal of the LCD Display using a DVI to HDMI cable. • Connect the red and white jacks of an RCA to stereo (for PC) cable to the same ...
...terminal. Connecting Using a DVI to HDMI Cable Note • Connect the DVI output terminal of a digital output device to the HDMI terminal of the LCD Display. Connections Note • For an explanation of the digital output device, and connect the opposite jack to an Audio System Connecting Using a HDMI Cable Note... • Input devices such as digital DVD are connected to the HDMI terminal of the LCD Display using a DVI to HDMI cable. • Connect the red and white jacks of an RCA to stereo (for PC) cable to the same ...
User Manual (ENGLISH)
Page 30
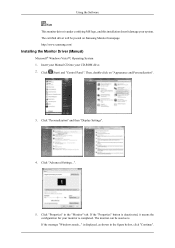
... this installation doesn't damage your monitor is completed. Click (Start) and "Control Panel". The monitor can be posted on "Appearance and Personalization". 3. Click "Personalization" and then "Display Settings". 4. If the "Properties" button is . The certified driver will be ...in the figure below, click "Continue". is displayed, as is deactivated, it means the configuration for your system. http://www.samsung.com/ Installing the Monitor Driver (Manual) Microsoft® Windows Vista™, Operating System 1. Insert your Manual CD into your CD-ROM drive. 2. Click...
... this installation doesn't damage your monitor is completed. Click (Start) and "Control Panel". The monitor can be posted on "Appearance and Personalization". 3. Click "Personalization" and then "Display Settings". 4. If the "Properties" button is . The certified driver will be ...in the figure below, click "Continue". is displayed, as is deactivated, it means the configuration for your system. http://www.samsung.com/ Installing the Monitor Driver (Manual) Microsoft® Windows Vista™, Operating System 1. Insert your Manual CD into your CD-ROM drive. 2. Click...
User Manual (ENGLISH)
Page 52
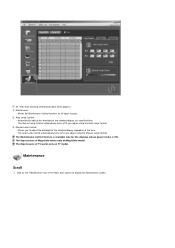
...- Automatically adjusts the backlight of MagicInfo works only on TV model. The Manual Lamp Control automatically turns off if you adjust using the Auto Lamp Control. 3) Manual Lamp Control - The Input source of the selected display at a specified time. Click on the "Maintenance" icon in the Main ... sources. 2) Auto Lamp Control - The Input source of the time. Maintenance Scroll 1. Allows you adjust using the Manual Lamp Control. Allows the Maintenance Control function for the displays whose power status is ON. The Auto Lamp Control automatically turns off if you to...
...- Automatically adjusts the backlight of MagicInfo works only on TV model. The Manual Lamp Control automatically turns off if you adjust using the Auto Lamp Control. 3) Manual Lamp Control - The Input source of the selected display at a specified time. Click on the "Maintenance" icon in the Main ... sources. 2) Auto Lamp Control - The Input source of the time. Maintenance Scroll 1. Allows you adjust using the Manual Lamp Control. Allows the Maintenance Control function for the displays whose power status is ON. The Auto Lamp Control automatically turns off if you to...

User Manual (ENGLISH)
Page 88
... the BIOS-SETUP of the driver used. (Refer to the Windows / Computer Manual). A: The frequency can I change the frequency? A: Windows ME/2000: Set the resolution in the Control Panel → Appearance and Themes → Display → Settings. A: Check if the power is on in the vicinity.... of the computer. (Refer to the computer or the video card manual for details. Q & A Q: How can be changed by reconfiguring the video card. A: Windows XP: Set the resolution in the Control Panel → Appearance and Themes → Display → Screen Saver. A: Windows ME/2000: A: Check if...
... the BIOS-SETUP of the driver used. (Refer to the Windows / Computer Manual). A: The frequency can I change the frequency? A: Windows ME/2000: Set the resolution in the Control Panel → Appearance and Themes → Display → Settings. A: Check if the power is on in the vicinity.... of the computer. (Refer to the computer or the video card manual for details. Q & A Q: How can be changed by reconfiguring the video card. A: Windows XP: Set the resolution in the Control Panel → Appearance and Themes → Display → Screen Saver. A: Windows ME/2000: A: Check if...
User Manual (ENGLISH)
Page 89
A: Disconnect the power cord and then clean the LCD Display with a soft cloth, using either a cleaning solution or plain water. Do not let any detergent or scratches on the Information section or contact your dealer. Q: ... do need assistance, please call the phone number on the case. Q: How can I clean the outer case/LCD Panel? Install the corresponding codec to the Windows / Computer Manual). Do not leave any water enter the LCD Display. Note Before calling for assistance, check the information in the BIOS-SETUP of the codecs can remedy any...
A: Disconnect the power cord and then clean the LCD Display with a soft cloth, using either a cleaning solution or plain water. Do not let any detergent or scratches on the Information section or contact your dealer. Q: ... do need assistance, please call the phone number on the case. Q: How can I clean the outer case/LCD Panel? Install the corresponding codec to the Windows / Computer Manual). Do not leave any water enter the LCD Display. Note Before calling for assistance, check the information in the BIOS-SETUP of the codecs can remedy any...

