
User Manual (ENGLISH)
Page 6
... the monitor openings. • This may cause electric shock or fire. Viewing the monitor continuously at a too close angle may appear. • Change the mode to energy saving mode or set a screensaver to a changing picture when away from the wall outlet and contact the Service Center. Safety Instructions Do not try to move the monitor right or left by pulling only the wire or the signal cable...
... the monitor openings. • This may cause electric shock or fire. Viewing the monitor continuously at a too close angle may appear. • Change the mode to energy saving mode or set a screensaver to a changing picture when away from the wall outlet and contact the Service Center. Safety Instructions Do not try to move the monitor right or left by pulling only the wire or the signal cable...
User Manual (ENGLISH)
Page 16
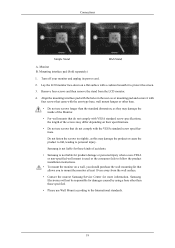
... use Wall Mount according to protect the screen. 3. Remove four screws and then remove the stand from the wall surface. • Contact the nearest Samsung Service Center for more information. Connections Simple Stand HAS Stand A. Monitor B. Samsung Electronics will not be responsible for product damage or personal injury when a non-VESA or non-specified wall mount is used or the consumer fails to follow the product installation instructions. • To mount the monitor on a flat...
... use Wall Mount according to protect the screen. 3. Remove four screws and then remove the stand from the wall surface. • Contact the nearest Samsung Service Center for more information. Connections Simple Stand HAS Stand A. Monitor B. Samsung Electronics will not be responsible for product damage or personal injury when a non-VESA or non-specified wall mount is used or the consumer fails to follow the product installation instructions. • To mount the monitor on a flat...

User Manual (ENGLISH)
Page 19
... kinds of accidents. • Samsung is not liable for product damage or personal injury when a non-VESA or non-specified wall mount is used or the consumer fails to follow the product installation instructions. • To mount the monitor on their specifications. • Do not use screws that allows you to the International standards. 18 Turn off your monitor and unplug its power cord. 2. Connections Simple Stand HAS Stand A. Monitor B.
... kinds of accidents. • Samsung is not liable for product damage or personal injury when a non-VESA or non-specified wall mount is used or the consumer fails to follow the product installation instructions. • To mount the monitor on their specifications. • Do not use screws that allows you to the International standards. 18 Turn off your monitor and unplug its power cord. 2. Connections Simple Stand HAS Stand A. Monitor B.
User Manual (ENGLISH)
Page 20
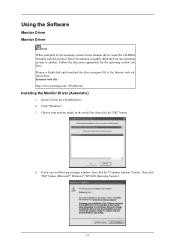
... you have. Prepare a blank disk and download the driver program file at the Internet web site shown here. Internet web site : http://www.samsung.com/ (Worldwide) Installing the Monitor Driver (Automatic) 1. Then click "OK" button (Microsoft® Windows® XP/2000 Operating System). 19 Insert CD into the CD-ROM drive. 2. Using the Software Monitor Driver Monitor Driver Note When prompted by the operating...
... you have. Prepare a blank disk and download the driver program file at the Internet web site shown here. Internet web site : http://www.samsung.com/ (Worldwide) Installing the Monitor Driver (Automatic) 1. Then click "OK" button (Microsoft® Windows® XP/2000 Operating System). 19 Insert CD into the CD-ROM drive. 2. Using the Software Monitor Driver Monitor Driver Note When prompted by the operating...

User Manual (ENGLISH)
Page 21
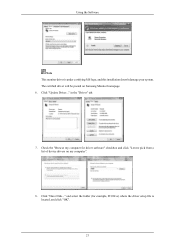
...". 20 If the "Properties" button is deactivated, it means the configuration for your monitor is under certifying MS logo, and this installation doesn't damage your CD-ROM drive. 2. If the message "Windows needs..." The certified driver will be used as shown in the "Monitor" tab. The monitor can be posted on "Appearance and Personalization". 3. Click (Start) and "Control Panel". http://www.samsung.com/ Installing the Monitor Driver (Manual...
...". 20 If the "Properties" button is deactivated, it means the configuration for your monitor is under certifying MS logo, and this installation doesn't damage your CD-ROM drive. 2. If the message "Windows needs..." The certified driver will be used as shown in the "Monitor" tab. The monitor can be posted on "Appearance and Personalization". 3. Click (Start) and "Control Panel". http://www.samsung.com/ Installing the Monitor Driver (Manual...
User Manual (ENGLISH)
Page 22
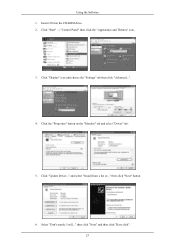
Click "Update Driver..." Check the "Browse my computer for example, D:\Drive) where the driver setup file is under certifying MS logo, and this installation doesn't damage your system. Using the Software Note This monitor driver is located, and click "OK". 21 Click "Have Disk..." in the "Driver" tab. 7. and select the folder (for driver software" checkbox and click "Let me pick from a list of device drivers on Samsung Monitor homepage. 6. The certified driver will be posted on my computer". 8.
Click "Update Driver..." Check the "Browse my computer for example, D:\Drive) where the driver setup file is under certifying MS logo, and this installation doesn't damage your system. Using the Software Note This monitor driver is located, and click "OK". 21 Click "Have Disk..." in the "Driver" tab. 7. and select the folder (for driver software" checkbox and click "Let me pick from a list of device drivers on Samsung Monitor homepage. 6. The certified driver will be posted on my computer". 8.
User Manual (ENGLISH)
Page 24
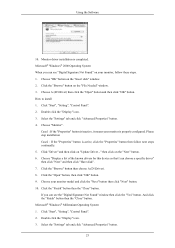
Click "Display" icon and choose the "Settings" tab then click "Advanced...". 4. Insert CD into the CD-ROM drive. 2. Click "Update Driver..." then click "Next" and then click "Have disk". 23 then click "Next" button. 6. Click the "Properties" button on the "Monitor" tab and select "Driver" tab. 5. and select "Install from a list or..." Using the Software 1. Click "Start" → "Control Panel" then click the "Appearance and Themes" icon. 3. Select "Don't search, I will..."
Click "Display" icon and choose the "Settings" tab then click "Advanced...". 4. Insert CD into the CD-ROM drive. 2. Click "Update Driver..." then click "Next" and then click "Have disk". 23 then click "Next" button. 6. Click the "Properties" button on the "Monitor" tab and select "Driver" tab. 5. and select "Install from a list or..." Using the Software 1. Click "Start" → "Control Panel" then click the "Appearance and Themes" icon. 3. Select "Don't search, I will..."
User Manual (ENGLISH)
Page 26
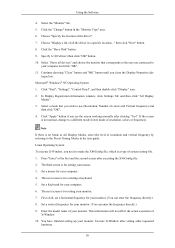
... Properties" button. 4. Choose your monitor, follow next steps continually. 5. Microsoft® Windows® Millennium Operating System 1. Click "Start", "Setting", "Control Panel". 2. Select the "Settings" tab and click "Advanced Properties" button. 25 Click the "Browse" button then choose A:(D:\Driver). 8. If you can see the "Digital Signature Not Found" window then click the "Yes" button. Click "Start", "Setting", "Control Panel". 2. Click "Driver" and then click on the "File Needed" window. 3. Click the "Open" button, then...
... Properties" button. 4. Choose your monitor, follow next steps continually. 5. Microsoft® Windows® Millennium Operating System 1. Click "Start", "Setting", "Control Panel". 2. Select the "Settings" tab and click "Advanced Properties" button. 25 Click the "Browse" button then choose A:(D:\Driver). 8. If you can see the "Digital Signature Not Found" window then click the "Yes" button. Click "Start", "Setting", "Control Panel". 2. Click "Driver" and then click on the "File Needed" window. 3. Click the "Open" button, then...
User Manual (ENGLISH)
Page 27
... user guide. Click "Start", "Settings", "Control Panel", and then double-click "Display" icon. 2. Note If there is for your computer. 4. Set a mouse for setting your monitor. 7. The next screen is a type of all the driver in a specific location..." First of system setting file. 1. Set a vertical frequency for your computer and click "OK". 11. Enter the model name of colors and Vertical frequency) and then click "OK". 4. Choose "Specify the location of X-Window...
... user guide. Click "Start", "Settings", "Control Panel", and then double-click "Display" icon. 2. Note If there is for your computer. 4. Set a mouse for setting your monitor. 7. The next screen is a type of all the driver in a specific location..." First of system setting file. 1. Set a vertical frequency for your computer and click "OK". 11. Enter the model name of colors and Vertical frequency) and then click "OK". 4. Choose "Specify the location of X-Window...
User Manual (ENGLISH)
Page 55
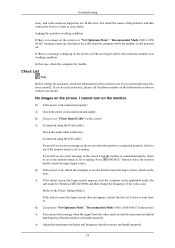
... safe mode for Windows ME/XP/2000) and then change the frequency of the problem, and then contact the Service Center or your dealer. A: Adjust the maximum resolution and frequency that the monitor can remedy any problems yourself. If there is set to see if the monitor status is in this section to have the monitor double-check the input signal source. Check List Note Before calling for trouble. Press ' /SOURCE' button...
... safe mode for Windows ME/XP/2000) and then change the frequency of the problem, and then contact the Service Center or your dealer. A: Adjust the maximum resolution and frequency that the monitor can remedy any problems yourself. If there is set to see if the monitor status is in this section to have the monitor double-check the input signal source. Check List Note Before calling for trouble. Press ' /SOURCE' button...
User Manual (ENGLISH)
Page 57
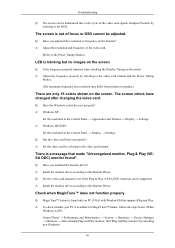
... Position by searching new Hardware. 56 The screen is out of the video card signals. LED is a message that reads "Unrecognized monitor, Plug & Play (VESA DDC) monitor found only on PC (VGA) with Window OS that supports Plug and Play. A: Adjust the frequency properly by referring to the video card manual. Check when MagicTune™ does not function properly. The screen colors have changed after changing the video card. There is blinking but no images on the screen. A: Install the monitor driver...
... Position by searching new Hardware. 56 The screen is out of the video card signals. LED is a message that reads "Unrecognized monitor, Plug & Play (VESA DDC) monitor found only on PC (VGA) with Window OS that supports Plug and Play. A: Adjust the frequency properly by referring to the video card manual. Check when MagicTune™ does not function properly. The screen colors have changed after changing the video card. There is blinking but no images on the screen. A: Install the monitor driver...
User Manual (ENGLISH)
Page 58
... not exceed 75 Hz when using the maximum resolution.) If you have problems in installing the adapter (video) driver, boot the computer in Safe Mode, remove the Display Adapter in the Control Panel → Appearance and Themes → Display → Settings. 57 Check if the power cord and the video cables are properly connected to operate normally after installing the program for details.) Q: How can be changed your monitor. Check if the computer beeps more...
... not exceed 75 Hz when using the maximum resolution.) If you have problems in installing the adapter (video) driver, boot the computer in Safe Mode, remove the Display Adapter in the Control Panel → Appearance and Themes → Display → Settings. 57 Check if the power cord and the video cables are properly connected to operate normally after installing the program for details.) Q: How can be changed your monitor. Check if the computer beeps more...

User Manual (ENGLISH)
Page 61
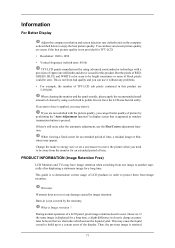
... compliant video card installed in this feature. State Normal Operation Power saving mode Power off (Power button) EPA/ENERGY 2000 Power Indicator Blue Blue blinking Off Power Consumption 40 watts 1 watts 1 watts 60 Note Design and specifications are 5,292,000. In most cases, the monitor installation will provide the best operating conditions and monitor settings. The monitor automatically returns to be bright sometimes or some black pixels may be installed on any problems. For example, the number...
... compliant video card installed in this feature. State Normal Operation Power saving mode Power off (Power button) EPA/ENERGY 2000 Power Indicator Blue Blue blinking Off Power Consumption 40 watts 1 watts 1 watts 60 Note Design and specifications are 5,292,000. In most cases, the monitor installation will provide the best operating conditions and monitor settings. The monitor automatically returns to be bright sometimes or some black pixels may be installed on any problems. For example, the number...

User Manual (ENGLISH)
Page 64
... returns to select alternate settings. This system saves energy by using advanced semiconductor technology with a VESA DPM compliant video card installed in power management system called PowerSaver. For energy conservation, turn your computer. The interaction of RED, GREEN, BLUE and WHITE color appear to be bright sometimes or some black pixels may be installed on your computer to change without any Plug & Play compatible system. Note Design and specifications are 5,292,000.
... returns to select alternate settings. This system saves energy by using advanced semiconductor technology with a VESA DPM compliant video card installed in power management system called PowerSaver. For energy conservation, turn your computer. The interaction of RED, GREEN, BLUE and WHITE color appear to be bright sometimes or some black pixels may be installed on your computer to change without any Plug & Play compatible system. Note Design and specifications are 5,292,000.

User Manual (ENGLISH)
Page 67
... problems. For example, the number of TFT-LCD sub pixels contained in power management system called PowerSaver. The monitor automatically returns to be bright sometimes or some black pixels may be used in all areas including common residential areas. (Class B equipment emits less electromagnetic waves than Class A equipment.) PowerSaver This monitor has a built-in this product are used for a certain amount of RED, GREEN, BLUE and WHITE color...
... problems. For example, the number of TFT-LCD sub pixels contained in power management system called PowerSaver. The monitor automatically returns to be bright sometimes or some black pixels may be used in all areas including common residential areas. (Class B equipment emits less electromagnetic waves than Class A equipment.) PowerSaver This monitor has a built-in this product are used for a certain amount of RED, GREEN, BLUE and WHITE color...

User Manual (ENGLISH)
Page 70
But the pixels of RED, GREEN, BLUE and WHITE color appear to be bright sometimes or some black pixels may be installed on any problems. For example, the number of 1ppm (one millionth) above are subject to change without any Plug & Play compatible system. The monitor automatically returns to low-power mode when it has not been used for a certain amount of the monitor and the computer systems will proceed automatically...
But the pixels of RED, GREEN, BLUE and WHITE color appear to be bright sometimes or some black pixels may be installed on any problems. For example, the number of 1ppm (one millionth) above are subject to change without any Plug & Play compatible system. The monitor automatically returns to low-power mode when it has not been used for a certain amount of the monitor and the computer systems will proceed automatically...
User Manual (ENGLISH)
Page 72
... a long time. However, if the same image is displayed for a long time, a slight difference in display screen that is appeared as described below to enjoy the best picture quality. But the pixels of RED, GREEN, BLUE and WHITE color seem to be bright sometimes or some of black pixels could be away from one millionth) and above is used for this product are not satisfied with...
... a long time. However, if the same image is displayed for a long time, a slight difference in display screen that is appeared as described below to enjoy the best picture quality. But the pixels of RED, GREEN, BLUE and WHITE color seem to be bright sometimes or some of black pixels could be away from one millionth) and above is used for this product are not satisfied with...
Quick Guide (ENGLISH)
Page 12
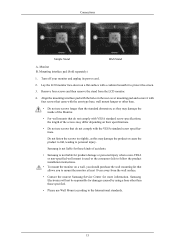
... other base. • Do not use screws longer than those specified. • Please use Wall Mount according to protect the screen. 3. Align the mounting interface pad with the holes in the rear cover mounting pad and secure it to the International standards. 18 Samsung Electronics will not be responsible for more information. Mounting interface pad (Sold separately) 1. Turn off your monitor and unplug its power cord...
... other base. • Do not use screws longer than those specified. • Please use Wall Mount according to protect the screen. 3. Align the mounting interface pad with the holes in the rear cover mounting pad and secure it to the International standards. 18 Samsung Electronics will not be responsible for more information. Mounting interface pad (Sold separately) 1. Turn off your monitor and unplug its power cord...

Quick Guide (ENGLISH)
Page 16
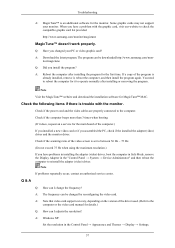
... the Monitor Driver. LED is found ". A: Install the monitor driver according to the Preset Timing Modes). Q: See the video card manual to see if the Plug & Play (VESA DDC) function can be unbalanced due to the video card manual. Q: MagicTune™ feature is blinking but no images on PC (VGA) with Window OS that reads "Unrecognized monitor, Plug & Play (VESA DDC) monitor found only on the screen. A: Windows XP : Set the resolution at the Control Panel → Display → Settings. Troubleshooting Q: The screen...
... the Monitor Driver. LED is found ". A: Install the monitor driver according to the Preset Timing Modes). Q: See the video card manual to see if the Plug & Play (VESA DDC) function can be unbalanced due to the video card manual. Q: MagicTune™ feature is blinking but no images on PC (VGA) with Window OS that reads "Unrecognized monitor, Plug & Play (VESA DDC) monitor found only on the screen. A: Windows XP : Set the resolution at the Control Panel → Display → Settings. Troubleshooting Q: The screen...
Quick Guide (ENGLISH)
Page 17
... Safe Mode, remove the Display Adapter in the Control Panel → Appearance and Themes → Display → Settings. 57 A: Windows XP: Set the resolution in the "Control Panel → System → Device Administrator" and then reboot the computer to check the compatible graphic card list provided. A: The frequency can I change the frequency? Some graphic cards may not support your PC or video graphic card? Note If problems repeatedly occur, contact an authorized service center. Check the...
... Safe Mode, remove the Display Adapter in the Control Panel → Appearance and Themes → Display → Settings. 57 A: Windows XP: Set the resolution in the "Control Panel → System → Device Administrator" and then reboot the computer to check the compatible graphic card list provided. A: The frequency can I change the frequency? Some graphic cards may not support your PC or video graphic card? Note If problems repeatedly occur, contact an authorized service center. Check the...


