
User Manual (ENGLISH)
Page 2
Main Page Safety Instructions Notational Power Installation Cleaning Other Introduction Unpacking Front Rear Setup Connecting Your Monitor Installing the Monitor Driver Automatic Manual Installing VESA compliant mounting On-Screen Display Troubleshooting Check List Q & A Self-Test Feature Check Specifications General Specifications PowerSaver Preset Display Modes Information Service Terms Regulatory Natural Color For Better Display Authority
Main Page Safety Instructions Notational Power Installation Cleaning Other Introduction Unpacking Front Rear Setup Connecting Your Monitor Installing the Monitor Driver Automatic Manual Installing VESA compliant mounting On-Screen Display Troubleshooting Check List Q & A Self-Test Feature Check Specifications General Specifications PowerSaver Preset Display Modes Information Service Terms Regulatory Natural Color For Better Display Authority
User Manual (ENGLISH)
Page 11
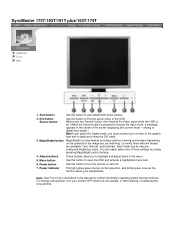
...the current mode -- Each mode has its own preconfigured brightness value. Auto button Use this button to highlight and adjust items in the manual for long periods. For energy conservation, turn the monitor on the contents of three settings by simply pressing MagicBright control buttons. 4. ...mode, you to turn your adjustments. Menu button Use this button to open the OSD and activate a highlighted menu item. 6. SyncMaster 173T/193T/191T plus/153T/174T Unpacking Front Rear 1. You can easily select one of the image you are available: Text, Internet, and Entertain....
...the current mode -- Each mode has its own preconfigured brightness value. Auto button Use this button to highlight and adjust items in the manual for long periods. For energy conservation, turn the monitor on the contents of three settings by simply pressing MagicBright control buttons. 4. ...mode, you to turn your adjustments. Menu button Use this button to open the OSD and activate a highlighted menu item. 6. SyncMaster 173T/193T/191T plus/153T/174T Unpacking Front Rear 1. You can easily select one of the image you are available: Text, Internet, and Entertain....
User Manual (ENGLISH)
Page 12
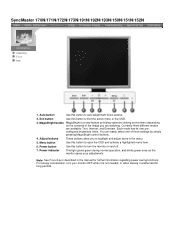
... settings by simply pressing MagicBright control buttons. 4. Currently three different modes are watching. Exit button Use this button to highlight and adjust items in the manual for long periods. SyncMaster 170N/171N/172N/173N/191N/192N/193N/150N/151N/152N Unpacking Front Rear 1.
... settings by simply pressing MagicBright control buttons. 4. Currently three different modes are watching. Exit button Use this button to highlight and adjust items in the manual for long periods. SyncMaster 170N/171N/172N/173N/191N/192N/193N/150N/151N/152N Unpacking Front Rear 1.
User Manual (ENGLISH)
Page 26
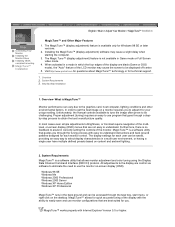
...-Step Installation 1. What is a software utility that allows monitor adjustment and color tuning using the Display Data Channel Command Interface (DDC/CI) protocol. Unfortunately, the manual controls available to tune the image often prove to select display characteristics in which the four edges of the LCD monitor may cause a slight delay...
...-Step Installation 1. What is a software utility that allows monitor adjustment and color tuning using the Display Data Channel Command Interface (DDC/CI) protocol. Unfortunately, the manual controls available to tune the image often prove to select display characteristics in which the four edges of the LCD monitor may cause a slight delay...
User Manual (ENGLISH)
Page 43
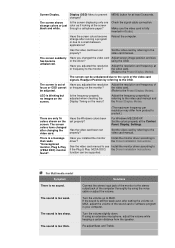
...Windows colors been set properly? using an extensive microphone, adjust the volume while keeping a certain distance from product to the video card manual. be adjusted. (Refer to the Preset Display Modes). For Windows ME/2000/XP: Set the colors properly at the screen through...Install the monitor driver according to if the Plug & Play (VESA DDC) the Driver Installation Instructions. See the video card manual to see Install the monitor driver according to the Driver Installation Instructions. Have you installed the monitor driver? Set the video card...
...Windows colors been set properly? using an extensive microphone, adjust the volume while keeping a certain distance from product to the video card manual. be adjusted. (Refer to the Preset Display Modes). For Windows ME/2000/XP: Set the colors properly at the screen through...Install the monitor driver according to if the Plug & Play (VESA DDC) the Driver Installation Instructions. See the video card manual to see Install the monitor driver according to the Driver Installation Instructions. Have you installed the monitor driver? Set the video card...
User Manual (ENGLISH)
Page 45
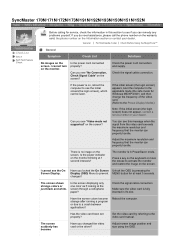
... the applicable mode (the safe mode for Windows ME/XP/2000 ) and then change the frequency of the video card. (Refer to the video card manual. Have you can properly handle. changes? Adjust screen image position and size using the OSD. You can be seen. Press a key on the screen. Is...
... the applicable mode (the safe mode for Windows ME/XP/2000 ) and then change the frequency of the video card. (Refer to the video card manual. Have you can properly handle. changes? Adjust screen image position and size using the OSD. You can be seen. Press a key on the screen. Is...
User Manual (ENGLISH)
Page 46
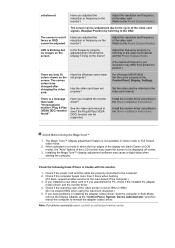
... Adjust the resolution and frequency of focus or OSD cannot be displayed off-center. 3. Set the video card by referring to the video card manual and the Preset Display Modes. (The maximum frequency per resolution may cause a slight delay when starting the computer. Check if the scanning ratio of... properly adjusted when checking the Display Timing on the screen. The screen can be unbalanced due to the Preset Display Modes). See the video card manual to see if the Plug & Play (VESA DDC) function can be supported. Check the following items if there is a message that reads "...
... Adjust the resolution and frequency of focus or OSD cannot be displayed off-center. 3. Set the video card by referring to the video card manual and the Preset Display Modes. (The maximum frequency per resolution may cause a slight delay when starting the computer. Check if the scanning ratio of... properly adjusted when checking the Display Timing on the screen. The screen can be unbalanced due to the Preset Display Modes). See the video card manual to see if the Plug & Play (VESA DDC) function can be supported. Check the following items if there is a message that reads "...
User Manual (ENGLISH)
Page 47
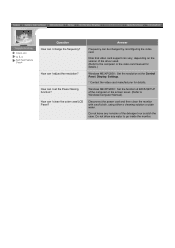
Windows ME/XP/2000 : Set the function at BIOS-SETUP of the computer or the screen saver. (Refer to the computer or the video card manual for details.) Windows ME/XP/2000 : Set the resolution at the Control Panel, Display, Settings. * Contact the video card manufacturer for details. Do not leave ... that video card support can be changed by reconfiguring the video card. Do not allow any remains of the driver used. (Refer to Windows/Computer Manual).
Windows ME/XP/2000 : Set the function at BIOS-SETUP of the computer or the screen saver. (Refer to the computer or the video card manual for details.) Windows ME/XP/2000 : Set the resolution at the Control Panel, Display, Settings. * Contact the video card manufacturer for details. Do not leave ... that video card support can be changed by reconfiguring the video card. Do not allow any remains of the driver used. (Refer to Windows/Computer Manual).

User Manual (ENGLISH)
Page 66
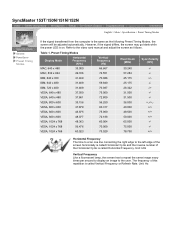
Refer to the video card manual and adjust the screen as the following Preset Timing Modes, the screen will be adjusted automatically. However, if the signal differs, the screen may go ... -/- The frequency of the Horizontal Cycle is called Vertical Frequency or Refresh Rate. Table 1. MAC, 832 x 624 49.726 74.551 57.284 -/- SyncMaster 173T/193T/170N/171N/172N/173N/191N/192N/193N/191T plus/174T General PowerSaver Preset Timing Modes If the signal transferred from the computer is the same...
Refer to the video card manual and adjust the screen as the following Preset Timing Modes, the screen will be adjusted automatically. However, if the signal differs, the screen may go ... -/- The frequency of the Horizontal Cycle is called Vertical Frequency or Refresh Rate. Table 1. MAC, 832 x 624 49.726 74.551 57.284 -/- SyncMaster 173T/193T/170N/171N/172N/173N/191N/192N/193N/191T plus/174T General PowerSaver Preset Timing Modes If the signal transferred from the computer is the same...
User Manual (ENGLISH)
Page 67
... -/- VESA, 1024 x 768 60.023 75.029 78.750 +/+ Horizontal Frequency The time to scan one line connecting the right edge to the video card manual and adjust the screen as the following Preset Timing Modes, the screen will be adjusted automatically. Table 1. VESA, 800 x 600 35.156 56.250 36...
... -/- VESA, 1024 x 768 60.023 75.029 78.750 +/+ Horizontal Frequency The time to scan one line connecting the right edge to the video card manual and adjust the screen as the following Preset Timing Modes, the screen will be adjusted automatically. Table 1. VESA, 800 x 600 35.156 56.250 36...

User Manual (ENGLISH)
Page 73
... on the standard of Information Technology Equipment z EN61000-3-2:1995+A1/A2:1998 - If this is a Class B product based on the environment and to the instruction manual. Install and use . Electromagnetic Immunity of the Voluntary Control Council for personal computers (TCO'95 applied model only) AB general requirements AB2 Written Eco-document...
... on the standard of Information Technology Equipment z EN61000-3-2:1995+A1/A2:1998 - If this is a Class B product based on the environment and to the instruction manual. Install and use . Electromagnetic Immunity of the Voluntary Control Council for personal computers (TCO'95 applied model only) AB general requirements AB2 Written Eco-document...
User Manual (ENGLISH)
Page 78
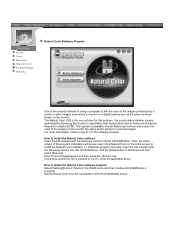
... initial screen to delete the Natural Color software program Select [Setting]/[Control Panel] on the monitor. To install the program manually, insert the CD included with the Samsung monitor into the CD-ROM Drive, click the [Start] button of the images on the monitor the same as those ...Color software. Select Natural Color from the list and then click the [Add/Delete] button. The Natural Color S/W is the very solution for Samsung monitors and makes the color of Windows and then select [Execute]. This system is available only for this problem. Service Terms Regulatory Natural Color...
... initial screen to delete the Natural Color software program Select [Setting]/[Control Panel] on the monitor. To install the program manually, insert the CD included with the Samsung monitor into the CD-ROM Drive, click the [Start] button of the images on the monitor the same as those ...Color software. Select Natural Color from the list and then click the [Add/Delete] button. The Natural Color S/W is the very solution for Samsung monitors and makes the color of Windows and then select [Execute]. This system is available only for this problem. Service Terms Regulatory Natural Color...

User Manual (SPANISH)
Page 60
TCO'95-Ecological requirements for professional use the equipment according to the instruction manual. Your purchase has also contributed to reducing the burden on the standard of the European Community. Electromagnetic Immunity of environmentally-adapted electronic products. Voltage Fluctuations ...
TCO'95-Ecological requirements for professional use the equipment according to the instruction manual. Your purchase has also contributed to reducing the burden on the standard of the European Community. Electromagnetic Immunity of environmentally-adapted electronic products. Voltage Fluctuations ...


