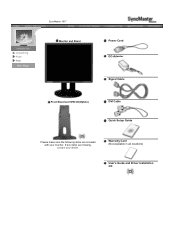
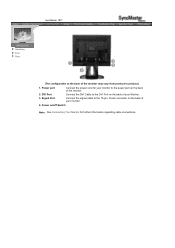
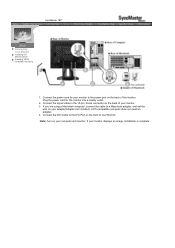
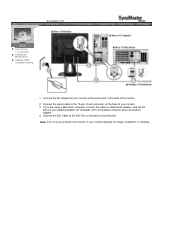
User Manual (user Manual) (ver.1.0) (English)
Page 8
User's Guide and Driver Installation CD Unparking Front Rear SyncMaster 181T Monitor and Stand Power Cord Signal Cable DVI Cable Pivot Stand and S/W CD(Option) Quick Setup Guide Warranty Card (Not available in all locations) Please make sure the following items are missing, contact your monitor. If any items are included with your dealer.
User Manual (user Manual) (ver.1.0) (English)
Page 9
If any items are included with your dealer. Unparking Front Rear SyncMaster 191T Monitor and Stand Power Cord DC-Adapter Signal Cable Pivot Stand and S/W CD(Option) DVI Cable Quick Setup Guide Please make sure the following items are missing, contact your monitor. Warranty Card (Not available in all locations) User's Guide and Driver Installation CD
User Manual (user Manual) (ver.1.0) (English)
Page 11
Power port 2. Signal Port Connect the power cord for further information regarding cable connections. Connect the signal cable to the 15-pin, D-sub connector on the back of your monitor to product.) 1. SyncMaster 181T Unparking Front Rear (The configuration at the back of your Monitor. Connect the DVI Cable to the DVI Port on the back of the monitor may vary from product to the power port on /off Switch Note: See Connecting Your Monitor for your monitor. 4. DVI Port 3. Power on the back of the monitor.
User Manual (user Manual) (ver.1.0) (English)
Page 12
DVI Port 3. Note: See Connecting Your Monitor for your monitor to the power port on the back of the monitor. Signal Port Connect the DC Adapter for further information regarding cable connections. Connect the DVI Cable to product.) 1. SyncMaster 191T Unparking Front Rear (The configuration at the back of your monitor. Connect the signal cable to the 15-pin, D-sub connector on the back of the monitor may vary from product to the DVI Port on the back of your Monitor. Power port 2.
User Manual (user Manual) (ver.1.0) (English)
Page 13
... you are using a Macintosh computer, connect the cable to the power port on your monitor displays an image, installation is complete. SyncMaster 181T Connecting Your Monitor Installing the Monitor Driver Installing VESA compliant mounting 1. If your adapter(Adapter not included). Connect the signal cable to the 15-pin, D-sub connector on the back of ...
User Manual (user Manual) (ver.1.0) (English)
Page 14
... the DC Adapter for your monitor displays an image, installation is complete. If your monitor to the 15-pin, D-sub connector on your Monitor. Connect the signal cable to the power port on your monitor. 3. Note: Turn on the back of your computer and monitor. SyncMaster 191T Connecting Your Monitor Installing the Monitor Driver Installing VESA compliant mounting...
User Manual (user Manual) (ver.1.0) (English)
Page 38
... Preset Timing Modes General Model Name SyncMaster 181T LCD Panel Size 18.1 inch diagonal Display area 359.04 (H) x 287.232 (V) Pixel Pitch 0.2805 (H) x 0.2805 (V) Type a-si TFT active matrix Viewing Angle 80... Weight 398.2 X 208.4 X 443.2 mm / 5.8kg(With Simple Stand) VESA Mounting Interface 100mm x 100mm (for this product are 3,932,160. Plug and Play Capability This monitor can use with Specialty(Arm) Mounting hardware.) Environmental considerations Operating Temperature: 50°F ~ 104°F(10°C ~ 40°C) Humidity: 10% ~ 80%, non-condensing Storage...
User Manual (user Manual) (ver.1.0) (English)
Page 39
... for use it without uneasiness. of black pixels could be installed on any Plug & Play compatible system. Plug and Play Capability This monitor can use with Specialty(Arm) Mounting hardware.) Environmental considerations Operating Temperature: 50°F ~ 104°F(10°C ~ 40°C) ...seen. Interaction of 99.999% above is contained in this product. z For example, the no. General PowerSaver Preset Timing Modes SyncMaster 191T General Model Name SyncMaster 191T LCD Panel Size 19.0 inch diagonal Display area 376.32 (H) x 301.056 (V) Pixel Pitch 0.298 (H) x 0.294 ...
User Manual (user Manual) (ver.1.0) (English)
Page 40
This system saves energy by switching your monitor into a low-power mode when it unattended for long periods. Use a software utility installed on the keyboard. As an ENERGY STAR® Partner, SAMSUNG has determined that this feature. State Power Indicator Power Consumption ...a certain amount of time. For energy conservation, turn your monitor OFF when it is EPA ENERGY STAR® compliant and ENERGY2000 compliant when used for energy efficiency. SyncMaster 181T General PowerSaver Preset Timing Modes This monitor has a built-in your computer. The PowerSaver system operates ...
User Manual (user Manual) (ver.1.0) (English)
Page 41
... returns to set up this product meets the ENERGY STAR® guidelines for energy efficiency. SyncMaster 191T General PowerSaver Preset Timing Modes This monitor has a built-in your computer to normal operation when you move the computer's mouse or press a key on your computer. ...Use a software utility installed on the keyboard. As an ENERGY STAR® Partner, SAMSUNG has determined that this feature....