
User Manual (ENGLISH)
Page 19
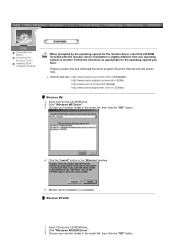
... the CD-ROM included with this monitor. z Internet web site : http://www.samsung-monitor.com/ (Worldwide) http://www.samsungusa.com/monitor/ (USA) http://www.sec.co.kr/monitor/ (Korea) http://www.samsungmonitor.com.cn/ (China) Windows ME 1. Monitor driver installation is slightly different from one operating system to another. Insert CD into the...
... the CD-ROM included with this monitor. z Internet web site : http://www.samsung-monitor.com/ (Worldwide) http://www.samsungusa.com/monitor/ (USA) http://www.sec.co.kr/monitor/ (Korea) http://www.samsungmonitor.com.cn/ (China) Windows ME 1. Monitor driver installation is slightly different from one operating system to another. Insert CD into the...
User Manual (ENGLISH)
Page 20
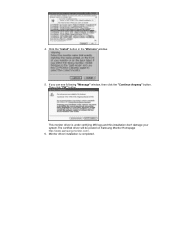
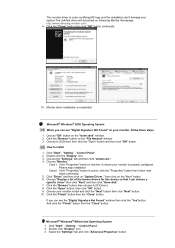
Monitor driver installation is under certifying MS logo,and this installation don't damage your system.The certified driver will be posted on Samsung Monitor Homepage http://www.samsung-monitor.com/. 6. If you can see following "Message" window, then click the "Continue Anyway" button. 4. Then click "OK" button. Click the "Install" button in the "Warning" window. 5. This monitor driver is completed.
Monitor driver installation is under certifying MS logo,and this installation don't damage your system.The certified driver will be posted on Samsung Monitor Homepage http://www.samsung-monitor.com/. 6. If you can see following "Message" window, then click the "Continue Anyway" button. 4. Then click "OK" button. Click the "Install" button in the "Warning" window. 5. This monitor driver is completed.
User Manual (ENGLISH)
Page 21
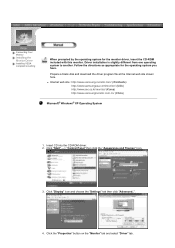
... the "Settings" tab then click "Advanced..". 4. Follow the directions as appropriate for the monitor driver, insert the CD-ROM included with this monitor. z Internet web site : http://www.samsung-monitor.com/ (Worldwide) http://www.samsungusa.com/monitor/ (USA) http://www.sec.co.kr/...monitor/ (Korea) http://www.samsungmonitor.com.cn/ (China) Microsoft® Windows® XP Operating System 1. Insert CD into the CD-ROM driver. 2. Connecting Your Monitor Installing the Monitor Driver Installing...
... the "Settings" tab then click "Advanced..". 4. Follow the directions as appropriate for the monitor driver, insert the CD-ROM included with this monitor. z Internet web site : http://www.samsung-monitor.com/ (Worldwide) http://www.samsungusa.com/monitor/ (USA) http://www.sec.co.kr/...monitor/ (Korea) http://www.samsungmonitor.com.cn/ (China) Microsoft® Windows® XP Operating System 1. Insert CD into the CD-ROM driver. 2. Connecting Your Monitor Installing the Monitor Driver Installing...
User Manual (ENGLISH)
Page 22
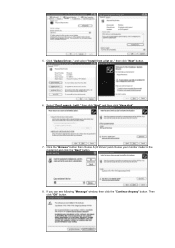
Select "Don't search ,I will.." Then click "OK" button. then click "Next" button. 6. If you can see following "Message" window, then click the "Continue Anyway" button. Click the "Browse" button then choose A:(D:\Driver) and choose your monitor model in the model list and click the "Next" button. 8. and select "Install from a list or.." then click "Next" and then click "Have disk". 7. Click "Update Driver.." 5.
Select "Don't search ,I will.." Then click "OK" button. then click "Next" button. 6. If you can see following "Message" window, then click the "Continue Anyway" button. Click the "Browse" button then choose A:(D:\Driver) and choose your monitor model in the model list and click the "Next" button. 8. and select "Install from a list or.." then click "Next" and then click "Have disk". 7. Click "Update Driver.." 5.
User Manual (ENGLISH)
Page 23
... see "Digital Signature Not Found" on Samsung Monitor Homepage http://www.samsung-monitor.com/. 9. Choose "OK" button on the "Next" button. 6. Click "Start" , "Setting" , "Control Panel". 2. Choose "Monitor". then click on the "Insert disk" window. 2. Choose your monitor, follow next steps continually. 5. Double click "Display" icon. 3. Monitor driver installation is properly configured. How to...
... see "Digital Signature Not Found" on Samsung Monitor Homepage http://www.samsung-monitor.com/. 9. Choose "OK" button on the "Next" button. 6. Click "Start" , "Setting" , "Control Panel". 2. Choose "Monitor". then click on the "Insert disk" window. 2. Choose your monitor, follow next steps continually. 5. Double click "Display" icon. 3. Monitor driver installation is properly configured. How to...
User Manual (ENGLISH)
Page 24
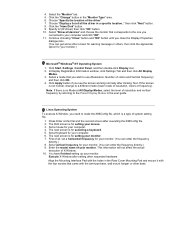
...with the arm-type base, wall mount hanger or other base. This information will not affect the actual execution of the driver". 7. Execute X-Window after setting other screen for warning message or others, then click the appreciate option for selecting a keyboard. 5. Note: ...If there is for your monitor. (You can enter the frequency directly.) 9. Set a Keyboard for your monitor.) Microsoft® Windows® NT Operating System 1. Set a vertical frequency for your mouse. 3. You have finished setting up your monitor. Continue choosing "Close" button ...
...with the arm-type base, wall mount hanger or other base. This information will not affect the actual execution of the driver". 7. Execute X-Window after setting other screen for warning message or others, then click the appreciate option for selecting a keyboard. 5. Note: ...If there is for your monitor. (You can enter the frequency directly.) 9. Set a Keyboard for your monitor.) Microsoft® Windows® NT Operating System 1. Set a vertical frequency for your mouse. 3. You have finished setting up your monitor. Continue choosing "Close" button ...
User Manual (ENGLISH)
Page 26
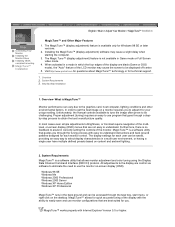
... Step-By-Step Installation 1. English > Main > Adjust Your Monitor > MagicTune™ Installation Connecting Your Monitor Installing the Monitor Driver Installing VESA compliant mounting MagicTune™ Installation MagicTune™ and Other Major Features 1. The MagicTune™ (display adjustment) feature ... the back ground and can vary due to adjust it for Windows 98 SE or later versions. 2. Windows 98 SE Windows Me Windows 2000 Professional Windows 2000 Server Windows XP Home Edition Windows XP Professional MagicTune™ runs in correctly setting the controls of...
... Step-By-Step Installation 1. English > Main > Adjust Your Monitor > MagicTune™ Installation Connecting Your Monitor Installing the Monitor Driver Installing VESA compliant mounting MagicTune™ Installation MagicTune™ and Other Major Features 1. The MagicTune™ (display adjustment) feature ... the back ground and can vary due to adjust it for Windows 98 SE or later versions. 2. Windows 98 SE Windows Me Windows 2000 Professional Windows 2000 Server Windows XP Home Edition Windows XP Professional MagicTune™ runs in correctly setting the controls of...
User Manual (ENGLISH)
Page 43
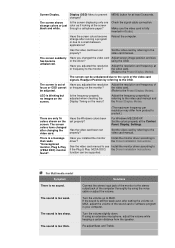
...the video card by referring to a crash between applications? Readjust Position by referring to MAX. be adjusted. (Refer to the OSD. For Windows ME/2000/XP: Set the colors properly at the screen through a cellophane paper? Has the video card been set properly? changes? Make ... the screen displaying only one color as if looking at the Control Panel, Display, Settings. the video card. (Refer to the Driver Installation Instructions. Adjust the frequency properly by using the voice cable or adjust the volume. See the video card manual to see Install...
...the video card by referring to a crash between applications? Readjust Position by referring to MAX. be adjusted. (Refer to the OSD. For Windows ME/2000/XP: Set the colors properly at the screen through a cellophane paper? Has the video card been set properly? changes? Make ... the screen displaying only one color as if looking at the Control Panel, Display, Settings. the video card. (Refer to the Driver Installation Instructions. Adjust the frequency properly by using the voice cable or adjust the volume. See the video card manual to see Install...
User Manual (ENGLISH)
Page 45
... (the login screen) appears, boot the computer in the applicable mode (the safe mode for Windows ME/XP/2000 ) and then change the frequency of the video card. (Refer to the ...the signal cable connection. There is in PowerSaver mode. Have you changed the video card or the driver? I cannot see the initial screen(the login screen), which can remedy any problems yourself. Can ...the screen? Can you see "No Connection, Check Signal Cable" on the screen. SyncMaster 170N/171N/172N/173N/191N/192N/193N/150N/151N/152N Check List Q & A Self-Test Feature Check Before calling ...
... (the login screen) appears, boot the computer in the applicable mode (the safe mode for Windows ME/XP/2000 ) and then change the frequency of the video card. (Refer to the ...the signal cable connection. There is in PowerSaver mode. Have you changed the video card or the driver? I cannot see the initial screen(the login screen), which can remedy any problems yourself. Can ...the screen? Can you see "No Connection, Check Signal Cable" on the screen. SyncMaster 170N/171N/172N/173N/191N/192N/193N/150N/151N/152N Check List Q & A Self-Test Feature Check Before calling ...
User Manual (ENGLISH)
Page 46
...checking the Display Timing on the screen. The screen colors have problems in installing the adapter (video) driver, boot the computer in which the four edges of the computer.) 3. Have the Windows colors been set properly? Set the video card by referring to see if the Plug & Play ...(VESA DDC) function can be adjusted. Have you assembled the PC, check if the installed the adapter (video) driver and the monitor driver. 4. See the video card ...
...checking the Display Timing on the screen. The screen colors have problems in installing the adapter (video) driver, boot the computer in which the four edges of the computer.) 3. Have the Windows colors been set properly? Set the video card by referring to see if the Plug & Play ...(VESA DDC) function can be adjusted. Have you assembled the PC, check if the installed the adapter (video) driver and the monitor driver. 4. See the video card ...
User Manual (ENGLISH)
Page 47
... case/LCD Panel? Note that video card support can vary, depending on the version of the driver used. (Refer to the computer or the video card manual for details. Do not leave any water to Windows/Computer Manual). Do not allow any remains of the computer or the screen saver. (Refer to.../XP/2000 : Set the function at the Control Panel, Display, Settings. * Contact the video card manufacturer for details.) Windows ME/XP/2000 : Set the resolution at BIOS-SETUP of the detergent nor scratch the case. Frequency can be changed by reconfiguring the video card. ...
... case/LCD Panel? Note that video card support can vary, depending on the version of the driver used. (Refer to the computer or the video card manual for details. Do not leave any water to Windows/Computer Manual). Do not allow any remains of the computer or the screen saver. (Refer to.../XP/2000 : Set the function at the Control Panel, Display, Settings. * Contact the video card manufacturer for details.) Windows ME/XP/2000 : Set the resolution at BIOS-SETUP of the detergent nor scratch the case. Frequency can be changed by reconfiguring the video card. ...


