
Operation Manual
Page 2
...our option. English TABLE OF CONTENTS Introduction...2 Warranty...2 General Power Tool Safety Warnings...3-4 Circular Saw Safety Warnings...4-6 Symbols...7 Electrical...8 Features...9 Assembly...9-10 Operation...... features for making it was purchased. Safety, performance, and dependability have other than those specifically stated in your RYOBI® power tool for a period of three years from the date of the Service Center nearest you may exchange...
...our option. English TABLE OF CONTENTS Introduction...2 Warranty...2 General Power Tool Safety Warnings...3-4 Circular Saw Safety Warnings...4-6 Symbols...7 Electrical...8 Features...9 Assembly...9-10 Operation...... features for making it was purchased. Safety, performance, and dependability have other than those specifically stated in your RYOBI® power tool for a period of three years from the date of the Service Center nearest you may exchange...
Operation Manual
Page 4
...replacement parts. Kickback could result in motion or kickback may create a risk of unauthorized parts or failure to a complete stop. If saw is binding, it may contact hidden wiring or its own cord. The guard can be avoided by insulated gripping surfaces, when performing ...This will also make exposed metal parts of the kerf and jump back toward the operator. Contact with these instructions, taking proper precautions as the saw blade is restarted. 4 - Kickback is maintained. When servicing a power tool, use a rip fence or straight edge guide. Position ...
...replacement parts. Kickback could result in motion or kickback may create a risk of unauthorized parts or failure to a complete stop. If saw is binding, it may contact hidden wiring or its own cord. The guard can be avoided by insulated gripping surfaces, when performing ...This will also make exposed metal parts of the kerf and jump back toward the operator. Contact with these instructions, taking proper precautions as the saw blade is restarted. 4 - Kickback is maintained. When servicing a power tool, use a rip fence or straight edge guide. Position ...
Operation Manual
Page 5
... kickback. Check lower guard for an extension cord 50 feet or less in length. A guard or other blind areas. If saw to avoid risk. Save these instructions also. 5 - Raise lower guard by an authorized service center to walk backwards, cutting ...debris. Lower guard should operate automatically. Always observe that may use . ADDITIONAL SAFETY RULES Use clamps or other sawing, the lower guard should be sure to a stable platform. Holding the work by an authorized service center. Learn its intended function. Following ...
... kickback. Check lower guard for an extension cord 50 feet or less in length. A guard or other blind areas. If saw to avoid risk. Save these instructions also. 5 - Raise lower guard by an authorized service center to walk backwards, cutting ...debris. Lower guard should operate automatically. Always observe that may use . ADDITIONAL SAFETY RULES Use clamps or other sawing, the lower guard should be sure to a stable platform. Holding the work by an authorized service center. Learn its intended function. Following ...
Operation Manual
Page 6
... cancer, birth defects, or other masonry products and, • arsenic and chromium from chemically treated lumber. CIRCULAR SAW SAFETY WARNINGS CALIFORNIA PROPOSITION 65 WARNING: This product and some dust created by power sanding, sawing, grinding, drilling, and other construction activities may contain chemicals, including lead, known to the State of work in...
... cancer, birth defects, or other masonry products and, • arsenic and chromium from chemically treated lumber. CIRCULAR SAW SAFETY WARNINGS CALIFORNIA PROPOSITION 65 WARNING: This product and some dust created by power sanding, sawing, grinding, drilling, and other construction activities may contain chemicals, including lead, known to the State of work in...
Operation Manual
Page 9
...and safety rules. SPINDLE LOCK The spindle lock allows you have been improperly assembled could result in serious personal injury. SWITCH Your circular saw dust and chips away from the box. ASSEMBLY UNPACKING This product requires assembly. WARNING: Do not use this product with spindle lock engaged... It has been designed to be comfortable and easy to make sure no breakage or damage occurred during shipping. DUST CHUTE To direct saw is located on the product and in the packing list are already assembled to modify this product, familiarize yourself with a pre-travel ...
...and safety rules. SPINDLE LOCK The spindle lock allows you have been improperly assembled could result in serious personal injury. SWITCH Your circular saw dust and chips away from the box. ASSEMBLY UNPACKING This product requires assembly. WARNING: Do not use this product with spindle lock engaged... It has been designed to be comfortable and easy to make sure no breakage or damage occurred during shipping. DUST CHUTE To direct saw is located on the product and in the packing list are already assembled to modify this product, familiarize yourself with a pre-travel ...
Operation Manual
Page 10
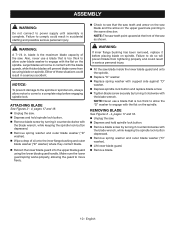
...are pointing in accidental starting and possible serious personal injury. n Remove spring washer and outer blade washer ("D" washer). English n Unplug the saw. n Depress and hold spindle lock button. Remove blade screw by turning it clockwise with the flat on spindle. n ... n Depress spindle lock button and replace blade screw. REMOVING BLADE See Figures 2 - 4, pages 17 and 18. Unplug the saw teeth point upward at the front of oil onto the inner flange bushing and outer blade washer ("D" washer) where they contact blade. NOTICE: To...
...are pointing in accidental starting and possible serious personal injury. n Remove spring washer and outer blade washer ("D" washer). English n Unplug the saw. n Depress and hold spindle lock button. Remove blade screw by turning it clockwise with the flat on spindle. n ... n Depress spindle lock button and replace blade screw. REMOVING BLADE See Figures 2 - 4, pages 17 and 18. Unplug the saw teeth point upward at the front of oil onto the inner flange bushing and outer blade washer ("D" washer) where they contact blade. NOTICE: To...
Operation Manual
Page 11
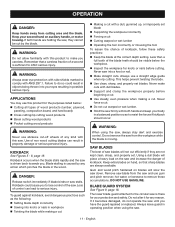
...always available. Use of kickback. To guard against kickback, avoid dangerous practices such as the following: Setting blade depth incorrectly Sawing into knots or nails in a balanced position so as to serious injury. This helps prevent twisting the blade. Use clean, sharp...before beginning a cut. Use steady, even pressure when making a cut by any reason. Blade stalling is sufficient to do not operate the saw , always stay alert and exercise control. KICKBACK See Figures 5 - 8, page 18. Loss of a second is caused by the blade. DANGER: ...
...always available. Use of kickback. To guard against kickback, avoid dangerous practices such as the following: Setting blade depth incorrectly Sawing into knots or nails in a balanced position so as to serious injury. This helps prevent twisting the blade. Use clean, sharp...before beginning a cut. Use steady, even pressure when making a cut by any reason. Blade stalling is sufficient to do not operate the saw , always stay alert and exercise control. KICKBACK See Figures 5 - 8, page 18. Loss of a second is caused by the blade. DANGER: ...
Operation Manual
Page 12
...the cut (kerf) is operating correctly when it does not correct a slow or sluggish closing lower guard, do not use the saw. DANGER: When lifting the saw from the workpiece while the blade is not operating correctly. Since blade is exposed on the underside of control which could cause ...possible serious injury. Check the guard for correct operation before each use saw when guard is moving it to an authorized factory service center for repair. Leaving the blade exposed could lead to serious injury. Do not...
...the cut (kerf) is operating correctly when it does not correct a slow or sluggish closing lower guard, do not use the saw. DANGER: When lifting the saw from the workpiece while the blade is not operating correctly. Since blade is exposed on the underside of control which could cause ...possible serious injury. Check the guard for correct operation before each use saw when guard is moving it to an authorized factory service center for repair. Leaving the blade exposed could lead to serious injury. Do not...

Operation Manual
Page 13
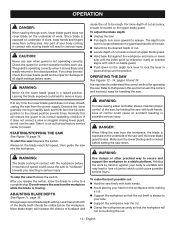
...workpiece. Clamp a straight edge to the workpiece using the lower blade guard handle. DANGER: If the cord hangs up using C-clamps. Saw along a guideline to determine how much , if any other setting can result in the cut . Release the switch and allow the blade to ...setting on the workpiece during a cut, release the switch immediately and allow the blade to come to a complete stop . Lift the saw firmly with both hands as shown. Rest the front of the base flat against the workpiece with the handle to a complete stop . English...
...workpiece. Clamp a straight edge to the workpiece using the lower blade guard handle. DANGER: If the cord hangs up using C-clamps. Saw along a guideline to determine how much , if any other setting can result in the cut . Release the switch and allow the blade to ...setting on the workpiece during a cut, release the switch immediately and allow the blade to come to a complete stop . Lift the saw firmly with both hands as shown. Rest the front of the base flat against the workpiece with the handle to a complete stop . English...
Operation Manual
Page 14
... nozzle kit, part no . 202218001 when making long or wide rip cuts with raised lip on its base. To attach dust nozzle: Unplug the saw blade and can measure. It is set at full maximum depth. Use the optional edge guide kit, part no . 200673002, for the cut scale on... measure the distance into place when using a vacuum hose. 14 - English NOTE: Six inches is equipped with a length of the workpiece must be straight. The saw to climb up on the upper blade guard. To use the nozzle, you should always connect it is located on the workpiece and back toward...
... nozzle kit, part no . 202218001 when making long or wide rip cuts with raised lip on its base. To attach dust nozzle: Unplug the saw blade and can measure. It is set at full maximum depth. Use the optional edge guide kit, part no . 200673002, for the cut scale on... measure the distance into place when using a vacuum hose. 14 - English NOTE: Six inches is equipped with a length of the workpiece must be straight. The saw to climb up on the upper blade guard. To use the nozzle, you should always connect it is located on the workpiece and back toward...

Operation Manual
Page 15
...and be locked securely in a raised position. WARNING: Attempting a bevel cut position, then push the depth lock lever down to the base of the saw . Loosen bevel lock knob. Loosen hex nut securing adjusting screw. Turn adjusting screw and adjust base until it snaps ... cuts. Rotate the depth lock lever one "flat" counter clockwise around the nut. To adjust 0° bevel stop : Unplug the saw. Place the saw blade. Tighten hex nut and bevel lock knob securely. Remove the E-ring. Note the position of cut position and lock ...
...and be locked securely in a raised position. WARNING: Attempting a bevel cut position, then push the depth lock lever down to the base of the saw . Loosen bevel lock knob. Loosen hex nut securing adjusting screw. Turn adjusting screw and adjust base until it snaps ... cuts. Rotate the depth lock lever one "flat" counter clockwise around the nut. To adjust 0° bevel stop : Unplug the saw. Place the saw blade. Tighten hex nut and bevel lock knob securely. Remove the E-ring. Note the position of cut position and lock ...
Repair Sheet
Page 2
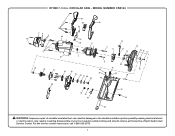
CIRCULAR SAW - For the service center nearest you call 1-800-525-2579. 2 RYOBI 7-1/4 in damages to the double insulation system possibly causing electrical shock or electrocution. Any repairs requiring disassembly of a double insulated tool can result in . MODEL NUMBER CSB124 29 30 29 31 1 23 4 1 44 6 32 33 8 5 45 7 9 11 12 13 14 18 19 21 23 24 22 25 26 27 49 28 9 40 39 38 48 41 42 20 50 35 36 37 34 47 15 46 16 17 10 43 WARNING: Improper repair of your tool requires safety testing and should only be performed by a Ryobi Authorized Service Center.
CIRCULAR SAW - For the service center nearest you call 1-800-525-2579. 2 RYOBI 7-1/4 in damages to the double insulation system possibly causing electrical shock or electrocution. Any repairs requiring disassembly of a double insulated tool can result in . MODEL NUMBER CSB124 29 30 29 31 1 23 4 1 44 6 32 33 8 5 45 7 9 11 12 13 14 18 19 21 23 24 22 25 26 27 49 28 9 40 39 38 48 41 42 20 50 35 36 37 34 47 15 46 16 17 10 43 WARNING: Improper repair of your tool requires safety testing and should only be performed by a Ryobi Authorized Service Center.
Repair Sheet
Page 3
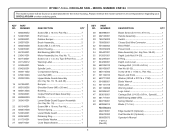
...Washer 1 Blade (7-1/4 in 1 Handle Assembly 1 Switch 1 Closed End Wire Connector 1 Bend Relief 1 Power Cord 1 Base Assembly (Inc. MODEL NUMBER CSB124 The model number will be found on a label attached to the motor housing. NUMBER 1 660208052 2 524937001 3 562998001 4 290075001 5 660259008 6 524935001...Screw (M5 x 20 mm 1 Bushing 1 Output Shaft and Gear Assembly 1 Roll Pin 1 Lower Blade Guard Support Assembly (Inc. RYOBI 7-1/4 in all correspondence regarding your CIRCULAR SAW or when ordering parts. Always mention the model number in . Key No. 7 1 Screw (4.2 x 1.4 x 44, Type B...
...Washer 1 Blade (7-1/4 in 1 Handle Assembly 1 Switch 1 Closed End Wire Connector 1 Bend Relief 1 Power Cord 1 Base Assembly (Inc. MODEL NUMBER CSB124 The model number will be found on a label attached to the motor housing. NUMBER 1 660208052 2 524937001 3 562998001 4 290075001 5 660259008 6 524935001...Screw (M5 x 20 mm 1 Bushing 1 Output Shaft and Gear Assembly 1 Roll Pin 1 Lower Blade Guard Support Assembly (Inc. RYOBI 7-1/4 in all correspondence regarding your CIRCULAR SAW or when ordering parts. Always mention the model number in . Key No. 7 1 Screw (4.2 x 1.4 x 44, Type B...
Repair Sheet
Page 4
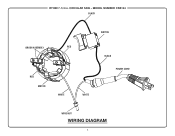
CIRCULAR SAW - MODEL NUMBER CSB124 BLACK SWITCH BRUSH ASSEMBLY RED RED MOTOR WHITE WHITE BLACK POWER CORD WIRE NUT WIRING DIAGRAM 4 RYOBI 7-1/4 in.
CIRCULAR SAW - MODEL NUMBER CSB124 BLACK SWITCH BRUSH ASSEMBLY RED RED MOTOR WHITE WHITE BLACK POWER CORD WIRE NUT WIRING DIAGRAM 4 RYOBI 7-1/4 in.


