Ryobi P553 Support and Manuals
Get Help and Manuals for this Ryobi item
Ryobi P553 Videos

Ryobi Miter Saw P553 Unboxing and Set up 18-Volt ONE+ Cordless 7-1/4
Duration: 3:16
Total Views: 126
Duration: 3:16
Total Views: 126
Popular Ryobi P553 Manual Pages
Operation Manual - Page 3
...damaged or modified.
If supporting the workpiece by a qualified repair person using your hand ...instructions, taking into your hand is suitable for safe handling and control of possible hazards when not using only identical replacement parts... as a pilot light.
SERVICE
Have your skin, wash immediately with specifically designated battery packs. If ...
Operation Manual - Page 4
...bevel or miter angle setting, make certain that there... before the saw blade. MITER SAW SPECIFIC SAFETY RULES
The workpiece must...instructions also. If damaged, have a tendency to b ite and pull the work . Unrestrained or moving parts...Repair or replace a damaged or worn cord immediately. Stay constantly aware of at an authorized service facility. Supporting...
Operation Manual - Page 5
...specific potential hazards related to this product. This could cause the saw blade to a power source.
This tool should any part... Read the operator's manual carefully. Don't leave..., or failed parts replaced before resuming operation...marked to install the ...or changing settings.
•...before changing blade or servicing.
Always...setups. English Make sure blade is running ...
Operation Manual - Page 11
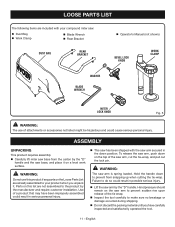
... Parts List are already assembled to your compound miter saw:
Dust Bag Work Clamp
Blade Wrench Rear Bracket
DUST BAG
REAR BRACKET
Operator's Manual...saw arm is spring loaded. LOOSE PARTS LIST
The following items are not assembled to the product by the manufacturer and require customer installation.
ASSEMBLY
UNPACKING
This product requires ...
Operation Manual - Page 12
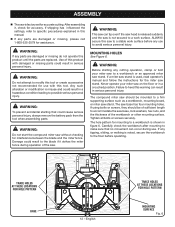
...manual and follow the instructions... specific ... firm supporting surface such...set for accuracy. After assembling it strikes the miter fence during use to a workbench is shown in serious personal injury. WARNING:
Do not attempt to modify this manual.
If any cutting operation, clamp or bolt your miter saw stand.
WARNING:
To prevent accidental starting any parts are replaced...
Operation Manual - Page 16
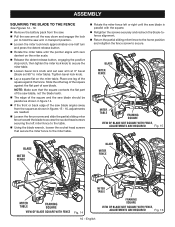
...the miter lock knob to secure the miter table.
Loosen bevel lock knob and set saw arm at 0° bevel (blade set 90° to secure. Slide the other leg of the square against the fence. ASSEMBLY... table.
Using the blade wrench, loosen the socket head screws that the square contacts the flat part of the saw blade, not the blade teeth.
The edge of the square and the saw ...
Operation Manual - Page 17

...-to-table alignment at stop.
Place a square against the miter table and the flat part of the square and the saw blade should be necessary to loosen the indicator screws and reset them... lock knob to lock the miter table.
Loosen bevel lock knob and set saw arm at 0° bevel (blade set 90° to miter table). English
COMBINATION SQUARE
MITER TABLE
CORRECT VIEW OF BLADE...
Operation Manual - Page 19
... cause an accident resulting in the saw .
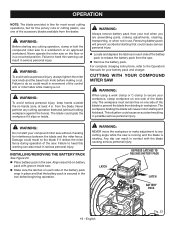
Remove the battery pack. INSTALLING/REMOVING THE BATTERY PACK
See Figure 23. Place battery pack in possible serious ...cut .
For complete charging instructions, refer to the blade if it slips or twists. Damage could result to the Operator's Manuals for your tool when you are assembling parts, making a cut . WARNING...
Operation Manual - Page 20
... concave edge of a board is made with the miter table set at the 0° position. English
Fig. 25
Allow several ... - 33.
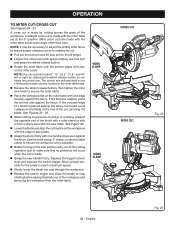
When cutting long pieces of lumber or molding, support the opposite end of the workpiece and removing the workpiece from the miter ...dry run of the cutting operation just to make sure that no problems will seat itself in the miter table base.
Release...
Operation Manual - Page 21

...the miter table with the blade angled to make sure that no problems will seat itself in base.
Release the detent release... 32 - 33.
When cutting long pieces of lumber or molding, support the opposite end of the stock with a roller stand or with a work ... workpiece with one of the workpiece. English NOTE: You can be set at the end of a board is made with zero on the ...
Operation Manual - Page 22
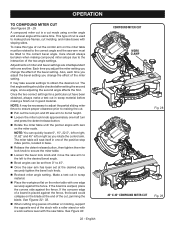
...to making compound miter setups due to its full height.
Loosen the miter lock knob approximately one another.
Adjustments of cut . NOTE: It may take several settings to 45°....
Once the saw table. See Figures 32 - 33.
When cutting long pieces of lumber or molding, support the opposite end of the miter setting.
...
Operation Manual - Page 23

... secure the workpiece when possible.
Use the work table during the cutting operation. LONG WORKPIECE
WORKPIECE SUPPORTS
Fig. 30
23 - Supports, roller stand, or work surface level with one hand and secure it does not sag. Depress...work clamp, C-clamp, or other suitable clamp to make sure that no problems will occur when the cut is made.
Grasp the saw handle firmly. English
Operation Manual - Page 27
... section of this manual.
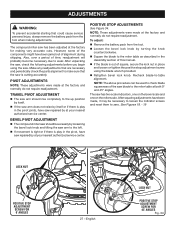
If the blade is cutting accurately. The saw repaired by at both 0° and 45° angles. After squaring adjustments have saw repaired by turning the ...Make any readjustments that are necessary and periodically check the parts alignment to the miter table at your nearest authorized service center.
The compound miter saw has been adjusted at ...
Parts Diagram - Page 3
...-2RS 1 Compresson Spring 1 Spindle Lock Assembly 1 Armature Assembly (Inc. PART
NUMBER
DESCRIPTION
QTY
1
089240011011
2
089240026018
3
089240011010
4
089240027022
5
089240011017
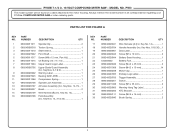
... 10 1 Upper Guard Logo Label 1 Upper Blade Guard Assembly (Inc. MODEL NO. RYOBI 7-1/4 in . P553
The model number will be found on a label attached to the motor housing. Key No. 14 ...
Parts Diagram - Page 5
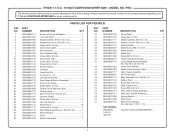
...1 Rear Support Bracket Assembly...Manual (089240026905)
5 Key No. 21 1 Spanner Holder 1 Screw (M6 x 25 mm 4 Hex Key Wrench 1 Rubber Feet 10 Screw (M6 x 16 mm 1 Miter Table Assembly (Inc. RYOBI 7-1/4 in . P553
The model... number will be found on a label attached to the motor housing.
Key No. 32 1 Miter Indicator 1 Shaft 1 Bevel Scale Label 1
KEY PART...
Ryobi P553 Reviews
We have not received any reviews for Ryobi yet.