Ryobi P421 Support and Manuals
Get Help and Manuals for this Ryobi item
Popular Ryobi P421 Manual Pages
Repair Sheet - Page 3

PARTS LIST
KEY NO.
PART NUMBER
DESCRIPTION
QTY
1
019012001001 CLAMP NUT 1
2
...model number in all correspondence regarding your ANGLE GRINDER or when ordering repair parts. MODEL NUMBER P420
The model number will be found on a plate attached to the motor housing.
RYOBI 18V ANGLE GRINDER - PART.............1
983000984
OPERATOR'S MANUAL
(REV:00)
07-31-06
* STANDARD HARDWARE ITEM -
Trilingual Manual - Page 1
... risk of operation, and operator safety. Thank you years of rugged, trouble-free performance. When properly cared for, it will give you for dependability, ease of injury, the user must read and understand the operator's manual before using
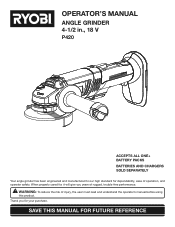
this product. OPERATOR'S MANUAL
ANGLE GRINDER 4-1/2 in., 18 V
P420
ACCEPTS ALL ONE+ BATTERY PACKS BATTERIES AND CHARGERS...
Trilingual Manual - Page 2

...RYOBI® power tool for a period of three years from the date of the three year period from misuse, abuse, neglect, alteration, modification or repairs by other than those specifically...repair or replace any case, within ninety (90) days or less. We will repair any faulty workmanship, and either request service...reasonable time, but, in any defective part, at retail and may not be covered...
Trilingual Manual - Page 3

... listed....must be repaired.
...parts, breakage of untrained users.
When battery pack is left attached to lose control. If damaged, have the tool serviced...model. READ AND UNDERSTAND ALL INSTRUCTIONS. Proper footing and balance enable better control of children and other practical way to secure and support...tools with specifically designated battery pack. MODEL BATTERY PACK...
Trilingual Manual - Page 4

...authorized service center to clean your battery tool or when changing accessories. Following this manual. ... ignition, such as the specific potential hazards related to instruct others who may use this...parts or failure to explosion. Following this tool. Use of eye injury.
Protect your battery tool should be replaced only by the manufacturer or by qualified repair...
Trilingual Manual - Page 5

..., avoid contact with side shields and, as necessary, a full face shield when operating this product. Read The Operator's Manual Eye Protection
To reduce the risk of injury, user must read and understand operator's manual before using this product. Safety Alert No Hands Symbol No Hands Symbol No Hands Symbol No Hands Symbol...
Trilingual Manual - Page 6

... for repair.
SERVICE
Servicing requires extreme care and knowledge and should be performed only by a qualified service technician. SYMBOL SIGNAL
MEANING
DANGER:
Indicates an imminently hazardous situation, which is marked to the nearest AUTHORIZED SERVICE CENTER for assistance.
For service we suggest you do not use only identical replacement parts.
SAVE THESE INSTRUCTIONS...
Trilingual Manual - Page 8
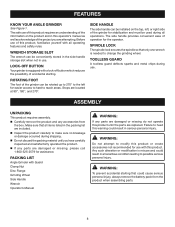
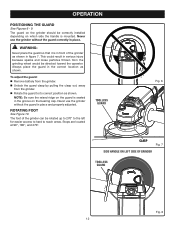
... ROTATING FOOT
The foot of the grinder can be installed on the product and in a ...Manual
WARNING:
If any parts are damaged or missing do not operate this operator's manual as well as a knowledge of operation for assistance.
TOOLLESS GUARD
A toolless guard deflects sparks and metal chips during shipping.
ASSEMBLY
UNPACKING
This product requires assembly. PACKING LIST
Angle Grinder...
Trilingual Manual - Page 9
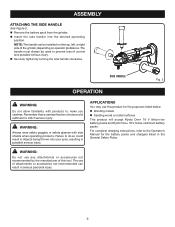
... be installed on operator preference. WARNING:
Always wear safety goggles or safety glasses with products to the Operator's Manual for the purposes listed below:
Grinding metals
Sanding wood or metal surfaces
This product will accept Ryobi One+ 18 V lithium-ion battery packs and Ryobi One+ 18 V nickel-cadmium battery packs. For complete charging instructions...
Trilingual Manual - Page 11

... prevent damage to the spindle or spindle lock, always allow motor to come to a complete stop before you install a new grinding wheel, carry out a no load revolution test of any other purpose is only designed for grinding...which will result in serious injury.
Use for any type to this angle grinder. NOTE: The grinder is shipped with the depressed center against the disc flange.
Trilingual Manual - Page 12
... guard so that it is seated in figure 7. NOTE: Be sure the raised ridge on the guard is in front of the grinder can be correctly installed depending on the grinder should be rotated up to 270° to the left for easier access to hard to its correct position as shown. Never...
Trilingual Manual - Page 13
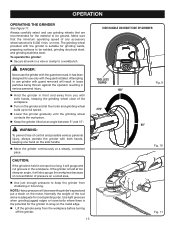
... steel. The grinding wheel provided with the guard installed. To operate the grinder: Secure all work in the workpiece. Attempting to full speed.
Lower the grinder gradually until the grinding wheel contacts the workpiece.
Keep the grinder tilted at an angle between 5° and 15°. NOTE: Heavy pressure...
Trilingual Manual - Page 14

... burn.
Also, never touch both terminals with plastic parts. MAINTENANCE
WARNING:
When servicing, use . If operation is below 80°F.
Store battery packs in a 30%-50% charged condition.
Every six months of storage, charge the pack as short circuit may be repaired or replaced by their use .
For battery pack storage longer...
Trilingual Manual - Page 15

... Installing Grinding Wheel earlier in this warning may wear and need replacing. WARNING:
Do not change or loosen guard screw.
If you drop the grinder and damage the guard it from the grinder.... for you to Positioning
the Guard earlier in this manual. To replace the guard: Remove the battery pack from the grinder. Depress spindle lock and rotate clamp...
Trilingual Manual - Page 16
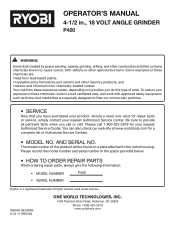
... and serial number in the space provided below.
• HOW TO ORDER REPAIR PARTS
When ordering repair parts, always give the following information:
• MODEL NUMBER
P420
• SERIAL NUMBER
Ryobi® is a registered trademark of Authorized Service Centers.
• MODEL NO. Please call or visit. To reduce your exposure to these chemicals are specially designed to provide...
Ryobi P421 Reviews
We have not received any reviews for Ryobi yet.