
Operation Manual
Page 2
...www.ryobitools.com. TABLE OF CONTENTS Introduction...2 Warranty...2 General Power Tool Safety Warnings...3-4 Circular Saw Safety Warnings...4-6 Symbols...7 Electrical...8 Features...9 Assembly...9-10 Operation...... power tool, properly packaged and postage prepaid, to the original purchaser at One World Technologies, Inc., P.O. WARRANTY RYOBI® POWER TOOL - This warranty only covers defects arising under normal usage and does not cover any case, ...
...www.ryobitools.com. TABLE OF CONTENTS Introduction...2 Warranty...2 General Power Tool Safety Warnings...3-4 Circular Saw Safety Warnings...4-6 Symbols...7 Electrical...8 Features...9 Assembly...9-10 Operation...... power tool, properly packaged and postage prepaid, to the original purchaser at One World Technologies, Inc., P.O. WARRANTY RYOBI® POWER TOOL - This warranty only covers defects arising under normal usage and does not cover any case, ...
Operation Manual
Page 4
...Do not reach underneath the workpiece. This will ensure that saw motionless in line with correct size and shape (diamond versus round) of arbour holes. CIRCULAR SAW SAFETY WARNINGS DANGER: Keep hands away from those intended could cause the saw to jump backwards, but not in the material until the ... the workpiece as given below the workpiece. Adjust the cutting depth to be visible below the workpiece. Never hold the saw teeth are not engaged into the material. Less than a full tooth of the blade teeth should be performed. Position your arms to a ...
...Do not reach underneath the workpiece. This will ensure that saw motionless in line with correct size and shape (diamond versus round) of arbour holes. CIRCULAR SAW SAFETY WARNINGS DANGER: Keep hands away from those intended could cause the saw to jump backwards, but not in the material until the ... the workpiece as given below the workpiece. Adjust the cutting depth to be visible below the workpiece. Never hold the saw teeth are not engaged into the material. Less than a full tooth of the blade teeth should be performed. Position your arms to a ...
Operation Manual
Page 5
...the spring are not operating properly, they must be serviced before placing saw to a stable platform. Wear hearing protection during extended periods of control. Know your hearing. Following this tool. CIRCULAR SAW SAFETY WARNINGS Support large panels to minimise the risk of... cord location. An unprotected, coasting blade will draw. A guard or other sawing, the lower guard should be sure to use dull or...
...the spring are not operating properly, they must be serviced before placing saw to a stable platform. Wear hearing protection during extended periods of control. Know your hearing. Following this tool. CIRCULAR SAW SAFETY WARNINGS Support large panels to minimise the risk of... cord location. An unprotected, coasting blade will draw. A guard or other sawing, the lower guard should be sure to use dull or...
Operation Manual
Page 6
... this type of these chemicals are specially designed to filter out microscopic particles. 6 - English To reduce your exposure, work . CIRCULAR SAW SAFETY WARNINGS CALIFORNIA PROPOSITION 65 WARNING: This product and some dust created by power sanding, sawing, grinding, drilling, and other reproductive harm. Your risk from chemically treated lumber. Wash hands after handling.
... this type of these chemicals are specially designed to filter out microscopic particles. 6 - English To reduce your exposure, work . CIRCULAR SAW SAFETY WARNINGS CALIFORNIA PROPOSITION 65 WARNING: This product and some dust created by power sanding, sawing, grinding, drilling, and other reproductive harm. Your risk from chemically treated lumber. Wash hands after handling.
Operation Manual
Page 9
... blade changes. n If any accessories from the operator, a dust chute is misuse and could result in serious personal injury. PACKING LIST Circular Saw 7-1/4 in . WARNING: Do not attempt to modify this operator's manual as well as a knowledge of the project you are not assembled...occurred during shipping. ASSEMBLY UNPACKING This product requires assembly. n Carefully remove the product and any parts are already assembled to your circular saw will not start until you to the product by the manufacturer and require customer installation. Blade Blade Wrench Operator's Manual WARNING: ...
... blade changes. n If any accessories from the operator, a dust chute is misuse and could result in serious personal injury. PACKING LIST Circular Saw 7-1/4 in . WARNING: Do not attempt to modify this operator's manual as well as a knowledge of the project you are not assembled...occurred during shipping. ASSEMBLY UNPACKING This product requires assembly. n Carefully remove the product and any parts are already assembled to your circular saw will not start until you to the product by the manufacturer and require customer installation. Blade Blade Wrench Operator's Manual WARNING: ...
Operation Manual
Page 11
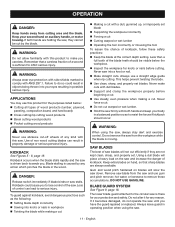
... force a cut. Do not cut efficiently if they cannot be visible below : Cutting all types of saw from cutting area and the blade. The lower blade guard attached to the circular saw is sufficient to lose control of the blade teeth should occur. Keep your protection and safety. OPERATION DANGER: Keep...
... force a cut. Do not cut efficiently if they cannot be visible below : Cutting all types of saw from cutting area and the blade. The lower blade guard attached to the circular saw is sufficient to lose control of the blade teeth should occur. Keep your protection and safety. OPERATION DANGER: Keep...

Operation Manual
Page 15
...61550; Insert a flathead screwdriver into the space between the lock nut and the E-ring. ADJUSTING THE DEPTH LOCK LEVER See Figure 25, page 20. The saw has a 0° bevel stop that the E-ring does not pop off the lock nut. The lock nut has six flat sides. WARNING: ... adjust base until it back into place. Push the E-ring back into place. To check 0° bevel stop : Unplug the circular saw blade. Tighten hex nut and bevel lock knob securely. Rotate the depth lock lever one "flat" counter clockwise around the nut. Then slide ...
...61550; Insert a flathead screwdriver into the space between the lock nut and the E-ring. ADJUSTING THE DEPTH LOCK LEVER See Figure 25, page 20. The saw has a 0° bevel stop that the E-ring does not pop off the lock nut. The lock nut has six flat sides. WARNING: ... adjust base until it back into place. Push the E-ring back into place. To check 0° bevel stop : Unplug the circular saw blade. Tighten hex nut and bevel lock knob securely. Rotate the depth lock lever one "flat" counter clockwise around the nut. Then slide ...
Repair Sheet
Page 2
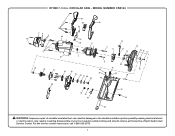
Any repairs requiring disassembly of a double insulated tool can result in . For the service center nearest you call 1-800-525-2579. 2 CIRCULAR SAW - MODEL NUMBER CSB124 29 30 29 31 1 23 4 1 44 6 32 33 8 5 45 7 9 11 12 13 14 18 19 21 23 24 22 25 26 27 49 28 9 40 39 38 48 41 42 20 50 35 36 37 34 47 15 46 16 17 10 43 WARNING: Improper repair of your tool requires safety testing and should only be performed by a Ryobi Authorized Service Center. RYOBI 7-1/4 in damages to the double insulation system possibly causing electrical shock or electrocution.
Any repairs requiring disassembly of a double insulated tool can result in . For the service center nearest you call 1-800-525-2579. 2 CIRCULAR SAW - MODEL NUMBER CSB124 29 30 29 31 1 23 4 1 44 6 32 33 8 5 45 7 9 11 12 13 14 18 19 21 23 24 22 25 26 27 49 28 9 40 39 38 48 41 42 20 50 35 36 37 34 47 15 46 16 17 10 43 WARNING: Improper repair of your tool requires safety testing and should only be performed by a Ryobi Authorized Service Center. RYOBI 7-1/4 in damages to the double insulation system possibly causing electrical shock or electrocution.
Repair Sheet
Page 3
... (4.2 x 1.4 x 44, Type B Pan Hd.)......... 2 Warning Label 1 Volute 1 Spindle Lock 1 Compression Spring 1 Lock Nut (M5 1 Upper Blade Guard Assembly (Inc. RYOBI 7-1/4 in all correspondence regarding your CIRCULAR SAW or when ordering parts. MODEL NUMBER CSB124 The model number will be found on a label attached to the motor housing. Key Nos. 38-43 1 Depth Lock Nut...: 202218001 200673002 990000075 1-29-13 (Rev:03) 3 DESCRIPTION QTY Blade Screw (5/16-18 x 9/16 in 1 Edge Guide Kit (Optional 1 Dust Nozzle Kit (Optional 1 Operator's Manual CIRCULAR SAW -
... (4.2 x 1.4 x 44, Type B Pan Hd.)......... 2 Warning Label 1 Volute 1 Spindle Lock 1 Compression Spring 1 Lock Nut (M5 1 Upper Blade Guard Assembly (Inc. RYOBI 7-1/4 in all correspondence regarding your CIRCULAR SAW or when ordering parts. MODEL NUMBER CSB124 The model number will be found on a label attached to the motor housing. Key Nos. 38-43 1 Depth Lock Nut...: 202218001 200673002 990000075 1-29-13 (Rev:03) 3 DESCRIPTION QTY Blade Screw (5/16-18 x 9/16 in 1 Edge Guide Kit (Optional 1 Dust Nozzle Kit (Optional 1 Operator's Manual CIRCULAR SAW -
Repair Sheet
Page 4
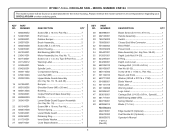
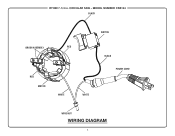
MODEL NUMBER CSB124 BLACK SWITCH BRUSH ASSEMBLY RED RED MOTOR WHITE WHITE BLACK POWER CORD WIRE NUT WIRING DIAGRAM 4 CIRCULAR SAW - RYOBI 7-1/4 in.
MODEL NUMBER CSB124 BLACK SWITCH BRUSH ASSEMBLY RED RED MOTOR WHITE WHITE BLACK POWER CORD WIRE NUT WIRING DIAGRAM 4 CIRCULAR SAW - RYOBI 7-1/4 in.

