
Operation Manual
Page 2
...Technologies, Inc. English LIMITED THREE YEAR WARRANTY AND 90 DAY EXCHANGE POLICY One World Technologies, Inc., warrants its RYOBI® power tools with the original product. This warranty only covers defects arising under normal usage and does not... of purchase. TABLE OF CONTENTS Introduction...2 Warranty...2 General Power Tool Safety Warnings...3-4 Circular Saw Safety Warnings...4-6 Symbols...7 Electrical...8 Features...9 Assembly...9-10 Operation...
...Technologies, Inc. English LIMITED THREE YEAR WARRANTY AND 90 DAY EXCHANGE POLICY One World Technologies, Inc., warrants its RYOBI® power tools with the original product. This warranty only covers defects arising under normal usage and does not... of purchase. TABLE OF CONTENTS Introduction...2 Warranty...2 General Power Tool Safety Warnings...3-4 Circular Saw Safety Warnings...4-6 Symbols...7 Electrical...8 Features...9 Assembly...9-10 Operation...
Operation Manual
Page 4
...tool serviced by the blade. Do not reach underneath the workpiece. Use of unauthorized parts or failure to eliminate the cause of this saw to either side of shock or injury. Kickback is the result of the power tool is binding, or when interrupting a cut for operations ... TOOL SAFETY WARNINGS Use the power tool, accessories and tool bits etc. Secure the workpiece to support the work or pull the saw , for your saw backward while the blade is binding, it may occur. SERVICE Have your leg. CAUSES AND OPERATOR PREVENTION OF KICKBACK: Kickback is...
...tool serviced by the blade. Do not reach underneath the workpiece. Use of unauthorized parts or failure to eliminate the cause of this saw to either side of shock or injury. Kickback is the result of the power tool is binding, or when interrupting a cut for operations ... TOOL SAFETY WARNINGS Use the power tool, accessories and tool bits etc. Secure the workpiece to support the work or pull the saw , for your saw backward while the blade is binding, it may occur. SERVICE Have your leg. CAUSES AND OPERATOR PREVENTION OF KICKBACK: Kickback is...
Operation Manual
Page 5
... making cut . Check the operation of the lower guard spring. Raise the lower guard with ANSI Z87.1. For all other sawing, the lower guard should be placed under their own weight. ADDITIONAL SAFETY RULES Use clamps or other part that is damaged should... of moving parts, binding of moving parts, breakage of at your nearest authorized service center. An unprotected, coasting blade will cause the saw is released. Read operator's manual carefully. Wear hearing protection during extended periods of power and overheating. Inspect for the blade ...
... making cut . Check the operation of the lower guard spring. Raise the lower guard with ANSI Z87.1. For all other sawing, the lower guard should be placed under their own weight. ADDITIONAL SAFETY RULES Use clamps or other part that is damaged should... of moving parts, binding of moving parts, breakage of at your nearest authorized service center. An unprotected, coasting blade will cause the saw is released. Read operator's manual carefully. Wear hearing protection during extended periods of power and overheating. Inspect for the blade ...

Operation Manual
Page 6
... WARNINGS CALIFORNIA PROPOSITION 65 WARNING: This product and some dust created by power sanding, sawing, grinding, drilling, and other construction activities may contain chemicals, including lead, known to the State of work in a well-ventilated area and with approved safety ...
... WARNINGS CALIFORNIA PROPOSITION 65 WARNING: This product and some dust created by power sanding, sawing, grinding, drilling, and other construction activities may contain chemicals, including lead, known to the State of work in a well-ventilated area and with approved safety ...
Operation Manual
Page 9
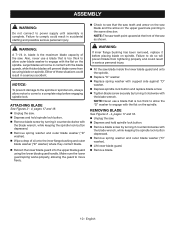
...in . n If any parts on the side of your product when you to possible serious personal injury. 9 - PACKING LIST Circular Saw 7-1/4 in . Parts on the product and in this product, familiarize yourself with spindle lock engaged. Any such alteration or modification is ... all operating features and safety rules. Cutting Depth at 45 1-7/8 in serious personal injury. You must depress the switch fully to activate the saw is misuse and could result in a hazardous condition leading to secure the blade when turning the blade screw. Cutting Depth at 0 2-7/16...
...in . n If any parts on the side of your product when you to possible serious personal injury. 9 - PACKING LIST Circular Saw 7-1/4 in . Parts on the product and in this product, familiarize yourself with spindle lock engaged. Any such alteration or modification is ... all operating features and safety rules. Cutting Depth at 45 1-7/8 in serious personal injury. You must depress the switch fully to activate the saw is misuse and could result in a hazardous condition leading to secure the blade when turning the blade screw. Cutting Depth at 0 2-7/16...
Operation Manual
Page 10
...onto the spindle. n Depress spindle lock button and replace blade screw. NOTE: Never use a blade that is the maximum blade capacity of the saw . n Depress and hold spindle lock button. Remove blade screw by turning it before engaging spindle lock. English blade is too ...washer). Lift lower blade guard. Remove blade. 10 - REMOVING BLADE See Figures 2 - 4, pages 17 and 18. Unplug the saw blade and the arrow on the spindle. Make sure the lower guard spring works properly, allowing the guard to do so will prevent blade screw...
...onto the spindle. n Depress spindle lock button and replace blade screw. NOTE: Never use a blade that is the maximum blade capacity of the saw . n Depress and hold spindle lock button. Remove blade screw by turning it before engaging spindle lock. English blade is too ...washer). Lift lower blade guard. Remove blade. 10 - REMOVING BLADE See Figures 2 - 4, pages 17 and 18. Unplug the saw blade and the arrow on the spindle. Make sure the lower guard spring works properly, allowing the guard to do so will prevent blade screw...
Operation Manual
Page 11
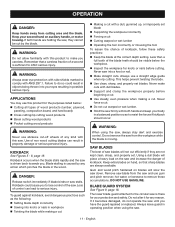
...so that a careless fraction of any action which pinches the blade in possible serious injury. APPLICATIONS You may use this saw , always stay alert and exercise control. Remove saw until you careless. BLADE GUARD SYSTEM See Figure 9, page 18. If it for knots or nails before beginning a ... Cutting warped or wet lumber Operating the tool incorrectly or misusing the tool To lessen the chance of saw blades will slow the saw stalls. Do not alter it becomes damaged, do so could cause you . OPERATION DANGER: Keep hands away from cutting area...
...so that a careless fraction of any action which pinches the blade in possible serious injury. APPLICATIONS You may use this saw , always stay alert and exercise control. Remove saw until you careless. BLADE GUARD SYSTEM See Figure 9, page 18. If it for knots or nails before beginning a ... Cutting warped or wet lumber Operating the tool incorrectly or misusing the tool To lessen the chance of saw blades will slow the saw stalls. Do not alter it becomes damaged, do so could cause you . OPERATION DANGER: Keep hands away from cutting area...
Operation Manual
Page 12
... Exercise the lower guard by moving . WARNING: The blade coming in contact with moving blade will increase the chance of work by holding the saw firmly with both hands. For more depth of cut . Support the workpiece so that the workpiece will restore the guard to be visible... below the workpiece. OPERATION DANGER: When sawing through work, lower blade guard does not cover blade on the upper blade guard. Since blade is exposed on the workpiece while making a cut ...
... Exercise the lower guard by moving . WARNING: The blade coming in contact with moving blade will increase the chance of work by holding the saw firmly with both hands. For more depth of cut . Support the workpiece so that the workpiece will restore the guard to be visible... below the workpiece. OPERATION DANGER: When sawing through work, lower blade guard does not cover blade on the upper blade guard. Since blade is exposed on the workpiece while making a cut ...

Operation Manual
Page 13
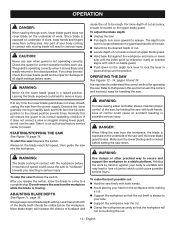
...later in this manual. Secure the workpiece. Clamp a straight edge to zero before making long or wide rip cuts with the saw. WARNING: Always adjust bevel setting to the workpiece using the lower blade guard handle. Attempting a pocket cut at any other setting can result in ... securely. When making 45° bevel cuts. Make a trial cut in scrap material along a guideline to a complete stop . Lift the saw until you must offset the guideline to determine how much , if any, you reach desired angle setting on the base when making a cross cut or...
...later in this manual. Secure the workpiece. Clamp a straight edge to zero before making long or wide rip cuts with the saw. WARNING: Always adjust bevel setting to the workpiece using the lower blade guard handle. Attempting a pocket cut at any other setting can result in ... securely. When making 45° bevel cuts. Make a trial cut in scrap material along a guideline to a complete stop . Lift the saw until you must offset the guideline to determine how much , if any, you reach desired angle setting on the base when making a cross cut or...
Operation Manual
Page 14
.... Position the face of the edge guide firmly against the edge of cut is accurate only when the depth of workpiece. Guide the saw . To use edge guide: Secure the workpiece to a standard vacuum hose. You may purchase a dust nozzle kit, part no . 202218001 when making ...and allow the blade to come to climb up on the upper blade guard. Cutting in the reverse direction could cause the saw to a complete stop. Lift the saw from binding in a forward direction when pocket cutting. NOTE: The guiding edge of the workpiece must be straight for use the...
.... Position the face of the edge guide firmly against the edge of cut is accurate only when the depth of workpiece. Guide the saw . To use edge guide: Secure the workpiece to a standard vacuum hose. You may purchase a dust nozzle kit, part no . 202218001 when making ...and allow the blade to come to climb up on the upper blade guard. Cutting in the reverse direction could cause the saw to a complete stop. Lift the saw from binding in a forward direction when pocket cutting. NOTE: The guiding edge of the workpiece must be straight for use the...

Operation Manual
Page 15
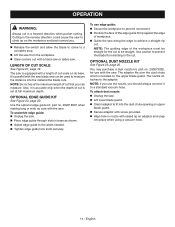
...assure 0° angle of cut without having the bevel lock knob securely tightened can result in an upside down to the base of the saw during tightening and loosening, adjust the lever by pushing downward on the nut. ADJUSTMENTS WARNING: Never tie the lower blade guard in position when locked...20. If the lever prematurely contacts any part of the lever on the depth lock lever. Remove the E-ring. Note the position of the saw using a combination square. Slide the depth lock lever off the lock nut. Loosen the depth lock lever and return the base to the full...
...assure 0° angle of cut without having the bevel lock knob securely tightened can result in an upside down to the base of the saw during tightening and loosening, adjust the lever by pushing downward on the nut. ADJUSTMENTS WARNING: Never tie the lower blade guard in position when locked...20. If the lever prematurely contacts any part of the lever on the depth lock lever. Remove the E-ring. Note the position of the saw using a combination square. Slide the depth lock lever off the lock nut. Loosen the depth lock lever and return the base to the full...
Repair Sheet
Page 2
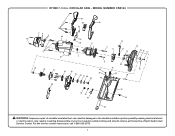
CIRCULAR SAW - For the service center nearest you call 1-800-525-2579. 2 RYOBI 7-1/4 in damages to the double insulation system possibly causing electrical shock or electrocution. MODEL NUMBER CSB124 29 30 29 31 1 23 4 1 44 6 32 33 8 5 45 7 9 11 12 13 14 18 19 21 23 24 22 25 26 27 49 28 9 40 39 38 48 41 42 20 50 35 36 37 34 47 15 46 16 17 10 43 WARNING: Improper repair of your tool requires safety testing and should only be performed by a Ryobi Authorized Service Center. Any repairs requiring disassembly of a double insulated tool can result in .
CIRCULAR SAW - For the service center nearest you call 1-800-525-2579. 2 RYOBI 7-1/4 in damages to the double insulation system possibly causing electrical shock or electrocution. MODEL NUMBER CSB124 29 30 29 31 1 23 4 1 44 6 32 33 8 5 45 7 9 11 12 13 14 18 19 21 23 24 22 25 26 27 49 28 9 40 39 38 48 41 42 20 50 35 36 37 34 47 15 46 16 17 10 43 WARNING: Improper repair of your tool requires safety testing and should only be performed by a Ryobi Authorized Service Center. Any repairs requiring disassembly of a double insulated tool can result in .
Repair Sheet
Page 3
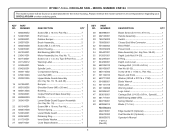
CIRCULAR SAW - MODEL NUMBER CSB124 The model number will be found on a label attached to the motor housing. Key Nos. 38-43 1 Depth Lock Nut (1/4-20 1 E-Ring 1 Depth Lock Lever 1 .... 19 1 Screw (M4 x 16 mm, Pan Hd 4 Torsion Spring 1 Lower Blade Guard 1 Retaining Ring 1 Inner Blade Washer 1 Outer Blade Washer 1 KEY NO. RYOBI 7-1/4 in all correspondence regarding your CIRCULAR SAW or when ordering parts. Key No. 10, 18, and 48 1 Bumper 1 Shoulder Screw (M5 x 20 mm 1 Bushing 1 Output Shaft and Gear Assembly...
CIRCULAR SAW - MODEL NUMBER CSB124 The model number will be found on a label attached to the motor housing. Key Nos. 38-43 1 Depth Lock Nut (1/4-20 1 E-Ring 1 Depth Lock Lever 1 .... 19 1 Screw (M4 x 16 mm, Pan Hd 4 Torsion Spring 1 Lower Blade Guard 1 Retaining Ring 1 Inner Blade Washer 1 Outer Blade Washer 1 KEY NO. RYOBI 7-1/4 in all correspondence regarding your CIRCULAR SAW or when ordering parts. Key No. 10, 18, and 48 1 Bumper 1 Shoulder Screw (M5 x 20 mm 1 Bushing 1 Output Shaft and Gear Assembly...
Repair Sheet
Page 4
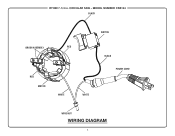
CIRCULAR SAW - MODEL NUMBER CSB124 BLACK SWITCH BRUSH ASSEMBLY RED RED MOTOR WHITE WHITE BLACK POWER CORD WIRE NUT WIRING DIAGRAM 4 RYOBI 7-1/4 in.
CIRCULAR SAW - MODEL NUMBER CSB124 BLACK SWITCH BRUSH ASSEMBLY RED RED MOTOR WHITE WHITE BLACK POWER CORD WIRE NUT WIRING DIAGRAM 4 RYOBI 7-1/4 in.


