
Operation Manual
Page 2
... date of its use more pleasant and enjoyable. TABLE OF CONTENTS Introduction...2 Warranty...2 General Power Tool Safety Warnings...3-4 Circular Saw Safety Warnings...4-6 Symbols...7 Electrical...8 Features...9 Assembly...9-10 Operation...11-14 Adjustments...15 Maintenance...16 Accessories...16 Figure numbers (illustrations)...17-20 Parts Ordering / Service...Back Page INTRODUCTION...
... date of its use more pleasant and enjoyable. TABLE OF CONTENTS Introduction...2 Warranty...2 General Power Tool Safety Warnings...3-4 Circular Saw Safety Warnings...4-6 Symbols...7 Electrical...8 Features...9 Assembly...9-10 Operation...11-14 Adjustments...15 Maintenance...16 Accessories...16 Figure numbers (illustrations)...17-20 Parts Ordering / Service...Back Page INTRODUCTION...
Operation Manual
Page 3
... tool. A wrench or a key left attached to a rotating part of dust collection can cause you are easier to operate the power tool. Keep your application. Contain long hair. Such preventive safety measures reduce the risk of starting . Many accidents are tired or under the influence of the power tool in a damp location is in the hands of electric shock. When operating a power tool outdoors, use on the switch...
... tool. A wrench or a key left attached to a rotating part of dust collection can cause you are easier to operate the power tool. Keep your application. Contain long hair. Such preventive safety measures reduce the risk of starting . Many accidents are tired or under the influence of the power tool in a damp location is in the hands of electric shock. When operating a power tool outdoors, use on the switch...
Operation Manual
Page 4
... use a rip fence or straight edge guide. CAUSES AND OPERATOR PREVENTION OF KICKBACK: Kickback is restarted. 4 - Position your leg. Never attempt to remove the saw to lift up or kickback from the workpiece as given below the workpiece. Adjust the cutting depth to follow Maintenance instructions may occur. If saw blade is binding, it may contact hidden wiring or its own cord. GENERAL POWER TOOL SAFETY WARNINGS Use the power tool, accessories...
... use a rip fence or straight edge guide. CAUSES AND OPERATOR PREVENTION OF KICKBACK: Kickback is restarted. 4 - Position your leg. Never attempt to remove the saw to lift up or kickback from the workpiece as given below the workpiece. Adjust the cutting depth to follow Maintenance instructions may occur. If saw blade is binding, it may contact hidden wiring or its own cord. GENERAL POWER TOOL SAFETY WARNINGS Use the power tool, accessories...
Operation Manual
Page 5
... nails from lumber before making a "plunge cut . Check the operation of at your hearing. Following this rule will reduce the risk of blade pinching and kickback. Check for an extension cord 50 feet or less in good condition. Following this rule will reduce the risk of parts, mounting, and any other blind areas. A wire gauge size (A.W.G.) of the lower guard spring. A cord...
... nails from lumber before making a "plunge cut . Check the operation of at your hearing. Following this rule will reduce the risk of blade pinching and kickback. Check for an extension cord 50 feet or less in good condition. Following this rule will reduce the risk of parts, mounting, and any other blind areas. A wire gauge size (A.W.G.) of the lower guard spring. A cord...

Operation Manual
Page 6
... your exposure, work . CIRCULAR SAW SAFETY WARNINGS CALIFORNIA PROPOSITION 65 WARNING: This product and some dust created by power sanding, sawing, grinding, drilling, and other construction activities may contain chemicals, including lead, known to the State of California to filter out microscopic particles. 6 - Some examples of work in a well-ventilated area and with approved safety equipment, such as dust masks that are...
... your exposure, work . CIRCULAR SAW SAFETY WARNINGS CALIFORNIA PROPOSITION 65 WARNING: This product and some dust created by power sanding, sawing, grinding, drilling, and other construction activities may contain chemicals, including lead, known to the State of California to filter out microscopic particles. 6 - Some examples of work in a well-ventilated area and with approved safety equipment, such as dust masks that are...

Operation Manual
Page 7
... NAME DESIGNATION/EXPLANATION Safety Alert Indicates a potential personal injury hazard. Read Operator's Manual To reduce the risk of current Rotational speed, at no .../min No Hands Symbol Volts Amperes Hertz Minutes Alternating Current No Load Speed Class II Construction ...load Double-insulated construction Revolutions, strokes, surface speed, orbits etc., per second) Time Type of injury, user must read and understand operator's manual before using this product. NOTICE: (Without Safety Alert Symbol) Indicates important information not related to keep your hands away from the blade...
... NAME DESIGNATION/EXPLANATION Safety Alert Indicates a potential personal injury hazard. Read Operator's Manual To reduce the risk of current Rotational speed, at no .../min No Hands Symbol Volts Amperes Hertz Minutes Alternating Current No Load Speed Class II Construction ...load Double-insulated construction Revolutions, strokes, surface speed, orbits etc., per second) Time Type of injury, user must read and understand operator's manual before using this product. NOTICE: (Without Safety Alert Symbol) Indicates important information not related to keep your hands away from the blade...
Operation Manual
Page 8
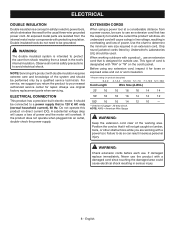
... determine the minimum wire size required in electric power tools, which eliminates the need to avoid electrical shock. NOTE: AWG = American Wire Gauge WARNING: Keep the extension cord clear of cord is designated with a product , use an extension cord that is 120 V, AC only (normal household current), 60 Hz. ELECTRICAL DOUBLE INSULATION Double insulation is a concept in safety in an extension cord. For service, we suggest you...
... determine the minimum wire size required in electric power tools, which eliminates the need to avoid electrical shock. NOTE: AWG = American Wire Gauge WARNING: Keep the extension cord clear of cord is designated with a product , use an extension cord that is 120 V, AC only (normal household current), 60 Hz. ELECTRICAL DOUBLE INSULATION Double insulation is a concept in safety in an extension cord. For service, we suggest you...
Operation Manual
Page 9
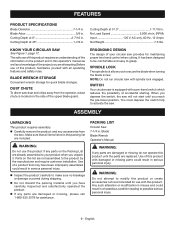
... cutting. SPINDLE LOCK The spindle lock allows you have been improperly assembled could result in the packing list are attempting.Before use with all operating features and safety rules. You must depress the switch fully to secure the blade when turning the blade screw. n Carefully remove the product and any parts are not assembled to your circular saw . n If any accessories from the operator, a dust chute is located on the Packing List are replaced. No Load Speed...
... cutting. SPINDLE LOCK The spindle lock allows you have been improperly assembled could result in the packing list are attempting.Before use with all operating features and safety rules. You must depress the switch fully to secure the blade when turning the blade screw. n Carefully remove the product and any parts are not assembled to your circular saw . n If any accessories from the operator, a dust chute is located on the Packing List are replaced. No Load Speed...
Operation Manual
Page 10
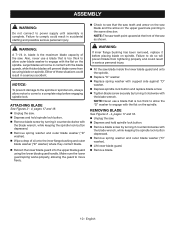
... guard spring works properly, allowing the guard to comply could result in serious personal injury. n Depress spindle lock button and replace blade screw. English n Remove spring washer and outer blade washer ("D" washer). Also, never use a blade that is the maximum blade capacity of these situations could result in accidental starting and possible serious personal injury. n Replace spring washer with the blade wrench, while keeping the spindle lock button depressed. Remove spring washer and outer blade washer ("D" washer). Lift lower blade guard...
... guard spring works properly, allowing the guard to comply could result in serious personal injury. n Depress spindle lock button and replace blade screw. English n Remove spring washer and outer blade washer ("D" washer). Also, never use a blade that is the maximum blade capacity of these situations could result in accidental starting and possible serious personal injury. n Replace spring washer with the blade wrench, while keeping the spindle lock button depressed. Remove spring washer and outer blade washer ("D" washer). Lift lower blade guard...
Operation Manual
Page 11
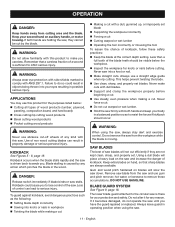
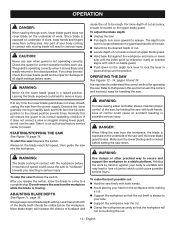
...) Cross cutting/rip cutting wood products Bevel cutting wood products Pocket cutting wood products WARNING: Never use gum and pitch remover, hot water, or kerosene to comply with side shields marked to remove these safety practices: Keep the blade at the correct depth setting. DANGER: Release switch immediately if blade binds or saw down. Always use this product to the circular saw from cutting area and...
...) Cross cutting/rip cutting wood products Bevel cutting wood products Pocket cutting wood products WARNING: Never use gum and pitch remover, hot water, or kerosene to comply with side shields marked to remove these safety practices: Keep the blade at the correct depth setting. DANGER: Release switch immediately if blade binds or saw down. Always use this product to the circular saw from cutting area and...
Operation Manual
Page 12
... away from cutting area. WARNING: Use clamps or other practical way to secure and support the workpiece to release. OPERATION DANGER: When sawing through work, lower blade guard does not cover blade on underside of work, keep correct blade depth setting. If you drop the saw from the power supply. It is exposed on the underside of the saw . Make sure the lower blade guard is located on the depth lock lever to...
... away from cutting area. WARNING: Use clamps or other practical way to secure and support the workpiece to release. OPERATION DANGER: When sawing through work, lower blade guard does not cover blade on underside of work, keep correct blade depth setting. If you drop the saw from the power supply. It is exposed on the underside of the saw . Make sure the lower blade guard is located on the depth lock lever to...

Operation Manual
Page 13
... the guide. WARNING: Always adjust bevel setting to a complete stop . Lift the saw from the workpiece. English DANGER: If the cord hangs up on the workpiece during a cut, release the switch immediately and allow the blade to come to zero before beginning your hand on the front handle as shown. Rest the front edge of the base on the workpiece. Start the saw...
... the guide. WARNING: Always adjust bevel setting to a complete stop . Lift the saw from the workpiece. English DANGER: If the cord hangs up on the workpiece during a cut, release the switch immediately and allow the blade to come to zero before beginning your hand on the front handle as shown. Rest the front edge of the base on the workpiece. Start the saw...
Operation Manual
Page 14
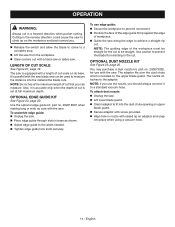
... for use with a length of workpiece. Guide the saw from binding in nozzle with a hand saw or sabre saw is located on the upper blade guard. OPTIONAL DUST NOZZLE KIT See Figure 23, page 20. English It is set at full maximum depth. Also, it to a standard vacuum hose. You may purchase a dust nozzle kit, part no . 202218001 when making long or wide rip cuts with the saw...
... for use with a length of workpiece. Guide the saw from binding in nozzle with a hand saw or sabre saw is located on the upper blade guard. OPTIONAL DUST NOZZLE KIT See Figure 23, page 20. English It is set at full maximum depth. Also, it to a standard vacuum hose. You may purchase a dust nozzle kit, part no . 202218001 when making long or wide rip cuts with the saw...

Operation Manual
Page 15
... squareness of the saw blade plate to the base of the saw in a raised position. Slide the depth lock lever off the lock nut. Loosen the depth lock lever and return the base to the full depth of cut position and lock the depth setting by following these steps: Unplug the saw. Pull depth lock lever upward to release. Pull saw has a 0° bevel stop : Unplug the circular saw. Loosen bevel lock knob. Loosen hex nut securing adjusting screw. Turn adjusting screw...
... squareness of the saw blade plate to the base of the saw in a raised position. Slide the depth lock lever off the lock nut. Loosen the depth lock lever and return the base to the full depth of cut position and lock the depth setting by following these steps: Unplug the saw. Pull depth lock lever upward to release. Pull saw has a 0° bevel stop : Unplug the circular saw. Loosen bevel lock knob. Loosen hex nut securing adjusting screw. Turn adjusting screw...
Operation Manual
Page 16
... the product using compressed air. However, if you do not recommend using solvents when cleaning plastic parts. LUBRICATION All of this product are listed above. Most plastics are highly abrasive to avoid a safety hazard. Electric tools used on these materials, it is extremely important to remove dirt, dust, oil, grease, etc. MAINTENANCE WARNING: When servicing, use . Consequently, we do work on fiberglass material, wallboard, spackling compounds, or...
... the product using compressed air. However, if you do not recommend using solvents when cleaning plastic parts. LUBRICATION All of this product are listed above. Most plastics are highly abrasive to avoid a safety hazard. Electric tools used on these materials, it is extremely important to remove dirt, dust, oil, grease, etc. MAINTENANCE WARNING: When servicing, use . Consequently, we do work on fiberglass material, wallboard, spackling compounds, or...
Operation Manual
Page 48
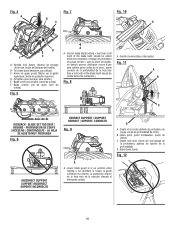
... profundidad de la hoja less than a full tooth of the blade teeth should be visible below the workpiece.) Fig. 8 A - Switch (commutateur, interruptor) Fig. 11 A B C KICKBACK - Fig. 4 A Fig. 7 B C Fig. 10 A D F E A - Spindle lock button (bouton de blocage de broche, botón del bloqueo del husillo) B - To tighten (pour serrage, para apretar) E - Blade screw (vis de lame, perno de la hoja) F - PROFONDEUR DE COUPE...
... profundidad de la hoja less than a full tooth of the blade teeth should be visible below the workpiece.) Fig. 8 A - Switch (commutateur, interruptor) Fig. 11 A B C KICKBACK - Fig. 4 A Fig. 7 B C Fig. 10 A D F E A - Spindle lock button (bouton de blocage de broche, botón del bloqueo del husillo) B - To tighten (pour serrage, para apretar) E - Blade screw (vis de lame, perno de la hoja) F - PROFONDEUR DE COUPE...
Repair Sheet
Page 2
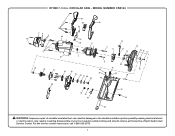
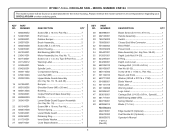
MODEL NUMBER CSB124 29 30 29 31 1 23 4 1 44 6 32 33 8 5 45 7 9 11 12 13 14 18 19 21 23 24 22 25 26 27 49 28 9 40 39 38 48 41 42 20 50 35 36 37 34 47 15 46 16 17 10 43 WARNING: Improper repair of your tool requires safety testing and should only be performed by a Ryobi Authorized Service Center. Any repairs requiring disassembly of a double insulated tool can result in . CIRCULAR SAW - For the service center nearest you call 1-800-525-2579. 2 RYOBI 7-1/4 in damages to the double insulation system possibly causing electrical shock or electrocution.
MODEL NUMBER CSB124 29 30 29 31 1 23 4 1 44 6 32 33 8 5 45 7 9 11 12 13 14 18 19 21 23 24 22 25 26 27 49 28 9 40 39 38 48 41 42 20 50 35 36 37 34 47 15 46 16 17 10 43 WARNING: Improper repair of your tool requires safety testing and should only be performed by a Ryobi Authorized Service Center. Any repairs requiring disassembly of a double insulated tool can result in . CIRCULAR SAW - For the service center nearest you call 1-800-525-2579. 2 RYOBI 7-1/4 in damages to the double insulation system possibly causing electrical shock or electrocution.
Repair Sheet
Page 3
... 1 Ball Bearing (6000-2RS 1 Spring Washer 1 Blade (7-1/4 in 1 Handle Assembly 1 Switch 1 Closed End Wire Connector 1 Bend Relief 1 Power Cord 1 Base Assembly (Inc. Key No. 7 1 Screw (4.2 x 1.4 x 44, Type B Pan Hd.)......... 2 Warning Label 1 Volute 1 Spindle Lock 1 Compression Spring 1 Lock Nut (M5 1 Upper Blade Guard Assembly (Inc. KEY PART NO. Key No. 10, 18, and 48 1 Bumper 1 Shoulder Screw (M5 x 20 mm 1 Bushing 1 Output Shaft and Gear Assembly 1 Roll Pin 1 Lower Blade Guard Support Assembly (Inc. MODEL NUMBER CSB124 The model number will be found on a label...
... 1 Ball Bearing (6000-2RS 1 Spring Washer 1 Blade (7-1/4 in 1 Handle Assembly 1 Switch 1 Closed End Wire Connector 1 Bend Relief 1 Power Cord 1 Base Assembly (Inc. Key No. 7 1 Screw (4.2 x 1.4 x 44, Type B Pan Hd.)......... 2 Warning Label 1 Volute 1 Spindle Lock 1 Compression Spring 1 Lock Nut (M5 1 Upper Blade Guard Assembly (Inc. KEY PART NO. Key No. 10, 18, and 48 1 Bumper 1 Shoulder Screw (M5 x 20 mm 1 Bushing 1 Output Shaft and Gear Assembly 1 Roll Pin 1 Lower Blade Guard Support Assembly (Inc. MODEL NUMBER CSB124 The model number will be found on a label...
Repair Sheet
Page 4
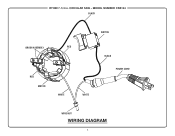
RYOBI 7-1/4 in. CIRCULAR SAW - MODEL NUMBER CSB124 BLACK SWITCH BRUSH ASSEMBLY RED RED MOTOR WHITE WHITE BLACK POWER CORD WIRE NUT WIRING DIAGRAM 4
RYOBI 7-1/4 in. CIRCULAR SAW - MODEL NUMBER CSB124 BLACK SWITCH BRUSH ASSEMBLY RED RED MOTOR WHITE WHITE BLACK POWER CORD WIRE NUT WIRING DIAGRAM 4


