Manuals
Page 21
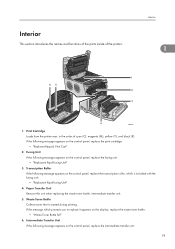
...Requrd: Print Cart" 2. Waste Toner Bottle Collects toner that is included with the fusing unit: • "Replacmnt Rqrd:Fusing Unit" 4. If the message which is wasted during printing. Intermediate Transfer Unit If the following message appears on the display, replace the waste toner bottle. &#...Waste Toner Bottle full" 6. Transcription Roller If the following message appears on the control panel, replace the fusing unit: • "Replacmnt Rqrd:Fusing Unit" 3. Interior This section introduces the names and functions of the parts inside of cyan (C), magenta (M), yellow (Y), ...
...Requrd: Print Cart" 2. Waste Toner Bottle Collects toner that is included with the fusing unit: • "Replacmnt Rqrd:Fusing Unit" 4. If the message which is wasted during printing. Intermediate Transfer Unit If the following message appears on the display, replace the waste toner bottle. &#...Waste Toner Bottle full" 6. Transcription Roller If the following message appears on the control panel, replace the fusing unit: • "Replacmnt Rqrd:Fusing Unit" 3. Interior This section introduces the names and functions of the parts inside of cyan (C), magenta (M), yellow (Y), ...
Manuals
Page 174
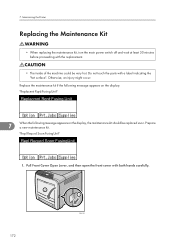
... then open the front cover with a label indicating the "hot surface". Replace the maintenance kit if the following message appears on the display: "Replacmnt Rqrd:Fusing Unit" Replacmnt Rqrd:Fusing Unit 7 When the following message appears on the display, the maintenance kit should be very hot. 7.
... then open the front cover with a label indicating the "hot surface". Replace the maintenance kit if the following message appears on the display: "Replacmnt Rqrd:Fusing Unit" Replacmnt Rqrd:Fusing Unit 7 When the following message appears on the display, the maintenance kit should be very hot. 7.
Manuals
Page 175
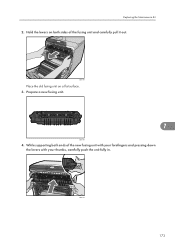
CBK168 Place the old fusing unit on both ends of the fusing unit and carefully pull it out. CBK170 173 While supporting both sides of the new fusing unit with your forefingers and pressing down the levers with your thumbs, carefully push the unit fully in. Prepare a new fusing unit. 7 CBK169 4. Hold the levers on a flat surface. 3. Replacing the Maintenance Kit 2.
CBK168 Place the old fusing unit on both ends of the fusing unit and carefully pull it out. CBK170 173 While supporting both sides of the new fusing unit with your forefingers and pressing down the levers with your thumbs, carefully push the unit fully in. Prepare a new fusing unit. 7 CBK169 4. Hold the levers on a flat surface. 3. Replacing the Maintenance Kit 2.

Manuals
Page 176
CBK132 Place the paper transfer unit on the front cover outwards. 7 CBK131 7. Hold both ends of the paper transfer unit and lift it up. Slide the levers on a flat surface. 174 CBK171 If the markings are aligned with the markings on the fusing unit are misaligned, align them by lowering the levers and once again pushing the fusing unit fully in. 6. Maintaining the Printer 5. 7. Make sure that the markings on the levers.
CBK132 Place the paper transfer unit on the front cover outwards. 7 CBK131 7. Hold both ends of the paper transfer unit and lift it up. Slide the levers on a flat surface. 174 CBK171 If the markings are aligned with the markings on the fusing unit are misaligned, align them by lowering the levers and once again pushing the fusing unit fully in. 6. Maintaining the Printer 5. 7. Make sure that the markings on the levers.

Manuals
Page 207
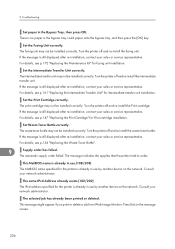
...For details, see p.147 "Replacing the Print Cartridge". Replacmnt Rqrd:Fusing Unit You need to clean the toner density sensor. Repl Soon:Prt.Cart. The toner has almost run out, or the photo conductor unit has reached the end of its service life. SD Card authenticatn.failed...see p.180 "Cleaning the Toner Density Sensor". 205 Replcmnt Rqrd Soon:IntTrans You will need to replace the fusing unit. Replacemnt Requird:IntTrans You need to replace the fusing unit soon. Problem:Wireless card Please call service. Repl Requrd Soon:FusingUnit 9 You will need to replace the ...
...For details, see p.147 "Replacing the Print Cartridge". Replacmnt Rqrd:Fusing Unit You need to clean the toner density sensor. Repl Soon:Prt.Cart. The toner has almost run out, or the photo conductor unit has reached the end of its service life. SD Card authenticatn.failed...see p.180 "Cleaning the Toner Density Sensor". 205 Replcmnt Rqrd Soon:IntTrans You will need to replace the fusing unit. Replacemnt Requird:IntTrans You need to replace the fusing unit soon. Problem:Wireless card Please call service. Repl Requrd Soon:FusingUnit 9 You will need to replace the ...
Manuals
Page 208
...Bottle". 9 Supply order has failed. Set Waste Toner Bottle correctly. For details, see p.147 "Replacing the Print Cartridge" for fusing unit installation. The same IPv4 Address already exists.(102/202) The IPv4 address specified for the printer is already in use by another ...is still displayed after re-installation, contact your network administrator. Troubleshooting Set paper in the bypass tray. Set the Fusing Unit correctly. The fusing unit may not be installed correctly. Turn the printer off and re-install the Print cartridge. If the message is still...
...Bottle". 9 Supply order has failed. Set Waste Toner Bottle correctly. For details, see p.147 "Replacing the Print Cartridge" for fusing unit installation. The same IPv4 Address already exists.(102/202) The IPv4 address specified for the printer is already in use by another ...is still displayed after re-installation, contact your network administrator. Troubleshooting Set paper in the bypass tray. Set the Fusing Unit correctly. The fusing unit may not be installed correctly. Turn the printer off and re-install the Print cartridge. If the message is still...
Manuals
Page 217
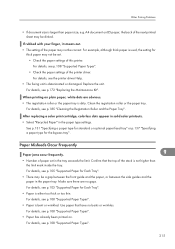
For details, see p.185 "Cleaning the Registration Roller and the Paper Tray". For details, see the printer driver Help. • The fusing unit is deteriorated or damaged. For details, see p.108 "Supported Paper Types". 215 For details, see p.105 "Supported Paper for thick paper .... Other Printing Problems • If document size is dirty. For example, although thick paper is not higher than paper size, e.g. Replace the unit. Clean the registration roller or the paper tray. For details, see p.108 "Supported Paper Types". • Check the paper settings of the ...
For details, see p.185 "Cleaning the Registration Roller and the Paper Tray". For details, see the printer driver Help. • The fusing unit is deteriorated or damaged. For details, see p.108 "Supported Paper Types". 215 For details, see p.105 "Supported Paper for thick paper .... Other Printing Problems • If document size is dirty. For example, although thick paper is not higher than paper size, e.g. Replace the unit. Clean the registration roller or the paper tray. For details, see p.108 "Supported Paper Types". • Check the paper settings of the ...
Manuals
Page 219
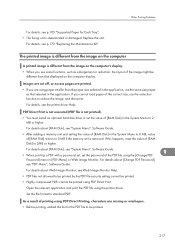
... details, see p.172 "Replacing the Maintenance Kit". For details about Web Image Monitor, see p.105 "Supported Paper for Each Tray". • The fusing unit is different from the image on the computer's display. • When you use some functions, such as that displayed on the computer display. Open ... to reduce the image, and then print. For details about [Change PDF Password], see "System Menu", Software Guide. • After adding a memory unit and setting the value of [RAM Disk] in the System Menu to 8 MB, value of printing using PDF Direct Print. As a result of [...
... details, see p.172 "Replacing the Maintenance Kit". For details about Web Image Monitor, see p.105 "Supported Paper for Each Tray". • The fusing unit is different from the image on the computer's display. • When you use some functions, such as that displayed on the computer display. Open ... to reduce the image, and then print. For details about [Change PDF Password], see "System Menu", Software Guide. • After adding a memory unit and setting the value of [RAM Disk] in the System Menu to 8 MB, value of printing using PDF Direct Print. As a result of [...

Manuals
Page 233
... could be very hot. Paper Misfeed Message (B) Paper Misfeed Message (B) The " (B) Open Front Cover and remove the paper." Lower the blue fusing unit levers, and pull out the jammed paper carefully. 10 CBK191 231 Do not touch the parts with both hands carefully. 2 1 CBK130 2. error... message appears when a paper misfeed occurs in the internal paper feed path. • The inside of the covers inside the fusing unit and paper transfer unit cool down. 1. Pull Front Cover Open Lever, and then open the front cover with a label indicating the "hot surface". Before removing ...
... could be very hot. Paper Misfeed Message (B) Paper Misfeed Message (B) The " (B) Open Front Cover and remove the paper." Lower the blue fusing unit levers, and pull out the jammed paper carefully. 10 CBK191 231 Do not touch the parts with both hands carefully. 2 1 CBK130 2. error... message appears when a paper misfeed occurs in the internal paper feed path. • The inside of the covers inside the fusing unit and paper transfer unit cool down. 1. Pull Front Cover Open Lever, and then open the front cover with a label indicating the "hot surface". Before removing ...

Manuals
Page 234
... Misfed Paper CBK192 Pull the paper downward to fully close the front cover when the guide is visible in the output tray, lower the blue fusing unit levers, and then pull the jammed paper out of these components. 232 Do not pull it . 10.
... Misfed Paper CBK192 Pull the paper downward to fully close the front cover when the guide is visible in the output tray, lower the blue fusing unit levers, and then pull the jammed paper out of these components. 232 Do not pull it . 10.

Manuals
Page 237
...printer. 235 Pull Front Cover Open Lever, and then open the front cover with both the fusing unit and the paper transfer unit have cooled down. 1. Before removing paper from the area around the fusing unit, wait until both hands carefully. 2 1 CBK130 2. Carefully remove misfed paper under the paper... transfer unit. 10 CBK196 If you cannot find the misfed paper, look inside of this reason, take care when removing ...
...printer. 235 Pull Front Cover Open Lever, and then open the front cover with both the fusing unit and the paper transfer unit have cooled down. 1. Before removing paper from the area around the fusing unit, wait until both hands carefully. 2 1 CBK130 2. Carefully remove misfed paper under the paper... transfer unit. 10 CBK196 If you cannot find the misfed paper, look inside of this reason, take care when removing ...
Manuals
Page 243
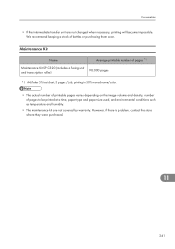
.... However, if there is problem, contact the store where they were purchased. 11 241 Maintenance Kit Name Average printable number of pages *1 Maintenance Kit SP C320 (includes a fusing unit and transcription roller) 90,000 pages *1 A4/letter 5% test chart, 3 pages / job, printing in 50% monochrome/color. • The actual number of printable pages...
.... However, if there is problem, contact the store where they were purchased. 11 241 Maintenance Kit Name Average printable number of pages *1 Maintenance Kit SP C320 (includes a fusing unit and transcription roller) 90,000 pages *1 A4/letter 5% test chart, 3 pages / job, printing in 50% monochrome/color. • The actual number of printable pages...
Manuals
Page 253
...gradation 191 Color paper 112 Consumables 239 Control panel 15, 21 Custom size paper 129, 135 D Data in indicator 22 Data overwrite security unit 65 DHCP 82 Digital camera connection 74 Display 21 Display panel 23 E ECO night sensor 21, 39 Enabling SSL 99 Envelopes 114 Error... connection 69 Ethernet configuration 79 Ethernet port 17 Ethernet speed 85 Exterior 15 F Friction pad 182 Front cover 15 Front cover open lever 17 Fusing unit 19 G Gigabit Ethernet board 57 Gradation correction sheet 194 Gradation correction value 191, 195 Guide to the printer 15, 17, 19, 21 ...
...gradation 191 Color paper 112 Consumables 239 Control panel 15, 21 Custom size paper 129, 135 D Data in indicator 22 Data overwrite security unit 65 DHCP 82 Digital camera connection 74 Display 21 Display panel 23 E ECO night sensor 21, 39 Enabling SSL 99 Envelopes 114 Error... connection 69 Ethernet configuration 79 Ethernet port 17 Ethernet speed 85 Exterior 15 F Friction pad 182 Front cover 15 Front cover open lever 17 Fusing unit 19 G Gigabit Ethernet board 57 Gradation correction sheet 194 Gradation correction value 191, 195 Guide to the printer 15, 17, 19, 21 ...


