
User Guide
Page 8
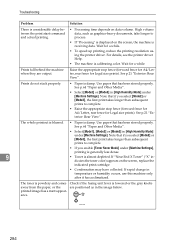
Troubleshooting Overview ...269 Common Problems 270 Paper Feed Problems 271 Removing Printing Jams 272 If paper jams inside the fusing unit 273 If paper jams inside a tray 275 If paper jams inside the transfer unit 277 Removing Scanning Jams 278 Print Quality Problems 282 Checking the Condition of Paper for Printing Copies 250 Specifying...
Troubleshooting Overview ...269 Common Problems 270 Paper Feed Problems 271 Removing Printing Jams 272 If paper jams inside the fusing unit 273 If paper jams inside a tray 275 If paper jams inside the transfer unit 277 Removing Scanning Jams 278 Print Quality Problems 282 Checking the Condition of Paper for Printing Copies 250 Specifying...

User Guide
Page 43
Installing the Machine G Pull the opening lever on the front cover, and then carefully lower the front cover. 2 BPC051S H Lower the blue fusing unit levers. BPC053S 33 BPC052S I Holding each orange tape near its joint, pull both tapes gently upward and remove them from the machine at the same time.
Installing the Machine G Pull the opening lever on the front cover, and then carefully lower the front cover. 2 BPC051S H Lower the blue fusing unit levers. BPC053S 33 BPC052S I Holding each orange tape near its joint, pull both tapes gently upward and remove them from the machine at the same time.
User Guide
Page 79
... only. • Do not use ink-jet printer paper because it may cause paper jams or malfunctions if the paper is dry enough to the fusing unit and cause a paper jam. • Do not load OHP transparencies. Also, configure the printer driver to 24 lb.). 2 • If printed envelopes come out badly...
... only. • Do not use ink-jet printer paper because it may cause paper jams or malfunctions if the paper is dry enough to the fusing unit and cause a paper jam. • Do not load OHP transparencies. Also, configure the printer driver to 24 lb.). 2 • If printed envelopes come out badly...
User Guide
Page 231
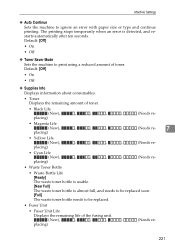
... error is almost full, and needs to be replaced soon. [Full] The waste toner bottle needs to be replaced. • Fuser Unit • Fuser Unit Life Displays the remaining life of the fusing unit. (New), , , , , placing) (Needs re- 221 Default: [Off] • On • Off ❖ Toner Saver Mode Sets the machine to ignore...
... error is almost full, and needs to be replaced soon. [Full] The waste toner bottle needs to be replaced. • Fuser Unit • Fuser Unit Life Displays the remaining life of the fusing unit. (New), , , , , placing) (Needs re- 221 Default: [Off] • On • Off ❖ Toner Saver Mode Sets the machine to ignore...
User Guide
Page 283
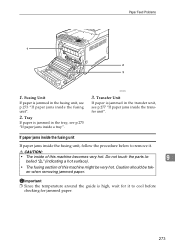
..., see p.277 "If paper jams inside the transfer unit". Paper Feed Problems 1. Fusing Unit If paper is high, wait for jammed paper. 273 If paper jams inside the fusing unit If paper jams inside the fusing unit". 2. Do not touch the parts la- 9 belled "v" (indicating a hot surface). • The fusing section of this machine might be taken when...
..., see p.277 "If paper jams inside the transfer unit". Paper Feed Problems 1. Fusing Unit If paper is high, wait for jammed paper. 273 If paper jams inside the fusing unit If paper jams inside the fusing unit". 2. Do not touch the parts la- 9 belled "v" (indicating a hot surface). • The fusing section of this machine might be taken when...

User Guide
Page 284
BPC047S 9 BPC048S If you cannot find the jammed paper, check for it by pulling down the guide. 274 BPC049S BPC045S B Lower the blue fusing unit lever, and pull out the jammed paper carefully. Troubleshooting A Pull the opening lever on the front cover, and then carefully lower the front cover.
BPC047S 9 BPC048S If you cannot find the jammed paper, check for it by pulling down the guide. 274 BPC049S BPC045S B Lower the blue fusing unit lever, and pull out the jammed paper carefully. Troubleshooting A Pull the opening lever on the front cover, and then carefully lower the front cover.
User Guide
Page 294
... the machine when they are positioned as in the image below. See p.21 "Exterior: Rear View". The toner is powdery and comes Check if the fusing unit lever is almost depleted.
... the machine when they are positioned as in the image below. See p.21 "Exterior: Rear View". The toner is powdery and comes Check if the fusing unit lever is almost depleted.

User Guide
Page 334
clockwise (until the slots are horizontally aligned with both gray knobs on but the ma- BPC061S F Close the front cover with the marking shown in the illustration below). chine has been inactive for a long time. 324 Maintenance D Lower the blue fusing unit lever. BPC047S E Using a coin, turn both hands carefully. 10 BPC046S Note ❒ This step is not necessary if the machine's power switch is on the fusing unit 90 degrees counter-
clockwise (until the slots are horizontally aligned with both gray knobs on but the ma- BPC061S F Close the front cover with the marking shown in the illustration below). chine has been inactive for a long time. 324 Maintenance D Lower the blue fusing unit lever. BPC047S E Using a coin, turn both hands carefully. 10 BPC046S Note ❒ This step is not necessary if the machine's power switch is on the fusing unit 90 degrees counter-

User Guide
Page 335
A Plug in the following procedure to Be Used for a Long Time Using the Machine Again After It Has Been Inactive for a long period. B Pull Front Cover Open Lever, and then open the front cover with both knobs back to their original positions, as shown in the power cable. If the Machine is Not Going to start using the machine again after it has been inactive for a Long Period Use the following procedure. BPC045S C Lower the blue fusing unit lever. Important ❒ To avoid damage to the fusing unit's knobs, be sure to turn both hands carefully. BPC047S 10 325
A Plug in the following procedure to Be Used for a Long Time Using the Machine Again After It Has Been Inactive for a long period. B Pull Front Cover Open Lever, and then open the front cover with both knobs back to their original positions, as shown in the power cable. If the Machine is Not Going to start using the machine again after it has been inactive for a Long Period Use the following procedure. BPC045S C Lower the blue fusing unit lever. Important ❒ To avoid damage to the fusing unit's knobs, be sure to turn both hands carefully. BPC047S 10 325

User Guide
Page 336
Maintenance D Using a coin, turn both hands carefully. BPC065S E Close the front cover with both gray knobs on the fusing unit 90 degrees clockwise (until the slots are vertically aligned with the marking shown in the illustration below). BPC046S F Turn the power switch to "aOn". 10 326
Maintenance D Using a coin, turn both hands carefully. BPC065S E Close the front cover with both gray knobs on the fusing unit 90 degrees clockwise (until the slots are vertically aligned with the marking shown in the illustration below). BPC046S F Turn the power switch to "aOn". 10 326

User Guide
Page 350
... Fax only mode, 193 FAX/TAD mode, 194 FAX/TEL mode, 193 Fax transmission settings, 209 Friction pad, 313 Front cover, 20 Function priority, 40 Fusing unit, 273 G G3 (analog) line interface connector, 21 Group (LAN-Fax), 183 H High humidity mode, 218 How to Read This Manual, 5
... Fax only mode, 193 FAX/TAD mode, 194 FAX/TEL mode, 193 Fax transmission settings, 209 Friction pad, 313 Front cover, 20 Function priority, 40 Fusing unit, 273 G G3 (analog) line interface connector, 21 Group (LAN-Fax), 183 H High humidity mode, 218 How to Read This Manual, 5

User Guide
Page 380
... 19 Error and Status Messages on the Screen 20 Printing or Scanning Problems 23 Fax Transmission Problems 24 Paper Jam Positions 25 Removing from the Fusing Unit 26 Removing from the Tray 27 Removing from the Transfer Unit 28 Removing from the ADF 29 Before Replacing Print Cartridges 32 Replacing Print Cartridges 33 2
... 19 Error and Status Messages on the Screen 20 Printing or Scanning Problems 23 Fax Transmission Problems 24 Paper Jam Positions 25 Removing from the Fusing Unit 26 Removing from the Tray 27 Removing from the Transfer Unit 28 Removing from the ADF 29 Before Replacing Print Cartridges 32 Replacing Print Cartridges 33 2

User Guide
Page 403
...• Do not forcefully remove jammed paper, as it may tear. Fusing Unit If paper is jammed in the ADF, see "Removing from the Tray" on prints made immediately after clearing a paper jam may be insufficiently fused and can smudge. ADF If paper is jammed inside the machine, check ...the following positions, in the transfer unit, see "Removing from the Fusing Unit" on page 28. 25 If paper is jammed in the fusing unit, see "Removing from the Transfer Unit" on page 26. Transfer Unit If paper is jammed in the ADF. Tray If paper is jammed...
...• Do not forcefully remove jammed paper, as it may tear. Fusing Unit If paper is jammed in the ADF, see "Removing from the Tray" on prints made immediately after clearing a paper jam may be insufficiently fused and can smudge. ADF If paper is jammed inside the machine, check ...the following positions, in the transfer unit, see "Removing from the Fusing Unit" on page 28. 25 If paper is jammed in the fusing unit, see "Removing from the Transfer Unit" on page 26. Transfer Unit If paper is jammed in the ADF. Tray If paper is jammed...
User Guide
Page 404
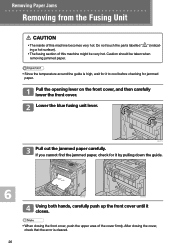
Do not touch the parts labelled " " (indicating a hot surface). • The fusing section of this machine becomes very hot. Lower the blue fusing unit lever. BPC018S BPC219S Using both hands, carefully push up the front cover until it by pulling down the guide. Pull the opening lever... BPC217S Pull out the jammed paper carefully. If you cannot find the jammed paper, check for jammed paper. Removing Paper Jams Removing from the Fusing Unit CAUTION • The inside of the cover firmly. After closing the front cover, push the upper area of this machine might be taken when...
Do not touch the parts labelled " " (indicating a hot surface). • The fusing section of this machine becomes very hot. Lower the blue fusing unit lever. BPC018S BPC219S Using both hands, carefully push up the front cover until it by pulling down the guide. Pull the opening lever... BPC217S Pull out the jammed paper carefully. If you cannot find the jammed paper, check for jammed paper. Removing Paper Jams Removing from the Fusing Unit CAUTION • The inside of the cover firmly. After closing the front cover, push the upper area of this machine might be taken when...


