
Operating Instructions
Page 2
... prohibited by law. Keep this machine. The preceding list is prohibited by local law: bank notes, revenue stamps, bonds, stock certificates, bank drafts, checks, passports, driver's licenses.
... prohibited by law. Keep this machine. The preceding list is prohibited by local law: bank notes, revenue stamps, bonds, stock certificates, bank drafts, checks, passports, driver's licenses.
Operating Instructions
Page 13
...Reader/Adobe Reader must be installed in order to view the manuals as PDF files. • A Web browser must be available on the driver CD-ROM. This manual is provided in order to view the html manuals. Refer to the manuals that you can use to error messages..., and resolving jams. Driver Installation Guide Contains procedures for installing the printer driver. and procedures such as "ELP-NX". 11 Software Guide Contains information about using Web Image Monitor. Manuals for ...
...Reader/Adobe Reader must be installed in order to view the manuals as PDF files. • A Web browser must be available on the driver CD-ROM. This manual is provided in order to view the html manuals. Refer to the manuals that you can use to error messages..., and resolving jams. Driver Installation Guide Contains procedures for installing the printer driver. and procedures such as "ELP-NX". 11 Software Guide Contains information about using Web Image Monitor. Manuals for ...
Operating Instructions
Page 33
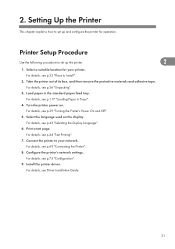
... the Printer". 8. Take the printer out of its box, and then remove the protective materials and adhesive tape. For details, see Driver Installation Guide. 31 Connect the printer to set up the printer. 2 1. Configure the printer's network settings. For details, see p....3. Turn the printer power on the display. Print a test page. For details, see p.43 "Selecting the Display Language". 6. Install the printer driver. Select a suitable location for operation. Printer Setup Procedure Use the following procedure to your printer. For details, see p.75 "Configuration". 9. 2....
... the Printer". 8. Take the printer out of its box, and then remove the protective materials and adhesive tape. For details, see Driver Installation Guide. 31 Connect the printer to set up the printer. 2 1. Configure the printer's network settings. For details, see p....3. Turn the printer power on the display. Print a test page. For details, see p.43 "Selecting the Display Language". 6. Install the printer driver. Select a suitable location for operation. Printer Setup Procedure Use the following procedure to your printer. For details, see p.75 "Configuration". 9. 2....

Operating Instructions
Page 53
...page from the [List/Test Print] menu. For details, see p.117 "Loading Paper in Trays". • After a new paper feed unit has been installed, the driver settings might need to confirm the installation. • When moving the printer, remove the paper feed unit. • After finishing the installation, you cannot install... attempting reinstallation, contact your sales or service representative. • If the print area is not centered correctly, adjust the printing position for the Printer", Driver Installation Guide. 51 Align them with the holes on the optional paper feed unit.
...page from the [List/Test Print] menu. For details, see p.117 "Loading Paper in Trays". • After a new paper feed unit has been installed, the driver settings might need to confirm the installation. • When moving the printer, remove the paper feed unit. • After finishing the installation, you cannot install... attempting reinstallation, contact your sales or service representative. • If the print area is not centered correctly, adjust the printing position for the Printer", Driver Installation Guide. 51 Align them with the holes on the optional paper feed unit.
Operating Instructions
Page 75
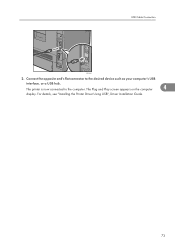
For details, see "Installing the Printer Driver Using USB", Driver Installation Guide. 73 The Plug and Play screen appears on the computer 4 display. USB Cable Connection CEC063 2. The printer is now connected to the desired device such as your computer's USB interface, or a USB hub. Connect the opposite end's flat connector to the computer.
For details, see "Installing the Printer Driver Using USB", Driver Installation Guide. 73 The Plug and Play screen appears on the computer 4 display. USB Cable Connection CEC063 2. The printer is now connected to the desired device such as your computer's USB interface, or a USB hub. Connect the opposite end's flat connector to the computer.
Operating Instructions
Page 76
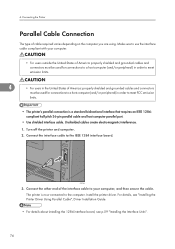
...; The printer's parallel connection is now connected to the IEEE 1284 interface board. For details, see "Installing the Printer Driver Using Parallel Cable", Driver Installation Guide. • For details about installing the 1284 interface board, see p.59 "Installing the Interface Units". 74 Install... the printer driver. CEC064 3. 4. Connecting the Printer Parallel Cable Connection The type of America: properly shielded and grounded cables and connectors must...
...; The printer's parallel connection is now connected to the IEEE 1284 interface board. For details, see "Installing the Printer Driver Using Parallel Cable", Driver Installation Guide. • For details about installing the 1284 interface board, see p.59 "Installing the Interface Units". 74 Install... the printer driver. CEC064 3. 4. Connecting the Printer Parallel Cable Connection The type of America: properly shielded and grounded cables and connectors must...
Operating Instructions
Page 107
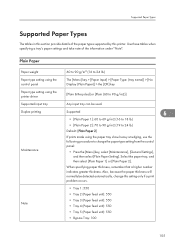
... g/m2 (16 to 18 lb.) • [Plain Paper 2]: 70 to 90 g/m2 (19 to 24 lb.) Default: [Plain Paper 2] If prints made using the printer driver [Plain & Recycled] or [Plain (60 to change this printer. Select the paper tray, and then select [Plain Paper 1] or [Plain Paper 2]. Supported Paper Types Supported...
... g/m2 (16 to 18 lb.) • [Plain Paper 2]: 70 to 90 g/m2 (19 to 24 lb.) Default: [Plain Paper 2] If prints made using the printer driver [Plain & Recycled] or [Plain (60 to change this printer. Select the paper tray, and then select [Plain Paper 1] or [Plain Paper 2]. Supported Paper Types Supported...

Operating Instructions
Page 108
... g/m2)] Any input tray can be used. Supported Thick Paper Paper weight 6 Paper type setting using the control panel Paper type setting using the printer driver Supported input tray Duplex printing Note 106 to 220 g/m2 (28 to 59 lb.) • The [Menu] key > [Paper Input] > [Paper Type: ... tray can be used. • [Thick Paper 1], [Thick Paper 2]: Supported • [Thick Paper 3]: Not supported Printing is slightly slower than when using the printer driver Supported input tray Duplex printing 91 to 105 g/m2 (24 to 28 lb.) The [Menu] key > [Paper Input] > [Paper Type: (tray name)] > [...
... g/m2)] Any input tray can be used. Supported Thick Paper Paper weight 6 Paper type setting using the control panel Paper type setting using the printer driver Supported input tray Duplex printing Note 106 to 220 g/m2 (28 to 59 lb.) • The [Menu] key > [Paper Input] > [Paper Type: ... tray can be used. • [Thick Paper 1], [Thick Paper 2]: Supported • [Thick Paper 3]: Not supported Printing is slightly slower than when using the printer driver Supported input tray Duplex printing 91 to 105 g/m2 (24 to 28 lb.) The [Menu] key > [Paper Input] > [Paper Type: (tray name)] > [...
Operating Instructions
Page 109
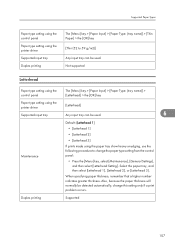
...panel The [Menu] key > [Paper Input] > [Paper Type: (tray name)] > [Letterhead] > the [OK] key Paper type setting using the printer driver [Letterhead] Supported input tray Any input tray can be used . 6 Maintenance Default: [Letterhead 1] • [Letterhead 1] • [Letterhead 2] • [...Letterhead 3] If prints made using the printer driver Supported input tray Duplex printing The [Menu] key > [Paper Input] > [Paper Type: (tray name)] > [Thin Paper] > the [OK] key [...
...panel The [Menu] key > [Paper Input] > [Paper Type: (tray name)] > [Letterhead] > the [OK] key Paper type setting using the printer driver [Letterhead] Supported input tray Any input tray can be used . 6 Maintenance Default: [Letterhead 1] • [Letterhead 1] • [Letterhead 2] • [...Letterhead 3] If prints made using the printer driver Supported input tray Duplex printing The [Menu] key > [Paper Input] > [Paper Type: (tray name)] > [Thin Paper] > the [OK] key [...
Operating Instructions
Page 110
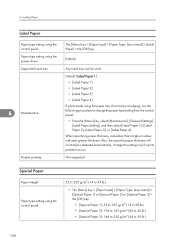
... thickness, remember that a higher number indicates greater thickness. Loading Paper Label Paper Paper type setting using the control panel Paper type setting using the printer driver Supported input tray 6 Maintenance Duplex printing The [Menu] key > [Paper Input] > [Paper Type: (tray name)] > [Label Paper] > the [OK] key [Labels] Any input tray can...
... thickness, remember that a higher number indicates greater thickness. Loading Paper Label Paper Paper type setting using the control panel Paper type setting using the printer driver Supported input tray 6 Maintenance Duplex printing The [Menu] key > [Paper Input] > [Paper Type: (tray name)] > [Label Paper] > the [OK] key [Labels] Any input tray can...

Operating Instructions
Page 111
...> [Paper Input] > [Paper Type: (tray name)] > [Recycled Paper] > the [OK] key 109 Supported Recycled Paper Paper type setting using the printer driver Supported input tray Duplex printing The [Menu] key > [Paper Input] > [Paper Type: (tray name)] > [Color Paper] > the [OK] key [Color... The [Menu] key > [Paper Input] > [Paper Type: (tray name)] > [Preprinted Paper] > the [OK] key Paper type setting using the printer driver Supported input tray Duplex printing Note [Special 1], [Special 2], [Special 3] Any input tray can be used. • [Special Paper 1], [Special Paper 2]: Supported ...
...> [Paper Input] > [Paper Type: (tray name)] > [Recycled Paper] > the [OK] key 109 Supported Recycled Paper Paper type setting using the printer driver Supported input tray Duplex printing The [Menu] key > [Paper Input] > [Paper Type: (tray name)] > [Color Paper] > the [OK] key [Color... The [Menu] key > [Paper Input] > [Paper Type: (tray name)] > [Preprinted Paper] > the [OK] key Paper type setting using the printer driver Supported input tray Duplex printing Note [Special 1], [Special 2], [Special 3] Any input tray can be used. • [Special Paper 1], [Special Paper 2]: Supported ...
Operating Instructions
Page 112
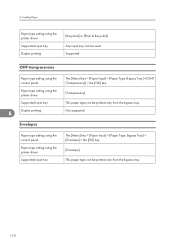
...OK] key [Transparency] This paper type can be used. Supported OHP transparencies Paper type setting using the control panel Paper type setting using the printer driver Supported input tray 6 Duplex printing Envelopes Paper type setting using the control panel Paper type setting using the printer... driver Supported input tray Duplex printing [Recycled] or [Plain & Recycled] Any input tray can be printed only from the bypass tray. 6. Not supported The [Menu] key ...
...OK] key [Transparency] This paper type can be used. Supported OHP transparencies Paper type setting using the control panel Paper type setting using the printer driver Supported input tray 6 Duplex printing Envelopes Paper type setting using the control panel Paper type setting using the printer... driver Supported input tray Duplex printing [Recycled] or [Plain & Recycled] Any input tray can be printed only from the bypass tray. 6. Not supported The [Menu] key ...
Operating Instructions
Page 114
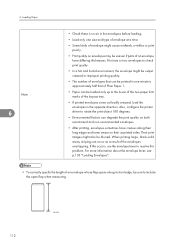
... when measuring. 112 ASH125S Their print images might cause misfeeds, wrinkles or print poorly. • Print quality on their unprinted sides. Also, configure the printer driver to the lower of the two paper limit marks of an envelope have creases along its short edge, be output creased or improper printing quality...
... when measuring. 112 ASH125S Their print images might cause misfeeds, wrinkles or print poorly. • Print quality on their unprinted sides. Also, configure the printer driver to the lower of the two paper limit marks of an envelope have creases along its short edge, be output creased or improper printing quality...
Operating Instructions
Page 117
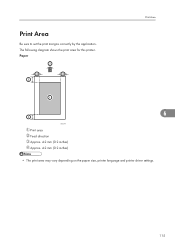
Paper 2 4 4 3 Print Area 1 6 3 CEC244 Print area Feed direction Approx. 4.2 mm (0.2 inches) Approx. 4.2 mm (0.2 inches) • The print area may vary depending on the paper size, printer language and printer driver settings. 115 Print Area Be sure to set the print margins correctly by the application. The following diagram shows the print area for this printer.
Paper 2 4 4 3 Print Area 1 6 3 CEC244 Print area Feed direction Approx. 4.2 mm (0.2 inches) Approx. 4.2 mm (0.2 inches) • The print area may vary depending on the paper size, printer language and printer driver settings. 115 Print Area Be sure to set the print margins correctly by the application. The following diagram shows the print area for this printer.
Operating Instructions
Page 118
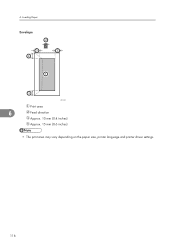
Loading Paper Envelope 2 3 3 4 1 3 CEC245 Print area 6 Feed direction Approx. 10 mm (0.4 inches) Approx. 15 mm (0.6 inches) • The print area may vary depending on the paper size, printer language and printer driver settings. 116 6.
Loading Paper Envelope 2 3 3 4 1 3 CEC245 Print area 6 Feed direction Approx. 10 mm (0.4 inches) Approx. 15 mm (0.6 inches) • The print area may vary depending on the paper size, printer language and printer driver settings. 116 6.
Operating Instructions
Page 119
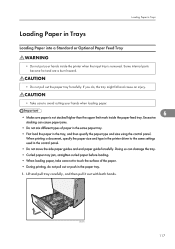
When printing a document, specify the paper size and type in the printer driver to avoid cutting your hands inside the printer when the input tray is not stacked higher than the upper limit mark inside the paper feed ...
When printing a document, specify the paper size and type in the printer driver to avoid cutting your hands inside the printer when the input tray is not stacked higher than the upper limit mark inside the paper feed ...
Operating Instructions
Page 124
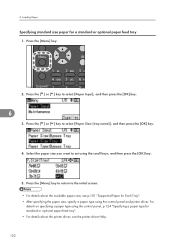
... or optional paper feed tray". • For details about the available paper size, see the printer driver Help. 122 Press the [Menu] key. Press the [ ] or [ ] key to set using the control panel and printer driver. Press the [Menu] key to return to select [Paper Size: (tray name)], and then press the... type using the scroll keys, and then press the [OK] key. 5. Press the [ ] or [ ] key to the initial screen. • For details about the printer driver, see p.101 "Supported Paper for a standard or optional paper feed tray 1. 6.
... or optional paper feed tray". • For details about the available paper size, see the printer driver Help. 122 Press the [Menu] key. Press the [ ] or [ ] key to set using the control panel and printer driver. Press the [Menu] key to return to select [Paper Size: (tray name)], and then press the... type using the scroll keys, and then press the [OK] key. 5. Press the [ ] or [ ] key to the initial screen. • For details about the printer driver, see p.101 "Supported Paper for a standard or optional paper feed tray 1. 6.
Operating Instructions
Page 126
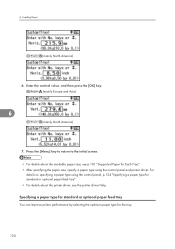
... or optional paper feed tray". • For details about the available paper size, see the printer driver Help. For details on specifying a paper type using the control panel and printer driver. 6. Loading Paper (mainly North America) 6. Press the [Menu] key to return to the initial... screen. • For details about the printer driver, see p.101 "Supported Paper for Each Tray". • After specifying ...
... or optional paper feed tray". • For details about the available paper size, see the printer driver Help. For details on specifying a paper type using the control panel and printer driver. 6. Loading Paper (mainly North America) 6. Press the [Menu] key to return to the initial... screen. • For details about the printer driver, see p.101 "Supported Paper for Each Tray". • After specifying ...
Operating Instructions
Page 128
... print side up. • During printing, do not conflict. Hold the both sides of the loaded paper on the control panel or in the printer driver. 6. Make sure the settings do not open or close the printer covers or bypass tray, or pull out or push in together. • Set the...
... print side up. • During printing, do not conflict. Hold the both sides of the loaded paper on the control panel or in the printer driver. 6. Make sure the settings do not open or close the printer covers or bypass tray, or pull out or push in together. • Set the...
Operating Instructions
Page 129
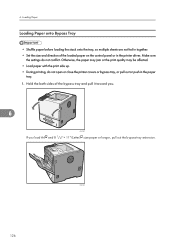
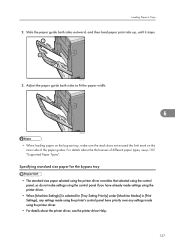
... panel, so do not make sure the stack does not exceed the limit mark on the inner side of different paper types, see the printer driver Help. 127 Slide the paper guide both sides to fit the paper width. 6 CEC024 • When loading paper on the bypass tray, make settings...; When [Machine Setting(s)] is selected for the bypass tray • The standard size paper selected using the printer driver overrides that selected using the printer driver. • For details about the thicknesses of the paper guides. Adjust the paper guide both sides outward, and then load paper print side up,...
... panel, so do not make sure the stack does not exceed the limit mark on the inner side of different paper types, see the printer driver Help. 127 Slide the paper guide both sides to fit the paper width. 6 CEC024 • When loading paper on the bypass tray, make settings...; When [Machine Setting(s)] is selected for the bypass tray • The standard size paper selected using the printer driver overrides that selected using the printer driver. • For details about the thicknesses of the paper guides. Adjust the paper guide both sides outward, and then load paper print side up,...


