Operating Instructions
Page 1
Operating Instructions Hardware Guide 1 Guide to the Printer 2 Setting Up the Printer 3 Installing Options 4 Connecting the Printer 5 Configuration 6 Loading Paper 7 Maintaining the Printer 8 Adjusting the Printer 9 Troubleshooting 10 Removing Misfed Paper 11 Appendix Read this machine and keep it handy for future reference. For safe and correct use this manual carefully before you use , be sure to read "Safety Information" before using the machine.
Operating Instructions Hardware Guide 1 Guide to the Printer 2 Setting Up the Printer 3 Installing Options 4 Connecting the Printer 5 Configuration 6 Loading Paper 7 Maintaining the Printer 8 Adjusting the Printer 9 Troubleshooting 10 Removing Misfed Paper 11 Appendix Read this machine and keep it handy for future reference. For safe and correct use this manual carefully before you use , be sure to read "Safety Information" before using the machine.

Operating Instructions
Page 2
...manufacturer recommends that might result from the manufacturer with your office products. For details, please contact your safety and benefit, read this manual in a handy place for its completeness or accuracy. Do not copy or print any questions concerning the legality of parts other than...in some countries. Copying or printing the following items is generally prohibited by law. The manufacturer shall not be available in this manual are subject to change without prior notice. Certain options might be liable for which reproduction is not inclusive. If you use of ...
...manufacturer recommends that might result from the manufacturer with your office products. For details, please contact your safety and benefit, read this manual in a handy place for its completeness or accuracy. Do not copy or print any questions concerning the legality of parts other than...in some countries. Copying or printing the following items is generally prohibited by law. The manufacturer shall not be available in this manual are subject to change without prior notice. Certain options might be liable for which reproduction is not inclusive. If you use of ...

Operating Instructions
Page 3
...Re-installing the Controller Board 47 1 TABLE OF CONTENTS How to Read This Manual...6 Symbols...6 Model-Specific Information...7 Machine Types...7 Positions of WARNING and CAUTION Labels 9 Power Switch Symbols...10 Manuals for This Printer...11 List of Option Installation...45 Where to Enter Characters......27 2. Installing Options Available Options...45 Order of Options...13 Operating Instructions...14 Reading the HTML Manuals on the CD-ROMs 14 Reading the HTML Manuals That You Install on the Power...39 Turning off the Power...41 Selecting the Display Language...43 Test ...
...Re-installing the Controller Board 47 1 TABLE OF CONTENTS How to Read This Manual...6 Symbols...6 Model-Specific Information...7 Machine Types...7 Positions of WARNING and CAUTION Labels 9 Power Switch Symbols...10 Manuals for This Printer...11 List of Option Installation...45 Where to Enter Characters......27 2. Installing Options Available Options...45 Order of Options...13 Operating Instructions...14 Reading the HTML Manuals on the CD-ROMs 14 Reading the HTML Manuals That You Install on the Power...39 Turning off the Power...41 Selecting the Display Language...43 Test ...

Operating Instructions
Page 8
This symbol is located at the end of data. How to Read This Manual Symbols This manual uses the following symbols: Indicates points to pay attention to when using the machine, and explanations of likely causes of paper misfeeds, damage to originals, ...
This symbol is located at the end of data. How to Read This Manual Symbols This manual uses the following symbols: Indicates points to pay attention to when using the machine, and explanations of likely causes of paper misfeeds, damage to originals, ...
Operating Instructions
Page 9
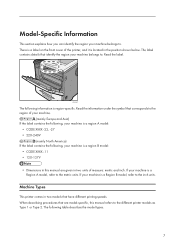
... a Region B model, refer to the different printer models as Type 1 or Type 2. Read the information under the symbol that are given in this manual are model-specific, this manual refers to the inch units. If your machine is a region B model: • CODE XXXX -11 • 120-127V • Dimensions in two units...
... a Region B model, refer to the different printer models as Type 1 or Type 2. Read the information under the symbol that are given in this manual are model-specific, this manual refers to the inch units. If your machine is a region B model: • CODE XXXX -11 • 120-127V • Dimensions in two units...
Operating Instructions
Page 13
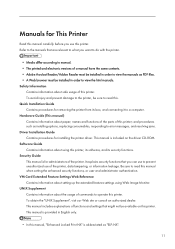
...• Adobe Acrobat Reader/Adobe Reader must be installed in order to view the manuals as PDF files. • A Web browser must be installed in English only. • In this manual, "Enhanced Locked Print NX" is included on this printer. and procedures such as ...Quick Installation Guide Contains procedures for removing the printer from its security functions. This manual includes explanations of the printer. UNIX Supplement Contains information about the usage of this manual when setting the enhanced security functions, or user and administrator authentication. VM Card ...
...• Adobe Acrobat Reader/Adobe Reader must be installed in order to view the manuals as PDF files. • A Web browser must be installed in English only. • In this manual, "Enhanced Locked Print NX" is included on this printer. and procedures such as ...Quick Installation Guide Contains procedures for removing the printer from its security functions. This manual includes explanations of the printer. UNIX Supplement Contains information about the usage of this manual when setting the enhanced security functions, or user and administrator authentication. VM Card ...

Operating Instructions
Page 14
• Manuals provided are specific to printer types. 12
• Manuals provided are specific to printer types. 12
Operating Instructions
Page 15
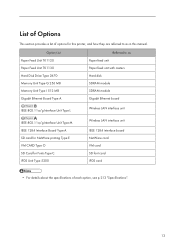
... Board Type A SD card for NetWare printing Type E VM CARD Type O SD Card for this printer, and how they are referred to as in this manual. List of Options This section provides a list of options for Fonts Type C IPDS Unit Type 5200 Wireless LAN interface unit IEEE 1284 interface board NetWare...
... Board Type A SD card for NetWare printing Type E VM CARD Type O SD Card for this printer, and how they are referred to as in this manual. List of Options This section provides a list of options for Fonts Type C IPDS Unit Type 5200 Wireless LAN interface unit IEEE 1284 interface board NetWare...
Operating Instructions
Page 16
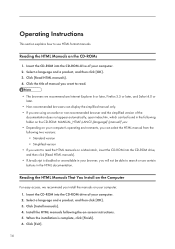
...• If you are Internet Explorer 6 or later, Firefox 3.5 or later, and Safari 4.0 or later. • Non-recommended browsers can display the simplified manual only. • If you want to use certain buttons in your computer. 1. Click [Exit]. 14 Select a language and a product, and then click [...OK]. 3. Reading the HTML Manuals That You Install on the Computer For easy access, we recommend are using an earlier or non-recommended browser and the simplified version of the...
...• If you are Internet Explorer 6 or later, Firefox 3.5 or later, and Safari 4.0 or later. • Non-recommended browsers can display the simplified manual only. • If you want to use certain buttons in your computer. 1. Click [Exit]. 14 Select a language and a product, and then click [...OK]. 3. Reading the HTML Manuals That You Install on the Computer For easy access, we recommend are using an earlier or non-recommended browser and the simplified version of the...
Operating Instructions
Page 17
...installation, menu folder names may differ. 15 Click the title of the manual you cannot install a manual, copy the "MANUAL_HTML" folder to your computer's hard drive, and then run "Setup.exe". • To delete an installed manual, on the [Start] menu, click [All Programs], then [Product ...uninstall the data. • Depending on the desktop. When opening the manuals from the [Start] menu, point to install the manuals. Log in as an Administrators group member. • The system requirements for installing the manuals are as follows: • Operating system: Windows XP/Vista/7, Windows ...
...installation, menu folder names may differ. 15 Click the title of the manual you cannot install a manual, copy the "MANUAL_HTML" folder to your computer's hard drive, and then run "Setup.exe". • To delete an installed manual, on the [Start] menu, click [All Programs], then [Product ...uninstall the data. • Depending on the desktop. When opening the manuals from the [Start] menu, point to install the manuals. Log in as an Administrators group member. • The system requirements for installing the manuals are as follows: • Operating system: Windows XP/Vista/7, Windows ...
Operating Instructions
Page 25
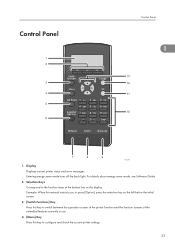
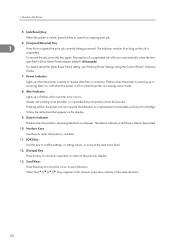
... status and error messages. For details about energy saver mode, see Software Guide. 2. Entering energy saver mode turns off the back light. Example: When this manual instructs you to press [Option], press the selection key on the left below the initial screen. 3. [Switch Functions] Key Press this key to switch between...
... status and error messages. For details about energy saver mode, see Software Guide. 2. Entering energy saver mode turns off the back light. Example: When this manual instructs you to press [Option], press the selection key on the left below the initial screen. 3. [Switch Functions] Key Press this key to switch between...
Operating Instructions
Page 26
... is off or while the printer is receiving data from a computer. Follow the instructions that appear on the display. 9. To resume the job, press this manual, press the scroll key of a suspended job will soon require maintenance or a replacement consumable such as the job is possible but print quality cannot be...
... is off or while the printer is receiving data from a computer. Follow the instructions that appear on the display. 9. To resume the job, press this manual, press the scroll key of a suspended job will soon require maintenance or a replacement consumable such as the job is possible but print quality cannot be...

Operating Instructions
Page 28
... be displayed before that you to press [ab/AB/12], press the selection key on the left selection key to move the cursor in this manual instructs you can enter. 2. If a character is 1 already displayed at the position indicated by pressing [ab/AB/12]. 26 CEC212 1. When ...the keys appear in each direction. 1. Example: When this manual, press the scroll key showing the same direction. 3. [Escape] Key Clears the entered text and numbers, and returns the display to display a list of ...
... be displayed before that you to press [ab/AB/12], press the selection key on the left selection key to move the cursor in this manual instructs you can enter. 2. If a character is 1 already displayed at the position indicated by pressing [ab/AB/12]. 26 CEC212 1. When ...the keys appear in each direction. 1. Example: When this manual, press the scroll key showing the same direction. 3. [Escape] Key Clears the entered text and numbers, and returns the display to display a list of ...
Operating Instructions
Page 103
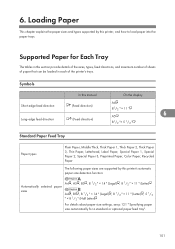
... in this printer, and how to load paper into the paper trays. Supported Paper for a standard or optional paper feed tray". 101 Symbols In this manual On the display A4 Short-edge feed direction (Feed direction) 81/2 " × 11 " A5 6 Long-edge feed direction (Feed direction) 81/2 "× 5 1/2 " Standard Paper Feed...
... in this printer, and how to load paper into the paper trays. Supported Paper for a standard or optional paper feed tray". 101 Symbols In this manual On the display A4 Short-edge feed direction (Feed direction) 81/2 " × 11 " A5 6 Long-edge feed direction (Feed direction) 81/2 "× 5 1/2 " Standard Paper Feed...
Operating Instructions
Page 104
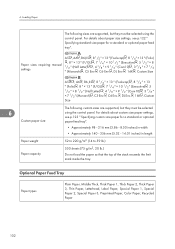
Paper sizes requiring manual settings A5 , A6 , B6 JIS , 8 1/2 " × 13 " (Foolscap) , 8 1/4 " × 13 " (Folio) , 8 " × 13 " (F/GL) , 7 1/4 " × 10 1/2 " (Executive) , 5 1/2 " × 8 1/2 " (Half Letter) , 4 1/8 " × 9 1/2 " (Com10) , 3 7/8 " × 7 1/2 " (Monarch) , C5 ...
Paper sizes requiring manual settings A5 , A6 , B6 JIS , 8 1/2 " × 13 " (Foolscap) , 8 1/4 " × 13 " (Folio) , 8 " × 13 " (F/GL) , 7 1/4 " × 10 1/2 " (Executive) , 5 1/2 " × 8 1/2 " (Half Letter) , 4 1/8 " × 9 1/2 " (Com10) , 3 7/8 " × 7 1/2 " (Monarch) , C5 ...

Operating Instructions
Page 105
..., see p.121 " Specifying paper size automatically for a standard or optional paper feed tray". B6 JIS , 8 1/2 " × 13 " (Foolscap) , 8 1/4 " × 13 " (Folio) , 8 " × Paper sizes requiring manual 13 " (F/GL) , 7 1/4 " × 10 1/2 " (Executive) , 5 1/2 " × 8 1/2 " (Half settings Letter) , 4 1/8 " × 9 1/2 " (Com10) , 3 7/8 " × 7 1/2 " (Monarch) 6 , C5 Env. , C6 Env. , DL Env. , 16K , Custom Size Custom paper size...
..., see p.121 " Specifying paper size automatically for a standard or optional paper feed tray". B6 JIS , 8 1/2 " × 13 " (Foolscap) , 8 1/4 " × 13 " (Folio) , 8 " × Paper sizes requiring manual 13 " (F/GL) , 7 1/4 " × 10 1/2 " (Executive) , 5 1/2 " × 8 1/2 " (Half settings Letter) , 4 1/8 " × 9 1/2 " (Com10) , 3 7/8 " × 7 1/2 " (Monarch) 6 , C5 Env. , C6 Env. , DL Env. , 16K , Custom Size Custom paper size...

Operating Instructions
Page 106
... 2, Thick Paper 3, Thin Paper, Letterhead, Label Paper, Special Paper 1, Special Paper 2, Special Paper 3, Preprinted Paper, Color Paper, Recycled Paper, OHP (Transparency), Envelope Paper sizes requiring manual settings The following custom sizes are supported, but they must be selected using the control panel. For details about custom size paper settings, see p.127...
... 2, Thick Paper 3, Thin Paper, Letterhead, Label Paper, Special Paper 1, Special Paper 2, Special Paper 3, Preprinted Paper, Color Paper, Recycled Paper, OHP (Transparency), Envelope Paper sizes requiring manual settings The following custom sizes are supported, but they must be selected using the control panel. For details about custom size paper settings, see p.127...
Operating Instructions
Page 157
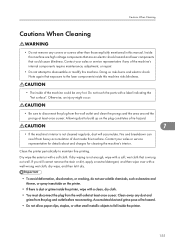
.... 155 If dry wiping is not cleaned regularly, dust will accumulate. Clean away any covers or screws other small metallic objects to fall inside this manual. Allowing dust to build up on the printer. • If there is wrung out well. Do not touch the parts with a soft cloth. Dry wipe...
.... 155 If dry wiping is not cleaned regularly, dust will accumulate. Clean away any covers or screws other small metallic objects to fall inside this manual. Allowing dust to build up on the printer. • If there is wrung out well. Do not touch the parts with a soft cloth. Dry wipe...
Operating Instructions
Page 176
... then turn off then on the power again, and then execute [Reset IPDS Fonts]. Consult your sales or service representative. 174 IPv6 Address already exists Manual Config. Contact your network administrator.
... then turn off then on the power again, and then execute [Reset IPDS Fonts]. Consult your sales or service representative. 174 IPv6 Address already exists Manual Config. Contact your network administrator.
Operating Instructions
Page 177
... cartridge. For details about installing the unit, see the procedure for removing the Fusing unit in p.197 "Paper Misfeed Message (B)(C)" or the unit replacement procedure manual provided with Hard Disk Please call service. It may be incorrectly installed. Replace print cartridge. /Print Cartridge replacement is installed properly or contact your sales...
... cartridge. For details about installing the unit, see the procedure for removing the Fusing unit in p.197 "Paper Misfeed Message (B)(C)" or the unit replacement procedure manual provided with Hard Disk Please call service. It may be incorrectly installed. Replace print cartridge. /Print Cartridge replacement is installed properly or contact your sales...


