Operating Instructions
Page 6
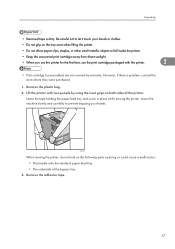
...Cannot Print Properly...181 Paper Misfeeds Occur Frequently...183 The printed image is different from the image on the computer 185 When Printer is Jammed...191 Paper Misfeed Message (A)...193 Paper Misfeed Message (B)(C)...197 Paper Misfeed Message (Y1)(Y2)(Y3)(Y4 202 Paper...209 Consumables...211 4 Removing Misfed Paper When Paper is Not Functioning Properly 186 Additional Troubleshooting...188 10. Maintaining the Printer Replacing the Print Cartridge...149 Replacing the Maintenance Kit...154 Cautions When Cleaning...155 Cleaning the Friction Pad and the Paper Feed Roller 156 Cleaning...
...Cannot Print Properly...181 Paper Misfeeds Occur Frequently...183 The printed image is different from the image on the computer 185 When Printer is Jammed...191 Paper Misfeed Message (A)...193 Paper Misfeed Message (B)(C)...197 Paper Misfeed Message (Y1)(Y2)(Y3)(Y4 202 Paper...209 Consumables...211 4 Removing Misfed Paper When Paper is Not Functioning Properly 186 Additional Troubleshooting...188 10. Maintaining the Printer Replacing the Print Cartridge...149 Replacing the Maintenance Kit...154 Cautions When Cleaning...155 Cleaning the Friction Pad and the Paper Feed Roller 156 Cleaning...
Operating Instructions
Page 23
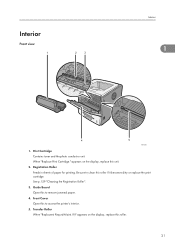
... Front view Interior 1 CEC209 1. Be sure to remove jammed paper. 4. See p.159 "Cleaning the Registration Roller". 3. When "Replace Print Cartridge." Guide Board Open this to clean this to access the printer's interior. 5. Print Cartridge Contains toner and the photo conductor unit. Front Cover Open this roller if it becomes dirty or replace the...
... Front view Interior 1 CEC209 1. Be sure to remove jammed paper. 4. See p.159 "Cleaning the Registration Roller". 3. When "Replace Print Cartridge." Guide Board Open this to clean this to access the printer's interior. 5. Print Cartridge Contains toner and the photo conductor unit. Front Cover Open this roller if it becomes dirty or replace the...
Operating Instructions
Page 26
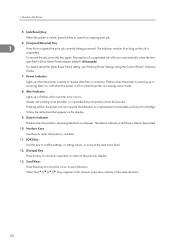
.... Resumption of the same direction. 24 Flashing yellow: the printer will occur automatically when the time specified in [Auto Reset Timer] elapses (default: 60 seconds). 1. The indicator remains lit as long as print cartridge. Steady red: printing is not possible, or is suspended.... Number Keys Use these keys to move to the previous display. 13. For details about the [Auto Reset Timer] setting, see "Making Printer Settings Using the Control Panel", Software Guide...
.... Resumption of the same direction. 24 Flashing yellow: the printer will occur automatically when the time specified in [Auto Reset Timer] elapses (default: 60 seconds). 1. The indicator remains lit as long as print cartridge. Steady red: printing is not possible, or is suspended.... Number Keys Use these keys to move to the previous display. 13. For details about the [Auto Reset Timer] setting, see "Making Printer Settings Using the Control Panel", Software Guide...
Operating Instructions
Page 39
..., contact the store where they were purchased. 1. Remove the plastic bag. 2. CEC232 When moving the printer. However, if there is dirty. Lift the printer with the printer. 2 • Print cartridge (consumables) are not covered by using the inset grips on both sides of the bypass tray. 3. ... small metallic objects to let it touch your hands. Be careful not to fall inside the printer. • Keep the uncovered print cartridge away from direct sunlight. • When you use this printer for the first time, use the print cartridge packaged with two people by warranty.
..., contact the store where they were purchased. 1. Remove the plastic bag. 2. CEC232 When moving the printer. However, if there is dirty. Lift the printer with the printer. 2 • Print cartridge (consumables) are not covered by using the inset grips on both sides of the bypass tray. 3. ... small metallic objects to let it touch your hands. Be careful not to fall inside the printer. • Keep the uncovered print cartridge away from direct sunlight. • When you use this printer for the first time, use the print cartridge packaged with two people by warranty.
Operating Instructions
Page 151
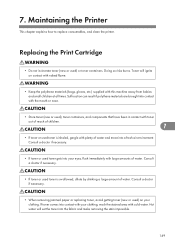
Doing so risks burns. Hot water will ignite on your eyes, flush immediately with cold water. Maintaining the Printer This chapter explains how to replace consumables, and clean the printer. Consult a doctor if necessary. • If toner or used toner gets into a fresh air environment. ... used ) on contact with naked flame. • Keep the polythene materials (bags, gloves, etc.) supplied with plenty of water. Replacing the Print Cartridge • Do not incinerate toner (new or used toner is swallowed, dilute by drinking a large amount of children. 7 • If toner or...
Doing so risks burns. Hot water will ignite on your eyes, flush immediately with cold water. Maintaining the Printer This chapter explains how to replace consumables, and clean the printer. Consult a doctor if necessary. • If toner or used toner gets into a fresh air environment. ... used ) on contact with naked flame. • Keep the polythene materials (bags, gloves, etc.) supplied with plenty of water. Replacing the Print Cartridge • Do not incinerate toner (new or used toner is swallowed, dilute by drinking a large amount of children. 7 • If toner or...
Operating Instructions
Page 152
... of other components. • Do not shake or shock the print cartridge. • Do not allow paper clips, staples, or other small metallic objects to fall inside the printer. • Do not expose the print cartridge without its cover to drop it . Therefore, we recommend you always keep... a new print cartridge ready. • The print cartridge might be careful not to direct sunlight for a long time. ...
... of other components. • Do not shake or shock the print cartridge. • Do not allow paper clips, staples, or other small metallic objects to fall inside the printer. • Do not expose the print cartridge without its cover to drop it . Therefore, we recommend you always keep... a new print cartridge ready. • The print cartridge might be careful not to direct sunlight for a long time. ...

Operating Instructions
Page 153
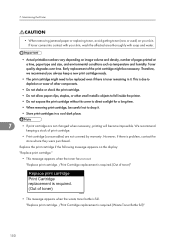
... print cartrdg soon." Toner is ending. Component at end of the photoconductor unit is almost empty. When the printer detects this condition, it will display the following message appears on the control panel. "Prepare Replacement" Prepare Replacement Check print cartridge replacement(s). Replace print cartrdg soon. CEE109 Replace print cartrdg soon. CEE134 151
... print cartrdg soon." Toner is ending. Component at end of the photoconductor unit is almost empty. When the printer detects this condition, it will display the following message appears on the control panel. "Prepare Replacement" Prepare Replacement Check print cartridge replacement(s). Replace print cartrdg soon. CEE109 Replace print cartrdg soon. CEE134 151
Operating Instructions
Page 154
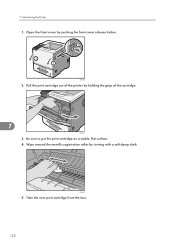
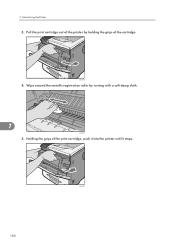
Open the front cover by holding the grips of the printer by pushing the front cover release button. 1 2 2 CEC025 2. CEC040 5. Maintaining the Printer 1. Be sure to put the print cartridge on a stable, flat surface. 4. Pull the print cartridge out of the cartridge. 7 CEC026 3. Wipe around the metallic registration roller by turning with a soft damp cloth. 7. Take the new print cartridge from the box. 152
Open the front cover by holding the grips of the printer by pushing the front cover release button. 1 2 2 CEC025 2. CEC040 5. Maintaining the Printer 1. Be sure to put the print cartridge on a stable, flat surface. 4. Pull the print cartridge out of the cartridge. 7 CEC026 3. Wipe around the metallic registration roller by turning with a soft damp cloth. 7. Take the new print cartridge from the box. 152

Operating Instructions
Page 155
Replacing the Print Cartridge 6. After that, close the cover easily, pull out the print cartridge from the printer and reinsert it stops. CEC028 7. If you cannot close the front cover again. 153 Close the front cover. 7 CEC214 • Do not close the front cover with excessive force. Hold the grips of the cartridge, and then insert it into the printer until it again.
Replacing the Print Cartridge 6. After that, close the cover easily, pull out the print cartridge from the printer and reinsert it stops. CEC028 7. If you cannot close the front cover again. 153 Close the front cover. 7 CEC214 • Do not close the front cover with excessive force. Hold the grips of the cartridge, and then insert it into the printer until it again.

Operating Instructions
Page 161
...front cover by specks of paper stuck to cool down or stand it vertically. • Do not put the print cartridge on printed OHP transparencies. • Do not hold the print cartridge upside down can result in a burn. • The inside of the machine could be very hot. Turn off the... power switch and wait for the printer to the roller) appear on an unstable or tilted surface. • Do not use ...
...front cover by specks of paper stuck to cool down or stand it vertically. • Do not put the print cartridge on printed OHP transparencies. • Do not hold the print cartridge upside down can result in a burn. • The inside of the machine could be very hot. Turn off the... power switch and wait for the printer to the roller) appear on an unstable or tilted surface. • Do not use ...
Operating Instructions
Page 162
Pull the print cartridge out of the printer by turning with a soft damp cloth. 7 CEC040 5. Holding the grips of the cartridge. CEC026 4. CEC028 160 Wipe around the metallic registration roller by holding the grips of the print cartridge, push it into the printer until it stops. 7. Maintaining the Printer 3.
Pull the print cartridge out of the printer by turning with a soft damp cloth. 7 CEC040 5. Holding the grips of the cartridge. CEC026 4. CEC028 160 Wipe around the metallic registration roller by holding the grips of the print cartridge, push it into the printer until it stops. 7. Maintaining the Printer 3.

Operating Instructions
Page 163
If you cannot close the front cover again. 7 161 After that, close the cover easily, pull the print cartridge out of the printer and insert it again. Cleaning the Registration Roller CEC214 • Carefully close the front cover. Close the front cover. 6.
If you cannot close the front cover again. 7 161 After that, close the cover easily, pull the print cartridge out of the printer and insert it again. Cleaning the Registration Roller CEC214 • Carefully close the front cover. Close the front cover. 6.
Operating Instructions
Page 176
.... Option RAM Error The printer cannot detect an optional SDRAM module. Prepare Replacement Check print cartridge replacement(s). The toner has run out, or the photo conductor unit has reached the end of the machine. The printer cannot communicate with the printer's font file. Select Reset...exists Link-local Address(109/209) The same IPv6 address already exists. IPv6 Address already exists Manual Config. Prepare a new print cartridge. IPv6 Address already exists Stateless Address(109/209) The same IPv6 address already exists. Load paper in the tray, press [JobReset...
.... Option RAM Error The printer cannot detect an optional SDRAM module. Prepare Replacement Check print cartridge replacement(s). The toner has run out, or the photo conductor unit has reached the end of the machine. The printer cannot communicate with the printer's font file. Select Reset...exists Link-local Address(109/209) The same IPv6 address already exists. IPv6 Address already exists Manual Config. Prepare a new print cartridge. IPv6 Address already exists Stateless Address(109/209) The same IPv6 address already exists. Load paper in the tray, press [JobReset...
Operating Instructions
Page 177
...the message is installed properly or contact your sales or service representative to obtain a new print cartridge. The printer cannot detect a hard disk. Replace print cartridge. /Print Cartridge replacement is installed properly or contact your sales or service representative to obtain a new unit. ... It may be installed correctly. For details about installing the unit, see p.149 "Replacing the Print Cartridge". Problem:Wireless card Please call service. The printer cannot detect a Wireless LAN board. Check if it is still displayed after re-installation, contact your ...
...the message is installed properly or contact your sales or service representative to obtain a new print cartridge. The printer cannot detect a hard disk. Replace print cartridge. /Print Cartridge replacement is installed properly or contact your sales or service representative to obtain a new unit. ... It may be installed correctly. For details about installing the unit, see p.149 "Replacing the Print Cartridge". Problem:Wireless card Please call service. The printer cannot detect a Wireless LAN board. Check if it is still displayed after re-installation, contact your ...
Operating Instructions
Page 178
...power off and re-install the Print cartridge. This NetBIOS name is already in use.(108/208) The NetBIOS name specified for the printer is invalid. The printer has detected a USB board failure. The message indicates the supplies that the printer tried to order. The same IPv4...in use by another device on again. Consult your sales or service representative. The print cartridge may not be installed correctly. The automatic supply order failed. 9. Values set for the printer is still displayed after re-installation, contact your sales or service representative. Press Exit ...
...power off and re-install the Print cartridge. This NetBIOS name is already in use.(108/208) The NetBIOS name specified for the printer is invalid. The printer has detected a USB board failure. The message indicates the supplies that the printer tried to order. The same IPv4...in use by another device on again. Consult your sales or service representative. The print cartridge may not be installed correctly. The automatic supply order failed. 9. Values set for the printer is still displayed after re-installation, contact your sales or service representative. Press Exit ...

Operating Instructions
Page 179
... was pressed. Paper may have jammed or print cartridge may need replenishing. 9 • Users cannot mute the printer's tone alerts. Single short beep. Job completed. Cause After cooling or being switched on, the printer has fully warmed up and is changing back to... jam or toner request, if the printer's covers are pressed. Single long beep. A valid control panel or screen key was reset. Printer requires user attention. Printer initialized. Tone pattern Two long beeps. Meaning Printer ready. A Printer job has finished. Printer alert. The screen is ready for use...
... was pressed. Paper may have jammed or print cartridge may need replenishing. 9 • Users cannot mute the printer's tone alerts. Single short beep. Job completed. Cause After cooling or being switched on, the printer has fully warmed up and is changing back to... jam or toner request, if the printer's covers are pressed. Single long beep. A valid control panel or screen key was reset. Printer requires user attention. Printer initialized. Tone pattern Two long beeps. Meaning Printer ready. A Printer job has finished. Printer alert. The screen is ready for use...
Operating Instructions
Page 183
...appears on the display, replace the print cartridge. Raise the resolution in the PostScript 3 printer driver's dialog box. For details, see p.149 "Replacing the Print Cartridge". 181 For details, see the printer driver Help. For details, see the printer driver Help. For example, you are ...Print Properly Toner smears appear on the print side of the application. When the "Replace print cartridge." If rapid change in the PostScript 3 printer driver's dialog box. See the printer driver Help. • Check that has been stored properly. Solid lines are coarse. •...
...appears on the display, replace the print cartridge. Raise the resolution in the PostScript 3 printer driver's dialog box. For details, see p.149 "Replacing the Print Cartridge". 181 For details, see the printer driver Help. For details, see the printer driver Help. For example, you are ...Print Properly Toner smears appear on the print side of the application. When the "Replace print cartridge." If rapid change in the PostScript 3 printer driver's dialog box. See the printer driver Help. • Check that has been stored properly. Solid lines are coarse. •...

Operating Instructions
Page 197
2. Open the front cover by holding the grips of the printer by pushing the front cover release button. 1 2 2 CEC025 4. Paper Misfeed Message (A) CEC229 3. Carefully slide the paper tray into the printer until it stops. Pull the print cartridge out of the cartridge. 10 CEC026 195
2. Open the front cover by holding the grips of the printer by pushing the front cover release button. 1 2 2 CEC025 4. Paper Misfeed Message (A) CEC229 3. Carefully slide the paper tray into the printer until it stops. Pull the print cartridge out of the cartridge. 10 CEC026 195
Operating Instructions
Page 198
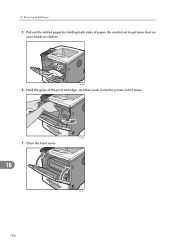
10. Pull out the misfed paper by holding both sides of the print cartridge, and then push it into the printer until it stops. CEC028 7. Hold the grips of paper. Be careful not to get toner dust on your hands or clothes. 1 2 CEC080 6. Close the front cover. 10 CEC214 196 Removing Misfed Paper 5.
10. Pull out the misfed paper by holding both sides of the print cartridge, and then push it into the printer until it stops. CEC028 7. Hold the grips of paper. Be careful not to get toner dust on your hands or clothes. 1 2 CEC080 6. Close the front cover. 10 CEC214 196 Removing Misfed Paper 5.

Operating Instructions
Page 199
...down or stand it before opening the front cover. • Be sure to tear and leave scraps of the cartridge. 10 CEC026 197 This might cause a misfeed and damage the printer. • If paper is fed from the bypass tray, be sure to remove all the paper from the... bypass tray and close it vertically. 1. Open the front cover by holding the grips of paper in the printer. Paper Misfeed Message (B)(C) Paper Misfeed Message (B)(C) The " (B)(C) Open Front/Rear Cover and remove misfeed." Pull the print cartridge out of the printer by pushing the front cover release button. 1 2 2 CEC025 2.
...down or stand it before opening the front cover. • Be sure to tear and leave scraps of the cartridge. 10 CEC026 197 This might cause a misfeed and damage the printer. • If paper is fed from the bypass tray, be sure to remove all the paper from the... bypass tray and close it vertically. 1. Open the front cover by holding the grips of paper in the printer. Paper Misfeed Message (B)(C) Paper Misfeed Message (B)(C) The " (B)(C) Open Front/Rear Cover and remove misfeed." Pull the print cartridge out of the printer by pushing the front cover release button. 1 2 2 CEC025 2.


