User Guide
Page 8
... the Alert Message Settings 259 Configuring the SNMP Settings 260 Configuring the SMTP Settings 261 Printing Reports 263 Configuring the Administrator Settings 264 Configuring the Password 264 Restoring the Default Settings 264 Backing Up the Machine's Settings 265 Restoring the Machine's Settings from a Backup File 266 Configuring the Date and Time...
... the Alert Message Settings 259 Configuring the SNMP Settings 260 Configuring the SMTP Settings 261 Printing Reports 263 Configuring the Administrator Settings 264 Configuring the Password 264 Restoring the Default Settings 264 Backing Up the Machine's Settings 265 Restoring the Machine's Settings from a Backup File 266 Configuring the Date and Time...
User Guide
Page 20
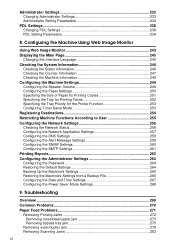
... a network To use this machine as a printer via network connection: A Connect the machine to the Machine Connecting via a network You can password protect your job is only available when printing from a computer running a Windows operating system using the machine's control panel. C Install the printer... on the driver CD-ROM. This means that your print job. Important ❒ This function is printed only after you enter the password using the PCL6 printer driver. 10 BSP004S For details, see the instructions provided on a computer. For details, see p.46 "Configuring the...
... a network To use this machine as a printer via network connection: A Connect the machine to the Machine Connecting via a network You can password protect your job is only available when printing from a computer running a Windows operating system using the machine's control panel. C Install the printer... on the driver CD-ROM. This means that your print job. Important ❒ This function is printed only after you enter the password using the PCL6 printer driver. 10 BSP004S For details, see the instructions provided on a computer. For details, see p.46 "Configuring the...
User Guide
Page 21
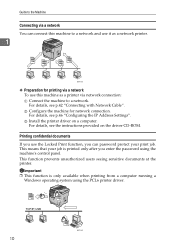
... To always enlarge or reduce copies: A Configure the machine's default [Reduce/Enlarge] setting. For details, see p.119 "Making Enlarged or Reduced Copies". 11 B Enter the password using the {Reduce/Enlarge} key before starting the current job. For details, see p.202 "Copy Settings". To use this machine when used as a Locked Print...
... To always enlarge or reduce copies: A Configure the machine's default [Reduce/Enlarge] setting. For details, see p.119 "Making Enlarged or Reduced Copies". 11 B Enter the password using the {Reduce/Enlarge} key before starting the current job. For details, see p.202 "Copy Settings". To use this machine when used as a Locked Print...

User Guide
Page 56
... select [DHCP Activated], and then press the {OK} key. G Confirm the setting, and then press the { } key. 46 C If you are requested to enter a password, enter the password using the num- Getting Started Configuring the Machine This section describes configuring the settings required to use the machine on whether IP address information...
... select [DHCP Activated], and then press the {OK} key. G Confirm the setting, and then press the { } key. 46 C If you are requested to enter a password, enter the password using the num- Getting Started Configuring the Machine This section describes configuring the settings required to use the machine on whether IP address information...
User Guide
Page 57
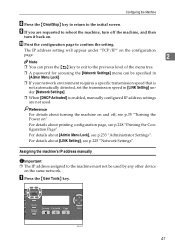
... under "TCP/IP" on the configuration page. 2 Note ❒ You can press the { } key to exit to the previous level of the menu tree. ❒ A password for accessing the [Network Settings] menu can be specified in [Admin Menu Lock]. ❒ If your network environment requires a specific transmission speed that is not...
... under "TCP/IP" on the configuration page. 2 Note ❒ You can press the { } key to exit to the previous level of the menu tree. ❒ A password for accessing the [Network Settings] menu can be specified in [Admin Menu Lock]. ❒ If your network environment requires a specific transmission speed that is not...
User Guide
Page 58
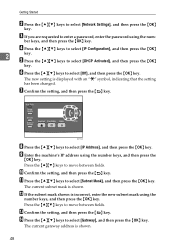
... subnet mask is incorrect, enter the new subnet mask using the number keys, and then press the {OK} key. N Press the {U}{T} keys to enter a password, enter the password using the num- Getting Started B Press the {U}{T} keys to select [IP Configuration], and then press the {OK} 2 key. D Press the {U}{T} keys to select [Network...
... subnet mask is incorrect, enter the new subnet mask using the number keys, and then press the {OK} key. N Press the {U}{T} keys to enter a password, enter the password using the num- Getting Started B Press the {U}{T} keys to select [IP Configuration], and then press the {OK} 2 key. D Press the {U}{T} keys to select [Network...
User Guide
Page 59
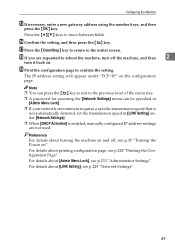
... the Power on". For details about [LINK Setting], see p.233 "Administrator Settings". S Print the configuration page to the previous level of the menu tree. ❒ A password for accessing the [Network Settings] menu can be specified in [Admin Menu Lock]. ❒ If your network environment requires a specific transmission speed that is not...
... the Power on". For details about [LINK Setting], see p.233 "Administrator Settings". S Print the configuration page to the previous level of the menu tree. ❒ A password for accessing the [Network Settings] menu can be specified in [Admin Menu Lock]. ❒ If your network environment requires a specific transmission speed that is not...
User Guide
Page 60
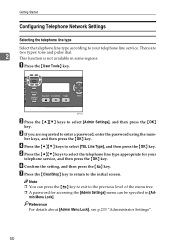
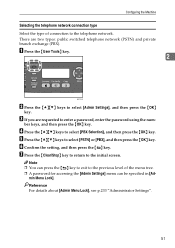
...TEL Line Type], and then press the {OK} key. E Press the {U}{T} keys to the previous level of the menu tree. ❒ A password for your telephone line service. Note ❒ You can press the { } key to exit to select the telephone line type appropriate for accessing the ...BSP051S B Press the {U}{T} keys to the initial screen. ber keys, and then press the {OK} key. D Press the {U}{T} keys to enter a password, enter the password using the num- Reference For details about [Admin Menu Lock], see p.233 "Administrator Settings". 50 min Menu Lock]. C If you are two types:...
...TEL Line Type], and then press the {OK} key. E Press the {U}{T} keys to the previous level of the menu tree. ❒ A password for your telephone line service. Note ❒ You can press the { } key to exit to select the telephone line type appropriate for accessing the ...BSP051S B Press the {U}{T} keys to the initial screen. ber keys, and then press the {OK} key. D Press the {U}{T} keys to enter a password, enter the password using the num- Reference For details about [Admin Menu Lock], see p.233 "Administrator Settings". 50 min Menu Lock]. C If you are two types:...
User Guide
Page 61
D Press the {U}{T} keys to enter a password, enter the password using the num- F Confirm the setting, and then press the { } key. Reference For details about [Admin Menu Lock], see p.233 "Administrator Settings". 51 There are ...] or [PBX], and then press the {OK} key. Configuring the Machine Selecting the telephone network connection type Select the type of the menu tree. ❒ A password for accessing the [Admin Settings] menu can press the { } key to exit to the previous level of connection to the initial screen. E Press the {U}{T} keys...
D Press the {U}{T} keys to enter a password, enter the password using the num- F Confirm the setting, and then press the { } key. Reference For details about [Admin Menu Lock], see p.233 "Administrator Settings". 51 There are ...] or [PBX], and then press the {OK} key. Configuring the Machine Selecting the telephone network connection type Select the type of the menu tree. ❒ A password for accessing the [Admin Settings] menu can press the { } key to exit to the previous level of connection to the initial screen. E Press the {U}{T} keys...
User Guide
Page 62
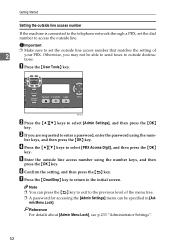
... machine is connected to the telephone network through a PBX, set the outside line access number that matches the setting of the menu tree. ❒ A password for accessing the [Admin Settings] menu can press the { } key to exit to set the dial number to outside destinations. A Press the {User ...} key. C If you may not be specified in [Ad- ber keys, and then press the {OK} key. D Press the {U}{T} keys to enter a password, enter the password using the number keys, and then press the {OK} key. min Menu Lock]. Important ❒ Make sure to the previous level of 2 your PBX...
... machine is connected to the telephone network through a PBX, set the outside line access number that matches the setting of the menu tree. ❒ A password for accessing the [Admin Settings] menu can press the { } key to exit to set the dial number to outside destinations. A Press the {User ...} key. C If you may not be specified in [Ad- ber keys, and then press the {OK} key. D Press the {U}{T} keys to enter a password, enter the password using the number keys, and then press the {OK} key. min Menu Lock]. Important ❒ Make sure to the previous level of 2 your PBX...
User Guide
Page 101
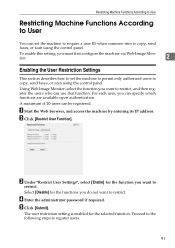
... to User You can set the machine to permit only authorized users to copy, send faxes, or scan using the control panel. D Enter the administrator password if required.
... to User You can set the machine to permit only authorized users to copy, send faxes, or scan using the control panel. D Enter the administrator password if required.
User Guide
Page 102
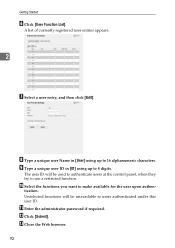
K Enter the administrator password if required. The user ID will be used to authenticate users at the control panel, when they try to use a restricted function. Unselected functions will ...
K Enter the administrator password if required. The user ID will be used to authenticate users at the control panel, when they try to use a restricted function. Unselected functions will ...
User Guide
Page 103
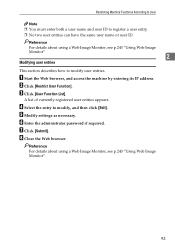
F Enter the administrator password if required. B Click [Restrict User Function]. Reference For details about using a Web Image Monitor, see p.243 "Using Web Image Monitor". 93 Restricting Machine Functions According ...
F Enter the administrator password if required. B Click [Restrict User Function]. Reference For details about using a Web Image Monitor, see p.243 "Using Web Image Monitor". 93 Restricting Machine Functions According ...
User Guide
Page 104
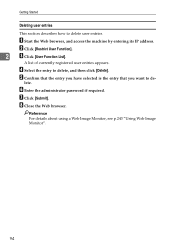
... user entries appears. E Confirm that the entry you have selected is the entry that you want to delete, and then click [Delete]. F Enter the administrator password if required. G Click [Submit]. D Select the entry to de- Reference For details about using a Web Image Monitor, see p.243 "Using Web Image Monitor". 94 lete...
... user entries appears. E Confirm that the entry you have selected is the entry that you want to delete, and then click [Delete]. F Enter the administrator password if required. G Click [Submit]. D Select the entry to de- Reference For details about using a Web Image Monitor, see p.243 "Using Web Image Monitor". 94 lete...
User Guide
Page 116
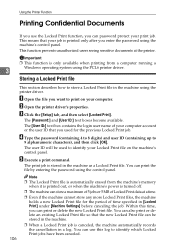
...[User ID:] text box contains the login user name of time specified in [Locked Print] under [Machine Settings] before canceling the job. D Type the password (containing 4 to 8 digits) and user ID (containing up to store a Locked Print file in the machine. ❒ When a Locked Print job is...file This section describes how to 9 alphanumeric characters), and then click [OK]. C Click the [Setup] tab, and then select [Locked Print]. The [Password:] and [User ID:] text boxes become available. You can use the Locked Print function, you used to identify your Locked Print file on your computer...
...[User ID:] text box contains the login user name of time specified in [Locked Print] under [Machine Settings] before canceling the job. D Type the password (containing 4 to 8 digits) and user ID (containing up to store a Locked Print file in the machine. ❒ When a Locked Print job is...file This section describes how to 9 alphanumeric characters), and then click [OK]. C Click the [Setup] tab, and then select [Locked Print]. The [Password:] and [User ID:] text boxes become available. You can use the Locked Print function, you used to identify your Locked Print file on your computer...
User Guide
Page 117
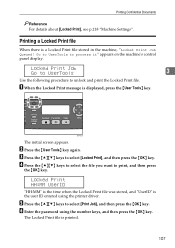
... the {User Tools} key. The Locked Print file is the user ID entered using the number keys, and then press the {OK} key. F Enter the password using the printer driver.
... the {User Tools} key. The Locked Print file is the user ID entered using the number keys, and then press the {OK} key. F Enter the password using the printer driver.
User Guide
Page 118
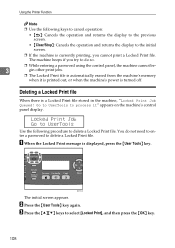
...the operation and returns the display to the initial screen. ❒ If the machine is currently printing, you try to do not need to enter a password to select [Locked Print], and then press the {OK} key. 108 Deleting a Locked Print file When there is displayed, press the {User Tools...} key. You do so. ❒ While entering a password using the control panel, the machine cannot be- 3 gin other print jobs. ❒ The Locked Print file is turned off. A When the Locked Print ...
...the operation and returns the display to the initial screen. ❒ If the machine is currently printing, you try to do not need to enter a password to select [Locked Print], and then press the {OK} key. 108 Deleting a Locked Print file When there is displayed, press the {User Tools...} key. You do so. ❒ While entering a password using the control panel, the machine cannot be- 3 gin other print jobs. ❒ The Locked Print file is turned off. A When the Locked Print ...
User Guide
Page 144
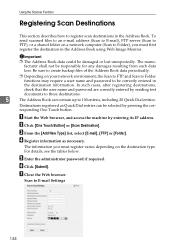
... on your network environment, the Scan to FTP and Scan to Folder functions may require a user name and password to 100 entries, including 20 Quick Dial entries. In such cases, after registering destinations, check that the user name and...folder on a network computer (Scan to Folder), you must first register the destination in the Address Book using Web Image Monitor. E Enter the administrator password if required. B Click [One Touch Button] or [Scan Destination]. F Click [Submit]. Scan to register scan destinations in the destination information. Important ...
... on your network environment, the Scan to FTP and Scan to Folder functions may require a user name and password to 100 entries, including 20 Quick Dial entries. In such cases, after registering destinations, check that the user name and...folder on a network computer (Scan to Folder), you must first register the destination in the Address Book using Web Image Monitor. E Enter the administrator password if required. B Click [One Touch Button] or [Scan Destination]. F Click [Submit]. Scan to register scan destinations in the destination information. Important ...

User Guide
Page 146
... pages in a document, but JPEG does not. Can contain up to 32 characters. E-mail address to 64 characters. Password for logging in color. Select the scanning size for B/W Required FTP User Name Password Directory Sender Document size Optional Optional Optional Optional Optional 136 Description Select when setting the destination as a Quick Dial...
... pages in a document, but JPEG does not. Can contain up to 32 characters. E-mail address to 64 characters. Password for logging in color. Select the scanning size for B/W Required FTP User Name Password Directory Sender Document size Optional Optional Optional Optional Optional 136 Description Select when setting the destination as a Quick Dial...
User Guide
Page 147
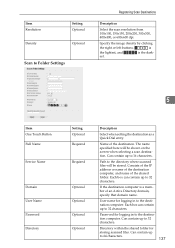
est. 5 Item One Touch Button Full Name Service Name Domain User Name Password Directory Setting Optional Required Required Optional Optional Optional Optional Description Select when setting the destination as a Quick Dial entry. Can contain up to 64 characters. ... will be shown on the screen when selecting a scan destination. Item Resolution Density Setting Optional Optional Scan to 32 characters. Path to the destination computer. Password for storing scanned files.
est. 5 Item One Touch Button Full Name Service Name Domain User Name Password Directory Setting Optional Required Required Optional Optional Optional Optional Description Select when setting the destination as a Quick Dial entry. Can contain up to 64 characters. ... will be shown on the screen when selecting a scan destination. Item Resolution Density Setting Optional Optional Scan to 32 characters. Path to the destination computer. Password for storing scanned files.


