User's Guide
Page 4
... ...11.1 Scanning to a USB memory device ...11.1 Printing from a USB memory device ...11.2 Backing up data ...11.3 Managing USB memory ...11.3 12. Supplies and accessories Toner cartridges ...12.1 Accessories ...12.1 Scanning Scanning basics ...8.1 Scanning to multiple destinations ...9.6 Sending a delayed fax ...9.7 Sending a priority fax ...9.7 Forwarding faxes ...9.8 10.
... ...11.1 Scanning to a USB memory device ...11.1 Printing from a USB memory device ...11.2 Backing up data ...11.3 Managing USB memory ...11.3 12. Supplies and accessories Toner cartridges ...12.1 Accessories ...12.1 Scanning Scanning basics ...8.1 Scanning to multiple destinations ...9.6 Sending a delayed fax ...9.7 Sending a priority fax ...9.7 Forwarding faxes ...9.8 10.
User's Guide
Page 5
Troubleshooting Clearing document jams ...14.1 Clearing paper jams ...14.2 Understanding display messages ...14.7 Toner cartridge-related messages ...14.10 Solving other problems ...14.11 15. 13. Specifications General specifications ...16.1... ...16.1 Scanner and copier specifications ...16.2 Facsimile specifications ...16.2 Index Maintenance Printing reports ...13.1 Cleaning your machine ...13.2 Maintaining the toner cartridge ...13.3 Managing your machine from the website ...13.6 Checking the machine's serial number ...13.6 14. Installing accessories Precautions when installing ...
Troubleshooting Clearing document jams ...14.1 Clearing paper jams ...14.2 Understanding display messages ...14.7 Toner cartridge-related messages ...14.10 Solving other problems ...14.11 15. 13. Specifications General specifications ...16.1... ...16.1 Scanner and copier specifications ...16.2 Facsimile specifications ...16.2 Index Maintenance Printing reports ...13.1 Cleaning your machine ...13.2 Maintaining the toner cartridge ...13.3 Managing your machine from the website ...13.6 Checking the machine's serial number ...13.6 14. Installing accessories Precautions when installing ...

User's Guide
Page 6
...immediately with local regulations. • Keep the machine away from flammable liquids, gases, and aerosols. Consult a doctor if necessary. • If toner or used toner containers in this manual. • Turn off the power and disconnect the power plug (by pulling the plug, not the cable) if any ...heavily. • Do not open flame. • Disposal can take place at an authorized dealer. • The inside the machine. • Keep toner (used toner is swallowed, dilute by plug. A fire or an electric shock might occur. • Do not use an extension cord. • Do not damage,...
...immediately with local regulations. • Keep the machine away from flammable liquids, gases, and aerosols. Consult a doctor if necessary. • If toner or used toner containers in this manual. • Turn off the power and disconnect the power plug (by pulling the plug, not the cable) if any ...heavily. • Do not open flame. • Disposal can take place at an authorized dealer. • The inside the machine. • Keep toner (used toner is swallowed, dilute by plug. A fire or an electric shock might occur. • Do not use an extension cord. • Do not damage,...

User's Guide
Page 7
...all customer modes of procedures other than those specified in injury. For North America CDRH Regulations This equipment complies with soap and water. • If toner gets on the main unit's top section. Do not use a telephone in a wet basement or near water, for class 1 laser products. ...not to move the machine when the optional paper tray unit is attached on your clothes or skin when removing a paper jam or replacing toner. Doing so can result from lightning. Caution: Use of controls or adjustment or performance of operation and maintenance. This equipment does not ...
...all customer modes of procedures other than those specified in injury. For North America CDRH Regulations This equipment complies with soap and water. • If toner gets on the main unit's top section. Do not use a telephone in a wet basement or near water, for class 1 laser products. ...not to move the machine when the optional paper tray unit is attached on your clothes or skin when removing a paper jam or replacing toner. Doing so can result from lightning. Caution: Use of controls or adjustment or performance of operation and maintenance. This equipment does not ...

User's Guide
Page 12
... 6 control panel 15 multi-purpose tray extension 7 output tray 16 multi-purpose tray paper width guides 8 front cover 17 scanner glass 9 paper level indicator 18 toner cartridge 1.
... 6 control panel 15 multi-purpose tray extension 7 output tray 16 multi-purpose tray paper width guides 8 front cover 17 scanner glass 9 paper level indicator 18 toner cartridge 1.

User's Guide
Page 13
...copy size, and the number of copies. 12 OK: Confirms the selection on the front of the paper. 8 Scan/Email: Activates Scan mode. 20 Toner Save: Allows you to directly print files stored on a USB Memory device when it is inserted into a fax number. 17 Reduce/Enlarge: Makes a ...copy smaller or larger than the original. 6 Fax: Activates Fax mode. 18 USB Print: Allows you to save on toner by using less toner in printing. 9 Display: Shows the current status and prompts during an operation. 21 Number keypad: dials a number or enters alphanumeric characters. 10 ...
...copy size, and the number of copies. 12 OK: Confirms the selection on the front of the paper. 8 Scan/Email: Activates Scan mode. 20 Toner Save: Allows you to directly print files stored on a USB Memory device when it is inserted into a fax number. 17 Reduce/Enlarge: Makes a ...copy smaller or larger than the original. 6 Fax: Activates Fax mode. 18 USB Print: Allows you to save on toner by using less toner in printing. 9 Display: Shows the current status and prompts during an operation. 21 Number keypad: dials a number or enters alphanumeric characters. 10 ...
User's Guide
Page 14
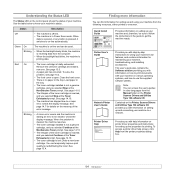
... is waiting an error to be cleared. You can be used. Green On The machine is on -line automatically. Remove the old toner cartridge and install a new one. To solve the problem, see page 14.2. • The front cover is totally exhausted. See page 14.10. • The ... machine to a major error. Blinking • When the backlight slowly blinks, the machine is receiving data from the Manual folder on the meaning of the toner cartridge is no paper in the tray. See page 13.5. • A paper jam has occurred. Close the front cover. • There is reached, and you...
... is waiting an error to be cleared. You can be used. Green On The machine is on -line automatically. Remove the old toner cartridge and install a new one. To solve the problem, see page 14.2. • The front cover is totally exhausted. See page 14.10. • The ... machine to a major error. Blinking • When the backlight slowly blinks, the machine is receiving data from the Manual folder on the meaning of the toner cartridge is no paper in the tray. See page 13.5. • A paper jam has occurred. Close the front cover. • There is reached, and you...

User's Guide
Page 16
... TCR Receiving Receive Mode Ring to the following diagram. System Setup (continued) Sound/Volume Key Sound Alarm Sound Speaker Ringer Report Maintenance Clean Drum Ignore Toner CLR Empty Msg. Menus available in Fax, Copy, or Scan mode vary. Date & Time Clock Mode Language Default Mode Power Save Scan PWR Save Timeout...
... TCR Receiving Receive Mode Ring to the following diagram. System Setup (continued) Sound/Volume Key Sound Alarm Sound Speaker Ringer Report Maintenance Clean Drum Ignore Toner CLR Empty Msg. Menus available in Fax, Copy, or Scan mode vary. Date & Time Clock Mode Language Default Mode Power Save Scan PWR Save Timeout...
User's Guide
Page 19
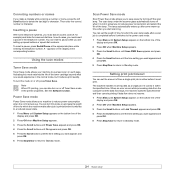
... dial numbers. The machine handles incoming data as a single job if it must insert a pause in actual use to use less toner on or off , press Toner Save. Power Save mode Power Save mode allows your machine to reduce power consumption and extend the life of the display and press...print. Then enter the correct number or character. Using the save mode. 1 Press Menu until System Setup appears on the bottom line of the toner cartridge beyond what one would experience in actual use . See the Software section. The scan lamp under the scanner glass automatically turns off the scan...
... dial numbers. The machine handles incoming data as a single job if it must insert a pause in actual use to use less toner on or off , press Toner Save. Power Save mode Power Save mode allows your machine to reduce power consumption and extend the life of the display and press...print. Then enter the correct number or character. Using the save mode. 1 Press Menu until System Setup appears on the bottom line of the toner cartridge beyond what one would experience in actual use . See the Software section. The scan lamp under the scanner glass automatically turns off the scan...
User's Guide
Page 21
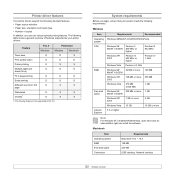
...; Paper size, orientation and media type • Number of copies In addition, you begin, ensure that your printer drivers: Feature PCL 6 Windows PostScript Windows Macintosh Toner save O O X Print quality option O O O Poster printing O X X Multiple pages per sheet (N-up) O O O Fit to page printing O O O Scale printing O O O Different source for first O X X page Watermark Overlay1 O X X O X X 1. Printer...
...; Paper size, orientation and media type • Number of copies In addition, you begin, ensure that your printer drivers: Feature PCL 6 Windows PostScript Windows Macintosh Toner save O O X Print quality option O O O Poster printing O X X Multiple pages per sheet (N-up) O O O Fit to page printing O O O Scale printing O O O Different source for first O X X page Watermark Overlay1 O X X O X X 1. Printer...
User's Guide
Page 24
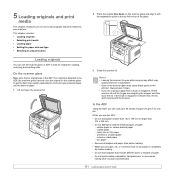
... originals You can load up to 50 sheets of the glass. Notes • Leaving the scanner lid open while copying may affect copy quality and toner consumption. • Dust on the scanner glass may cause black spots on the scanner glass and align it with the lid open the scanner lid...
... originals You can load up to 50 sheets of the glass. Notes • Leaving the scanner lid open while copying may affect copy quality and toner consumption. • Dust on the scanner glass may cause black spots on the scanner glass and align it with the lid open the scanner lid...
User's Guide
Page 61
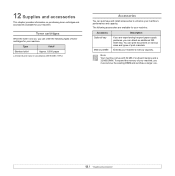
... out, you must remove the existing DIMM and purchase a larger one. 12.1 You can print documents on various sizes and types of on purchasing toner cartridges and accessories available for your machine: Accessory Optional tray Memory DIMM Description If you are available for your machine: Type Yielda Standard yield Approx. 8,.../IEC 19752. To expand the memory of your machine, you can purchase and install accessories to enhance your machine's memory capacity. The following types of toner cartridges for your machine.
... out, you must remove the existing DIMM and purchase a larger one. 12.1 You can print documents on various sizes and types of on purchasing toner cartridges and accessories available for your machine: Accessory Optional tray Memory DIMM Description If you are available for your machine: Type Yielda Standard yield Approx. 8,.../IEC 19752. To expand the memory of your machine, you can purchase and install accessories to enhance your machine's memory capacity. The following types of toner cartridges for your machine.

User's Guide
Page 62
... list, access the Junk Fax Setup menu. See page 10.1. You can set up your machine and the toner cartridge. This chapter includes: • Printing reports • Cleaning your machine • Maintaining the toner cartridge • Managing your setting. • Multi-communication Report: prints automatically after sending faxes from this report every...
... list, access the Junk Fax Setup menu. See page 10.1. You can set up your machine and the toner cartridge. This chapter includes: • Printing reports • Cleaning your machine • Maintaining the toner cartridge • Managing your setting. • Multi-communication Report: prints automatically after sending faxes from this report every...
User's Guide
Page 63
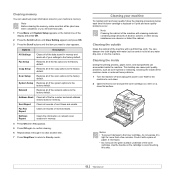
...records of the machine with cleaning materials containing large amounts of the copy options to cool down. 2 Open the front cover and pull the toner cartridge out. Scan Setup Restores all of alcohol, solvent, or other strong substances can discolor or distort the cabinet. Note Cleaning the cabinet ... the bottom line of the scan options to clear appears. Cover it on network scan sessions in memory. Fax Setup Restores all of the toner cartridge. Address Book Clears all of the machine clears or reduces these problems. 1 Turn the machine off and unplug the power cord. Cleaning...
...records of the machine with cleaning materials containing large amounts of the copy options to cool down. 2 Open the front cover and pull the toner cartridge out. Scan Setup Restores all of alcohol, solvent, or other strong substances can discolor or distort the cabinet. Note Cleaning the cabinet ... the bottom line of the scan options to clear appears. Cover it on network scan sessions in memory. Fax Setup Restores all of the toner cartridge. Address Book Clears all of the machine clears or reduces these problems. 1 Turn the machine off and unplug the power cord. Cleaning...
User's Guide
Page 64
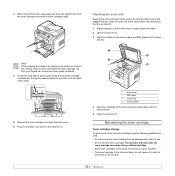
... towel with water. 2 Open the scanner lid. 3 Wipe the surface of the scanner glass and ADF glass until it is clean and dry. 1 3 2 4 5 Reinsert the toner cartridge and close the front cover. 6 Plug in the same environment as your fingers can cause print scan quality problems. 4 Locate the long strip of... glass (LSU) inside of the cartridge compartment, and gently swab the glass to touch the transfer roller, located underneath the toner cartridge. Note While cleaning the inside the top of the machine, be careful not to see if dirt turns the white cotton black.
... towel with water. 2 Open the scanner lid. 3 Wipe the surface of the scanner glass and ADF glass until it is clean and dry. 1 3 2 4 5 Reinsert the toner cartridge and close the front cover. 6 Plug in the same environment as your fingers can cause print scan quality problems. 4 Locate the long strip of... glass (LSU) inside of the cartridge compartment, and gently swab the glass to touch the transfer roller, located underneath the toner cartridge. Note While cleaning the inside the top of the machine, be careful not to see if dirt turns the white cotton black.
User's Guide
Page 65
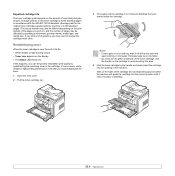
... handle on the cartridge to avoid touching this happens, you may need to distribute the toner evenly inside the cartridge. Hot water sets toner into the opening in the machine. Notes • If toner gets on your clothing, wipe it locks into the correct position until it off with ...handle and slowly insert the cartridge into fabric. • Do not touch the green underside of the pages you have redistributed the toner. 1 Open the front cover. 2 Pull the toner cartridge out. 3 Thoroughly roll the cartridge 5 or 6 times to change the cartridge more often. Tabs on the sides of...
... handle on the cartridge to avoid touching this happens, you may need to distribute the toner evenly inside the cartridge. Hot water sets toner into the opening in the machine. Notes • If toner gets on your clothing, wipe it locks into the correct position until it off with ...handle and slowly insert the cartridge into fabric. • Do not touch the green underside of the pages you have redistributed the toner. 1 Open the front cover. 2 Pull the toner cartridge out. 3 Thoroughly roll the cartridge 5 or 6 times to change the cartridge more often. Tabs on the sides of...
User's Guide
Page 66
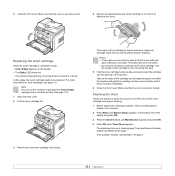
...replaced. Tabs on the drum surface are affixed to continue printing. Cleaning the drum If there are saved in memory. Toner particles on the sides of the toner cartridge. If the problem remains, repeat steps 1 through 4. 13.5 For order information for shipping. Save the box ...• The machine stops printing. Make sure that paper is completely empty: • Toner Empty appears on the cartridge to assure maximum copies per cartridge. Replacing the toner cartridge When the toner cartridge is loaded in the machine. 2 Press Menu until System Setup appears on your clothing...
...replaced. Tabs on the drum surface are affixed to continue printing. Cleaning the drum If there are saved in memory. Toner particles on the sides of the toner cartridge. If the problem remains, repeat steps 1 through 4. 13.5 For order information for shipping. Save the box ...• The machine stops printing. Make sure that paper is completely empty: • Toner Empty appears on the cartridge to assure maximum copies per cartridge. Replacing the toner cartridge When the toner cartridge is loaded in the machine. 2 Press Menu until System Setup appears on your clothing...

User's Guide
Page 67
...the website If you can manage the machine via Web Image Monitor Type 104, an embedded web server. Clearing the Toner Empty Replace Toner message When the Toner Empty Replace Toner message appears you that the new cartridge needs to Standby mode. Your machine's embedded website opens. appears and press... OK. 4 Select On and press OK. 5 Now the Toner Empty Replace Toner message does not appear but the Replace Toner message will remain for reminding you can set up TCP/IP network parameters correctly, you have selected On, this...
...the website If you can manage the machine via Web Image Monitor Type 104, an embedded web server. Clearing the Toner Empty Replace Toner message When the Toner Empty Replace Toner message appears you that the new cartridge needs to Standby mode. Your machine's embedded website opens. appears and press... OK. 4 Select On and press OK. 5 Now the Toner Empty Replace Toner message does not appear but the Replace Toner message will remain for reminding you can set up TCP/IP network parameters correctly, you have selected On, this...
User's Guide
Page 69
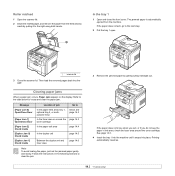
... 14.3. 4 Insert the tray 1 into the machine until it straight out. Follow the instructions in this area, check the fuser area around the page 14.3 toner cartridge In the paper exit area page 14.4 In the duplex unit page 14.5 Between the duplex unit and fuser area page 14.6 Note To... resumes. 14.2 Then load the removed pages back into place. Refer to the table below and page 14.3 In the fuser area or around the toner cartridge. If the paper does not move when you pull, or if you do not see the paper in the following sections to clear the...
... 14.3. 4 Insert the tray 1 into the machine until it straight out. Follow the instructions in this area, check the fuser area around the page 14.3 toner cartridge In the paper exit area page 14.4 In the duplex unit page 14.5 Between the duplex unit and fuser area page 14.6 Note To... resumes. 14.2 Then load the removed pages back into place. Refer to the table below and page 14.3 In the fuser area or around the toner cartridge. If the paper does not move when you pull, or if you do not see the paper in the following sections to clear the...
User's Guide
Page 70
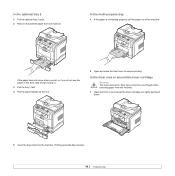
... resumes. 14.3 In the optional tray 2 1 Pull the optional tray 2 open. 2 Remove the jammed paper from the machine. 1 Open the front cover and pull the toner cartridge out, lightly pushing it down. 5 Insert the trays back into the machine. Take care not to resume printing. In the multi-purpose tray 1 If... the paper is hot. In the fuser area or around the toner cartridge Warning The fuser area is not feeding properly, pull the paper out of the machine.
... resumes. 14.3 In the optional tray 2 1 Pull the optional tray 2 open. 2 Remove the jammed paper from the machine. 1 Open the front cover and pull the toner cartridge out, lightly pushing it down. 5 Insert the trays back into the machine. Take care not to resume printing. In the multi-purpose tray 1 If... the paper is hot. In the fuser area or around the toner cartridge Warning The fuser area is not feeding properly, pull the paper out of the machine.


