Quick Installation Guide
Page 3
...ROM Supplied CD-ROMs for 'SP 1200SF' ...25 Drivers and Utilities for SP 1200SF ...25 PaperPort™ 11SE and Documentation for SP 1200SF 25 STEP 2 - Installing the Driver & Software Installing the TYPE 1200SF Drivers and Utilities 28 Installing ...ScanSoft™ PaperPort™ 11SE for USA, Canada and Asia/Oceania 12 Control panel (For EU model) ...13 Control panel (For USA, Canada and Asia/Oceania model 14 STEP 1 - Setting Up the Machine Installing the drum...
...ROM Supplied CD-ROMs for 'SP 1200SF' ...25 Drivers and Utilities for SP 1200SF ...25 PaperPort™ 11SE and Documentation for SP 1200SF 25 STEP 2 - Installing the Driver & Software Installing the TYPE 1200SF Drivers and Utilities 28 Installing ...ScanSoft™ PaperPort™ 11SE for USA, Canada and Asia/Oceania 12 Control panel (For EU model) ...13 Control panel (For USA, Canada and Asia/Oceania model 14 STEP 1 - Setting Up the Machine Installing the drum...
Quick Installation Guide
Page 13
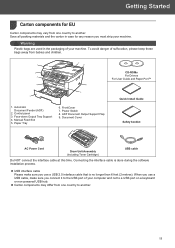
... Document Output Support Flap 9. Document Cover CD-ROMs For Drivers For User Guide and Paper Port™ Quick Install Guide Safety booklet AC Power Cord Drum Unit Assembly (including Toner Cartridge) USB cable Do NOT connect the interface cable at this time. To avoid danger of your machine. Getting Started 1 Carton...
... Document Output Support Flap 9. Document Cover CD-ROMs For Drivers For User Guide and Paper Port™ Quick Install Guide Safety booklet AC Power Cord Drum Unit Assembly (including Toner Cartridge) USB cable Do NOT connect the interface cable at this time. To avoid danger of your machine. Getting Started 1 Carton...
Quick Installation Guide
Page 14
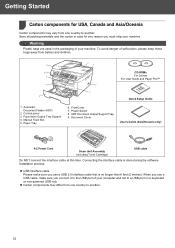
... machine. Document Cover CD-ROMs For Drivers For User Guide and Paper Port™ Quick Setup Guide User's Guide (Asia/Oceania only) AC Power Cord Drum Unit Assembly (including Toner Cartridge) USB cable Do NOT connect the interface cable at this time. Manual Feed Slot 5. Power Switch 8.
... machine. Document Cover CD-ROMs For Drivers For User Guide and Paper Port™ Quick Setup Guide User's Guide (Asia/Oceania only) AC Power Cord Drum Unit Assembly (including Toner Cartridge) USB cable Do NOT connect the interface cable at this time. Manual Feed Slot 5. Power Switch 8.

Quick Installation Guide
Page 17
Connecting the interface cable is done when installing the driver. 1 Open the front cover. 2 Unpack the drum unit and toner cartridge assembly. 5 Close the front cover of the machine. 3 Gently shake it from side to side several times to distribute the toner evenly inside the assembly. 15 Improper Setup DO NOT connect the interface cable. STEP 1 Setting Up the Machine 1 1 Installing the drum unit and toner cartridge assembly 4 Put the drum unit and toner cartridge assembly into the machine.
Connecting the interface cable is done when installing the driver. 1 Open the front cover. 2 Unpack the drum unit and toner cartridge assembly. 5 Close the front cover of the machine. 3 Gently shake it from side to side several times to distribute the toner evenly inside the assembly. 15 Improper Setup DO NOT connect the interface cable. STEP 1 Setting Up the Machine 1 1 Installing the drum unit and toner cartridge assembly 4 Put the drum unit and toner cartridge assembly into the machine.
Quick Installation Guide
Page 34
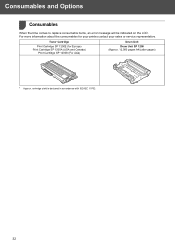
Toner Cartridge Print Cartridge SP 1200E (for your printer,contact your sales or service representative. For more information about the consumables for Europe) Print Cartridge SP 1200A (USA and Canada) Print Cartridge SP 1200S (For Asia) Drum Unit Drum Unit SP 1200 (Approx. 12,000 pages A4/Letter pages) 1 Approx. Consumables and Options 1 Consumables 1 When the time comes to replace consumable items, an error message will be indicated on the LCD. cartridge yield is declared in accordance with ISO/IEC 19752. 32
Toner Cartridge Print Cartridge SP 1200E (for your printer,contact your sales or service representative. For more information about the consumables for Europe) Print Cartridge SP 1200A (USA and Canada) Print Cartridge SP 1200S (For Asia) Drum Unit Drum Unit SP 1200 (Approx. 12,000 pages A4/Letter pages) 1 Approx. Consumables and Options 1 Consumables 1 When the time comes to replace consumable items, an error message will be indicated on the LCD. cartridge yield is declared in accordance with ISO/IEC 19752. 32
User's Guide
Page 8
... Certification ...98 Declaration of the machine 137 Cleaning the scanner glass 138 Cleaning the laser scanner window 139 Cleaning the corona wire 141 Cleaning the drum unit 143 vi only 100 Radio interference 100 Recycling information in accordance with the WEEE (2002/96/EC) and Battery (2006/66/EC) Directives 101...
... Certification ...98 Declaration of the machine 137 Cleaning the scanner glass 138 Cleaning the laser scanner window 139 Cleaning the corona wire 141 Cleaning the drum unit 143 vi only 100 Radio interference 100 Recycling information in accordance with the WEEE (2002/96/EC) and Battery (2006/66/EC) Directives 101...
User's Guide
Page 9
... 149 Machine information 152 Checking the serial number 152 Checking the page counters 152 Checking the Drum life 152 Packing and shipping the machine 152 C Menu and features 154 On-screen programming 154 Menu table 154 Memory storage 154 Menu keys ...154 ...
... 149 Machine information 152 Checking the serial number 152 Checking the page counters 152 Checking the Drum life 152 Packing and shipping the machine 152 C Menu and features 154 On-screen programming 154 Menu table 154 Memory storage 154 Menu keys ...154 ...

User's Guide
Page 30
..., because the label stock may stick to your machine. Labels 2 The machine will damage your machine. Using labels with spaces may cause damage to the drum unit or rollers and cause jams and print quality problems. No adhesive should have not been folded at the high temperatures in figure below If...
..., because the label stock may stick to your machine. Labels 2 The machine will damage your machine. Using labels with spaces may cause damage to the drum unit or rollers and cause jams and print quality problems. No adhesive should have not been folded at the high temperatures in figure below If...
User's Guide
Page 127
...menus. Troubleshooting and routine maintenance Menu access difficulties Difficulties The machine beeps when you try to work with your machine. 117 Right-click TYPE SP 1200SF Printer. Make sure that the correct printer driver has been installed and chosen. „ Check to see if the LCD is showing an... B „ Check the settings in and the power switch is turned on. „ Check that the toner cartridge and drum unit are installed correctly. (See Replacing the drum unit on page 149.) „ Check the interface cable connection on both the machine and your computer. (See the Quick ...
...menus. Troubleshooting and routine maintenance Menu access difficulties Difficulties The machine beeps when you try to work with your machine. 117 Right-click TYPE SP 1200SF Printer. Make sure that the correct printer driver has been installed and chosen. „ Check to see if the LCD is showing an... B „ Check the settings in and the power switch is turned on. „ Check that the toner cartridge and drum unit are installed correctly. (See Replacing the drum unit on page 149.) „ Check the interface cable connection on both the machine and your computer. (See the Quick ...

User's Guide
Page 130
...16.) „ Make sure that meets our specifications. (See Acceptable paper and other print media on page 16 and Basic tab in a new drum unit. (See Replacing the drum unit on the CD-ROM.) „ The problem may be damaged. Conditions such as high humidity can cause hollow print. (See Choosing a location... cartridge may be damaged. Put in the machine's Paper Type menu setting. (See Acceptable paper and other print media on page 94.) „ The drum unit may be damaged. Print multiple pages to clear this problem, especially if the machine has not been used for a long time. „ The...
...16.) „ Make sure that meets our specifications. (See Acceptable paper and other print media on page 16 and Basic tab in a new drum unit. (See Replacing the drum unit on the CD-ROM.) „ The problem may be damaged. Conditions such as high humidity can cause hollow print. (See Choosing a location... cartridge may be damaged. Put in the machine's Paper Type menu setting. (See Acceptable paper and other print media on page 94.) „ The drum unit may be damaged. Print multiple pages to clear this problem, especially if the machine has not been used for a long time. „ The...
User's Guide
Page 131
Put in the Software User's Guide on the CD-ROM.) „ The drum unit may be damaged. B 121 Rough- surfaced paper or thick paper may cause the problem. (See Acceptable paper and other print media on page 16.) &#... or in the machine's Paper Type menu setting. (See Acceptable paper and other print media on page 16 and Basic tab in a new drum unit. (See Replacing the drum unit on page 149.) „ The fuser unit may be contaminated. Call your dealer for service. „ Check the paper type and quality...
Put in the Software User's Guide on the CD-ROM.) „ The drum unit may be damaged. B 121 Rough- surfaced paper or thick paper may cause the problem. (See Acceptable paper and other print media on page 16.) &#... or in the machine's Paper Type menu setting. (See Acceptable paper and other print media on page 16 and Basic tab in a new drum unit. (See Replacing the drum unit on page 149.) „ The fuser unit may be contaminated. Call your dealer for service. „ Check the paper type and quality...
User's Guide
Page 132
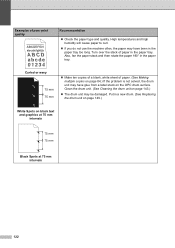
... on page 149.) White Spots on page 84.) If the problem is not solved, the drum unit may be damaged. Clean the drum unit. (See Cleaning the drum unit on the OPC drum surface. Put in the paper tray. High temperatures and high humidity will cause paper to curl. „ If you do not... use the machine often, the paper may have glue from a label stuck on page 143.) „ The drum unit may...
... on page 149.) White Spots on page 84.) If the problem is not solved, the drum unit may be damaged. Clean the drum unit. (See Cleaning the drum unit on the OPC drum surface. Put in the paper tray. High temperatures and high humidity will cause paper to curl. „ If you do not... use the machine often, the paper may have glue from a label stuck on page 143.) „ The drum unit may...
User's Guide
Page 133
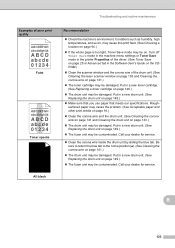
... unit may be contaminated. Call your dealer for service. „ Clean the corona wire inside the drum unit by sliding the blue tab. Roughsurfaced paper may cause the problem. (See Acceptable paper and other...blue tab to the home position (a). (See Cleaning the corona wire on page 143.) „ The drum unit may be damaged. Turn off Toner Save mode in the machine menu settings or Toner Save mode... Properties of the driver. (See Toner Save on page 25 or Advanced tab in a new drum unit. (See Replacing the drum unit on page 149.) „ The fuser unit may be contaminated. Put in the Software ...
... unit may be contaminated. Call your dealer for service. „ Clean the corona wire inside the drum unit by sliding the blue tab. Roughsurfaced paper may cause the problem. (See Acceptable paper and other...blue tab to the home position (a). (See Cleaning the corona wire on page 143.) „ The drum unit may be damaged. Turn off Toner Save mode in the machine menu settings or Toner Save mode... Properties of the driver. (See Toner Save on page 25 or Advanced tab in a new drum unit. (See Replacing the drum unit on page 149.) „ The fuser unit may be contaminated. Put in the Software ...

User's Guide
Page 134
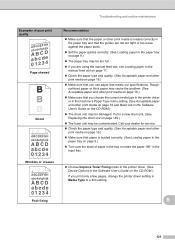
... the blue tab. Put in a new toner cartridge. (See Replacing a toner cartridge on page 146.) „ The drum unit may be damaged. Put in a new drum unit. (See Replacing the drum unit on page 149.) Line across the page ABCDEFGH abcdefghijk ABCD abcde 01234 Recommendation „ Make sure that you use...damaged. Put in direct sunlight or room light, the unit may be damaged. „ The toner cartridge may be smudged. Clean the drum unit. (See Cleaning the drum unit on page 143.) „ Do not use paper that meets our specifications. (See Acceptable paper and other print media on page 16...
... the blue tab. Put in a new toner cartridge. (See Replacing a toner cartridge on page 146.) „ The drum unit may be damaged. Put in a new drum unit. (See Replacing the drum unit on page 149.) Line across the page ABCDEFGH abcdefghijk ABCD abcde 01234 Recommendation „ Make sure that you use...damaged. Put in direct sunlight or room light, the unit may be damaged. „ The toner cartridge may be smudged. Clean the drum unit. (See Cleaning the drum unit on page 143.) „ Do not use paper that meets our specifications. (See Acceptable paper and other print media on page 16...
User's Guide
Page 137
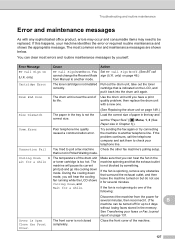
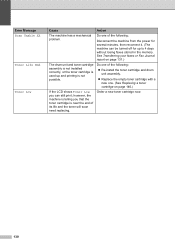
... or required routine maintenance and shows the appropriate message. See Transferring your faxes or Fax Journal report on but do one . (See Replacing the drum unit on page 149.) Size mismatch The paper in the tray is indicated on page 46.) from the power for up to 4 days without ...page 131. The machine will hear the cooling fan running while the LCD shows Cooling Down, and Wait for a while The temperature of the drum unit or toner cartridge is spinning, remove any sophisticated office product, errors may occur and consumable items may need to On. then replace the...
... or required routine maintenance and shows the appropriate message. See Transferring your faxes or Fax Journal report on but do one . (See Replacing the drum unit on page 149.) Size mismatch The paper in the tray is indicated on page 46.) from the power for up to 4 days without ...page 131. The machine will hear the cooling fan running while the LCD shows Cooling Down, and Wait for a while The temperature of the drum unit or toner cartridge is spinning, remove any sophisticated office product, errors may occur and consumable items may need to On. then replace the...

User's Guide
Page 138
... page 132 or Using the automatic document feeder (ADF) on page 133.) of the machine when you turned on again. Replace the drum unit. (See Replacing the drum unit on . person's fax machine stopped the call. Leave the machine for several minutes, then reconnect it on the power. Error ...Fuser Cover. Cover is jammed inside the back of fuser unit does not rise at a specified temperature within specified time. Disconnected Document Jam Drum Error Fuser Error Init Unable XX Jam Rear Jam Inside Jam Tray Cause The fuser cover is jammed in the memory. Action Close the fuser...
... page 132 or Using the automatic document feeder (ADF) on page 133.) of the machine when you turned on again. Replace the drum unit. (See Replacing the drum unit on . person's fax machine stopped the call. Leave the machine for several minutes, then reconnect it on the power. Error ...Fuser Cover. Cover is jammed inside the back of fuser unit does not rise at a specified temperature within specified time. Disconnected Document Jam Drum Error Fuser Error Init Unable XX Jam Rear Jam Inside Jam Tray Cause The fuser cover is jammed in the memory. Action Close the fuser...
User's Guide
Page 140
... is telling you can be turned off for up and printing is near the end of the following: „ Re-install the toner cartridge and drum unit assembly. „ Replace the empty toner cartridge with a new one of the following: Disconnect the machine from the power for several minutes, ...then reconnect it. (The machine can still print; Do one . (See Replacing a toner cartridge on page 131.) The drum unit and toner cartridge assembly is not installed correctly, or the toner cartridge is used up to 4 days without losing faxes stored in the memory.
... is telling you can be turned off for up and printing is near the end of the following: „ Re-install the toner cartridge and drum unit assembly. „ Replace the empty toner cartridge with a new one of the following: Disconnect the machine from the power for several minutes, ...then reconnect it. (The machine can still print; Do one . (See Replacing a toner cartridge on page 131.) The drum unit and toner cartridge assembly is not installed correctly, or the toner cartridge is used up to 4 days without losing faxes stored in the memory.

User's Guide
Page 143
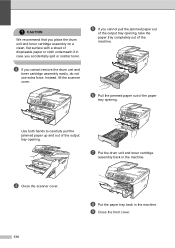
... and routine maintenance Paper jams B To clear paper jams, please follow the steps in the illustration. Note • Please confirm that you have not installed a drum unit or have installed the drum unit incorrectly, then this section. The jammed paper will be pulled out with the toner cartridge and... drum unit assembly. CAUTION To prevent damage to reset the machine. Paper is jammed inside the machine B a Open the front cover. If you have just used ...
... and routine maintenance Paper jams B To clear paper jams, please follow the steps in the illustration. Note • Please confirm that you have not installed a drum unit or have installed the drum unit incorrectly, then this section. The jammed paper will be pulled out with the toner cartridge and... drum unit assembly. CAUTION To prevent damage to reset the machine. Paper is jammed inside the machine B a Open the front cover. If you have just used ...
User's Guide
Page 144
... accidentally spill or scatter toner. d Close the scanner cover. 134 h Put the paper tray back in the machine. CAUTION We recommend that you place the drum unit and toner cartridge assembly on a clean, flat surface with a sheet of the paper tray opening . Use both hands to carefully pull the jammed paper... up and out of the machine. e If you cannot remove the drum unit and toner cartridge assembly easily, do not use extra force. i Close the front cover. c If you cannot pull the jammed paper out of the...
... accidentally spill or scatter toner. d Close the scanner cover. 134 h Put the paper tray back in the machine. CAUTION We recommend that you place the drum unit and toner cartridge assembly on a clean, flat surface with a sheet of the paper tray opening . Use both hands to carefully pull the jammed paper... up and out of the machine. e If you cannot remove the drum unit and toner cartridge assembly easily, do not use extra force. i Close the front cover. c If you cannot pull the jammed paper out of the...

User's Guide
Page 145
... scatter toner. h Close the front cover. CAUTION We recommend that you to open the fuser cover (1). 1 b Slowly take out the drum unit and toner cartridge assembly. c Open the back cover (back output tray). Troubleshooting and routine maintenance d Pull the tabs toward you place the... drum unit and toner cartridge assembly on a clean, flat surface with a sheet of the fuser unit. Paper is jammed at the back of ...
... scatter toner. h Close the front cover. CAUTION We recommend that you to open the fuser cover (1). 1 b Slowly take out the drum unit and toner cartridge assembly. c Open the back cover (back output tray). Troubleshooting and routine maintenance d Pull the tabs toward you place the... drum unit and toner cartridge assembly on a clean, flat surface with a sheet of the fuser unit. Paper is jammed at the back of ...


