Manuals
Page 2
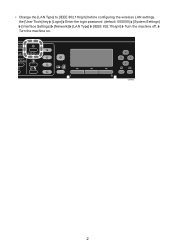
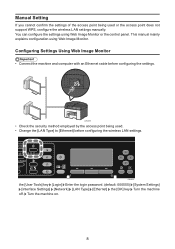
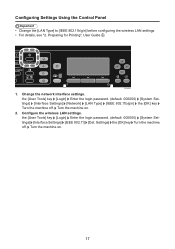
Turn the machine on. CHV632 2 • Change the [LAN Type] to [IEEE 802.11b/g/n] before configuring the wireless LAN settings. the [User Tools] key [Login] Enter the login password. (default: 000000) [System Settings] [Interface Settings] [Network] [LAN Type] [IEEE 802.11b/g/n] Turn the machine off.
Turn the machine on. CHV632 2 • Change the [LAN Type] to [IEEE 802.11b/g/n] before configuring the wireless LAN settings. the [User Tools] key [Login] Enter the login password. (default: 000000) [System Settings] [Interface Settings] [Network] [LAN Type] [IEEE 802.11b/g/n] Turn the machine off.
Manuals
Page 4
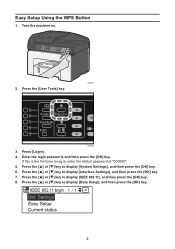
... this is the first time to display [Interface Settings], and then press the [OK] key. 7. Press the [ ] or [ ] key to log in, enter the default password of "000000". 5. CHV605 CHV051 3. Press the [ ] or [ ] key to display [IEEE 802.11], and then press the [OK] key. 8. Press [Login]. 4. Press the [ ] or [ ] key...
... this is the first time to display [Interface Settings], and then press the [OK] key. 7. Press the [ ] or [ ] key to log in, enter the default password of "000000". 5. CHV605 CHV051 3. Press the [ ] or [ ] key to display [IEEE 802.11], and then press the [OK] key. 8. Press [Login]. 4. Press the [ ] or [ ] key...
Manuals
Page 6
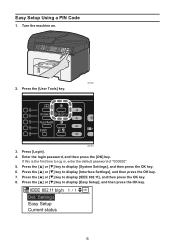
... display [IEEE 802.11], and then press the OK key. 8. Press the [ ] or [ ] key to log in, enter the default password of "000000". 5. Press the [User Tools] key. Enter the login password, and then press the [OK] key. Easy Setup Using a PIN Code 1. Press [Login]. 4. Press the [ ] or [ ] key to display [Easy...
... display [IEEE 802.11], and then press the OK key. 8. Press the [ ] or [ ] key to log in, enter the default password of "000000". 5. Press the [User Tools] key. Enter the login password, and then press the [OK] key. Easy Setup Using a PIN Code 1. Press [Login]. 4. Press the [ ] or [ ] key to display [Easy...
Manuals
Page 8
... the access point being used . • Change the [LAN Type] to [Ethernet] before configuring the settings. CHV632 the [User Tools] key [Login] Enter the login password. (default: 000000) [System Settings] [Interface Settings] [Network] [LAN Type] [Ethernet] the [OK] key Turn the machine off. Manual Setting If you cannot confirm the settings...
... the access point being used . • Change the [LAN Type] to [Ethernet] before configuring the settings. CHV632 the [User Tools] key [Login] Enter the login password. (default: 000000) [System Settings] [Interface Settings] [Network] [LAN Type] [Ethernet] the [OK] key Turn the machine off. Manual Setting If you cannot confirm the settings...
Manuals
Page 10
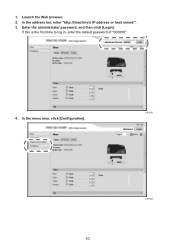
In the menu area, click [Configuration]. If this is the first time to log in, enter the default password of "000000". 4. Enter the administrator password, and then click [Login]. Launch the Web browser. 2. CHV636 CHV638 10 In the address bar, enter "http://(machine's IP address or host name)/". 3. 1.
In the menu area, click [Configuration]. If this is the first time to log in, enter the default password of "000000". 4. Enter the administrator password, and then click [Login]. Launch the Web browser. 2. CHV636 CHV638 10 In the address bar, enter "http://(machine's IP address or host name)/". 3. 1.
Manuals
Page 13
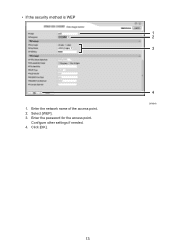
Configure other settings if needed. 4. • If the security method is WEP 1. Enter the network name of the access point. 2. Click [OK]. 1 2 3 4 CHV648 13 Enter the password for the access point. Select [WEP]. 3.
Configure other settings if needed. 4. • If the security method is WEP 1. Enter the network name of the access point. 2. Click [OK]. 1 2 3 4 CHV648 13 Enter the password for the access point. Select [WEP]. 3.
Manuals
Page 14
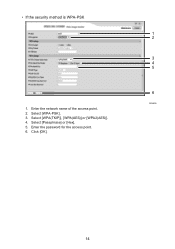
Enter the network name of the access point. 2. Select [WPA(TKIP)], [WPA(AES)],or [WPA2(AES)]. 4. Click [OK]. 1 2 3 4 5 6 CHV650 14 • If the security method is WPA-PSK 1. Select [Passphrase] or [Hex]. 5. Enter the password for the access point. 6. Select [WPA-PSK]. 3.
Enter the network name of the access point. 2. Select [WPA(TKIP)], [WPA(AES)],or [WPA2(AES)]. 4. Click [OK]. 1 2 3 4 5 6 CHV650 14 • If the security method is WPA-PSK 1. Select [Passphrase] or [Hex]. 5. Enter the password for the access point. 6. Select [WPA-PSK]. 3.
Manuals
Page 15
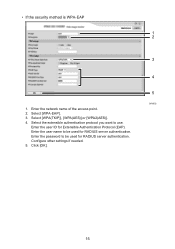
Enter the user ID for RADIUS server authentication. Configure other settings if needed. 5. Click [OK]. 3 4 5 CHV652 15 Select [WPA-EAP]. 3. Enter the user name to be used for RADIUS server authentication. Select [WPA(TKIP)], [WPA(AES)],or [WPA2(AES)]. 4. Enter the password to be used for Extensible Authentication Protocol (EAP). Select the extensible authentication protocol you want to use. Enter the network name of the access point. 2. • If the security method is WPA-EAP 1 2 1.
Enter the user ID for RADIUS server authentication. Configure other settings if needed. 5. Click [OK]. 3 4 5 CHV652 15 Select [WPA-EAP]. 3. Enter the user name to be used for RADIUS server authentication. Select [WPA(TKIP)], [WPA(AES)],or [WPA2(AES)]. 4. Enter the password to be used for Extensible Authentication Protocol (EAP). Select the extensible authentication protocol you want to use. Enter the network name of the access point. 2. • If the security method is WPA-EAP 1 2 1.
Manuals
Page 17
...) [System Settings] [Interface Settings] [Network] [LAN Type] [IEEE 802.11b/g/n] the [OK] key Turn the machine off . the [User Tools] key [Login] Enter the login password. (default: 000000) [System Settings] [Interface Settings] [IEEE 802.11] [Det. Turn the machine on . 2. Configuring Settings Using the Control Panel • Change the [LAN Type...
...) [System Settings] [Interface Settings] [Network] [LAN Type] [IEEE 802.11b/g/n] the [OK] key Turn the machine off . the [User Tools] key [Login] Enter the login password. (default: 000000) [System Settings] [Interface Settings] [IEEE 802.11] [Det. Turn the machine on . 2. Configuring Settings Using the Control Panel • Change the [LAN Type...
User Guide
Page 153
...Interface Settings] page • [Ethernet] You can check the ROM firmware version and update the firmware as the user name and leave the password blank. Download the latest update from the manufacturer's website and update the firmware according to the machine. In the address bar, enter "http...://(machine's IP address or host name)/". 3. Enter the user name and password, and then click [OK]. Click [OK]. The specified settings are transmitted to the displayed instructions. [Auto Email Notification] area See p.155 ...
...Interface Settings] page • [Ethernet] You can check the ROM firmware version and update the firmware as the user name and leave the password blank. Download the latest update from the manufacturer's website and update the firmware according to the machine. In the address bar, enter "http...://(machine's IP address or host name)/". 3. Enter the user name and password, and then click [OK]. Click [OK]. The specified settings are transmitted to the displayed instructions. [Auto Email Notification] area See p.155 ...
User Guide
Page 154
...; [WPA Settings] You can specify [WPA Authentication Method], [WPA Encryption Method], [PSK], [Confirm PSK], [User Name], [EAP Type], [Password], and [Confirm Password]. • [Firmware Update] You can specify [Default Gateway Address], [DNS Server1], [DNS Server2], [DNS Protocol Priority], [LPR(515)], ...firmware according to the displayed instructions. [Administrator Tools] area • [Administrator Authentication] page You can specify [New Password] and [Confirm New Password]. • [Restore Defaults] page You can restore the default settings for the network interface. [Network] area &#...
...; [WPA Settings] You can specify [WPA Authentication Method], [WPA Encryption Method], [PSK], [Confirm PSK], [User Name], [EAP Type], [Password], and [Confirm Password]. • [Firmware Update] You can specify [Default Gateway Address], [DNS Server1], [DNS Server2], [DNS Protocol Priority], [LPR(515)], ...firmware according to the displayed instructions. [Administrator Tools] area • [Administrator Authentication] page You can specify [New Password] and [Confirm New Password]. • [Restore Defaults] page You can restore the default settings for the network interface. [Network] area &#...

User Guide
Page 155
...destinations. • [Account(User)] You can specify [Account Name(User)], [Authentication Password(User)], [Authentication Password re-enter(User)], [Encryption Password(User)], [Encryption Password re-enter(User)], and [Access Type(User)]. • [Account(Administrator)] You ...can specify [Account Name(Administrator)], [Authentication Password(Administrator)], [Authentication Password re-enter(Administrator)], [Encryption Password(Administrator)], [Encryption Password re-enter(Administrator)], and [Access Type(Administrator)]. • [Bonjour] page You...
...destinations. • [Account(User)] You can specify [Account Name(User)], [Authentication Password(User)], [Authentication Password re-enter(User)], [Encryption Password(User)], [Encryption Password re-enter(User)], and [Access Type(User)]. • [Account(Administrator)] You ...can specify [Account Name(Administrator)], [Authentication Password(Administrator)], [Authentication Password re-enter(Administrator)], [Encryption Password(Administrator)], [Encryption Password re-enter(Administrator)], and [Access Type(Administrator)]. • [Bonjour] page You...
User Guide
Page 156
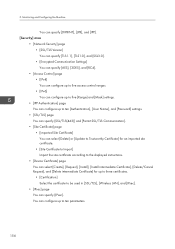
...] page You can select [Create], [Request], [Install], [Install intermediate Certificate], [Delete/Cancel Request], and [Delete intermediate Certificate] for up to ten [Authentication], [User Name], and [Password] settings. • [SSL/TLS] page You can specify [SSL/TLS(443)] and [Permit SSL/TLS Communication]. • [Site Certificate] page • [Imported Site Certificate] You...
...] page You can select [Create], [Request], [Install], [Install intermediate Certificate], [Delete/Cancel Request], and [Delete intermediate Certificate] for up to ten [Authentication], [User Name], and [Password] settings. • [SSL/TLS] page You can specify [SSL/TLS(443)] and [Permit SSL/TLS Communication]. • [Site Certificate] page • [Imported Site Certificate] You...
User Guide
Page 158
... name using up to 127 characters. Default: Blank 156 Default: Blank [Administrator Email Address] Enter the administrator's e-mail address using up to 127 characters. Password] Enter the password using up to 191 characters. Default: Blank • [SMTP Auth. 5. The "Administrator Email Address" will appear in the e-mail message. User Name] Enter the...
... name using up to 127 characters. Default: Blank 156 Default: Blank [Administrator Email Address] Enter the administrator's e-mail address using up to 127 characters. Password] Enter the password using up to 191 characters. Default: Blank • [SMTP Auth. 5. The "Administrator Email Address" will appear in the e-mail message. User Name] Enter the...
User Guide
Page 159
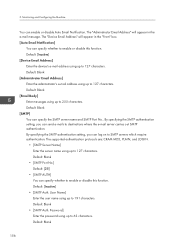
... to use POP before SMTP, and specify the POP server name, POP port number, POP user name, and POP password. • [POP before SMTP. Default: Blank • [Confirm POP Password] Enter a password using up to 63 characters. Default: Blank • [POP Auth. Default: [Auto Select] • [Timeout setting... up to destinations where the email server carries out SMTP authentication. If you can specify whether to 63 characters. Password] Enter the password using POP before SMTP, you select [Off], the printer logs on only by APOP login, and then in plain text. Default: Blank...
... to use POP before SMTP, and specify the POP server name, POP port number, POP user name, and POP password. • [POP before SMTP. Default: Blank • [Confirm POP Password] Enter a password using up to 63 characters. Default: Blank • [POP Auth. Default: [Auto Select] • [Timeout setting... up to destinations where the email server carries out SMTP authentication. If you can specify whether to 63 characters. Password] Enter the password using POP before SMTP, you select [Off], the printer logs on only by APOP login, and then in plain text. Default: Blank...

User Guide
Page 170
... Connection via the Print & Fax Preferences Pane • Connect the machine to install the file, click [Change Install Location...]. 6. Enter the administrator's user name and password, and then click [OK]. 7. For Mac OS X 10.5.x, click [OK]. 4. The procedures for your machine might differ slightly from those shown if you must log...
... Connection via the Print & Fax Preferences Pane • Connect the machine to install the file, click [Change Install Location...]. 6. Enter the administrator's user name and password, and then click [OK]. 7. For Mac OS X 10.5.x, click [OK]. 4. The procedures for your machine might differ slightly from those shown if you must log...

User Guide
Page 173
Installing the Printer Driver on a Macintosh 8. Enter the administrator's user name and password, and then click [OK]. 9. Click [OK]. 171
Installing the Printer Driver on a Macintosh 8. Enter the administrator's user name and password, and then click [OK]. 9. Click [OK]. 171

User Guide
Page 302
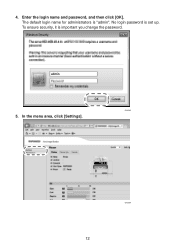
4. To ensure security, it is "admin". CHU282 5. The default login name for administrators is important you change the password. CHU268 5 In the menu area, click [Settings]. Enter the login name and password, and then click [OK]. No login password is set up.
4. To ensure security, it is "admin". CHU282 5. The default login name for administrators is important you change the password. CHU268 5 In the menu area, click [Settings]. Enter the login name and password, and then click [OK]. No login password is set up.
User Guide
Page 309
Enter the login name and password, and then click [OK]. The default login name for administrators is important you change the password. To ensure security, it is "admin". No login password is set up. In the menu area, click [Settings]. CHU282 5. 4. CHU268 12
Enter the login name and password, and then click [OK]. The default login name for administrators is important you change the password. To ensure security, it is "admin". No login password is set up. In the menu area, click [Settings]. CHU282 5. 4. CHU268 12


