
Copy/Document Server Reference
Page 21
... Select 13 Missing Image Area 14 Placing Originals 15 Original Orientation 16 Placing Originals on Copies v Adjusting Colors ...vi Adjusting Images...vii What You Can Do with This Machine ix Types of Jobs 30 Holding Print... 32 xix TABLE OF CONTENTS Manuals for This Machine i What You Can Do with This Machine ....iii Color Copying ...iii Stamping on the Exposure Glass 17 Placing Originals in the Print Queue 30 Changing the Order...2 Symbols ...2 Functions Requiring Optional Configurations 3 Display ...4 Simplified Display...5 User Tools Menu (Copier / Document Server Features 6 1.
... Select 13 Missing Image Area 14 Placing Originals 15 Original Orientation 16 Placing Originals on Copies v Adjusting Colors ...vi Adjusting Images...vii What You Can Do with This Machine ix Types of Jobs 30 Holding Print... 32 xix TABLE OF CONTENTS Manuals for This Machine i What You Can Do with This Machine ....iii Color Copying ...iii Stamping on the Exposure Glass 17 Placing Originals in the Print Queue 30 Changing the Order...2 Symbols ...2 Functions Requiring Optional Configurations 3 Display ...4 Simplified Display...5 User Tools Menu (Copier / Document Server Features 6 1.

Copy/Document Server Reference
Page 22
... Thin Paper 37 When Copying onto Thick Paper 38 When Copying onto Envelopes 39 Color Functions 40 Selecting a Color Mode 40 Convert Colors ...41 Erase Color ...42 Color Background ...43 Color Balance...44 Color Balance Program 45 Color Adjustment...47 Image Adjustment ...48 User Color ...53 Copier Functions 57 Adjusting Copy Image Density 57 Selecting the Original Type Setting 59...
... Thin Paper 37 When Copying onto Thick Paper 38 When Copying onto Envelopes 39 Color Functions 40 Selecting a Color Mode 40 Convert Colors ...41 Erase Color ...42 Color Background ...43 Color Balance...44 Color Balance Program 45 Color Adjustment...47 Image Adjustment ...48 User Color ...53 Copier Functions 57 Adjusting Copy Image Density 57 Selecting the Original Type Setting 59...

Copy/Document Server Reference
Page 29
... {Simplified Display} key again to return to use the "Simplified Display" and introduces its keys. AQI031S ❖ Simplified Copier Screen AMG055S 1. [Key Color] Use this to intensify the screen contrast by pressing the {Simplified Display} key. You can view the simplified display from the... Copier's initial screen by changing the color of the keys. Simplified Display This section explains how to the copier default screen. ❒ The simplified display screen does not contain every available key....
... {Simplified Display} key again to return to use the "Simplified Display" and introduces its keys. AQI031S ❖ Simplified Copier Screen AMG055S 1. [Key Color] Use this to intensify the screen contrast by pressing the {Simplified Display} key. You can view the simplified display from the... Copier's initial screen by changing the color of the keys. Simplified Display This section explains how to the copier default screen. ❒ The simplified display screen does not contain every available key....

Copy/Document Server Reference
Page 30
... describes items that is automatically selected after power on , when modes are cleared or reset, or when a color selection key is pressed. The Copier / Document Server Features screen can set the original orientation when making two-sided copies. Copy Orientation in Duplex Mode...: Register up these items, see General Settings Guide. ❖ General Features Item Description Auto Image Density Prior- Customize Function: Copier Register up to six frequently used functions and display them on the initial screen. (Registered functions can set up to six frequently...
... describes items that is automatically selected after power on , when modes are cleared or reset, or when a color selection key is pressed. The Copier / Document Server Features screen can set the original orientation when making two-sided copies. Copy Orientation in Duplex Mode...: Register up these items, see General Settings Guide. ❖ General Features Item Description Auto Image Density Prior- Customize Function: Copier Register up to six frequently used functions and display them on the initial screen. (Registered functions can set up to six frequently...

Copy/Document Server Reference
Page 83
... from [Others] when Original Type Display (Copier / Document Server Features) has been set to Hide. Reference See "Copier / Document Server Features" and "Adjust Color Image", Gen- Select this type from [Others] when Original Type Display (Copier / Document Server Features) has been set ... with settings suitable for faint copied slips. eral Settings Guide. 59 magazines): • When copying copies or originals generated by color copiers: ❖ Generation Copy If your originals contain photographs or pictures with text. ❖ Photo Delicate tones of the following ...
... from [Others] when Original Type Display (Copier / Document Server Features) has been set to Hide. Reference See "Copier / Document Server Features" and "Adjust Color Image", Gen- Select this type from [Others] when Original Type Display (Copier / Document Server Features) has been set ... with settings suitable for faint copied slips. eral Settings Guide. 59 magazines): • When copying copies or originals generated by color copiers: ❖ Generation Copy If your originals contain photographs or pictures with text. ❖ Photo Delicate tones of the following ...

Copy/Document Server Reference
Page 127
...B Press [Erase]. Pressing and holding down the relevant key changes the width in step E, press [n] and [o] to set a new value. C Press [Erase Center / Border]. Copier Functions E Set an erase border width with [n] or [o]. G Place your originals, and then press the {Start} key. D Press [Different Width]. 103 Note ❒ To ...value entered in increments of 10 mm (1 inch). 2 F Press [OK] twice. Pressing [n] or [o] changes the width in increments of the original image. A Press [Edit / Color]. Border Erase (different width) This mode erases the edge margin of 1 mm (0.1 inches).
...B Press [Erase]. Pressing and holding down the relevant key changes the width in step E, press [n] and [o] to set a new value. C Press [Erase Center / Border]. Copier Functions E Set an erase border width with [n] or [o]. G Place your originals, and then press the {Start} key. D Press [Different Width]. 103 Note ❒ To ...value entered in increments of 10 mm (1 inch). 2 F Press [OK] twice. Pressing [n] or [o] changes the width in increments of the original image. A Press [Edit / Color]. Border Erase (different width) This mode erases the edge margin of 1 mm (0.1 inches).

Copy/Document Server Reference
Page 129
E Press [Same Width]. I Place your originals, and then press the {Start} key. 105 C Press [Erase Center / Border]. G Press [Border], and then set the erase center width with [n] and [o]. H Press [OK] twice. Copier Functions Center/Border Erase (same width) This mode erases both the center and edge margins of the original image. D Press [Erase Center / Border]. F Press [Center], and then set the erase border width with [n] and [o]. A Press [Edit / Color]. 2 B Press [Erase].
E Press [Same Width]. I Place your originals, and then press the {Start} key. 105 C Press [Erase Center / Border]. G Press [Border], and then set the erase center width with [n] and [o]. H Press [OK] twice. Copier Functions Center/Border Erase (same width) This mode erases both the center and edge margins of the original image. D Press [Erase Center / Border]. F Press [Center], and then set the erase border width with [n] and [o]. A Press [Edit / Color]. 2 B Press [Erase].
Copy/Document Server Reference
Page 131
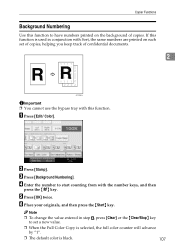
...]. F Place your originals, and then press the {Start} key. Copier Functions Background Numbering Use this function to have numbers printed on each set a new value. ❒ When the Full Color Copy is selected, the full color counter will advance by "1". ❒ The default color is used in step D, press [Clear] or the {Clear/Stop...
...]. F Place your originals, and then press the {Start} key. Copier Functions Background Numbering Use this function to have numbers printed on each set a new value. ❒ When the Full Color Copy is selected, the full color counter will advance by "1". ❒ The default color is used in step D, press [Clear] or the {Clear/Stop...

Copy/Document Server Reference
Page 133
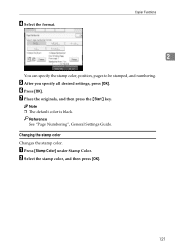
G Press [OK]. D Select the desired message. E Press [All Pages] or [1st Page Only] to select the print page. Reference See "Preset Stamp", General Settings Guide. 109 A Press [Edit / Color]. H Place your originals, and then press the {Start} key. C Press [Preset Stamp]. F After you specify all desired settings, press [OK]. Copier Functions 2 B Press [Stamp]. You can change the stamp color, position, size, and density of the stamp. Note ❒ When the Full Color Copy is selected, the full color counter will advance by "1". ❒ The default user stamp color is red.
G Press [OK]. D Select the desired message. E Press [All Pages] or [1st Page Only] to select the print page. Reference See "Preset Stamp", General Settings Guide. 109 A Press [Edit / Color]. H Place your originals, and then press the {Start} key. C Press [Preset Stamp]. F After you specify all desired settings, press [OK]. Copier Functions 2 B Press [Stamp]. You can change the stamp color, position, size, and density of the stamp. Note ❒ When the Full Color Copy is selected, the full color counter will advance by "1". ❒ The default user stamp color is red.

Copy/Document Server Reference
Page 137
A Press [Change] under Stamp Color. A Press the {User Tools/Counter} key. B Select the desired position, and then press [OK]. Copier Functions 2 To program the user stamp This function scans an image that is 10-297 mm (0.4"-11.7") high and 10- 432 mm (0.4"-...of stamp images for readability is used as a user stamp. A Press [Stamp Color] under Stamp Position. The range of the area automatically. AQI036S 113 B Select the stamp color, and then press [OK]. Changing the user stamp color Changes the stamp color. Changing the user stamp position Changes the stamp position.
A Press [Change] under Stamp Color. A Press the {User Tools/Counter} key. B Select the desired position, and then press [OK]. Copier Functions 2 To program the user stamp This function scans an image that is 10-297 mm (0.4"-11.7") high and 10- 432 mm (0.4"-...of stamp images for readability is used as a user stamp. A Press [Stamp Color] under Stamp Position. The range of the area automatically. AQI036S 113 B Select the stamp color, and then press [OK]. Changing the user stamp color Changes the stamp color. Changing the user stamp position Changes the stamp position.

Copy/Document Server Reference
Page 141
H Place your originals, and then press the {Start} key. E Press [All Pages] or [1st Page Only] to be stamped. A Press [Edit / Color]. G Press [OK]. Note ❒ The default color is Black. F After all settings are complete, press [OK]. D Select the stamp format. C Press [Date Stamp]. You can change the stamp color, format and position of the date to be stamped. You can change the Stamp color, style and position of the date to select the print page. Copier Functions 2 B Press [Stamp]. Reference See "Date Stamp", General Settings Guide. 117
H Place your originals, and then press the {Start} key. E Press [All Pages] or [1st Page Only] to be stamped. A Press [Edit / Color]. G Press [OK]. Note ❒ The default color is Black. F After all settings are complete, press [OK]. D Select the stamp format. C Press [Date Stamp]. You can change the stamp color, format and position of the date to be stamped. You can change the Stamp color, style and position of the date to select the print page. Copier Functions 2 B Press [Stamp]. Reference See "Date Stamp", General Settings Guide. 117
Copy/Document Server Reference
Page 145
E After you specify all desired settings, press [OK]. Note ❒ The default color is black. A Press [Stamp Color] under Stamp Color. B Select the stamp color, and then press [OK]. 121 G Place the originals, and then press the {Start} key. D Select the format. Copier Functions 2 You can specify the stamp color, position, pages to be stamped, and numbering. Changing the stamp color Changes the stamp color. F Press [OK]. Reference See "Page Numbering", General Settings Guide.
E After you specify all desired settings, press [OK]. Note ❒ The default color is black. A Press [Stamp Color] under Stamp Color. B Select the stamp color, and then press [OK]. 121 G Place the originals, and then press the {Start} key. D Select the format. Copier Functions 2 You can specify the stamp color, position, pages to be stamped, and numbering. Changing the stamp color Changes the stamp color. F Press [OK]. Reference See "Page Numbering", General Settings Guide.
Copy/Document Server Reference
Page 151
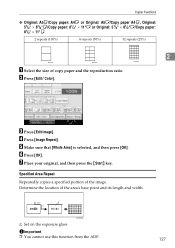
... then press the {Start} key. D Press [Image Repeat]. Specified Area Repeat Repeatedly copies a specified portion of the area's base point and its length and width. Copier Functions ❖ Original: A5K/Copy paper: A4L or Original: A5L/Copy paper A4K, Original: 51/2" × 81/2"K/Copy paper: 81/2" × 11"L or Original: 51...: 81/2" × 11"K 2 repeats (100%) 8 repeats (50%) 32 repeats (25%) Repeat3 Repeat4 2 Repeat5 A Select the size of copy paper and the reproduction ratio. B Press [Edit / Color].
... then press the {Start} key. D Press [Image Repeat]. Specified Area Repeat Repeatedly copies a specified portion of the area's base point and its length and width. Copier Functions ❖ Original: A5K/Copy paper: A4L or Original: A5L/Copy paper A4K, Original: 51/2" × 81/2"K/Copy paper: 81/2" × 11"L or Original: 51...: 81/2" × 11"K 2 repeats (100%) 8 repeats (50%) 32 repeats (25%) Repeat3 Repeat4 2 Repeat5 A Select the size of copy paper and the reproduction ratio. B Press [Edit / Color].

Copy/Document Server Reference
Page 155
F Place your originals, and then press the {Start} key. 131 E Press [OK]. B Press [Edit / Color]. D Press [Centering]. C Press [Edit Image]. Copier Functions ❖ Metric version Original placed on: Exposure glass ADF Paper size and orientation A3L, B4 JISL, A4KL, B5 JISKL, 8" × 13"L A3L, B4 JISL, ...
F Place your originals, and then press the {Start} key. 131 E Press [OK]. B Press [Edit / Color]. D Press [Centering]. C Press [Edit Image]. Copier Functions ❖ Metric version Original placed on: Exposure glass ADF Paper size and orientation A3L, B4 JISL, A4KL, B5 JISKL, 8" × 13"L A3L, B4 JISL, ...

Copy/Document Server Reference
Page 157
GCMILL1J B Press [Edit Image]. C Press [Mirror Image]. D Press [OK]. Copier Functions Mirror Copies by reversing the image from left to right, as reflected in a mirror. 2 A Press [Edit / Color]. E Place the originals, and then press the {Start} key. 133
GCMILL1J B Press [Edit Image]. C Press [Mirror Image]. D Press [OK]. Copier Functions Mirror Copies by reversing the image from left to right, as reflected in a mirror. 2 A Press [Edit / Color]. E Place the originals, and then press the {Start} key. 133
Copy/Document Server Reference
Page 208
... Sides, 89 2 Sided to 1 Sided, 92 2 Sided to 2 Sided, 83 2 Sided to Booklet, 94 A Adjust Color, vi, 47 Adjust Color Image, 6 Adjusting Colors Based on Selected Color, 54 Adjusting Copy Image Density, 57 Adjusting the background density, 51 Adjusting the contrast, 50 Adjusting the sharpness/softness, 50 Adjusting..., 30 Checking the Details of a Stored Document, 158 Color Background, iii, 43 Color Balance, vi, 44 Color Functions, 40 Combine, 173 Combined auto and manual image density, 57, 58 Contrast, vii, 48 Convert Colors, iii, 41 Copier Functions, 57, 147 Copying 2-Sided Pages, xviii Copying ...
... Sides, 89 2 Sided to 1 Sided, 92 2 Sided to 2 Sided, 83 2 Sided to Booklet, 94 A Adjust Color, vi, 47 Adjust Color Image, 6 Adjusting Colors Based on Selected Color, 54 Adjusting Copy Image Density, 57 Adjusting the background density, 51 Adjusting the contrast, 50 Adjusting the sharpness/softness, 50 Adjusting..., 30 Checking the Details of a Stored Document, 158 Color Background, iii, 43 Color Balance, vi, 44 Color Functions, 40 Combine, 173 Combined auto and manual image density, 57, 58 Contrast, vii, 48 Convert Colors, iii, 41 Copier Functions, 57, 147 Copying 2-Sided Pages, xviii Copying ...

General Settings Guide
Page 6
Copier / Document Server Features General Features 91 Reproduction Ratio 96 Edit ...100 Stamp ...106 Background Numbering 106 Preset Stamp ...107 User Stamp ...110 Date Stamp ...111 Page Numbering ...113 Input/Output ...116 Adjust Color Image 119 Settings for the Document Server 120 4. Facsimile Features General Features 121 Scan Settings ...124 Send Settings ...125...
Copier / Document Server Features General Features 91 Reproduction Ratio 96 Edit ...100 Stamp ...106 Background Numbering 106 Preset Stamp ...107 User Stamp ...110 Date Stamp ...111 Page Numbering ...113 Input/Output ...116 Adjust Color Image 119 Settings for the Document Server 120 4. Facsimile Features General Features 121 Scan Settings ...124 Send Settings ...125...

General Settings Guide
Page 11
...remain in bold type. Note ❒ Operations for repairs, or to change the Facsimile Features, press [Facsimile Features]. To adjust color registration or gradation, press [Maintenance]. To change the Printer Features, press [Printer Features]. To change the Scanner Features, press ...turned off, or the {Energy Saver} or {Clear Modes} key is specified, contact your administrator. To change the Copier / Document Server Features, press [Copier / Document Server Features]. To check the counter, press [Counter]. 3 Reference p.4 "Quitting User Tools" Changing Default ...
...remain in bold type. Note ❒ Operations for repairs, or to change the Facsimile Features, press [Facsimile Features]. To adjust color registration or gradation, press [Maintenance]. To change the Printer Features, press [Printer Features]. To change the Scanner Features, press ...turned off, or the {Energy Saver} or {Clear Modes} key is specified, contact your administrator. To change the Copier / Document Server Features, press [Copier / Document Server Features]. To check the counter, press [Counter]. 3 Reference p.4 "Quitting User Tools" Changing Default ...
General Settings Guide
Page 89
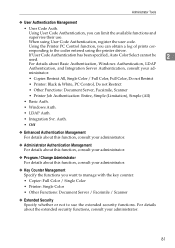
.... ❖ Key Counter Management Specify the functions you want to manage with the key counter. • Copier: Full Color / Single Color • Printer: Single Color • Other Functions: Document Server / Facsimile / Scanner ❖ Extended Security Specify whether or not to... the codes entered using User Code Authentication, register the user code. ministrator. • Copier: Restrict All, Single Color / Full Color, Full Color, Do not Restrict • Printer: Black & White, PC Control, Do not Restrict • Other Functions: Document ...
.... ❖ Key Counter Management Specify the functions you want to manage with the key counter. • Copier: Full Color / Single Color • Printer: Single Color • Other Functions: Document Server / Facsimile / Scanner ❖ Extended Security Specify whether or not to... the codes entered using User Code Authentication, register the user code. ministrator. • Copier: Restrict All, Single Color / Full Color, Full Color, Do not Restrict • Printer: Black & White, PC Control, Do not Restrict • Other Functions: Document ...

General Settings Guide
Page 99
...is turned on how to access Copier / Document Server Features, see "Accessing User Tools (System Settings)". Copier / Document Server Features This chapter describes user tools in the Copier / Document Server Features menu. For details on , or modes cleared. • Full Color • Text • ...Text / Photo • Photo • Pale • Generation Copy • Map • B&W / Single Color • Text • Text / Photo...
...is turned on how to access Copier / Document Server Features, see "Accessing User Tools (System Settings)". Copier / Document Server Features This chapter describes user tools in the Copier / Document Server Features menu. For details on , or modes cleared. • Full Color • Text • ...Text / Photo • Photo • Pale • Generation Copy • Map • B&W / Single Color • Text • Text / Photo...


