
Setup Guide
Page 2
... a class I laser device, safe for quick reference. We assume no event will the company be slightly different from the supplier with your office products. For good print quality, the supplier recommends that might result from the use of consumables (toner, maintenance kits and parts) other... consumables from the machine. For details, please contact your safety and benefit, read this machine. If you use genuine toner, maintenance kits and parts from the supplier. Introduction This manual contains detailed instructions and notes on the operation and use of this manual carefully...
... a class I laser device, safe for quick reference. We assume no event will the company be slightly different from the supplier with your office products. For good print quality, the supplier recommends that might result from the use of consumables (toner, maintenance kits and parts) other... consumables from the machine. For details, please contact your safety and benefit, read this machine. If you use genuine toner, maintenance kits and parts from the supplier. Introduction This manual contains detailed instructions and notes on the operation and use of this manual carefully...

Setup Guide
Page 16
...board. 12 Attach the interface cable, the network interface cable or the 1394 interface cable to overheating. 15. Rear Cover 9. Power Switch Use this Printer", Maintenance Guide. Note ❒ Paper Tray is required to overheating. 17. Clean the friction pad when more than one sheet at a time. Ventilators ... 14. Remove to install the optional duplex unit or to install some options. Also, replace the friction pad when the message, "Replace Maintenance Kit", appears. Ventilator This hole helps to keep components inside the printer from overheating. 13.
...board. 12 Attach the interface cable, the network interface cable or the 1394 interface cable to overheating. 15. Rear Cover 9. Power Switch Use this Printer", Maintenance Guide. Note ❒ Paper Tray is required to overheating. 17. Clean the friction pad when more than one sheet at a time. Ventilators ... 14. Remove to install the optional duplex unit or to install some options. Also, replace the friction pad when the message, "Replace Maintenance Kit", appears. Ventilator This hole helps to keep components inside the printer from overheating. 13.

Setup Guide
Page 17
...Cover Open this board to remove misfed paper. 4. Guide Board Open this cover when accessing the inside of the printer. 3. Transfer Roller When "Replace Maintenance Kit" appears on the panel display, replace this roller. 7. Fusing Unit Fuses the image onto paper. When "Replace... Roller Feeds the paper. If it becomes dirty, clean it. When "Replace Maintenance Kit" appears on the panel display, replace this cover when replacing a transfer roller. 6. See "Cleaning the Registration Roller", Maintenance Guide. Transfer Roller Cover Open this unit. 13 Inside Inside 1 1. AGN044S ...
...Cover Open this board to remove misfed paper. 4. Guide Board Open this cover when accessing the inside of the printer. 3. Transfer Roller When "Replace Maintenance Kit" appears on the panel display, replace this roller. 7. Fusing Unit Fuses the image onto paper. When "Replace... Roller Feeds the paper. If it becomes dirty, clean it. When "Replace Maintenance Kit" appears on the panel display, replace this cover when replacing a transfer roller. 6. See "Cleaning the Registration Roller", Maintenance Guide. Transfer Roller Cover Open this unit. 13 Inside Inside 1 1. AGN044S ...

Maintenance Manual
Page 1
For safe and correct use this product and keep it handy for future reference. Maintenance Guide 1 Paper and Other Media 2 Replacing Consumables and Maintenance Kit 3 Cleaning the Printer 4 Adjusting the Printer 5 Troubleshooting 6 Removing Misfed Paper 7 Appendix Read this manual carefully before you use , please be sure to read the Safety Information in the "Setup Guide" before using the machine.
For safe and correct use this product and keep it handy for future reference. Maintenance Guide 1 Paper and Other Media 2 Replacing Consumables and Maintenance Kit 3 Cleaning the Printer 4 Adjusting the Printer 5 Troubleshooting 6 Removing Misfed Paper 7 Appendix Read this manual carefully before you use , please be sure to read the Safety Information in the "Setup Guide" before using the machine.
Maintenance Manual
Page 3
... in the Bypass Tray 19 Loading Envelopes 24 Switching between Paper Trays 28 2. Adjusting the Printer Adjusting the Image Density 49 Adjusting Tray Registration 50 5. Replacing Consumables and Maintenance Kit Replacing the Toner Cartridge 29 Replacing the Maintenance Kit 32 Before Replacing...32 Replacing the Friction Pad 33 Replacing the Transfer Roller 35 Replacing the...
... in the Bypass Tray 19 Loading Envelopes 24 Switching between Paper Trays 28 2. Adjusting the Printer Adjusting the Image Density 49 Adjusting Tray Registration 50 5. Replacing Consumables and Maintenance Kit Replacing the Toner Cartridge 29 Replacing the Maintenance Kit 32 Before Replacing...32 Replacing the Friction Pad 33 Replacing the Transfer Roller 35 Replacing the...
Maintenance Manual
Page 4
6. Appendix Moving and Transporting the Printer 79 Moving the Printer ...80 Consumables ...81 Toner Cartridge ...81 Maintenance Kit ...82 Specifications...83 Mainframe ...83 Options ...86 INDEX...89 ii Removing Misfed Paper Removing Misfed Paper 69 When "Remove Misfeed Paper Tray" Appears 70 When "Remove Misfeed Internal Path" Appears 71 When "Remove Misfeed Paper Exit Cover" Appears 73 When "Remove Misfeed Duplex Unit" Appears 76 7.
6. Appendix Moving and Transporting the Printer 79 Moving the Printer ...80 Consumables ...81 Toner Cartridge ...81 Maintenance Kit ...82 Specifications...83 Mainframe ...83 Options ...86 INDEX...89 ii Removing Misfed Paper Removing Misfed Paper 69 When "Remove Misfeed Paper Tray" Appears 70 When "Remove Misfeed Internal Path" Appears 71 When "Remove Misfeed Paper Exit Cover" Appears 73 When "Remove Misfeed Duplex Unit" Appears 76 7.

Maintenance Manual
Page 33
Replacing Consumables and Maintenance Kit Replacing the Toner Cartridge R WARNING: • Do not incinerate spilled toner or used toner is swal- Consult a doctor if necessary. R CAUTION: • If toner or ...
Replacing Consumables and Maintenance Kit Replacing the Toner Cartridge R WARNING: • Do not incinerate spilled toner or used toner is swal- Consult a doctor if necessary. R CAUTION: • If toner or ...

Maintenance Manual
Page 34
... cartridge from the box. 30 AGN020S ZKGX461E Important ❒ Do not use chemical cleaner or organic solvent such as temperature and humidity. Replacing Consumables and Maintenance Kit Note ❒ When handling toner cartridges, never stand them up on an unstable or tilted surface. Toner AGN022S quality degrades over time. You may have...
... cartridge from the box. 30 AGN020S ZKGX461E Important ❒ Do not use chemical cleaner or organic solvent such as temperature and humidity. Replacing Consumables and Maintenance Kit Note ❒ When handling toner cartridges, never stand them up on an unstable or tilted surface. Toner AGN022S quality degrades over time. You may have...

Maintenance Manual
Page 36
... allow internal parts to the following message appears on the display: • Transfer Roller (with wet hands. 2 R CAUTION: • The inside of this printer be- Replace the maintenance kit if the following procedure. Do not touch parts labelled "v" (indicating a hot surface). B Check the box contains the fol- Replace them according to cool down...
... allow internal parts to the following message appears on the display: • Transfer Roller (with wet hands. 2 R CAUTION: • The inside of this printer be- Replace the maintenance kit if the following procedure. Do not touch parts labelled "v" (indicating a hot surface). B Check the box contains the fol- Replace them according to cool down...

Maintenance Manual
Page 37
ZKGM160E D Use a sharp-pointed item like a ball-point pen, to release the two catches that lock the friction pad are released. Replacing the Maintenance Kit Replacing the Friction Pad C Remove paper from the paper tray. on a flat surface. Note ❒ The friction pad may come off when the catches are ... pad spring. ❒ The catches that lock the friction pad. A Lift the paper tray slightly, and then pull it out until it out of the printer. One is for the paper tray (Tray 1), and the other are two kinds of the tray, and then pull it stops. Be careful not to...
ZKGM160E D Use a sharp-pointed item like a ball-point pen, to release the two catches that lock the friction pad are released. Replacing the Maintenance Kit Replacing the Friction Pad C Remove paper from the paper tray. on a flat surface. Note ❒ The friction pad may come off when the catches are ... pad spring. ❒ The catches that lock the friction pad. A Lift the paper tray slightly, and then pull it out until it out of the printer. One is for the paper tray (Tray 1), and the other are two kinds of the tray, and then pull it stops. Be careful not to...

Maintenance Manual
Page 38
... tray. Push the friction pad until it locks nal position, and then remove the securely. friction pad from the tray. H If your printer is properly installed. Replacing Consumables and Maintenance Kit E G Return the paper tray to lose replacing the friction pad. 2 the friction pad spring. Be careful not to its origi- Then push...
... tray. Push the friction pad until it locks nal position, and then remove the securely. friction pad from the tray. H If your printer is properly installed. Replacing Consumables and Maintenance Kit E G Return the paper tray to lose replacing the friction pad. 2 the friction pad spring. Be careful not to its origi- Then push...
Maintenance Manual
Page 39
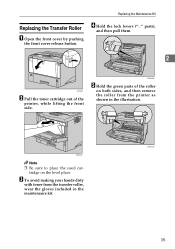
... then remove the roller from the transfer roller, wear the gloves included in the illustration. C To avoid making your hands dirty with toner from the printer as shown in the maintenance kit. 35 Replacing the Maintenance Kit Replacing the Transfer Roller A Open the front cover by pushing the front cover release button.
... then remove the roller from the transfer roller, wear the gloves included in the illustration. C To avoid making your hands dirty with toner from the printer as shown in the maintenance kit. 35 Replacing the Maintenance Kit Replacing the Transfer Roller A Open the front cover by pushing the front cover release button.

Maintenance Manual
Page 40
... the green parts of both sides of the printer until it touches the back. AGN023S J Lower the toner cartridge when it stops. 2 ZKGM220E Important ❒ Do not insert the roller on the left and right side indentations. Replacing Consumables and Maintenance Kit F Insert the new transfer roller on the ...socket with the gear of the roller positioned on the back of the socket, or the printer might be damaged. ❒ Insert the metallic part of the ...
... the green parts of both sides of the printer until it touches the back. AGN023S J Lower the toner cartridge when it stops. 2 ZKGM220E Important ❒ Do not insert the roller on the left and right side indentations. Replacing Consumables and Maintenance Kit F Insert the new transfer roller on the ...socket with the gear of the roller positioned on the back of the socket, or the printer might be damaged. ❒ Insert the metallic part of the ...

Maintenance Manual
Page 41
... paper feed roller on the optional paper feed unit differs from the printer. Note ❒ If the printer is in- AGN017S A For the paper tray B For the paper feed unit ZKGM120E 37 Replacing the Maintenance Kit Replacing the Paper Feed Rollers A If the optional duplex unit is equipped... with the optional paper feed unit, do not move the printer hori- unit(s). The following procedure shows how to scatter. ❒ Do...
... paper feed roller on the optional paper feed unit differs from the printer. Note ❒ If the printer is in- AGN017S A For the paper tray B For the paper feed unit ZKGM120E 37 Replacing the Maintenance Kit Replacing the Paper Feed Rollers A If the optional duplex unit is equipped... with the optional paper feed unit, do not move the printer hori- unit(s). The following procedure shows how to scatter. ❒ Do...
Maintenance Manual
Page 42
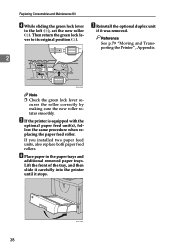
Replacing Consumables and Maintenance Kit D While sliding the green lock lever to its original position ( ). G Reinstall the optional duplex unit if it stops. 38 ZKGY150E ver to the left ( ), set ... rollers. F Place paper in the paper trays and additional removed paper trays. Lift the front of the tray, and then slide it carefully into the printer until it was removed. cures the roller correctly by making sure the new roller rotates smoothly. Reference See p.79 "Moving and Transporting the...
Replacing Consumables and Maintenance Kit D While sliding the green lock lever to its original position ( ). G Reinstall the optional duplex unit if it stops. 38 ZKGY150E ver to the left ( ), set ... rollers. F Place paper in the paper trays and additional removed paper trays. Lift the front of the tray, and then slide it carefully into the printer until it was removed. cures the roller correctly by making sure the new roller rotates smoothly. Reference See p.79 "Moving and Transporting the...

Maintenance Manual
Page 43
... result in a horizon- AGN004S B Remove the rear cover in a burn. ing unit, turn off the printer and wait about an hour. After that, install the new fusing unit. ZKGX220E ZKGM010E 39 tal direction. Replacing the Maintenance Kit Replacing the Fusing Unit C Lift the lock levers of the new fusing unit. two knobs. AGN007S...
... result in a horizon- AGN004S B Remove the rear cover in a burn. ing unit, turn off the printer and wait about an hour. After that, install the new fusing unit. ZKGX220E ZKGM010E 39 tal direction. Replacing the Maintenance Kit Replacing the Fusing Unit C Lift the lock levers of the new fusing unit. two knobs. AGN007S...

Maintenance Manual
Page 44
... clicks. Reference For more information about printing the configuration page, see "Test Printing", Setup Guide. AGN009S H Insert the rear cover to con- Replacing Consumables and Maintenance Kit F Replace the new fusing unit into the printer. AGN005S J Print a configuration page to the inside grooves on the right side of the...
... clicks. Reference For more information about printing the configuration page, see "Test Printing", Setup Guide. AGN009S H Insert the rear cover to con- Replacing Consumables and Maintenance Kit F Replace the new fusing unit into the printer. AGN005S J Print a configuration page to the inside grooves on the right side of the...

Maintenance Manual
Page 45
Replacing the Maintenance Kit B Lift the lock levers of the printer until it is connected. E Replace the new fusing unit into back of the printer aligning the rails inside of the fusing unit as shown in the illustration. AGN009S G Align the power cable with the groove of the left slide of the duplex unit, and then insert the duplex unit into the printer. 2 C Pull the fusing unit out. AGN006S AGN008S F Push the lock levers of the new fusing unit. AGN007S D Pull out the pins on both sides of the fusing unit down until it clicks. ZKGM010E ZKGX240E 41
Replacing the Maintenance Kit B Lift the lock levers of the printer until it is connected. E Replace the new fusing unit into back of the printer aligning the rails inside of the fusing unit as shown in the illustration. AGN009S G Align the power cable with the groove of the left slide of the duplex unit, and then insert the duplex unit into the printer. 2 C Pull the fusing unit out. AGN006S AGN008S F Push the lock levers of the new fusing unit. AGN007S D Pull out the pins on both sides of the fusing unit down until it clicks. ZKGM010E ZKGX240E 41

Maintenance Manual
Page 46
Replacing Consumables and Maintenance Kit H Print a configuration page to con- Reference For more information about printing the configuration page, 2 see "Test Printing", Setup Guide. 42 erly. firm that the printer works prop-
Replacing Consumables and Maintenance Kit H Print a configuration page to con- Reference For more information about printing the configuration page, 2 see "Test Printing", Setup Guide. 42 erly. firm that the printer works prop-

Maintenance Manual
Page 61
... Car- correctly or toner is suspended. Error & Status Messages on . Replace the new maintenance kit. work connection. See p.32 "Replacing the Maintenance Kit". Replace Toner Cartridge The toner cartridge is ready to use. problem persists, call your service plex unit. printer is not set Set the toner cartridge correctly. If the image density gets too...
... Car- correctly or toner is suspended. Error & Status Messages on . Replace the new maintenance kit. work connection. See p.32 "Replacing the Maintenance Kit". Replace Toner Cartridge The toner cartridge is ready to use. problem persists, call your service plex unit. printer is not set Set the toner cartridge correctly. If the image density gets too...


