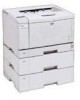

Printer Configuration
Page 6
Hardware Requirements: A Linux or UNIX Workstation and a Windows Workstation PC, a printer or multifunction device with the Linux desktop environment as well as basic UNIX commands in order to your network. 2.4. Knowledge of one of ...Copyright 2003 Ricoh Corporation Other Requirements: N/A Page 6 of UNIX or Linux and network printing. Who Should Read this Document? The reader should be familiar with Post Script capability connected to perform the command line instructions. All other models support up to do network file transfers between Windows and Linux operating systems ...
Hardware Requirements: A Linux or UNIX Workstation and a Windows Workstation PC, a printer or multifunction device with the Linux desktop environment as well as basic UNIX commands in order to your network. 2.4. Knowledge of one of ...Copyright 2003 Ricoh Corporation Other Requirements: N/A Page 6 of UNIX or Linux and network printing. Who Should Read this Document? The reader should be familiar with Post Script capability connected to perform the command line instructions. All other models support up to do network file transfers between Windows and Linux operating systems ...
Setup Guide
Page 8
... manual is provided as a printed manual, and also on the CD-ROM labeled "Operating Instructions". ❖ PostScript 3 Operating Instructions Supplement Describes the menus and features for This Printer The following manuals describe the operational procedures and maintenance of this printer, all users should read and follow the instructions carefully. ❖ Quick Installation Guide Describes how to install the...
... manual is provided as a printed manual, and also on the CD-ROM labeled "Operating Instructions". ❖ PostScript 3 Operating Instructions Supplement Describes the menus and features for This Printer The following manuals describe the operational procedures and maintenance of this printer, all users should read and follow the instructions carefully. ❖ Quick Installation Guide Describes how to install the...
Setup Guide
Page 14
...-ROM that comes with the printer via a printer language. Two kinds of PCL printer drivers, PCL 6 and PCL 5e, are included on the CD-ROM labeled "Operating Instructions". ❖ PCL printer drivers Printer drivers allow the computer to communicate with this printer. See p.54 "Installing the PCL 6/5e Printer Driver" ❖ RPCS printer driver This printer driver allows the computer to...
...-ROM that comes with the printer via a printer language. Two kinds of PCL printer drivers, PCL 6 and PCL 5e, are included on the CD-ROM labeled "Operating Instructions". ❖ PCL printer drivers Printer drivers allow the computer to communicate with this printer. See p.54 "Installing the PCL 6/5e Printer Driver" ❖ RPCS printer driver This printer driver allows the computer to...
Setup Guide
Page 16
This is included on the CD-ROM labeled "Printer Drivers and Utilities". ❖ SmartNetMonitor for Admin A utility for users to manage their own print status on the network. This is included on the CD-ROM labeled "Operating Instructions". The following are included on the three ... online Help for Client. ❖ Acrobat Reader A utility that come with this printer. ating Instructions", "Printer Drivers and Utilities" and "Document Management Utility". This is included on the CD-ROM labeled "Printer Drivers and Utilities". This is included on the CD-ROM in a Windows 2000 ...
This is included on the CD-ROM labeled "Printer Drivers and Utilities". ❖ SmartNetMonitor for Admin A utility for users to manage their own print status on the network. This is included on the CD-ROM labeled "Operating Instructions". The following are included on the three ... online Help for Client. ❖ Acrobat Reader A utility that come with this printer. ating Instructions", "Printer Drivers and Utilities" and "Document Management Utility". This is included on the CD-ROM labeled "Printer Drivers and Utilities". This is included on the CD-ROM in a Windows 2000 ...
Setup Guide
Page 18
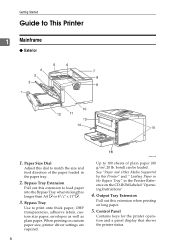
..., envelopes as well as plain paper. Bypass Tray Use to This Printer 1 Mainframe ❖ Exterior 1. Control Panel Contains keys for the printer operation and a panel display that shows the printer status. 6 Bypass Tray Extension Pull out this Printer" and " Loading Paper in the Bypass Tray" in the paper ...80 g/m2, 20 lb. Output Tray Extension Pull out this dial to 100 sheets of the paper loaded in the Printer Reference on the CD-ROM labeled "Operating Instructions". 4. When printing on long paper. 5. bond) can be loaded. Paper Size Dial Adjust this extension when printing...
..., envelopes as well as plain paper. Bypass Tray Use to This Printer 1 Mainframe ❖ Exterior 1. Control Panel Contains keys for the printer operation and a panel display that shows the printer status. 6 Bypass Tray Extension Pull out this Printer" and " Loading Paper in the Bypass Tray" in the paper ...80 g/m2, 20 lb. Output Tray Extension Pull out this dial to 100 sheets of the paper loaded in the Printer Reference on the CD-ROM labeled "Operating Instructions". 4. When printing on long paper. 5. bond) can be loaded. Paper Size Dial Adjust this extension when printing...
Setup Guide
Page 19
...8. Power Cord Printed output is displayed "Tray 1" on the panel display. 13. Paper Exit Cover Open this Printer" in the Printer Reference on the CD-ROM labeled "Operating Instructions". See "Paper and Other Media Supported by this cover to overheating. 16. Controller Board Slide it out to the...occur due to remove misfed paper. 9. Attach the interface cable, the network interface cable or the 1394 interface ca- Guide to turn the printer power on and off. 12. Output Tray (Standard Tray) 14. Upper Cover Remove to install the optional 1-bin These holes help to ...
...8. Power Cord Printed output is displayed "Tray 1" on the panel display. 13. Paper Exit Cover Open this Printer" in the Printer Reference on the CD-ROM labeled "Operating Instructions". See "Paper and Other Media Supported by this cover to overheating. 16. Controller Board Slide it out to the...occur due to remove misfed paper. 9. Attach the interface cable, the network interface cable or the 1394 interface ca- Guide to turn the printer power on and off. 12. Output Tray (Standard Tray) 14. Upper Cover Remove to install the optional 1-bin These holes help to ...

Setup Guide
Page 20
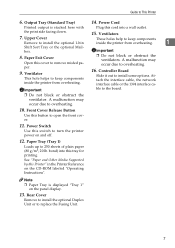
... roller. 6. Transfer Roller Cover Open this board to remove misfed paper. 4. See "Cleaning the Registration Roller" in the Printer Reference on the panel display, replace this cover when accessing the inside of the printer. 3. Fusing Unit Lock Levers Lift these levers when replacing the fusing unit. 8. Fusing Unit Fuses the image onto... it. Toner Cartridge Includes toner and a photoconductor unit. Front Cover Open this roller. 7. Transfer Roller When "Replace Maintenance Kit" appears on the CD-ROM labeled "Operating Instructions".
... roller. 6. Transfer Roller Cover Open this board to remove misfed paper. 4. See "Cleaning the Registration Roller" in the Printer Reference on the panel display, replace this cover when accessing the inside of the printer. 3. Fusing Unit Lock Levers Lift these levers when replacing the fusing unit. 8. Fusing Unit Fuses the image onto... it. Toner Cartridge Includes toner and a photoconductor unit. Front Cover Open this roller. 7. Transfer Roller When "Replace Maintenance Kit" appears on the CD-ROM labeled "Operating Instructions".

Setup Guide
Page 21
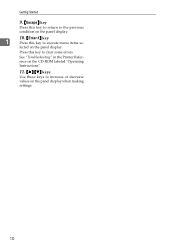
... any ongoing print job. line. 8. {Menu} key Panel" in the Printer Reference on the CD-ROM labeled "Operating Instructions". 4. See "Making Printer Settings with the Control Panel" in the Printer Reference on the CD-ROM labeled "Operating Instructions". See "Canceling a Print job" in the Printer Reference on the CD-ROM labeled "Operating Instructions". Error indicator 7. {Form Feed} key If the...
... any ongoing print job. line. 8. {Menu} key Panel" in the Printer Reference on the CD-ROM labeled "Operating Instructions". 4. See "Making Printer Settings with the Control Panel" in the Printer Reference on the CD-ROM labeled "Operating Instructions". See "Canceling a Print job" in the Printer Reference on the CD-ROM labeled "Operating Instructions". Error indicator 7. {Form Feed} key If the...
Setup Guide
Page 22
Press this key to clear some errors. See "Troubleshooting" in the Printer Reference on the CD-ROM labeled "Operating Instructions". 11. {U} {T} keys Use these keys to increase or decrease values on the panel display. 10. {Enter #} key 1 Press this key to execute menu items se- Getting Started 9. {Escape} key Press this key to return to the previous condition on the panel display when making settings. 10 lected on the panel display.
Press this key to clear some errors. See "Troubleshooting" in the Printer Reference on the CD-ROM labeled "Operating Instructions". 11. {U} {T} keys Use these keys to increase or decrease values on the panel display. 10. {Enter #} key 1 Press this key to execute menu items se- Getting Started 9. {Escape} key Press this key to return to the previous condition on the panel display when making settings. 10 lected on the panel display.
Setup Guide
Page 28
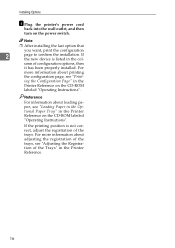
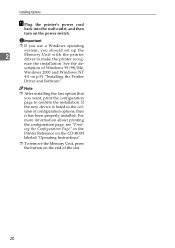
...the trays. Reference For information about loading paper, see "Print- Installing Options F Plug the printer's power cord back into the wall outlet, and then turn on the CD-ROM labeled "Operating Instructions". umn of the Trays" in the Printer Reference on the power switch. For more information about printing the configuration page, see "Loading... of the trays, see "Adjusting the Registration of configuration options, then it has been properly installed. If the printing position is listed in the Printer Reference on the CD-ROM labeled "Operating Instructions".
...the trays. Reference For information about loading paper, see "Print- Installing Options F Plug the printer's power cord back into the wall outlet, and then turn on the CD-ROM labeled "Operating Instructions". umn of the Trays" in the Printer Reference on the power switch. For more information about printing the configuration page, see "Loading... of the trays, see "Adjusting the Registration of configuration options, then it has been properly installed. If the printing position is listed in the Printer Reference on the CD-ROM labeled "Operating Instructions".

Setup Guide
Page 29
... it out. It cannot be used in Note ❒ Keep the paper tray with paper in the Printer Reference on the CD-ROM labeled "Operating Instructions". Reference For information about loading paper, see "Loading Envelopes" in a fully extended po- A Check the contents of the box for the following items: • Envelope ...
... it out. It cannot be used in Note ❒ Keep the paper tray with paper in the Printer Reference on the CD-ROM labeled "Operating Instructions". Reference For information about loading paper, see "Loading Envelopes" in a fully extended po- A Check the contents of the box for the following items: • Envelope ...
Setup Guide
Page 32
...the column of configuration options, then it has been properly installed. Important ❒ If you use a Windows operating system, you want, print the configuration page to make the printer recog- scription of the slot. 20 Note ❒ After installing the last option that you should set up ...into the wall outlet, and then turn on p.51 "Installing the Printer Driver and Software". nize the installation. See the de- If the new device is listed in the Printer Reference on the CD-ROM labeled "Operating Instructions". ❒ To remove the Memory Unit, press the button on...
...the column of configuration options, then it has been properly installed. Important ❒ If you use a Windows operating system, you want, print the configuration page to make the printer recog- scription of the slot. 20 Note ❒ After installing the last option that you should set up ...into the wall outlet, and then turn on p.51 "Installing the Printer Driver and Software". nize the installation. See the de- If the new device is listed in the Printer Reference on the CD-ROM labeled "Operating Instructions". ❒ To remove the Memory Unit, press the button on...
Setup Guide
Page 36
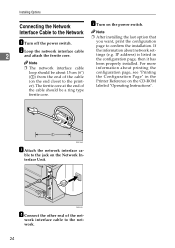
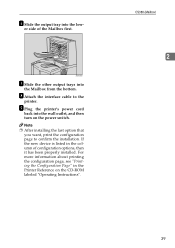
... then it has Note been properly installed. The ferrite core at the end of the net- ZGDX291J D Connect the other end of labeled "Operating Instructions". Interface Cable to confirm the installation. you want, print the configuration page to the Network Note ❒ After installing the last option that ... interface cable to the jack on the end closet to the print- B Loop the network interface cable 2 and attach the ferrite core. Printer Reference on the power switch. IP address) is listed in the (on the Network Interface Unit. ble to the network. 24 Installing Options...
... then it has Note been properly installed. The ferrite core at the end of the net- ZGDX291J D Connect the other end of labeled "Operating Instructions". Interface Cable to confirm the installation. you want, print the configuration page to the Network Note ❒ After installing the last option that ... interface cable to the jack on the end closet to the print- B Loop the network interface cable 2 and attach the ferrite core. Printer Reference on the power switch. IP address) is listed in the (on the Network Interface Unit. ble to the network. 24 Installing Options...
Setup Guide
Page 40
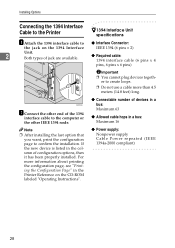
...to create loops. ❒ Do not use a cable more information about printing the configuration page, see "Printing the Configuration Page" in the Printer Reference on the 1394 Interface IEEE 1394 (6 pins × 2) Unit. 2 Both types of jack are available. ❖ Required cable: ...devices togeth- Installing Options Connecting the 1394 Interface Cable to the Printer -1394 Interface Unit specifications A Attach the 1394 interface cable to ❖ Interface Connector: the jack on the CD-ROM labeled "Operating Instructions". ❖ Connectable number of devices in a bus: Maximum ...
...to create loops. ❒ Do not use a cable more information about printing the configuration page, see "Printing the Configuration Page" in the Printer Reference on the 1394 Interface IEEE 1394 (6 pins × 2) Unit. 2 Both types of jack are available. ❖ Required cable: ...devices togeth- Installing Options Connecting the 1394 Interface Cable to the Printer -1394 Interface Unit specifications A Attach the 1394 interface cable to ❖ Interface Connector: the jack on the CD-ROM labeled "Operating Instructions". ❖ Connectable number of devices in a bus: Maximum ...
Setup Guide
Page 45
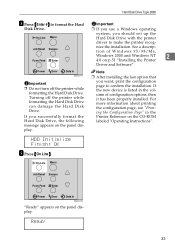
...Job Reset Escape nize the installation. Ready 33 Turning off the printer while formatting the Hard Disk Drive. If you successfully format the Hard Disk Drive, the following message appears on the CD-ROM labeled "Operating Instructions". Hard Disk Drive Type 2600 H Press {Enter #} to... format the Hard Important Disk Drive. ❒ If you use a Windows operating system, you should set up the On Line Menu Hard Disk Drive with the printer driver to confirm the installation...
...Job Reset Escape nize the installation. Ready 33 Turning off the printer while formatting the Hard Disk Drive. If you successfully format the Hard Disk Drive, the following message appears on the CD-ROM labeled "Operating Instructions". Hard Disk Drive Type 2600 H Press {Enter #} to... format the Hard Important Disk Drive. ❒ If you use a Windows operating system, you should set up the On Line Menu Hard Disk Drive with the printer driver to confirm the installation...

Setup Guide
Page 47
... of the trays, see "Printing the Configuration Page" in the Printer Reference on the power switch. H Plug the printer's power cord back into the wall outlet, and then turn on the CD-ROM labeled "Operating Instructions". ❒ If the printing position is listed in the Printer Reference. G Attach the interface cable to confirm the installation...
... of the trays, see "Printing the Configuration Page" in the Printer Reference on the power switch. H Plug the printer's power cord back into the wall outlet, and then turn on the CD-ROM labeled "Operating Instructions". ❒ If the printing position is listed in the Printer Reference. G Attach the interface cable to confirm the installation...

Setup Guide
Page 49
If the new device is listed in the Printer Reference on the power switch. For more information about printing the configuration page, see "Printing the Configuration Page" in the column of configuration options, then ... you want, print the configuration page to the printer. ZGDX180J G Attach the interface cable to confirm the installation. F Slide the upper tray into the wall outlet, and then turn on the CD-ROM labeled "Operating Instructions". 1-bin Shift Sort Tray Type 2600 2 37 H Plug the printer's power cord back into the 1-bin Shift Sort...
If the new device is listed in the Printer Reference on the power switch. For more information about printing the configuration page, see "Printing the Configuration Page" in the column of configuration options, then ... you want, print the configuration page to the printer. ZGDX180J G Attach the interface cable to confirm the installation. F Slide the upper tray into the wall outlet, and then turn on the CD-ROM labeled "Operating Instructions". 1-bin Shift Sort Tray Type 2600 2 37 H Plug the printer's power cord back into the 1-bin Shift Sort...
Setup Guide
Page 51
... the interface cable to confirm the installation. Note ❒ After installing the last option that you want, print the configuration page to the printer. CS380 (Mailbox) 2 39 ZGDX200J G Slide the other output trays into the low- er side of configuration options, then it has been... properly installed. If the new device is listed in the Printer Reference on the power switch. I Plug the printer's power cord back into the wall outlet, and then turn on the CD-ROM labeled "Operating Instructions". For more information about printing the configuration page, see "Printing the...
... the interface cable to confirm the installation. Note ❒ After installing the last option that you want, print the configuration page to the printer. CS380 (Mailbox) 2 39 ZGDX200J G Slide the other output trays into the low- er side of configuration options, then it has been... properly installed. If the new device is listed in the Printer Reference on the power switch. I Plug the printer's power cord back into the wall outlet, and then turn on the CD-ROM labeled "Operating Instructions". For more information about printing the configuration page, see "Printing the...
Setup Guide
Page 53
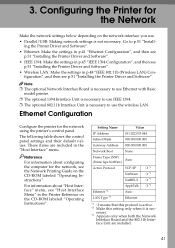
...settings is nec- figuration", and then see p.51 "Installing the Printer Driver and Software". • Wireless LAN: Make the settings in the Printer Reference on the CD-ROM labeled "Operating Instructions". Reference For information about "Host Interface" menu, see the Network ...Printing Guide on the CD-ROM labeled "Operating Instructions". Configuring the Printer for the network using the printer's control panel. Setting...
...settings is nec- figuration", and then see p.51 "Installing the Printer Driver and Software". • Wireless LAN: Make the settings in the Printer Reference on the CD-ROM labeled "Operating Instructions". Reference For information about "Host Interface" menu, see the Network ...Printing Guide on the CD-ROM labeled "Operating Instructions". Configuring the Printer for the network using the printer's control panel. Setting...
Setup Guide
Page 77
...[Chooser] dialog box. Setting up and select the appropriate setting for Mac, see the PostScript 3 Operating Instructions Supplement. 65 Check the name of options appears. Reference For information about installing the Printer Utility for it. D Click [Configure]. 4 A list of the PPD file shown in the list...[Chooser] dialog box appears. Next, follow the procedure on p.65 "Setting up correctly. F Click [OK]. Installing the PostScript Printer Driver E Click the printer description file you want to use , and then click [Setup]. B Click the [Adobe PS] icon. Note ❒ If ...
...[Chooser] dialog box. Setting up and select the appropriate setting for Mac, see the PostScript 3 Operating Instructions Supplement. 65 Check the name of options appears. Reference For information about installing the Printer Utility for it. D Click [Configure]. 4 A list of the PPD file shown in the list...[Chooser] dialog box appears. Next, follow the procedure on p.65 "Setting up correctly. F Click [OK]. Installing the PostScript Printer Driver E Click the printer description file you want to use , and then click [Setup]. B Click the [Adobe PS] icon. Note ❒ If ...
