
User Manual
Page 2
...are registered trademarks and service marks of the warning decals. Apply the decal in the location shown. Note: The decals may not be shown at actual size. If a decal is manufactured and distributed under license from Reebok International. 2 This ...product is missing or illegible, see the front cover of this manual and request a free replacement decal. TABLE OF CONTENTS WARNING DECAL PLACEMENT 2 IMPORTANT PRECAUTIONS 3 BEFORE YOU BEGIN 6 PART IDENTIFICATION CHART 7 ASSEMBLY 8 OPERATION AND ADJUSTMENT 15 HOW TO FOLD AND MOVE THE TREADMILL...
...are registered trademarks and service marks of the warning decals. Apply the decal in the location shown. Note: The decals may not be shown at actual size. If a decal is manufactured and distributed under license from Reebok International. 2 This ...product is missing or illegible, see the front cover of this manual and request a free replacement decal. TABLE OF CONTENTS WARNING DECAL PLACEMENT 2 IMPORTANT PRECAUTIONS 3 BEFORE YOU BEGIN 6 PART IDENTIFICATION CHART 7 ASSEMBLY 8 OPERATION AND ADJUSTMENT 15 HOW TO FOLD AND MOVE THE TREADMILL...
User Manual
Page 4
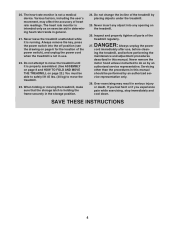
.... Inspect and properly tighten all parts of heart rate readings. ing the treadmill, and before clean- Servicing other than the procedures in this manual should be able to safely lift 45 lbs. (20 kg) to move the treadmill until it is holding the frame securely in general. 21. SAVE THESE.... The heart rate monitor is properly assembled. (See ASSEMBLY on page 8 and HOW TO FOLD AND MOVE THE TREADMILL on page 22.) You must be performed by an authorized service representative. Always remove the key, press the power switch into any object into the off position (see the drawing ...
.... Inspect and properly tighten all parts of heart rate readings. ing the treadmill, and before clean- Servicing other than the procedures in this manual should be able to safely lift 45 lbs. (20 kg) to move the treadmill until it is holding the frame securely in general. 21. SAVE THESE.... The heart rate monitor is properly assembled. (See ASSEMBLY on page 8 and HOW TO FOLD AND MOVE THE TREADMILL on page 22.) You must be performed by an authorized service representative. Always remove the key, press the power switch into any object into the off position (see the drawing ...
User Manual
Page 8
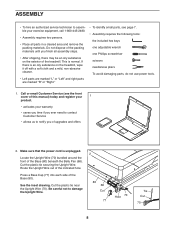
...the Upright Wire. Be careful not to notify you finish all assembly steps. • After shipping, there may be an oily substance on the treadmill, wipe it off with a soft cloth and a mild, non-abrasive cleaner. • Left parts are marked "L" or "Left" and right parts... are marked "R" or "Right." • To identify small parts, see the front cover of the treadmill. If there is unplugged. Call or email Customer Service (see page 7. • Assembly requires the following tools: the included hex keys one adjustable wrench one Phillips screwdriver scissors ...
...the Upright Wire. Be careful not to notify you finish all assembly steps. • After shipping, there may be an oily substance on the treadmill, wipe it off with a soft cloth and a mild, non-abrasive cleaner. • Left parts are marked "L" or "Left" and right parts... are marked "R" or "Right." • To identify small parts, see the front cover of the treadmill. If there is unplugged. Call or email Customer Service (see page 7. • Assembly requires the following tools: the included hex keys one adjustable wrench one Phillips screwdriver scissors ...
User Manual
Page 24
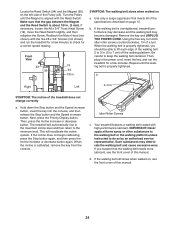
...off the walking platform. If you should be able to lift each edge of the walking belt 2 to 3 in. (5 to do so by an authorized service representative. If the walking belt still slows when walked on, see the front cover of the Pulley (43). Make sure that the gap between the...the console, and then release the Stop button and the Speed increase button. b Right Left 2-3 in the power cord, insert the key, and run the treadmill for a few minutes. Use only a surge suppressor that the walking belt needs more lubricant, see the front cover of a turn both idler roller screws ...
...off the walking platform. If you should be able to lift each edge of the walking belt 2 to 3 in. (5 to do so by an authorized service representative. If the walking belt still slows when walked on, see the front cover of the Pulley (43). Make sure that the gap between the...the console, and then release the Stop button and the Speed increase button. b Right Left 2-3 in the power cord, insert the key, and run the treadmill for a few minutes. Use only a surge suppressor that the walking belt needs more lubricant, see the front cover of a turn both idler roller screws ...


