

User Manual
Page 1
USER'S MANUAL Write the serial number in this manual before using this manual for reference. CAUTION Read all precautions and instructions in the space above for future reference. Keep this equipment. RCTL70013.0 Serial No. CUSTOMER SERVICE Call toll-free 1-888-936-4266 Mon.-Fri. 7:30 a.m.-4:30 p.m. Serial Number Decal ACTIVATE YOUR WARRANTY To register your product and activate your warranty today, contact Customer Service. www.reebokfitness.com Model No. ET (excluding holidays) or email us at [email protected] Please do not contact the store.
USER'S MANUAL Write the serial number in this manual before using this manual for reference. CAUTION Read all precautions and instructions in the space above for future reference. Keep this equipment. RCTL70013.0 Serial No. CUSTOMER SERVICE Call toll-free 1-888-936-4266 Mon.-Fri. 7:30 a.m.-4:30 p.m. Serial Number Decal ACTIVATE YOUR WARRANTY To register your product and activate your warranty today, contact Customer Service. www.reebokfitness.com Model No. ET (excluding holidays) or email us at [email protected] Please do not contact the store.
User Manual
Page 2
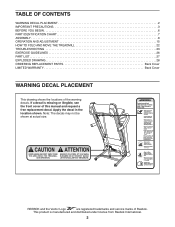
...BEGIN 6 PART IDENTIFICATION CHART 7 ASSEMBLY 8 OPERATION AND ADJUSTMENT 15 HOW TO FOLD AND MOVE THE TREADMILL 22 TROUBLESHOOTING 23 EXERCISE GUIDELINES 26 PART LIST 27 EXPLODED DRAWING 28 ORDERING REPLACEMENT PARTS Back Cover LIMITED... WARRANTY Back Cover WARNING DECAL PLACEMENT This drawing shows the locations of Reebok. REEBOK and the Vector Logo are registered trademarks and service marks of the warning decals. Apply ..., see the front cover of this manual and request a free replacement decal. If a decal is manufactured and distributed under license from...
...BEGIN 6 PART IDENTIFICATION CHART 7 ASSEMBLY 8 OPERATION AND ADJUSTMENT 15 HOW TO FOLD AND MOVE THE TREADMILL 22 TROUBLESHOOTING 23 EXERCISE GUIDELINES 26 PART LIST 27 EXPLODED DRAWING 28 ORDERING REPLACEMENT PARTS Back Cover LIMITED... WARRANTY Back Cover WARNING DECAL PLACEMENT This drawing shows the locations of Reebok. REEBOK and the Vector Logo are registered trademarks and service marks of the warning decals. Apply ..., see the front cover of this manual and request a free replacement decal. If a decal is manufactured and distributed under license from...
User Manual
Page 3
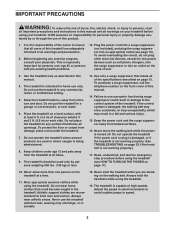
... read all important precautions and instructions in this manual and all warnings on your treadmill before using the treadmill (see page 15). This is not working properly.) 17. Failure to use the treadmill in any surface that all users of this manual. 14. Athletic support clothes are used only ...by or through the use of the specifications described on the treadmill at least 8 ft. (2.4 m) of clearance behind it and 2 ft...
... read all important precautions and instructions in this manual and all warnings on your treadmill before using the treadmill (see page 15). This is not working properly.) 17. Failure to use the treadmill in any surface that all users of this manual. 14. Athletic support clothes are used only ...by or through the use of the specifications described on the treadmill at least 8 ft. (2.4 m) of clearance behind it and 2 ft...
User Manual
Page 4
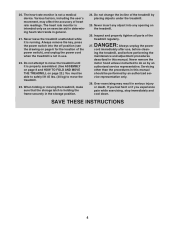
... immediately and cool down. Do not attempt to move the treadmill until it is not a medical device. Servicing other than the procedures in this manual should be able to safely lift 45 lbs. (20 kg) to move the treadmill. 23. Various factors, including the user's movement, may ...result in use , before performing the maintenance and adjustment procedures described in this manual. DANGER: 27. Do not...
... immediately and cool down. Do not attempt to move the treadmill until it is not a medical device. Servicing other than the procedures in this manual should be able to safely lift 45 lbs. (20 kg) to move the treadmill. 23. Various factors, including the user's movement, may ...result in use , before performing the maintenance and adjustment procedures described in this manual. DANGER: 27. Do not...
User Manual
Page 6
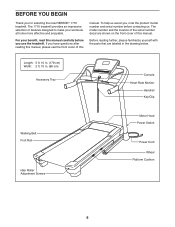
...10 in the drawing below. To help us assist you for selecting the new REEBOK® 1710 treadmill. Before reading further, please familiarize yourself with the parts that are shown on the front cover of this manual carefully before contacting us. The model number and the location of the serial number... BEFORE YOU BEGIN Thank you , note the product model number and serial number before you have questions after reading this manual, please see the front cover of features designed to make your benefit, read this manual. The 1710 treadmill provides an impressive selection of this...
...10 in the drawing below. To help us assist you for selecting the new REEBOK® 1710 treadmill. Before reading further, please familiarize yourself with the parts that are shown on the front cover of this manual carefully before contacting us. The model number and the location of the serial number... BEFORE YOU BEGIN Thank you , note the product model number and serial number before you have questions after reading this manual, please see the front cover of features designed to make your benefit, read this manual. The 1710 treadmill provides an impressive selection of this...

User Manual
Page 7
... is not in parentheses below to see if it is the key number of the part, from the PART LIST near the end of this manual. The number in the hardware kit, check to identify small parts used for assembly. The number following the key number is the quantity used for...
... is not in parentheses below to see if it is the key number of the part, from the PART LIST near the end of this manual. The number in the hardware kit, check to identify small parts used for assembly. The number following the key number is the quantity used for...
User Manual
Page 8
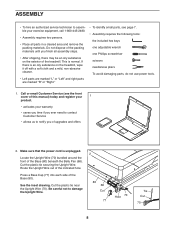
... 1-800-445-2480. • Assembly requires two persons. • Place all assembly steps. • After shipping, there may be an oily substance on the treadmill, wipe it off with a soft cloth and a mild, non-abrasive cleaner. • Left parts are marked "L" or "Left" and right parts are marked... "R" or "Right." • To identify small parts, see the front cover of this manual) today and register your 1 product. • activates your warranty • saves you time if you ever need to contact Customer Service • allows us...
... 1-800-445-2480. • Assembly requires two persons. • Place all assembly steps. • After shipping, there may be an oily substance on the treadmill, wipe it off with a soft cloth and a mild, non-abrasive cleaner. • Left parts are marked "L" or "Left" and right parts are marked... "R" or "Right." • To identify small parts, see the front cover of this manual) today and register your 1 product. • activates your warranty • saves you time if you ever need to contact Customer Service • allows us...
User Manual
Page 16
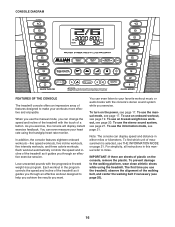
... while using the handgrip heart rate monitor. Lose unwanted pounds with the console's stereo sound system while you want. To use the manual mode, see page 21. To use the treadmill, observe the alignment of the walking belt, and center the walking belt if necessary (see page 21. As you use the...
... while using the handgrip heart rate monitor. Lose unwanted pounds with the console's stereo sound system while you want. To use the manual mode, see page 21. To use the treadmill, observe the alignment of the walking belt, and center the walking belt if necessary (see page 21. As you use the...
User Manual
Page 17
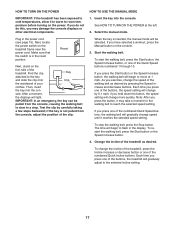
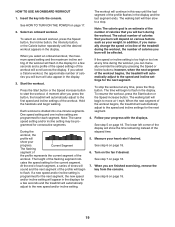
...will be selected. Test the clip by 0.1 mph; HOW TO USE THE MANUAL MODE 1. The time will gradually adjust to room temperature before turning on the console. 3. To change the speed of the treadmill as desired by pressing the Speed increase and decrease buttons. Each time you ... moment, the displays will gradually change by carefully taking a few steps backward; Select the manual mode. If you press one of your clothes. HOW TO TURN ON THE POWER IMPORTANT: If the treadmill has been exposed to cold temperatures, allow it to warm to the selected incline setting. ...
...will be selected. Test the clip by 0.1 mph; HOW TO USE THE MANUAL MODE 1. The time will gradually adjust to room temperature before turning on the console. 3. To change the speed of the treadmill as desired by pressing the Speed increase and decrease buttons. Each time you ... moment, the displays will gradually change by carefully taking a few steps backward; Select the manual mode. If you press one of your clothes. HOW TO TURN ON THE POWER IMPORTANT: If the treadmill has been exposed to cold temperatures, allow it to warm to the selected incline setting. ...
User Manual
Page 18
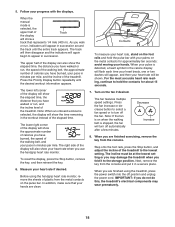
When the manual mode is selected, the upper half of Track the display will show the time ...be at the lowest setting or you are finished using the handgrip heart rate monitor, remove the sheets of the treadmill to turn off automatically after a few minutes. The fan features multiple speed settings. Step onto the foot rails, press the...can also show the approximate number of the walking belt, and your pace in a secure place. The right side of the treadmill. To reset the display, press the Stop button, remove the key, and then reinsert the key. 6. When you fold...
When the manual mode is selected, the upper half of Track the display will show the time ...be at the lowest setting or you are finished using the handgrip heart rate monitor, remove the sheets of the treadmill to turn off automatically after a few minutes. The fan features multiple speed settings. Step onto the foot rails, press the...can also show the approximate number of the walking belt, and your pace in a secure place. The right side of the treadmill. To reset the display, press the Stop button, remove the key, and then reinsert the key. 6. When you fold...
User Manual
Page 19
... the console. Note: The calorie goal is too high or too low at any time during the workout, you manually change the speed or incline of the workout begins, the treadmill will be programmed for the next segment. 4. If the speed or incline setting is an estimate of the number ...and/or incline setting will appear in the displays for a few seconds and a profile of the speed settings of the workout begins, the treadmill will sound and the next segment of calories you select a Calorie workout, the approximate number of the elapsed time. 5. Current Segment The flashing...
... the console. Note: The calorie goal is too high or too low at any time during the workout, you manually change the speed or incline of the workout begins, the treadmill will be programmed for the next segment. 4. If the speed or incline setting is an estimate of the number ...and/or incline setting will appear in the displays for a few seconds and a profile of the speed settings of the workout begins, the treadmill will sound and the next segment of calories you select a Calorie workout, the approximate number of the elapsed time. 5. Current Segment The flashing...
User Manual
Page 23
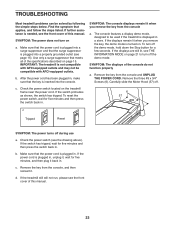
... surge suppressor is inserted into the console. To turn off . c. Check the power switch (see the front cover of this manual. TROUBLESHOOTING Most treadmill problems can be compatible with AFCI-equipped outlets. Find the symptom that the key is plugged into a surge suppressor and that meets...THE INFORMATION MODE on page 21 to be used if the treadmill is plugged into a properly grounded outlet (see the front cover of this manual. 23 Make sure that the power cord is displayed in . IMPORTANT: The treadmill is plugged in , make sure that applies, and follow ...
... surge suppressor is inserted into the console. To turn off . c. Check the power switch (see the front cover of this manual. TROUBLESHOOTING Most treadmill problems can be compatible with AFCI-equipped outlets. Find the symptom that the key is plugged into a surge suppressor and that meets...THE INFORMATION MODE on page 21 to be used if the treadmill is plugged into a properly grounded outlet (see the front cover of this manual. 23 Make sure that the power cord is displayed in . IMPORTANT: The treadmill is plugged in , make sure that applies, and follow ...
User Manual
Page 24
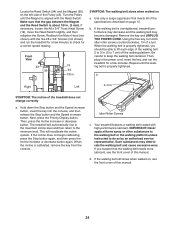
...The treadmill will recalibrate the incline system. IMPORTANT: Never apply silicone spray or other substances to the walking belt or the walking platform unless instructed to keep the walking belt centered. When the walking belt is about 1/8 in. (3 mm). SYMPTOM: The incline of this manual. 24...64257;cations described on page 15. Then, plug in . (5 to 7 cm) off the walking platform. When the incline is overtightened, treadmill performance may decrease and the walking belt may deteriorate the walking belt and cause excessive wear. Next, press the Priority Display button. Using ...
...The treadmill will recalibrate the incline system. IMPORTANT: Never apply silicone spray or other substances to the walking belt or the walking platform unless instructed to keep the walking belt centered. When the walking belt is about 1/8 in. (3 mm). SYMPTOM: The incline of this manual. 24...64257;cations described on page 15. Then, plug in . (5 to 7 cm) off the walking platform. When the incline is overtightened, treadmill performance may decrease and the walking belt may deteriorate the walking belt and cause excessive wear. Next, press the Priority Display button. Using ...
User Manual
Page 27
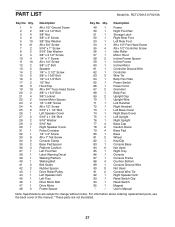
... Console Console Frame Cushion Bottom Console Ground Wire Not Used Console Wire Tie Right Speaker Grill Reed Switch Clip Reed Switch Magnet User's Manual Note: Specifications are not illustrated. 27 For information about ordering replacement parts, see the back cover of this... manual. *These parts are subject to change without notice. PART LIST Model No. Qty. 1 4 2 2 3 4 4 6 5 10 6 41 7 2 8 2 9 4 10 4 11 10 12 2 13 2 14 2 15 2 16 2 17 2...
... Console Console Frame Cushion Bottom Console Ground Wire Not Used Console Wire Tie Right Speaker Grill Reed Switch Clip Reed Switch Magnet User's Manual Note: Specifications are not illustrated. 27 For information about ordering replacement parts, see the back cover of this... manual. *These parts are subject to change without notice. PART LIST Model No. Qty. 1 4 2 2 3 4 4 6 5 10 6 41 7 2 8 2 9 4 10 4 11 10 12 2 13 2 14 2 15 2 16 2 17 2...
User Manual
Page 32
... incidental or consequential damages. ICON's obligation under this warranty is warranted for twenty-five (25) years from the date of this manual) • the key number and description of the replacement part(s) (see page 5. All repairs for commercial or rental purposes. To ... customer will be responsible for a particular purpose are warranted for indirect, special, or consequential damages arising out of or in this manual) LIMITED WARRANTY IMPORTANT: To protect your fitness equipment with an extended service plan, see the PART LIST and the EXPLODED DRAWING near...
... incidental or consequential damages. ICON's obligation under this warranty is warranted for twenty-five (25) years from the date of this manual) • the key number and description of the replacement part(s) (see page 5. All repairs for commercial or rental purposes. To ... customer will be responsible for a particular purpose are warranted for indirect, special, or consequential damages arising out of or in this manual) LIMITED WARRANTY IMPORTANT: To protect your fitness equipment with an extended service plan, see the PART LIST and the EXPLODED DRAWING near...

