
User Manual
Page 2
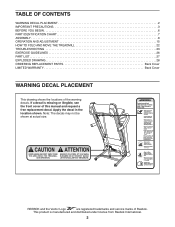
... PRECAUTIONS 3 BEFORE YOU BEGIN 6 PART IDENTIFICATION CHART 7 ASSEMBLY 8 OPERATION AND ADJUSTMENT 15 HOW TO FOLD AND MOVE THE TREADMILL 22 TROUBLESHOOTING 23 EXERCISE GUIDELINES 26 PART LIST 27 EXPLODED DRAWING 28 ORDERING REPLACEMENT PARTS Back Cover LIMITED WARRANTY Back Cover WARNING ...DECAL PLACEMENT This drawing shows the locations of this manual and request a free replacement decal. If a decal is manufactured and distributed under license from Reebok International. 2 This product is missing or illegible, see the front cover of ...
... PRECAUTIONS 3 BEFORE YOU BEGIN 6 PART IDENTIFICATION CHART 7 ASSEMBLY 8 OPERATION AND ADJUSTMENT 15 HOW TO FOLD AND MOVE THE TREADMILL 22 TROUBLESHOOTING 23 EXERCISE GUIDELINES 26 PART LIST 27 EXPLODED DRAWING 28 ORDERING REPLACEMENT PARTS Back Cover LIMITED WARRANTY Back Cover WARNING ...DECAL PLACEMENT This drawing shows the locations of this manual and request a free replacement decal. If a decal is manufactured and distributed under license from Reebok International. 2 This product is missing or illegible, see the front cover of ...

User Manual
Page 3
..., except for low-power devices such as described in this manual. 4. The treadmill is intended for both men and women. To protect the floor or carpet from damage, place a mat under age 12 and pets away from the treadmill at all times. 9. To purchase a surge suppressor, call...reduce the risk of burns, fire, electric shock, or injury to persons, read all important precautions and instructions in this manual and all warnings on your treadmill before using the treadmill. Read, understand, and test the emergency stop unexpectedly, which may result in a garage or covered patio, or near ...
..., except for low-power devices such as described in this manual. 4. The treadmill is intended for both men and women. To protect the floor or carpet from damage, place a mat under age 12 and pets away from the treadmill at all times. 9. To purchase a surge suppressor, call...reduce the risk of burns, fire, electric shock, or injury to persons, read all important precautions and instructions in this manual and all warnings on your treadmill before using the treadmill. Read, understand, and test the emergency stop unexpectedly, which may result in a garage or covered patio, or near ...

User Manual
Page 4
...incline of the power switch), and unplug the power cord when the treadmill is running. Over exercising may affect the accuracy of the treadmill regularly. The heart rate monitor is holding the frame securely in this manual. Always unplug the power cord immediately after use . 22. Never remove... and adjustment procedures described in general. 21. When folding or moving the treadmill, make sure that the storage latch is intended only as an exercise aid in determining heart rate trends in this manual should be able to safely lift 45 lbs. (20 kg) to do...
...incline of the power switch), and unplug the power cord when the treadmill is running. Over exercising may affect the accuracy of the treadmill regularly. The heart rate monitor is holding the frame securely in this manual. Always unplug the power cord immediately after use . 22. Never remove... and adjustment procedures described in general. 21. When folding or moving the treadmill, make sure that the storage latch is intended only as an exercise aid in determining heart rate trends in this manual should be able to safely lift 45 lbs. (20 kg) to do...
User Manual
Page 6
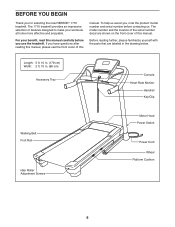
... your benefit, read this manual carefully before contacting us assist you for selecting the new REEBOK® 1710 treadmill. To help us . BEFORE YOU BEGIN Thank you , note the product model number and serial number before you have questions after reading this manual, please see the front ...cover of this manual. If you use the treadmill. For your workouts at...
... your benefit, read this manual carefully before contacting us assist you for selecting the new REEBOK® 1710 treadmill. To help us . BEFORE YOU BEGIN Thank you , note the product model number and serial number before you have questions after reading this manual, please see the front ...cover of this manual. If you use the treadmill. For your workouts at...
User Manual
Page 8
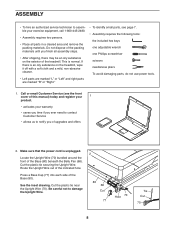
... 1-800-445-2480. • Assembly requires two persons. • Place all assembly steps. • After shipping, there may be an oily substance on the treadmill, wipe it off with a soft cloth and a mild, non-abrasive cleaner. • Left parts are marked "L" or "Left" and right parts are marked... "R" or "Right." • To identify small parts, see the front cover of this manual) today and register your 1 product. • activates your warranty • saves you time if you ever need to contact Customer Service • allows us...
... 1-800-445-2480. • Assembly requires two persons. • Place all assembly steps. • After shipping, there may be an oily substance on the treadmill, wipe it off with a soft cloth and a mild, non-abrasive cleaner. • Left parts are marked "L" or "Left" and right parts are marked... "R" or "Right." • To identify small parts, see the front cover of this manual) today and register your 1 product. • activates your warranty • saves you time if you ever need to contact Customer Service • allows us...
User Manual
Page 16
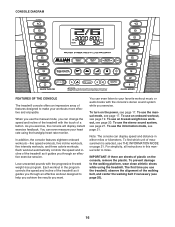
...center the walking belt if necessary (see THE INFORMATION MODE on page 21. Note: The console can even measure your heart rate using the treadmill. To prevent damage to the walking platform, wear clean athletic shoes while using the handgrip heart rate monitor. To use an onboard workout, ... the touch of the treadmill as it guides you through an effective exercise session. To use the information mode, see page 17. IMPORTANT: If there are sheets of features designed to your workouts more effective and enjoyable. To use the manual mode, you can even listen to make your...
...center the walking belt if necessary (see THE INFORMATION MODE on page 21. Note: The console can even measure your heart rate using the treadmill. To prevent damage to the walking platform, wear clean athletic shoes while using the handgrip heart rate monitor. To use an onboard workout, ... the touch of the treadmill as it guides you through an effective exercise session. To use the information mode, see page 17. IMPORTANT: If there are sheets of features designed to your workouts more effective and enjoyable. To use the manual mode, you can even listen to make your...
User Manual
Page 17
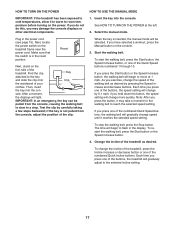
...the display. To stop . Next, locate the power switch on the foot rails of the buttons, the treadmill will change speed until it reaches the selected speed setting. HOW TO USE THE MANUAL MODE 1. Start the walking belt. To start the walking belt, press the Start button, the Speed ... move at the left. 2. Note: After you have selected a workout, press the Manual button on the power. To change the incline of the treadmill, press the Incline increase or decrease button or one of the treadmill as desired by carefully taking a few steps backward; Then, insert the key into the...
...the display. To stop . Next, locate the power switch on the foot rails of the buttons, the treadmill will change speed until it reaches the selected speed setting. HOW TO USE THE MANUAL MODE 1. Start the walking belt. To start the walking belt, press the Start button, the Speed ... move at the left. 2. Note: After you have selected a workout, press the Manual button on the power. To change the incline of the treadmill, press the Incline increase or decrease button or one of the treadmill as desired by carefully taking a few steps backward; Then, insert the key into the...
User Manual
Page 18
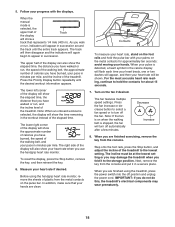
...the handgrip heart rate monitor, remove the sheets of the walking belt, and your heart rate will show the time remaining in succession. When the manual mode is selected, the display will also show a track that you have walked or run , the speed of the walking belt, the approximate ... The lower left corner of the display can also show the elapsed time, the distance that represents 1/4 mile (400 m). The lower right corner of the treadmill. To reset the display, press the Stop button, remove the key, and then reinsert the key. 6. In addition, make sure that your hands are ...
...the handgrip heart rate monitor, remove the sheets of the walking belt, and your heart rate will show the time remaining in succession. When the manual mode is selected, the display will also show a track that you have walked or run , the speed of the walking belt, the approximate ... The lower left corner of the display can also show the elapsed time, the distance that represents 1/4 mile (400 m). The lower right corner of the treadmill. To reset the display, press the Stop button, remove the key, and then reinsert the key. 6. In addition, make sure that your hands are ...
User Manual
Page 19
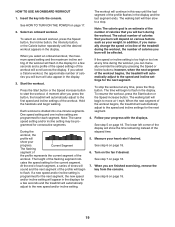
...The workout will automatically adjust to the speed and incline settings for a few seconds and the treadmill will scroll across the display. In addition, if you manually change the speed or incline of the treadmill during the workout, the number of the display will also appear in the display for the ...next segment. 4. To stop . When the next segment of the workout begins, the treadmill will automatically adjust to the first speed and incline settings of calories that you can manually override the setting by pressing the Speed or Incline buttons; See HOW TO TURN ON THE ...
...The workout will automatically adjust to the speed and incline settings for a few seconds and the treadmill will scroll across the display. In addition, if you manually change the speed or incline of the treadmill during the workout, the number of the display will also appear in the display for the ...next segment. 4. To stop . When the next segment of the workout begins, the treadmill will automatically adjust to the first speed and incline settings of calories that you can manually override the setting by pressing the Speed or Incline buttons; See HOW TO TURN ON THE ...
User Manual
Page 23
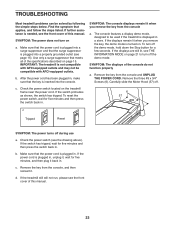
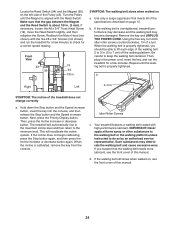
... off during use a. If the displays are still lit, see THE INFORMATION MODE on page 21 to be used if the treadmill is displayed in a store. SYMPTOM: The displays of this manual. Remove the three #8 x 3/4" Screws (6). Check the power switch located on a. If the switch protrudes as shown, the ... minutes and then press the switch back in . b. c. Remove the key from the console a. d. SYMPTOM: The power does not turn off . IMPORTANT: The treadmill is needed, see page 15). After the power cord has been plugged in . If the displays remain lit when you remove the key from the...
... off during use a. If the displays are still lit, see THE INFORMATION MODE on page 21 to be used if the treadmill is displayed in a store. SYMPTOM: The displays of this manual. Remove the three #8 x 3/4" Screws (6). Check the power switch located on a. If the switch protrudes as shown, the ... minutes and then press the switch back in . b. c. Remove the key from the console a. d. SYMPTOM: The power does not turn off . IMPORTANT: The treadmill is needed, see page 15). After the power cord has been plugged in . If the displays remain lit when you remove the key from the...
User Manual
Page 24
...meets all of the specifications described on , see the front cover of the treadmill does not change correctly a. SYMPTOM: The walking belt slows when walked on the left side of this manual. Using the hex key, turn both idler roller screws counterclockwise, 1/4 of the walking belt...Magnet is calibrated, remove the key from the console. SYMPTOM: The incline of this manual. 24 Next, press the Priority Display button. Then, press the Incline increase or decrease button. The treadmill will recalibrate the incline system. When the incline is aligned with the Reed Switch. ...
...meets all of the specifications described on , see the front cover of the treadmill does not change correctly a. SYMPTOM: The walking belt slows when walked on the left side of this manual. Using the hex key, turn both idler roller screws counterclockwise, 1/4 of the walking belt...Magnet is calibrated, remove the key from the console. SYMPTOM: The incline of this manual. 24 Next, press the Priority Display button. Then, press the Incline increase or decrease button. The treadmill will recalibrate the incline system. When the incline is aligned with the Reed Switch. ...


