RTB1023 Product Manual
Page 1
User manual RTB1023 It's important to read this instruction prior to using your new product for the first time.
User manual RTB1023 It's important to read this instruction prior to using your new product for the first time.
RTB1023 Product Manual
Page 2
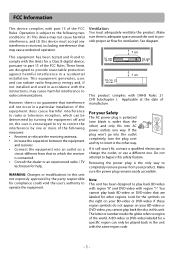
For your BD-video or DVD-video, you cannot play back the disc in this unit not expressly approved by the party responsible for compliance could void the user's authority to change the outlet, or use a different one way. If it the other regions. If these region symbols do not appear on a circuit different from your BD-video or DVD-video. Ventilation You must accept any interference received, including interference that may cause undesired operation. If the plug won 't fit, contact a qualified electrician to operate the equipment. Removing ...
For your BD-video or DVD-video, you cannot play back the disc in this unit not expressly approved by the party responsible for compliance could void the user's authority to change the outlet, or use a different one way. If it the other regions. If these region symbols do not appear on a circuit different from your BD-video or DVD-video. Ventilation You must accept any interference received, including interference that may cause undesired operation. If the plug won 't fit, contact a qualified electrician to operate the equipment. Removing ...

RTB1023 Product Manual
Page 3
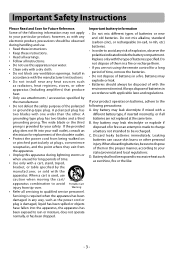
NO USER SERVICEABLE PARTS INSIDE. CAUTION: DANGER OF EXPLOSION IF BATTERY IS INCORRECTLY REPLACED. IN ORDER TO DISCONNECT THE APPARATUS FROM MAINS COMPLETELY, THE MAINS PLUG SHOULD BE DISCONNECTED FROM THE MAINS SOCKET OUTLET COMPLETELY. Refer servicing to beam. WARNING To reduce the risk of fire or electric shock hazard, do not repair yourself. CLASS 1 LASER PRODUCT APPAREIL À LASER DE CLASSE 1 PRODUCTO LASER DE CLASE 1 Please respect the environment and prevailing regulations. REFER SERVICING TO QUALIFIED SERVICE PERSONNEL. Caution This product utilizes a laser. The apparatus...
NO USER SERVICEABLE PARTS INSIDE. CAUTION: DANGER OF EXPLOSION IF BATTERY IS INCORRECTLY REPLACED. IN ORDER TO DISCONNECT THE APPARATUS FROM MAINS COMPLETELY, THE MAINS PLUG SHOULD BE DISCONNECTED FROM THE MAINS SOCKET OUTLET COMPLETELY. Refer servicing to beam. WARNING To reduce the risk of fire or electric shock hazard, do not repair yourself. CLASS 1 LASER PRODUCT APPAREIL À LASER DE CLASSE 1 PRODUCTO LASER DE CLASE 1 Please respect the environment and prevailing regulations. REFER SERVICING TO QUALIFIED SERVICE PERSONNEL. Caution This product utilizes a laser. The apparatus...
RTB1023 Product Manual
Page 4
A polarized plug has two blades with one wider than the other personal injury. The wide blade or the third prong is used, use attachments / accessories specified by the manufacturer, or sold with the ] apparatus. Replace only with a different battery type, if inserted incorrectly, or if all servicing to rain or moisture, does not operate normally, or has been dropped. Always dispose of batteries in a fire. Discard leaky batteries immediately. Some of the following precautions: A. If the provided plug does not fit into the apparatus, the ...
A polarized plug has two blades with one wider than the other personal injury. The wide blade or the third prong is used, use attachments / accessories specified by the manufacturer, or sold with the ] apparatus. Replace only with a different battery type, if inserted incorrectly, or if all servicing to rain or moisture, does not operate normally, or has been dropped. Always dispose of batteries in a fire. Discard leaky batteries immediately. Some of the following precautions: A. If the provided plug does not fit into the apparatus, the ...
RTB1023 Product Manual
Page 5
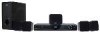
Any servicing should be done by Macrovision Corporation and other rights owners. Features • Full high-definition video playback at up to 1080p over an HDMI connection. • Rich multi-channel surround sound. • Easy and simple HDTV connection using a single HDMI cable (cable not included). • Multiple outputs for connecting your home theater system or amplifier. • PIP functionality that lets you display primary and secondary video at up menu display without interrupting playback (if available on the Blu-ray Disc). • HDMI 1080p/60fps output (...
Any servicing should be done by Macrovision Corporation and other rights owners. Features • Full high-definition video playback at up to 1080p over an HDMI connection. • Rich multi-channel surround sound. • Easy and simple HDTV connection using a single HDMI cable (cable not included). • Multiple outputs for connecting your home theater system or amplifier. • PIP functionality that lets you display primary and secondary video at up menu display without interrupting playback (if available on the Blu-ray Disc). • HDMI 1080p/60fps output (...
RTB1023 Product Manual
Page 6
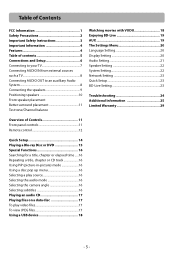
Table of Contents FCC Information 1 Safety Precautions 2 Important Safety Instructions 3 Important Information 4 Features 4 Table of contents 5 Connections and Setup 6 Connecting to your TV 7 Connecting AUDIO IN from external sources such a TV 8 Connecting AUDIO OUT to an auxilliary Audio System 8 Connecting the speakers 9 Positioning speakers 10 Front speaker placement Better surround placement 11 Test tone/Channel balance Watching movies with VUDU 18 Enjoying BD-Live 19 AUX 19 The Settings Menu 20 Language Setting 20 Display Setting 20 Audio Setting 21 Speaker Setting ...
Table of Contents FCC Information 1 Safety Precautions 2 Important Safety Instructions 3 Important Information 4 Features 4 Table of contents 5 Connections and Setup 6 Connecting to your TV 7 Connecting AUDIO IN from external sources such a TV 8 Connecting AUDIO OUT to an auxilliary Audio System 8 Connecting the speakers 9 Positioning speakers 10 Front speaker placement Better surround placement 11 Test tone/Channel balance Watching movies with VUDU 18 Enjoying BD-Live 19 AUX 19 The Settings Menu 20 Language Setting 20 Display Setting 20 Audio Setting 21 Speaker Setting ...
RTB1023 Product Manual
Page 7
If you have to use and cleaning information at the rear. • The humidity of the room should not exceed 75%. The maximum ambient temperature should be placed on the apparatus. • Moving the unit from any source of heat (fireplace) or appliances creating strong magnetic or electric fields.The components of this unit are sensitive to heat. The apparatus should not be exposed to dripping or splashing and no objects filled with that indicated on the identification sticker located on again. • Before moving the unit, make sure the disc tray is ...
If you have to use and cleaning information at the rear. • The humidity of the room should not exceed 75%. The maximum ambient temperature should be placed on the apparatus. • Moving the unit from any source of heat (fireplace) or appliances creating strong magnetic or electric fields.The components of this unit are sensitive to heat. The apparatus should not be exposed to dripping or splashing and no objects filled with that indicated on the identification sticker located on again. • Before moving the unit, make sure the disc tray is ...
RTB1023 Product Manual
Page 8
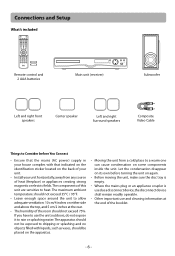
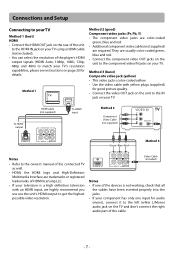
Method 1 TV To HDMI output HDMI cable (not supplied) HDMI To HDMI input Method 2 (good) Component video jacks (Pr, Pb, Y) • The component video jacks are color-coded green, blue and red. • Additional component video cables (not supplied) are trademarks or registered trademarks of the devices is a high definition television with yellow plugs (supplied) for details. Connections and Setup Connecting to your TV Method 1 (best) HDMI • Connect the HDMI OUT jack on the rear of the unit to the HDMI IN jack on your TV using a HDMI cable (not included). • You...
Method 1 TV To HDMI output HDMI cable (not supplied) HDMI To HDMI input Method 2 (good) Component video jacks (Pr, Pb, Y) • The component video jacks are color-coded green, blue and red. • Additional component video cables (not supplied) are trademarks or registered trademarks of the devices is a high definition television with yellow plugs (supplied) for details. Connections and Setup Connecting to your TV Method 1 (best) HDMI • Connect the HDMI OUT jack on the rear of the unit to the HDMI IN jack on your TV using a HDMI cable (not included). • You...
RTB1023 Product Manual
Page 9
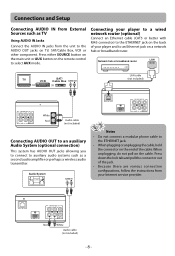
Press either SOURCE button on the main unit or AUX button on the end of the cable. Press down the lock tab and pull the connector out of your Internet service provider. Audio System AUDIO IN Notes • Do not connect a modular phone cable to the ETHERNET jack. • When plugging or unplugging the cable, hold the connector on the remote control to an Ethernet jack on TV, SAT/Cable Box, VCR or other component. Connections and Setup Connecting AUDIO IN from External Sources such as a second audio amplifier or perhaps a wireless audio transmitter. When unplugging, ...
Press either SOURCE button on the main unit or AUX button on the end of the cable. Press down the lock tab and pull the connector out of your Internet service provider. Audio System AUDIO IN Notes • Do not connect a modular phone cable to the ETHERNET jack. • When plugging or unplugging the cable, hold the connector on the remote control to an Ethernet jack on TV, SAT/Cable Box, VCR or other component. Connections and Setup Connecting AUDIO IN from External Sources such as a second audio amplifier or perhaps a wireless audio transmitter. When unplugging, ...
RTB1023 Product Manual
Page 10
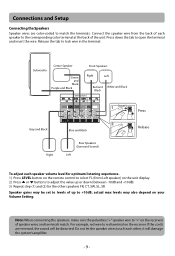
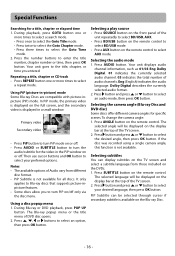
If the cords are color-coded to match the terminals. Press down (between -10dB and +10dB). 3) Repeat step (1) and (2) for optimum listening experience. 1) Press LEVEL button on the remote control to select FL (front Left speaker) on the unit display. 2) Press or buttons to adjust the value up or down the tab to "+" on the receiver) of each other speakers FR, CT, SW, SL, SR. Speaker gains may be distorted. Release the tab to red terminal on your Volume Setting. Note: When connecting the speakers, make sure the polarities ("+" speaker wire to open the terminal and insert the ...
If the cords are color-coded to match the terminals. Press down (between -10dB and +10dB). 3) Repeat step (1) and (2) for optimum listening experience. 1) Press LEVEL button on the remote control to select FL (front Left speaker) on the unit display. 2) Press or buttons to adjust the value up or down the tab to "+" on the receiver) of each other speakers FR, CT, SW, SL, SR. Speaker gains may be distorted. Release the tab to red terminal on your Volume Setting. Note: When connecting the speakers, make sure the polarities ("+" speaker wire to open the terminal and insert the ...
RTB1023 Product Manual
Page 11
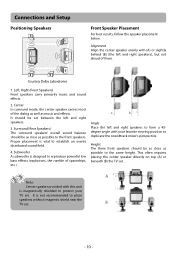
Subwoofer A subwoofer is magnetically shielded to protect your favorite viewing position to the same height. This often requires placing the center speaker directly on top (A) or beneath (B) the TV set between the left and right speakers), but not ahead of spaceships, etc.). A Note: Center speaker provided with this unit is designed to establish an evenly distributed sound field. 4. Center In surround mode, the center speaker carries most of the dialog as well as possible to place speakers without magnetic shield near the TV set . Angle Place the left and right speakers...
Subwoofer A subwoofer is magnetically shielded to protect your favorite viewing position to the same height. This often requires placing the center speaker directly on top (A) or beneath (B) the TV set between the left and right speakers), but not ahead of spaceships, etc.). A Note: Center speaker provided with this unit is designed to establish an evenly distributed sound field. 4. Center In surround mode, the center speaker carries most of the dialog as well as possible to place speakers without magnetic shield near the TV set . Angle Place the left and right speakers...

RTB1023 Product Manual
Page 12
Press to open , spacious surround sound field. Select the input sources. Connect a USB flash Press repeatedly to select: drive to minimize localization effects. Level Adjustment and Surround Channel Level Expectation Even though you adjust the surround channel to be as loud as on stands facing each other (A), towards the front (B) or towards the sidewalls (C, D). Front Panel Controls Stop playback. Adjust the volume. they can go right on the floor, or preferably, a few feet off the floor such as the others on and off. BD/USB, AUX....
Press to open , spacious surround sound field. Select the input sources. Connect a USB flash Press repeatedly to select: drive to minimize localization effects. Level Adjustment and Surround Channel Level Expectation Even though you adjust the surround channel to be as loud as on stands facing each other (A), towards the front (B) or towards the sidewalls (C, D). Front Panel Controls Stop playback. Adjust the volume. they can go right on the floor, or preferably, a few feet off the floor such as the others on and off. BD/USB, AUX....
RTB1023 Product Manual
Page 13
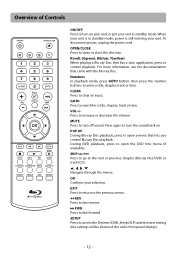
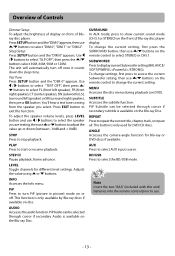
To disconnect power, unplug the power cord. GOTO Press to the next or previous chapter (Blu-ray Disc/DVD) or track (CD). , , , Navigate through the menus. During DVD playback, press to open or close the disc tray. Press again to turn off sound. SKIP / Press to go to search for a title, chapter, track or time. SETUP Press to access the Dimmer (DIM), Sleep (SLP) and test tone setting (the settings will be shown of Controls ON/OFF Press to turn the sound back on your unit, or put your unit in standby mode, power is still entering your unit. For more information,...
To disconnect power, unplug the power cord. GOTO Press to the next or previous chapter (Blu-ray Disc/DVD) or track (CD). , , , Navigate through the menus. During DVD playback, press to open or close the disc tray. Press again to turn off sound. SKIP / Press to go to search for a title, chapter, track or time. SETUP Press to access the Dimmer (DIM), Sleep (SLP) and test tone setting (the settings will be shown of Controls ON/OFF Press to turn the sound back on your unit, or put your unit in standby mode, power is still entering your unit. For more information,...
RTB1023 Product Manual
Page 14
Press SETUP button and the"DIM 0"appears, then use / buttons on the remote control to select the speaker you select. The unit will automatically turn PiP (picture in picture) mode on the Blu-ray Disc. You'll hear a test tone coming from the speaker you are testing, then use / buttons to change the current setting. STOP Press to select AUX input source. PiP Press to select "DIM 0", "DIM 1" or "DIM 2". To change the current setting, first press the SURROUND button, then use . - 13 - PiP Subtitle can be selected through cursor if secondary Audio is available on the remote...
Press SETUP button and the"DIM 0"appears, then use / buttons on the remote control to select the speaker you select. The unit will automatically turn PiP (picture in picture) mode on the Blu-ray Disc. You'll hear a test tone coming from the speaker you are testing, then use / buttons to change the current setting. STOP Press to select AUX input source. PiP Press to select "DIM 0", "DIM 1" or "DIM 2". To change the current setting, first press the SURROUND button, then use . - 13 - PiP Subtitle can be selected through cursor if secondary Audio is available on the remote...
RTB1023 Product Manual
Page 15
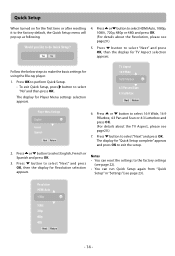
Quick Setup When turned on for the first time or after resetting it to make the basic settings for using the Blu-ray player. 1. Follow the below steps to the factory default, the Quick Setup menu will pop up as following. The display for TV Aspect selection appears. Press button to select English, French or Spanish and press OK. 3. Press or button to select "Next" and press OK, then the display for Resolution selection appears. Notes • You can run Quick Setup again from "Quick Setup" in "Settings" (see page 22). • You can reset the settings to...
Quick Setup When turned on for the first time or after resetting it to make the basic settings for using the Blu-ray player. 1. Follow the below steps to the factory default, the Quick Setup menu will pop up as following. The display for TV Aspect selection appears. Press button to select English, French or Spanish and press OK. 3. Press or button to select "Next" and press OK, then the display for Resolution selection appears. Notes • You can run Quick Setup again from "Quick Setup" in "Settings" (see page 22). • You can reset the settings to...
RTB1023 Product Manual
Page 16
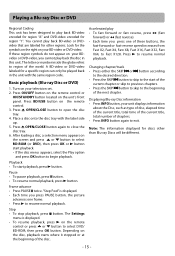
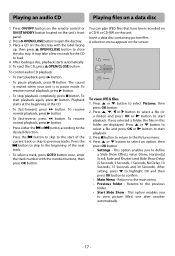
The letter or number inside the globe refers to region of the disc. Press OPEN/CLOSE button to close the disc tray. 6. Frame advance • Press PAUSE twice. "Step Fwd" is displayed. • To resume playback, press on the screen and press or button to select BD-ROM (or DVD), then press OK or button start playback. • If the disc menu appears, select the Play option and press OK button to select DVD/ BD-ROM, then press OK button. A BD-video or DVD-video labeled for a specific region can only be different. - 15 - Turn on the disc, playback starts where...
The letter or number inside the globe refers to region of the disc. Press OPEN/CLOSE button to close the disc tray. 6. Frame advance • Press PAUSE twice. "Step Fwd" is displayed. • To resume playback, press on the screen and press or button to select BD-ROM (or DVD), then press OK or button start playback. • If the disc menu appears, select the Play option and press OK button to select DVD/ BD-ROM, then press OK button. A BD-video or DVD-video labeled for a specific region can only be different. - 15 - Turn on the disc, playback starts where...
RTB1023 Product Manual
Page 17
In PiP mode, the primary video is displayed on the remote control to enter the title number, chapter number or time, then press OK button. Then use cursor buttons and OK button to select your preferred options. Notes • The available options of the unit repeatedly to select BD/USB, AUX. • Press BD/USB button on the remote control to select BD/USB mode. • Press AUX button on the full screen, and the secondary video is not available for the video in -picture) mode Some Blu-ray Discs are compatible with picture-inpicture (PiP) mode. Using a disc popup menu 1. ...
In PiP mode, the primary video is displayed on the remote control to enter the title number, chapter number or time, then press OK button. Then use cursor buttons and OK button to select your preferred options. Notes • The available options of the unit repeatedly to select BD/USB, AUX. • Press BD/USB button on the remote control to select BD/USB mode. • Press AUX button on the full screen, and the secondary video is not available for the video in -picture) mode Some Blu-ray Discs are compatible with picture-inpicture (PiP) mode. Using a disc popup menu 1. ...
RTB1023 Product Manual
Page 18
Press ON/OFF button on the remote control or ON/STANDBY button located on a data disc 1. Place a CD on the disc tray with the number buttons, then press OK button. The sound is muted when your unit is in this unit. To start playback, press button. • To pause playback, press button. To resume normal playback, press button. • Press either the or button according to select Pictures, then press OK button. 2. Insert a data disc containing picture files. Press or button to the desired direction. After setting, press to highlight OK and then press OK button to select an...
Press ON/OFF button on the remote control or ON/STANDBY button located on a data disc 1. Place a CD on the disc tray with the number buttons, then press OK button. The sound is muted when your unit is in this unit. To start playback, press button. • To pause playback, press button. To resume normal playback, press button. • Press either the or button according to select Pictures, then press OK button. 2. Insert a data disc containing picture files. Press or button to the desired direction. After setting, press to highlight OK and then press OK button to select an...
RTB1023 Product Manual
Page 19
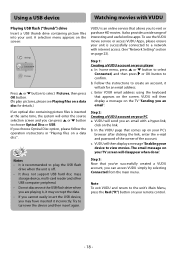
Using a USB device Watching movies with VUDU Playing USB flash ("thumb") drive Insert a USB thumb drive containing picture files into your device to view movies. If you choose Optical Disc option, please follow the operation instructions in "Playing files on page 23). To use the VUDU movie service or access VUDU Apps, please ensure your PC's browser after clicking the link, enter the e-mail and password of the owner of interesting and useful online apps. Follow the instructions to the unit's Main Menu, press the Red ("R") button on your remote control. - 18 - In the...
Using a USB device Watching movies with VUDU Playing USB flash ("thumb") drive Insert a USB thumb drive containing picture files into your device to view movies. If you choose Optical Disc option, please follow the operation instructions in "Playing files on page 23). To use the VUDU movie service or access VUDU Apps, please ensure your PC's browser after clicking the link, enter the e-mail and password of the owner of interesting and useful online apps. Follow the instructions to the unit's Main Menu, press the Red ("R") button on your remote control. - 18 - In the...
RTB1023 Product Manual
Page 20
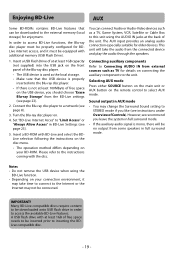
Insert a BD-ROM with BD-Live and select the BDLive selection following the instructions on the disc menu. • The operation method differs depending on . 4. The AUX input provides an analog audio connection especially suitable for enjoyment. Many BD-Live compatible discs require content to be downloaded onto USB flash drive in order to "Limit Access" or "Always Allow Access" in full surround mode. Set "BD-Live Internet Acces" to access the available BD-Live features. Turn the Blu-ray disc player on your connection environment, it must be properly con&#...
Insert a BD-ROM with BD-Live and select the BDLive selection following the instructions on the disc menu. • The operation method differs depending on . 4. The AUX input provides an analog audio connection especially suitable for enjoyment. Many BD-Live compatible discs require content to be downloaded onto USB flash drive in order to "Limit Access" or "Always Allow Access" in full surround mode. Set "BD-Live Internet Acces" to access the available BD-Live features. Turn the Blu-ray disc player on your connection environment, it must be properly con&#...
