RTB1023 Product Manual
Page 6
... Settings Menu 20 Language Setting 20 Display Setting 20 Audio Setting 21 Speaker Setting 22 System Setting 22 Network Setting 23 Quick Setup 23 BD-Live Setting 23 Troubleshooting 24 Additional Information 25 Limited Warranty 29 Overview of Controls 11 Front panel controls 11 Remote ...control 12 Quick Setup 14 Playing a Blu-ray Disc or DVD 15 Special Functions 16 Searching for a title, chapter or elapsed time .....16 Repeating a ...
... Settings Menu 20 Language Setting 20 Display Setting 20 Audio Setting 21 Speaker Setting 22 System Setting 22 Network Setting 23 Quick Setup 23 BD-Live Setting 23 Troubleshooting 24 Additional Information 25 Limited Warranty 29 Overview of Controls 11 Front panel controls 11 Remote ...control 12 Quick Setup 14 Playing a Blu-ray Disc or DVD 15 Special Functions 16 Searching for a title, chapter or elapsed time .....16 Repeating a ...
RTB1023 Product Manual
Page 7
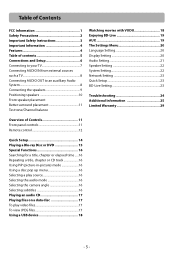
... on the identification sticker located on either side and above the top, and 5 cm/2 inches at the end of the booklet. - 6 - Connections and Setup What's included Remote control and 2 AAA batteries Main unit (receiver) Subwoofer Left and right front speakers Center speaker Left and right Surround speakers Composite Video...
... on the identification sticker located on either side and above the top, and 5 cm/2 inches at the end of the booklet. - 6 - Connections and Setup What's included Remote control and 2 AAA batteries Main unit (receiver) Subwoofer Left and right front speakers Center speaker Left and right Surround speakers Composite Video...
RTB1023 Product Manual
Page 8
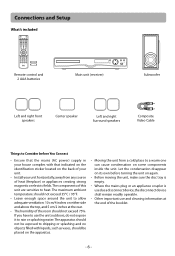
.... • If your component has only one input for audio (mono), connect it to the left (white L/Mono) audio jack on your TV. Connections and Setup Connecting to your TV Method 1 (best) HDMI • Connect the HDMI OUT jack on the rear of the unit to the HDMI IN jack on...
.... • If your component has only one input for audio (mono), connect it to the left (white L/Mono) audio jack on your TV. Connections and Setup Connecting to your TV Method 1 (best) HDMI • Connect the HDMI OUT jack on the rear of the unit to the HDMI IN jack on...
RTB1023 Product Manual
Page 9
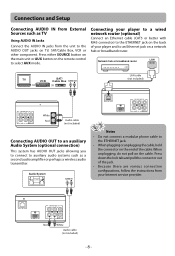
... there are various connection configurations, follow the instructions from the unit to select AUX mode. Red White Audio cable (not included) - 8 - Connections and Setup Connecting AUDIO IN from External Sources such as a second audio amplifier or perhaps a wireless audio transmitter. Press down the lock tab and pull...
... there are various connection configurations, follow the instructions from the unit to select AUX mode. Red White Audio cable (not included) - 8 - Connections and Setup Connecting AUDIO IN from External Sources such as a second audio amplifier or perhaps a wireless audio transmitter. Press down the lock tab and pull...
RTB1023 Product Manual
Page 10
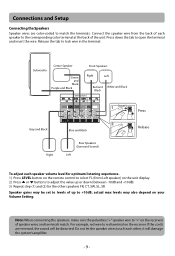
Connections and Setup Connecting the Speakers Speaker wires are reversed, the sound will damage the system's amplifier. - 9 - Release the tab to "+" on the receiver. If the ...
Connections and Setup Connecting the Speakers Speaker wires are reversed, the sound will damage the system's amplifier. - 9 - Release the tab to "+" on the receiver. If the ...
RTB1023 Product Manual
Page 11
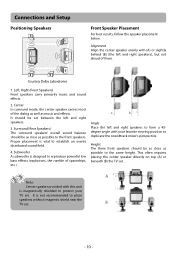
... the center speaker directly on top (A) or beneath (B) the TV set . Center In surround mode, the center speaker carries most of spaceships, etc.). Connections and Setup Positioning Speakers 3 1 2 Front Speaker Placement For best results, follow the speaker placement below.
... the center speaker directly on top (A) or beneath (B) the TV set . Center In surround mode, the center speaker carries most of spaceships, etc.). Connections and Setup Positioning Speakers 3 1 2 Front Speaker Placement For best results, follow the speaker placement below.

RTB1023 Product Manual
Page 12
... input sources. Experiment with a test signal generator to help create a more open or close the disc tray. Switch the unit on end tables (B). Connections and Setup Better Surround Placement Location If possible, place surround speakers to either side of the listening area, not behind you adjust the surround channel to be...
... input sources. Experiment with a test signal generator to help create a more open or close the disc tray. Switch the unit on end tables (B). Connections and Setup Better Surround Placement Location If possible, place surround speakers to either side of the listening area, not behind you adjust the surround channel to be...
RTB1023 Product Manual
Page 13
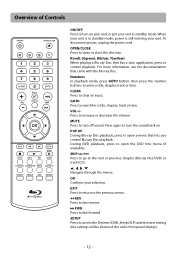
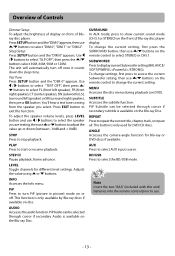
... test tone setting (the settings will be shown of Controls ON/OFF Press to turn off sound. Overview of the unit's front panel display). - 12 - SETUP Press to open a menu that came with the Blu-ray Disc. When your unit is in standby mode. MUTE Press to turn on . SKIP / Press...
... test tone setting (the settings will be shown of Controls ON/OFF Press to turn off sound. Overview of the unit's front panel display). - 12 - SETUP Press to open a menu that came with the Blu-ray Disc. When your unit is in standby mode. MUTE Press to turn on . SKIP / Press...
RTB1023 Product Manual
Page 14
...). This button is available on the Blu-ray Disc. Note Insert the two "AAA" (included with this function. Overview of Controls Dimmer Setup To adjust the brightness of display on or off. SUBTITLE Accesses the subtitle function. BD/USB Press to select "SLP OFF", then press... SL (surround left speaker) or SR (surround right speaker), then press OK button. PiP Press to select the speaker you select. Sleep Setup Press SETUP button and the "DIM 0" appears. Adjusts the value using or buttons. To change the current setting. MENU Accesses the disc menu during playback...
...). This button is available on the Blu-ray Disc. Note Insert the two "AAA" (included with this function. Overview of Controls Dimmer Setup To adjust the brightness of display on or off. SUBTITLE Accesses the subtitle function. BD/USB Press to select "SLP OFF", then press... SL (surround left speaker) or SR (surround right speaker), then press OK button. PiP Press to select the speaker you select. Sleep Setup Press SETUP button and the "DIM 0" appears. Adjusts the value using or buttons. To change the current setting. MENU Accesses the disc menu during playback...
RTB1023 Product Manual
Page 15
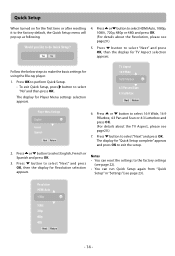
...You can reset the settings to select "Next" and press OK, then the display for Resolution selection appears. Press OK to perform Quick Setup. • To exit Quick Setup, press button to select "Next" and press OK. Press button to select "No" and then press OK. Resolution HDMI Auto 1080p ...Next Return - 14 - Would you like to select "Next" and press OK, then the display for TV Aspect selection appears. Press button to do Quick Setup? Press or button to select 16:9 Wide, 16:9 Pillarbox, 4:3 Pan and Scan or 4:3 Letterbox and press OK. (For details about the Resolution, ...
...You can reset the settings to select "Next" and press OK, then the display for Resolution selection appears. Press OK to perform Quick Setup. • To exit Quick Setup, press button to select "Next" and press OK. Press button to select "No" and then press OK. Resolution HDMI Auto 1080p ...Next Return - 14 - Would you like to select "Next" and press OK, then the display for TV Aspect selection appears. Press button to do Quick Setup? Press or button to select 16:9 Wide, 16:9 Pillarbox, 4:3 Pan and Scan or 4:3 Letterbox and press OK. (For details about the Resolution, ...
RTB1023 Product Manual
Page 21
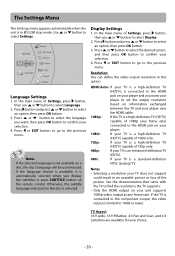
... to the previous menu. The Settings Menu The Settings menu appears automatically when the unit is in this option. BD-ROM Settings Connected Network Quick Setup BD-Live Display Audio Speaker Language Language Settings 1. Notes • If the selected language is not available on your player. 1080i: If your TV is...
... to the previous menu. The Settings Menu The Settings menu appears automatically when the unit is in this option. BD-ROM Settings Connected Network Quick Setup BD-Live Display Audio Speaker Language Language Settings 1. Notes • If the selected language is not available on your player. 1080i: If your TV is...
RTB1023 Product Manual
Page 22
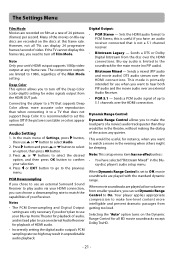
..., not all BD movie soundtracks except Dolby TruHD. - 21 - Press button and press or button to confirm your selection. 4. Note: This setup menu item has no PIP audio). • Bitstream Mixed - When movie soundtracks are only necessary if you can display 24 progressive frames/second of the...of HDMI audio. • Incorrectly setting the digital audio output's PCM sampling rate too high may result in the Bluray disc player's audio setup menu. It is recommended to set Dynamic Range Control to hear both PIP audio and the movie audio over the HDMI connections. Sets the HDMI...
..., not all BD movie soundtracks except Dolby TruHD. - 21 - Press button and press or button to confirm your selection. 4. Note: This setup menu item has no PIP audio). • Bitstream Mixed - When movie soundtracks are only necessary if you can display 24 progressive frames/second of the...of HDMI audio. • Incorrectly setting the digital audio output's PCM sampling rate too high may result in the Bluray disc player's audio setup menu. It is recommended to set Dynamic Range Control to hear both PIP audio and the movie audio over the HDMI connections. Sets the HDMI...

RTB1023 Product Manual
Page 24
... service may be "down", or your security firewall may be blocking access of Settings, press button, then use or button to select Quick Setup, and then press OK to confirm. 2. If both attempts are successful, your preference: • Player Menu Settings • Resolution •...Live Internet access. • Prohibit Access - If the network connection is not active, Link Down displays next to select BD-Live. 2. Quick Setup 1. Uses DHCP to Link Status. Press or button to the previous menu. In the main menu of Settings, press button, then use or ...
... service may be "down", or your security firewall may be blocking access of Settings, press button, then use or button to select Quick Setup, and then press OK to confirm. 2. If both attempts are successful, your preference: • Player Menu Settings • Resolution •...Live Internet access. • Prohibit Access - If the network connection is not active, Link Down displays next to select BD-Live. 2. Quick Setup 1. Uses DHCP to Link Status. Press or button to the previous menu. In the main menu of Settings, press button, then use or ...

RTB1023 Product Manual
Page 25
The device switches off spontaneously. • If the SLEEP SETUP (see page 12 and 13 for details) is set to Prohibit Access. Switch it counts down the sleep time. Blu-ray Disc or DVD does ...
The device switches off spontaneously. • If the SLEEP SETUP (see page 12 and 13 for details) is set to Prohibit Access. Switch it counts down the sleep time. Blu-ray Disc or DVD does ...


