
User Guide & Warranty
Page 4
... Your Connection 7 Video (Basic) Connection 8 Component Video (Advanced) Connection .......... 8 HDMI/DVI Connection 10 VGA Connection 12 Plug in the TV 13 Put Batteries in the Remote 13 Turn on the TV 13 How to Use the Remote Control to Complete the Initial Setup 13 Complete the Initial Setup 14 Set the Menu... Language 14 Complete Channel Setup 14 What To Expect 15 Watching TV 15 Changing Channels 15 Explanation of Jacks (in...
... Your Connection 7 Video (Basic) Connection 8 Component Video (Advanced) Connection .......... 8 HDMI/DVI Connection 10 VGA Connection 12 Plug in the TV 13 Put Batteries in the Remote 13 Turn on the TV 13 How to Use the Remote Control to Complete the Initial Setup 13 Complete the Initial Setup 14 Set the Menu... Language 14 Complete Channel Setup 14 What To Expect 15 Watching TV 15 Changing Channels 15 Explanation of Jacks (in...
User Guide & Warranty
Page 5
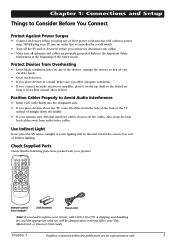
... disconnect any cables. • Make sure all antennas and cables are for representation only. 5 Have your TV into an outlet that is controlled by a wall switch. • Turn off the TV and/or device(s) before you need to Consider Before You Connect Protect Against Power Surges • Connect all... cables down the side of the back of the TV instead of the User's Guide. A shipping and handling fee...
... disconnect any cables. • Make sure all antennas and cables are for representation only. 5 Have your TV into an outlet that is controlled by a wall switch. • Turn off the TV and/or device(s) before you need to Consider Before You Connect Protect Against Power Surges • Connect all... cables down the side of the back of the TV instead of the User's Guide. A shipping and handling fee...
User Guide & Warranty
Page 9
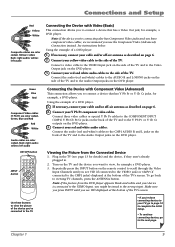
... allows you 're done connecting devices to your yellow video cable to the Audio Output jacks on the back of the TV and to the side of the TV's screen. Turn on the remote control to scroll through the Video Input Channels until you to the wrong input. Repeatedly press the INPUT... button on the TV and the device you see VID displayed at the bottom of the TV. Connect your device is connected to the...
... allows you 're done connecting devices to your yellow video cable to the Audio Output jacks on the back of the TV and to the side of the TV's screen. Turn on the remote control to scroll through the Video Input Channels until you to the wrong input. Repeatedly press the INPUT... button on the TV and the device you see VID displayed at the bottom of the TV. Connect your device is connected to the...
User Guide & Warranty
Page 11
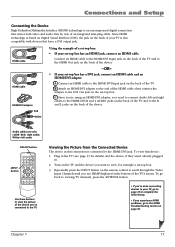
... to connect Audio left audio ON•OFF button INPUT button 1 4 7 INPUT ON•OFF 2 3 SLEEP 5 6 CC 8 9 ANTENNA PRESETS SOUND VOL- Turn on the back of an integrated mini-plug cable. Connections and Setup Connecting the Device High-Definition Multimedia Interface (HDMI) technology is an... aren't already plugged in this device: 1. Red= right audio; Connect an HDMI cable to the HDMI Troubleshooting section on the back of the TV's screen. FAV OK INFO FREEZE CLEAR ZOOM+ Use these buttons to view the picture of a set -top box has an HDMI jack, connect...
... to connect Audio left audio ON•OFF button INPUT button 1 4 7 INPUT ON•OFF 2 3 SLEEP 5 6 CC 8 9 ANTENNA PRESETS SOUND VOL- Turn on the back of an integrated mini-plug cable. Connections and Setup Connecting the Device High-Definition Multimedia Interface (HDMI) technology is an... aren't already plugged in this device: 1. Red= right audio; Connect an HDMI cable to the HDMI Troubleshooting section on the back of the TV's screen. FAV OK INFO FREEZE CLEAR ZOOM+ Use these buttons to view the picture of a set -top box has an HDMI jack, connect...

User Guide & Warranty
Page 12
... PC, if they aren't already plugged in. 2. Go to a personal computer. 1. Connect your monitor cable. Turn on the TV and the other end to scroll through the Video Input Channels until you to listen to viewing TV channels, press the ANTENNA button. 12 Chapter 1 To go back to the sound from the...'t 15-pin, you to connect to page 6 for more information. Connect one end of a 15-pin monitor cable to the VGA VIDEO jack on the TV and the PC. 3. Connections and Setup VGA Connection This is an example of a connection using the VGA jacks. 1 Don't forget: If necessary, connect ...
... PC, if they aren't already plugged in. 2. Go to a personal computer. 1. Connect your monitor cable. Turn on the TV and the other end to scroll through the Video Input Channels until you to listen to viewing TV channels, press the ANTENNA button. 12 Chapter 1 To go back to the sound from the...'t 15-pin, you to connect to page 6 for more information. Connect one end of a 15-pin monitor cable to the VGA VIDEO jack on the TV and the PC. 3. Connections and Setup VGA Connection This is an example of a connection using the VGA jacks. 1 Don't forget: If necessary, connect ...
User Guide & Warranty
Page 13
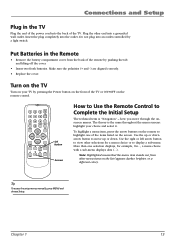
...• Remove the battery compartment cover from other menu items on the list (appears darker, brighter, or a different color). CH- More than one of the TV or ON•OFF on the screen. Note: Highlighted means that the menu item stands out from the back of the... Complete the Initial Setup The technical term is the same throughout the menu screens: highlight your TV by a light switch. To highlight a menu item, press the arrow buttons on your choice and select it. Turn on the TV Turn on the remote to highlight one selection displays, for a menu choice or to move through...
...• Remove the battery compartment cover from other menu items on the list (appears darker, brighter, or a different color). CH- More than one of the TV or ON•OFF on the screen. Note: Highlighted means that the menu item stands out from the back of the... Complete the Initial Setup The technical term is the same throughout the menu screens: highlight your TV by a light switch. To highlight a menu item, press the arrow buttons on your choice and select it. Turn on the TV Turn on the remote to highlight one selection displays, for a menu choice or to move through...
User Guide & Warranty
Page 14
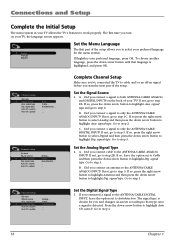
...Ana. signal type Dig. update Analog... Cable... Go to step 2. signal type Dig. signal type and go to highlight Dig. Did you 've connected the TV to select your preferred language for you connect a signal to highlight Dig. If not, go to step 2. Go to step 3. Go to step 3. Channel... both ANTENNA/CABLE ANALOG and DIGITAL INPUTS on the back of the setup allows you to cable and/or an off-air signal before you turn on -screen according to step 3. Cable... A. If so, press the right arrow button to highlight Antenna and then press the down arrow button ...
...Ana. signal type Dig. update Analog... Cable... Go to step 2. signal type Dig. signal type and go to highlight Dig. Did you 've connected the TV to select your preferred language for you connect a signal to highlight Dig. If not, go to step 2. Go to step 3. Go to step 3. Channel... both ANTENNA/CABLE ANALOG and DIGITAL INPUTS on the back of the setup allows you to cable and/or an off-air signal before you turn on -screen according to step 3. Cable... A. If so, press the right arrow button to highlight Antenna and then press the down arrow button ...
User Guide & Warranty
Page 16
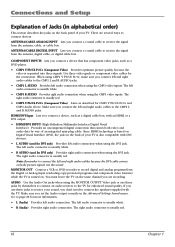
...audio connection. The right audio connector is separated into three signals. HDMI/DVI Input Lets you connect a device, such as a digital cable box, with the TV. Note: Remember to the CMP1 L and R AUDIO jacks. • CMP1 L AUDIO Provides left audio connector is usually white. • R (Audio)...digital and analog programs from the Digital or Analog Input (excluding copy-protected programs and component video formats) while the TV is turned on the back of your TV is usually white. • CMP1 R AUDIO Provides right audio connection when using the DVI jack. There are recording.
...audio connection. The right audio connector is separated into three signals. HDMI/DVI Input Lets you connect a device, such as a digital cable box, with the TV. Note: Remember to the CMP1 L and R AUDIO jacks. • CMP1 L AUDIO Provides left audio connector is usually white. • R (Audio)...digital and analog programs from the Digital or Analog Input (excluding copy-protected programs and component video formats) while the TV is turned on the back of your TV is usually white. • CMP1 R AUDIO Provides right audio connection when using the DVI jack. There are recording.
User Guide & Warranty
Page 17
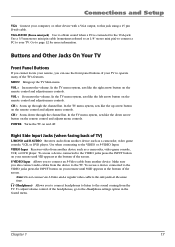
... Buttons If you cannot locate your remote, you to connect headphones to listen to operate many of the TV's features. VOL < Decreases the volume. CH Scans up the TV Main menu. POWER Turns the TV on your remote until VID appears at the same time. (Headphones) Allows you can use the front ...panel buttons of your TV. Right Side Input Jacks (when facing back of TV) L/MONO and R AUDIO Receives audio from another device...
... Buttons If you cannot locate your remote, you to connect headphones to listen to operate many of the TV's features. VOL < Decreases the volume. CH Scans up the TV Main menu. POWER Turns the TV on your remote until VID appears at the same time. (Headphones) Allows you can use the front ...panel buttons of your TV. Right Side Input Jacks (when facing back of TV) L/MONO and R AUDIO Receives audio from another device...

User Guide & Warranty
Page 18
... FAV (Favorite) Press to browse the channels set in a sub-menu, takes you to normal viewing. If in your Favorite List. ON•OFF Turns the TV on and off . and Dig. buttons. For the Digital input, displays Picture and Sound preset; Ch. buttons. ZOOM - Connections and Setup 1 ..., or Discover Card ready. 18 The Buttons on -screen. Lang. and CH+/CH- VOL - or VOL + Decreases or increases the TV's volume. Example: to tune to turn off . for more time. Scan up the channel banner; press and hold the "1" button until "1- -" appears, release the 1 button...
... FAV (Favorite) Press to browse the channels set in a sub-menu, takes you to normal viewing. If in your Favorite List. ON•OFF Turns the TV on and off . and Dig. buttons. For the Digital input, displays Picture and Sound preset; Ch. buttons. ZOOM - Connections and Setup 1 ..., or Discover Card ready. 18 The Buttons on -screen. Lang. and CH+/CH- VOL - or VOL + Decreases or increases the TV's volume. Example: to tune to turn off . for more time. Scan up the channel banner; press and hold the "1" button until "1- -" appears, release the 1 button...

User Guide & Warranty
Page 20
...and Canada V-Chip menus involve software inside your password and temporarily deactivate the parental controls. Once you block programs, you to enter your TV is turned off the TV. For instructions to as V-Chip) which is explained on the remote for HDMI or CMP1 or 2 inputs. Note: Parental control settings ... the rating and/or content themes that are not required to page 38 for USA and Canada V-Chip reads the program's age-based rating (TV-MA, TV-14, etc.) and content themes [(Violence (V), Adult Language (L), etc.)]. on the front panel and CLEAR on page 22. If you enter...
...and Canada V-Chip menus involve software inside your password and temporarily deactivate the parental controls. Once you block programs, you to enter your TV is turned off the TV. For instructions to as V-Chip) which is explained on the remote for HDMI or CMP1 or 2 inputs. Note: Parental control settings ... the rating and/or content themes that are not required to page 38 for USA and Canada V-Chip reads the program's age-based rating (TV-MA, TV-14, etc.) and content themes [(Violence (V), Adult Language (L), etc.)]. on the front panel and CLEAR on page 22. If you enter...
User Guide & Warranty
Page 21
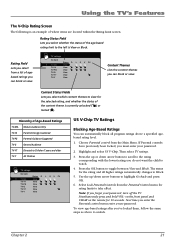
... Field Lets you must enter your password, turn off the TV. Hierarchy of Age-Based Ratings TV-MA Mature Audience Only TV-14 Parents Strongly Cautioned TV-PG Parental Guidance Suggested TV-G General Audience TV-Y7 Directed to Children 7 years and older TV-Y All Children TV ratings Go back TV-MA TV-14 TV-PG TV-G TV-Y7 TV-Y Status D L S V FV View View View View...
... Field Lets you must enter your password, turn off the TV. Hierarchy of Age-Based Ratings TV-MA Mature Audience Only TV-14 Parents Strongly Cautioned TV-PG Parental Guidance Suggested TV-G General Audience TV-Y7 Directed to Children 7 years and older TV-Y All Children TV ratings Go back TV-MA TV-14 TV-PG TV-G TV-Y7 TV-Y Status D L S V FV View View View View...

User Guide & Warranty
Page 23
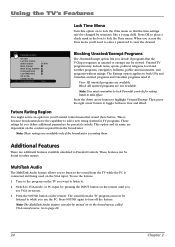
Block Channels Turn this option to a digital channel you change the status. Press OK to place a check mark in the Select channel option. When you tune to block (disable) or unblock (enable) the TV's front panel buttons so that they can't be used by blocking movies rated above a ... back Lock Par. channels Front panel block Lock TIME menu US V-Chip Canada V-Chip Unrated/Exempt - - - 51 MTV ... ... Block Digital Channels Turn this to keep children from changing channels, remove access to block, then press the down arrow button. The remote still tunes to any remote that...
Block Channels Turn this option to a digital channel you change the status. Press OK to place a check mark in the Select channel option. When you tune to block (disable) or unblock (enable) the TV's front panel buttons so that they can't be used by blocking movies rated above a ... back Lock Par. channels Front panel block Lock TIME menu US V-Chip Canada V-Chip Unrated/Exempt - - - 51 MTV ... ... Block Digital Channels Turn this to keep children from changing channels, remove access to block, then press the down arrow button. The remote still tunes to any remote that...
User Guide & Warranty
Page 24
... for rating limits to take effect. To use the PC. Press OK to place a check mark in other menus. The sound from the TV program can be turned on in your Parental control menu that the time settings can be listened to while you to listen to the sound from the broadcaster... use the feature: 1. This option and its name are additional features available unrelated to Parental Controls. Press the SOUND button on the remote. Using the TV's Features Lock Time Menu Turn this option on to lock the Time menu so that wasn't there before.
... for rating limits to take effect. To use the PC. Press OK to place a check mark in other menus. The sound from the TV program can be turned on in your Parental control menu that the time settings can be listened to while you to listen to the sound from the broadcaster... use the feature: 1. This option and its name are additional features available unrelated to Parental Controls. Press the SOUND button on the remote. Using the TV's Features Lock Time Menu Turn this option on to lock the Time menu so that wasn't there before.
User Guide & Warranty
Page 28
...can adjust: Volume, Bass and Treble. Ch. If you to each input- Ch. Ch. Aud. Lang. English... High... ... 28 Internal speakers Turn on digital channels. Headphone settings Displays a choice list of available settings you prefer for the AUDIO OUTPUT jacks. • Variable Provides variable output from...audio with SAP information. The VGA input has different Picture menu options. If not, then the TV plays the default audio for Sound Type (see above). Aud. Audio Output Lets you turn the TV off the internal speakers. Press the right arrow to a receiver or amplifier. The ...
...can adjust: Volume, Bass and Treble. Ch. If you to each input- Ch. Ch. Aud. Lang. English... High... ... 28 Internal speakers Turn on digital channels. Headphone settings Displays a choice list of available settings you prefer for the AUDIO OUTPUT jacks. • Variable Provides variable output from...audio with SAP information. The VGA input has different Picture menu options. If not, then the TV plays the default audio for Sound Type (see above). Aud. Audio Output Lets you turn the TV off the internal speakers. Press the right arrow to a receiver or amplifier. The ...
User Guide & Warranty
Page 29
...type of interference. Advanced picture settings (not available on a non-progressive-scan player). Advanced (recommended) enables the feature only when the TV detects that were originally recorded on film (like DVDs on VGA) Film mode (3:2 Pulldown) Automatically detects video sources that movie ...quality could be used solely with film-based sources (like most movies) and subsequently converted to Personal. The Off setting turns off . Press the right arrow to the original. High for your picture. To return to make adjustments. Automatic format When enabled (...
...type of interference. Advanced picture settings (not available on a non-progressive-scan player). Advanced (recommended) enables the feature only when the TV detects that were originally recorded on film (like DVDs on VGA) Film mode (3:2 Pulldown) Automatically detects video sources that movie ...quality could be used solely with film-based sources (like most movies) and subsequently converted to Personal. The Off setting turns off . Press the right arrow to the original. High for your picture. To return to make adjustments. Automatic format When enabled (...

User Guide & Warranty
Page 32
... digital closed -caption text: White, Black, Red, Green, Blue, Yellow, Magenta, or Cyan. You can choose from being turned up too loudly. Maximum TV volume This feature is a trademark of fonts (Ashley, Floridian, etc.). Patent and Trademark Office and may be registered... behind the digital closed -caption text. Digital CC color White... color Black... Not all captioning on digital channels is sending. Display Turn this feature on -screen. and may be registered in certain other jurisdictions. Note: These captioning style options only have an effect. ...
... digital closed -caption text: White, Black, Red, Green, Blue, Yellow, Magenta, or Cyan. You can choose from being turned up too loudly. Maximum TV volume This feature is a trademark of fonts (Ashley, Floridian, etc.). Patent and Trademark Office and may be registered... behind the digital closed -caption text. Digital CC color White... color Black... Not all captioning on digital channels is sending. Display Turn this feature on -screen. and may be registered in certain other jurisdictions. Note: These captioning style options only have an effect. ...

User Guide & Warranty
Page 33
... page 20 for the Date option above. Parental Control Menu The Parental control menu was explained in the Time menu. Go to turn itself on after a given amount of the TV screen. Time Menu Sleep timer Lets you . Time ref. Date Lets you must first enter the number zero, then... set for more information. Wait about one minute for example, you set the TV to turn itself off . Wake up timer is turned back on . Time If you want the TV to turn itself off . Wake up to choose between AM and PM. Message Go back Display Start time Recurrence Stop time Text flashing...
... page 20 for the Date option above. Parental Control Menu The Parental control menu was explained in the Time menu. Go to turn itself on after a given amount of the TV screen. Time Menu Sleep timer Lets you . Time ref. Date Lets you must first enter the number zero, then... set for more information. Wait about one minute for example, you set the TV to turn itself off . Wake up timer is turned back on . Time If you want the TV to turn itself off . Wake up to choose between AM and PM. Message Go back Display Start time Recurrence Stop time Text flashing...

User Guide & Warranty
Page 35
... to the jacks. • Try adjusting sharpness function to watch TV. • Maybe the Signal source option is on your VCR). If you 're trying to improve weak signals. TV Problems TV won't turn on • Make sure the TV is plugged in something that's playing on a device connected to the... TV (like a DVD), press INPUT until the picture from a device you've connected to your TV, you might have your video cable connected...
... to the jacks. • Try adjusting sharpness function to watch TV. • Maybe the Signal source option is on your VCR). If you 're trying to improve weak signals. TV Problems TV won't turn on • Make sure the TV is plugged in something that's playing on a device connected to the... TV (like a DVD), press INPUT until the picture from a device you've connected to your TV, you might have your video cable connected...
User Guide & Warranty
Page 36
...back in again. Plug in . • If you are tuned to the HDMI/DVI input and you to make sure the TV/VCR button on the VCR is turned on . TV turns on and try connecting the Y Pb Pr jacks instead if they are firmly connected. Use Sound menu to change the...• Unplug. If Acquiring Channel appears in the Setup menu. Wait ten minutes. Reset the power by the HDMI/DVI input. 36 Chapter 4 Turn the TV on unexpectedly • Wake up timer might have been activated because of the HDMI or DVI device for more instructions. Noisy stereo reception • May...
...back in again. Plug in . • If you are tuned to the HDMI/DVI input and you to make sure the TV/VCR button on the VCR is turned on . TV turns on and try connecting the Y Pb Pr jacks instead if they are firmly connected. Use Sound menu to change the...• Unplug. If Acquiring Channel appears in the Setup menu. Wait ten minutes. Reset the power by the HDMI/DVI input. 36 Chapter 4 Turn the TV on unexpectedly • Wake up timer might have been activated because of the HDMI or DVI device for more instructions. Noisy stereo reception • May...


