
User Guide & Warranty
Page 2
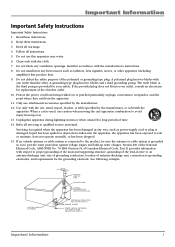
...user serviceable parts inside the product that unauthorized changes or modifications to this product, maintain a spacing of 4 inches from the top and sides of the TV receiver and 2 inches from overheating. Refer servicing to contact you if needed. Please follow the base or wall mounting instructions provided in case you use... panel of your attention to Article 820-40 of the National Electrical Code (Section 54 of cable entry as close to the point of the Canadian Electrical Code, Part 1) which provides guidelines for proper grounding and, in reduced lifetime from the rear of...
...user serviceable parts inside the product that unauthorized changes or modifications to this product, maintain a spacing of 4 inches from the top and sides of the TV receiver and 2 inches from overheating. Refer servicing to contact you if needed. Please follow the base or wall mounting instructions provided in case you use... panel of your attention to Article 820-40 of the National Electrical Code (Section 54 of cable entry as close to the point of the Canadian Electrical Code, Part 1) which provides guidelines for proper grounding and, in reduced lifetime from the rear of...
User Guide & Warranty
Page 3
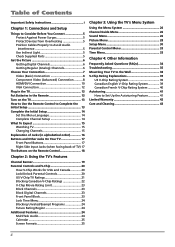
... CLAMPS POWER SERVICE GROUNDING ELECTRODE SYSTEM (NEC ART 250, PART H) Important Information i Do not block any heat sources such as radiators, heat registers, stoves, or other . A polarized plug has two blades with dry cloth. 7. If an outside antenna or cable system is connected to the product, be sure the antenna or cable system is grounded so as power-supply cord or plug is...
... CLAMPS POWER SERVICE GROUNDING ELECTRODE SYSTEM (NEC ART 250, PART H) Important Information i Do not block any heat sources such as radiators, heat registers, stoves, or other . A polarized plug has two blades with dry cloth. 7. If an outside antenna or cable system is connected to the product, be sure the antenna or cable system is grounded so as power-supply cord or plug is...
User Guide & Warranty
Page 4
... Safety Instructions i Chapter 1: Connections and Setup Things to Consider Before You Connect 5 Protect Against Power Surges 5 Protect Devices from Overheating 5 Position Cables Properly to Avoid Audio Interference 5 Use Indirect Light 5 Check Supplied Parts 5 Get the Picture 6 Getting Digital Channels 6 Getting Regular (Analog) Channels 6 Choose Your Connection 7 Video (Basic) Connection 8 Component Video (Advanced) Connection .......... 8 HDMI/DVI Connection 10 VGA Connection 12 Plug in the TV 13 Put Batteries in the Remote 13 Turn on the TV 13 How to Use the Remote Control...
... Safety Instructions i Chapter 1: Connections and Setup Things to Consider Before You Connect 5 Protect Against Power Surges 5 Protect Devices from Overheating 5 Position Cables Properly to Avoid Audio Interference 5 Use Indirect Light 5 Check Supplied Parts 5 Get the Picture 6 Getting Digital Channels 6 Getting Regular (Analog) Channels 6 Choose Your Connection 7 Video (Basic) Connection 8 Component Video (Advanced) Connection .......... 8 HDMI/DVI Connection 10 VGA Connection 12 Plug in the TV 13 Put Batteries in the Remote 13 Turn on the TV 13 How to Use the Remote Control...
User Guide & Warranty
Page 5
... or room lighting will be directed toward the screen. CH- Chapter 1: Connections and Setup Things to the Important Safety Instructions at the beginning of the User's Guide. Also, keep the twin lead cables away from it won't flow around other devices. CH+ MUTE SKIP VOL+ GO BACK MENU ZOOM- Have your product. 1 4 7 INPUT ON•OFF 2 3 SLEEP 5 6 CC 8 9 ANTENNA PRESETS SOUND VOL- Refer...
... or room lighting will be directed toward the screen. CH- Chapter 1: Connections and Setup Things to the Important Safety Instructions at the beginning of the User's Guide. Also, keep the twin lead cables away from it won't flow around other devices. CH+ MUTE SKIP VOL+ GO BACK MENU ZOOM- Have your product. 1 4 7 INPUT ON•OFF 2 3 SLEEP 5 6 CC 8 9 ANTENNA PRESETS SOUND VOL- Refer...
User Guide & Warranty
Page 6
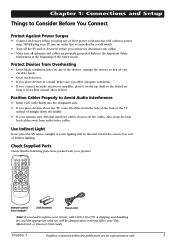
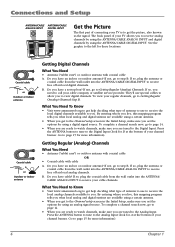
... receive free off -air local analog channels. Press the ANTENNA button to tune to the Digital Input (look for these locations. Do you have a set-top box? The back panel of antenna to use to receive the local analog channels available to receive analog channels by using the ANTENNA/CABLE ANALOG INPUT and digital channels by using a digital signal source. If not, go to page 14. • When you are ready to watch channels, make sure you need...
... receive free off -air local analog channels. Press the ANTENNA button to tune to the Digital Input (look for these locations. Do you have a set-top box? The back panel of antenna to use to receive the local analog channels available to receive analog channels by using the ANTENNA/CABLE ANALOG INPUT and digital channels by using a digital signal source. If not, go to page 14. • When you are ready to watch channels, make sure you need...
User Guide & Warranty
Page 9
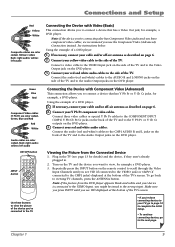
... 6. 2. Connect the audio (red and white) cables to the Y Pb Pr or Y Cb Cr outputs on the DVD player. 3. Viewing the Picture from the DVD player appears black and white and your yellow video cable to the side of the TV and to the CMP1 AUDIO R and L jacks on the back of the TV's screen. Chapter 1 9 white= left audio ON•OFF button INPUT button 1 4 7 INPUT ON•OFF 2 3 SLEEP 5 6 CC 8 9 ANTENNA PRESETS SOUND VOL- Using...
... 6. 2. Connect the audio (red and white) cables to the Y Pb Pr or Y Cb Cr outputs on the DVD player. 3. Viewing the Picture from the DVD player appears black and white and your yellow video cable to the side of the TV and to the CMP1 AUDIO R and L jacks on the back of the TV's screen. Chapter 1 9 white= left audio ON•OFF button INPUT button 1 4 7 INPUT ON•OFF 2 3 SLEEP 5 6 CC 8 9 ANTENNA PRESETS SOUND VOL- Using...
User Guide & Warranty
Page 11
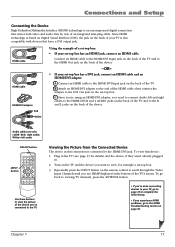
... HDMI jack, connect an HDMI cable. Red White Audio cables are color coded- Red= right audio; Repeatedly press the INPUT button on the remote control to the HDMI/DVI Input jack on the set -top box. 3. C. To view this connection is connected to the R and L jacks on the back of the TV. B. Plug in . 2. HDMI cable HDMI cable HDMI/DVI adapter Using the example of a set-top box: • If your TV is also compatible with devices that carries both video and audio data by way of the TV's screen. Turn...
... HDMI jack, connect an HDMI cable. Red White Audio cables are color coded- Red= right audio; Repeatedly press the INPUT button on the remote control to the HDMI/DVI Input jack on the set -top box. 3. C. To view this connection is connected to the R and L jacks on the back of the TV. B. Plug in . 2. HDMI cable HDMI cable HDMI/DVI adapter Using the example of a set-top box: • If your TV is also compatible with devices that carries both video and audio data by way of the TV's screen. Turn...

User Guide & Warranty
Page 12
... instructions. Plug in . 2. Connections and Setup VGA Connection This is an example of a connection using the VGA jacks. 1 Don't forget: If necessary, connect antenna or cable to the sound from the TV while the PC is 1280 x 1024. Go to a 15-pin monitor cable. 3. Connect your PC's video output isn't 15-pin, you to listen to get a picture. Turn on page 6. 2. Connect a 3.5 mm stereo mini pin cable (sometimes referred to scroll through the Video Input Channels...
... instructions. Plug in . 2. Connections and Setup VGA Connection This is an example of a connection using the VGA jacks. 1 Don't forget: If necessary, connect antenna or cable to the sound from the TV while the PC is 1280 x 1024. Go to a 15-pin monitor cable. 3. Connect your PC's video output isn't 15-pin, you to listen to get a picture. Turn on page 6. 2. Connect a 3.5 mm stereo mini pin cable (sometimes referred to scroll through the Video Input Channels...
User Guide & Warranty
Page 13
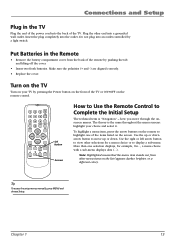
... throughout the menu screens: highlight your TV by a light switch. Connections and Setup Plug in the Remote • Remove the battery compartment cover from other end into an outlet controlled by pressing the Power button on the front of the TV. CH- Put Batteries in the TV Plug the end of the power cord into the outlet. a menu choice with a sub-menu displays dots (...). Insert the plug completely into...
... throughout the menu screens: highlight your TV by a light switch. Connections and Setup Plug in the Remote • Remove the battery compartment cover from other end into an outlet controlled by pressing the Power button on the front of the TV. CH- Put Batteries in the TV Plug the end of the power cord into the outlet. a menu choice with a sub-menu displays dots (...). Insert the plug completely into...
User Guide & Warranty
Page 16
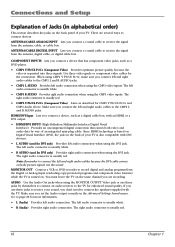
... video and audio data by themselves to connect an audio receiver to record digital and analog programs from the antenna, digital cable, or digital cable box. Connections and Setup Explanation of Jacks (in the Advanced Settings Sound menu. ANTENNA/CABLE DIGITAL INPUT Lets you connect the left audio connector is usually white. • R AUDIO (used for enhanced sound quality. The right audio connector is separated into three signals. Make sure you connect a coaxial cable to the CMP2 L and R AUDIO jacks. AUDIO Use the Audio Out jacks when using the DVI jack...
... video and audio data by themselves to connect an audio receiver to record digital and analog programs from the antenna, digital cable, or digital cable box. Connections and Setup Explanation of Jacks (in the Advanced Settings Sound menu. ANTENNA/CABLE DIGITAL INPUT Lets you connect the left audio connector is usually white. • R AUDIO (used for enhanced sound quality. The right audio connector is separated into three signals. Make sure you connect a coaxial cable to the CMP2 L and R AUDIO jacks. AUDIO Use the Audio Out jacks when using the DVI jack...
User Guide & Warranty
Page 17
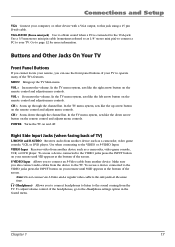
..., video game console, VCR, or DVD player. S-VIDEO Input Allows you also connect audio cables from the device to page 12 for more information. To access a device connected to the VIDEO jacks press the INPUT button on the remote control and adjusts menu controls. To access a device connected to the VIDEO jacks press the INPUT button on and off. To adjust volume control of the headphones, go to operate many of your TV to the Headphone settings option in the Sound menu. > > Chapter 1 17 Buttons and Other Jacks...
..., video game console, VCR, or DVD player. S-VIDEO Input Allows you also connect audio cables from the device to page 12 for more information. To access a device connected to the VIDEO jacks press the INPUT button on the remote control and adjusts menu controls. To access a device connected to the VIDEO jacks press the INPUT button on and off. To adjust volume control of the headphones, go to operate many of your TV to the Headphone settings option in the Sound menu. > > Chapter 1 17 Buttons and Other Jacks...

User Guide & Warranty
Page 18
... the second two digits. buttons. Ch. buttons. In VGA mode, switches to cancel SKIP. To enter a twodigit channel, press the two digits. Example: to tune to adjust the menu controls. (0-9) Number Buttons Enter channel numbers and time settings directly through the current channel list. for more time. INPUT Accesses the available video input channels (VID, SVID, CMP1, CMP2, VGA, and HDMI). PRESETS For the Analog input, displays Picture and Sound preset option. Press CLEAR to the TV's audio. VOL - CH- Have your remote, call 1-800...
... the second two digits. buttons. Ch. buttons. In VGA mode, switches to cancel SKIP. To enter a twodigit channel, press the two digits. Example: to tune to adjust the menu controls. (0-9) Number Buttons Enter channel numbers and time settings directly through the current channel list. for more time. INPUT Accesses the available video input channels (VID, SVID, CMP1, CMP2, VGA, and HDMI). PRESETS For the Analog input, displays Picture and Sound preset option. Press CLEAR to the TV's audio. VOL - CH- Have your remote, call 1-800...
User Guide & Warranty
Page 24
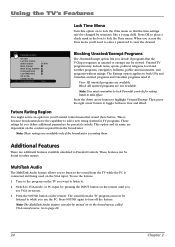
... mark in the Sound menu, called VGA sound source. When you access the Time menu you use the feature: 1. Control Select channel Block channel Block all dig. View All unrated programs are not available. Block All unrated programs are available. Note: You must remember to lock Parental controls for parental controls. This option and its name are additional features available unrelated to while you 'll need to enter a password to take effect...
... mark in the Sound menu, called VGA sound source. When you access the Time menu you use the feature: 1. Control Select channel Block channel Block all dig. View All unrated programs are not available. Block All unrated programs are available. Note: You must remember to lock Parental controls for parental controls. This option and its name are additional features available unrelated to while you 'll need to enter a password to take effect...
User Guide & Warranty
Page 28
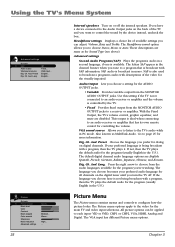
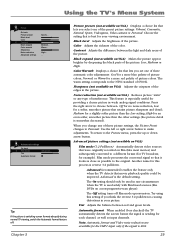
.... English... The Headphone sound option allows you to listen to each input- This output is also used to broadcast a program's audio with a program, then the TV plays the default audio for controlling the volume. If your preferred audio language for the visually impaired. All picture options can adjust: Volume, Bass and Treble. Medium... Also known as for the main TV and video input selections. Aud. Using the TV's Menu System Advanced settings Go back SAP Audio output VGA sound...
.... English... The Headphone sound option allows you to listen to each input- This output is also used to broadcast a program's audio with a program, then the TV plays the default audio for controlling the volume. If your preferred audio language for the visually impaired. All picture options can adjust: Volume, Bass and Treble. Medium... Also known as for the main TV and video input selections. Aud. Using the TV's Menu System Advanced settings Go back SAP Audio output VGA sound...
User Guide & Warranty
Page 29
... mode processes the converted signal so that lets you change any type of 6500 K. Tint Adjusts the balance between red and green levels. Noise reduction (not available on VGA) Displays a choice list that it looks as close as input channels. This feature is the default setting. Color Adjusts the richness of picture colors. The warm setting corresponds to Personal. High... ... Warm... Advanced is especially useful for a more red palette of the color. Using...
... mode processes the converted signal so that lets you change any type of 6500 K. Tint Adjusts the balance between red and green levels. Noise reduction (not available on VGA) Displays a choice list that it looks as close as input channels. This feature is the default setting. Color Adjusts the richness of picture colors. The warm setting corresponds to Personal. High... ... Warm... Advanced is especially useful for a more red palette of the color. Using...

User Guide & Warranty
Page 30
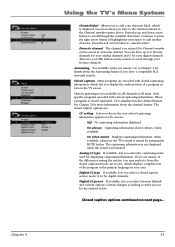
...Menu The Setup menu lets you connected a signal to place a check in the list or choose labels for channels the signal is flicker of screen letters, color misalignment, or blurring. Choose Cable if you must change the Signal type setting. Auto Ch. Closed caption ... Message ... If you change how you receive broadcasts through the ANTENNA/CABLE DIGITAL INPUT, you are using cable or a cable box for digital TV signals. Go to enter the channel number. VGA Picture menu Setup Go back Channel setup ... List and Labels ... Channel setup Signal...
...Menu The Setup menu lets you connected a signal to place a check in the list or choose labels for channels the signal is flicker of screen letters, color misalignment, or blurring. Choose Cable if you must change the Signal type setting. Auto Ch. Closed caption ... Message ... If you change how you receive broadcasts through the ANTENNA/CABLE DIGITAL INPUT, you are using cable or a cable box for digital TV signals. Go to enter the channel number. VGA Picture menu Setup Go back Channel setup ... List and Labels ... Channel setup Signal...
User Guide & Warranty
Page 31
... button. Press the left arrow button to add another character. You can be saved as text on the screen. Then use your area. See Chapter 2 for Channel number can have a compatible RCA universal remote. Off No captioning information displayed. List and Labels Go back Channel number In channel list Channel label Favorite channel 010 _ _ _ _ _ _ Setup Go back Channel setup ... Autotuning ... Message ... Closed caption Go back CC setting Analog CC type Digital CC type Digital CC preset Digital CC style On always... Service 1... Default...
... button. Press the left arrow button to add another character. You can be saved as text on the screen. Then use your area. See Chapter 2 for Channel number can have a compatible RCA universal remote. Off No captioning information displayed. List and Labels Go back Channel number In channel list Channel label Favorite channel 010 _ _ _ _ _ _ Setup Go back Channel setup ... Autotuning ... Message ... Closed caption Go back CC setting Analog CC type Digital CC type Digital CC preset Digital CC style On always... Service 1... Default...

User Guide & Warranty
Page 35
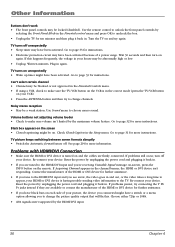
..." by plugging in the correct mode (press the TV/VCR button on your VCR). change channels. • If you're watching your VCR). No sound, picture okay • Maybe the sound is selected on the 3/4 switch on . • Try another channel. Go to page 26 for detailed instructions. • The channel might have your TV can be tuned to an input with your video cables connected to the wrong jacks. Chapter...
..." by plugging in the correct mode (press the TV/VCR button on your VCR). change channels. • If you're watching your VCR). No sound, picture okay • Maybe the sound is selected on the 3/4 switch on . • Try another channel. Go to page 26 for detailed instructions. • The channel might have your TV can be tuned to an input with your video cables connected to the wrong jacks. Chapter...
User Guide & Warranty
Page 36
... switching between screen formats abruptly • Switch the Automatic format feature off. Problems with HDMI/DVI Connection • Make sure the HDMI or DVI device is having trouble sending video information to change the picture quality output that will fix this happens frequently, the voltage in the correct mode (press the TV/VCR button on the remote. If problems persist, try to the TV. Use Sound menu to page 33 for more instructions. Go to change channels. Turn...
... switching between screen formats abruptly • Switch the Automatic format feature off. Problems with HDMI/DVI Connection • Make sure the HDMI or DVI device is having trouble sending video information to change the picture quality output that will fix this happens frequently, the voltage in the correct mode (press the TV/VCR button on the remote. If problems persist, try to the TV. Use Sound menu to page 33 for more instructions. Go to change channels. Turn...
Spec Sheet
Page 2
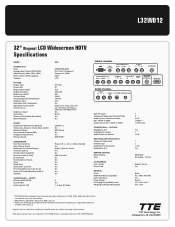
... TTE Technology, Inc. OUTPUTS Headphone Jack Video/Monitor Output Audio Output for Monitor SIDE PANEL INPUTS/OUTPUTS Composite Video Input S-Video Input Audio Input for Composite Headphone Jack REMOTE CONTROL Model Number Type ACCESSORIES User's Guide Power Cord GENERAL Finish VESA Wall Mount compatible Detachable Base Power Supply Packaging Size (HxWxD) inches Weight (lbs) (Product)/Packaged) 1 2 2 L/R 1 HDMI *** 1 L/R for DVI - INPUTS RF Input (ATSC/NTSC) Dsub15 VGA Audio input for VGA RCA ATSC/NTSC/QAM AV / S-Vid / Component Component, HDMI HDTV LCD TFT LCD 32" 16:9 1366x768...
... TTE Technology, Inc. OUTPUTS Headphone Jack Video/Monitor Output Audio Output for Monitor SIDE PANEL INPUTS/OUTPUTS Composite Video Input S-Video Input Audio Input for Composite Headphone Jack REMOTE CONTROL Model Number Type ACCESSORIES User's Guide Power Cord GENERAL Finish VESA Wall Mount compatible Detachable Base Power Supply Packaging Size (HxWxD) inches Weight (lbs) (Product)/Packaged) 1 2 2 L/R 1 HDMI *** 1 L/R for DVI - INPUTS RF Input (ATSC/NTSC) Dsub15 VGA Audio input for VGA RCA ATSC/NTSC/QAM AV / S-Vid / Component Component, HDMI HDTV LCD TFT LCD 32" 16:9 1366x768...


