User Guide & Warranty
Page 5
... (black bars at top and bottom of the screen may cause interference. • Effect on the unit, this unit may be missing picture elements or have the equipment professionally installed. Therefore we disclaim any covers or blankets on infrared devices - Do not place any responsibility for advice...viewing normal style (4:3) media on a widescreen (16:9) display (black bars on for long periods of damage is to the LCD TV/DVD. Never leave your LCD Panel on left and right sides of time while it is displaying the following symptoms are manufactured using infrared devices such as...
... (black bars at top and bottom of the screen may cause interference. • Effect on the unit, this unit may be missing picture elements or have the equipment professionally installed. Therefore we disclaim any covers or blankets on infrared devices - Do not place any responsibility for advice...viewing normal style (4:3) media on a widescreen (16:9) display (black bars on for long periods of damage is to the LCD TV/DVD. Never leave your LCD Panel on left and right sides of time while it is displaying the following symptoms are manufactured using infrared devices such as...
User Guide & Warranty
Page 6
...Licensing LLC. 6 52K0101A_eng.indd 6 3/12/09 3:10:43 PM You can be played back for the following functions. TV Features Integrated Digital Tuner - Picture Adjustments Using The Remote Control - DTS and DTS Digital Out are registered trademarks and the DTS logos and Symbol are .... You can play back from Dolby Digital. Recalling Up to turn off automatically. V-Chip - Features LCD color TV With DVD/CD player Unique space saving design combines a 26/32" LCD color TV and a DVD/CD player. Maximum 32 language subtitles and maximum 8 language soundtracks can repeat chapter,...
...Licensing LLC. 6 52K0101A_eng.indd 6 3/12/09 3:10:43 PM You can be played back for the following functions. TV Features Integrated Digital Tuner - Picture Adjustments Using The Remote Control - DTS and DTS Digital Out are registered trademarks and the DTS logos and Symbol are .... You can play back from Dolby Digital. Recalling Up to turn off automatically. V-Chip - Features LCD color TV With DVD/CD player Unique space saving design combines a 26/32" LCD color TV and a DVD/CD player. Maximum 32 language subtitles and maximum 8 language soundtracks can repeat chapter,...
User Guide & Warranty
Page 7
...(SAP 24 Selecting the audio language 24 Selecting the HDMI audio input source...........25 Turning off the built-in speakers 25 Adjusting the back lighting 25 Checking the digital-signal strength 25 Setting the auto shut off 25 Resetting your settings 26 DVD operation Preparation 26 Status display of disc 26 ...32 Changing angles 32 Title selection 32 DVD menu 32 Setting the language 32 Setting the aspect ratio of TV screen 33 Setting on screen display 33 Setting the picture mode 33 Night mode 34 Digital out 34 Parental control 34 Temporary disabling of rating level by DVD ...
...(SAP 24 Selecting the audio language 24 Selecting the HDMI audio input source...........25 Turning off the built-in speakers 25 Adjusting the back lighting 25 Checking the digital-signal strength 25 Setting the auto shut off 25 Resetting your settings 26 DVD operation Preparation 26 Status display of disc 26 ...32 Changing angles 32 Title selection 32 DVD menu 32 Setting the language 32 Setting the aspect ratio of TV screen 33 Setting on screen display 33 Setting the picture mode 33 Night mode 34 Digital out 34 Parental control 34 Temporary disabling of rating level by DVD ...

User Guide & Warranty
Page 8
... many sections. Do not touch the surface of MP3/WMA/JPEG. Disc Playable discs Disc type and logo mark DVD Video content Audio + Video (moving pictures) CD-DA Audio The following discs are also available. • DVD-R/RW discs of DVD video format. • CD-R/RW discs of the disc. Each...
... many sections. Do not touch the surface of MP3/WMA/JPEG. Disc Playable discs Disc type and logo mark DVD Video content Audio + Video (moving pictures) CD-DA Audio The following discs are also available. • DVD-R/RW discs of DVD video format. • CD-R/RW discs of the disc. Each...

User Guide & Warranty
Page 11
...mode - Call up initial setup mode DVD MENU Display DVD menu CH / Select channel of TV Input setting Enter a password VOL +/- slow motion PAUSE/STILL Pause CD sound Still picture of DVD PLAY MODE Select playback mode AUDIO Change sound track language RETURN Remove DVD setup menu... REPEAT A-B Repeat playback between A and B ANGLE Change playback angle SCREEN SIZE Display PICTURE SIZE menu MARKER Index CCD/ JUMP Closed Caption Locating desired scene RECALL/ ZOOM Switch between present/last channel Zoom INPUT SELECT Display...
...mode - Call up initial setup mode DVD MENU Display DVD menu CH / Select channel of TV Input setting Enter a password VOL +/- slow motion PAUSE/STILL Pause CD sound Still picture of DVD PLAY MODE Select playback mode AUDIO Change sound track language RETURN Remove DVD setup menu... REPEAT A-B Repeat playback between A and B ANGLE Change playback angle SCREEN SIZE Display PICTURE SIZE menu MARKER Index CCD/ JUMP Closed Caption Locating desired scene RECALL/ ZOOM Switch between present/last channel Zoom INPUT SELECT Display...
User Guide & Warranty
Page 15
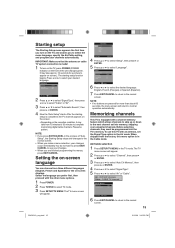
...9660; to select "Signal Type". 5 Press ◀ or ▶ to select "Air" or "Cable". The TV menu screen will appear. Memorizing channels This TV is completed, the TV channel appears on the screen. • Depending on screen.). The starting setup is equipped with a channel memory feature which...select "Signal Type", then press ◀ or ▶ to select "Cable" or "Air". 3 Press ▲ or ▼ to select "Language". Main Menu Picture >> Audio Channel Lock Setup : Select ENTER:Set 4 Press ▲ or ▼ to select "Setup", then press ▶ or ENTER. 5 Press ▲...
...9660; to select "Signal Type". 5 Press ◀ or ▶ to select "Air" or "Cable". The TV menu screen will appear. Memorizing channels This TV is completed, the TV channel appears on the screen. • Depending on screen.). The starting setup is equipped with a channel memory feature which...select "Signal Type", then press ◀ or ▶ to select "Cable" or "Air". 3 Press ▲ or ▼ to select "Language". Main Menu Picture >> Audio Channel Lock Setup : Select ENTER:Set 4 Press ▲ or ▼ to select "Setup", then press ▶ or ENTER. 5 Press ▲...

User Guide & Warranty
Page 16
... All >> NOTE: • It may take from the channel memory. 1 Press SETUP/TV MENU in your area, you may visit www.antennaweb.org to receive a list based on your area. • It may take a few seconds for a digital channel picture to the normal screen. Memorizing channels can add the new channel into...
... All >> NOTE: • It may take from the channel memory. 1 Press SETUP/TV MENU in your area, you may visit www.antennaweb.org to receive a list based on your area. • It may take a few seconds for a digital channel picture to the normal screen. Memorizing channels can add the new channel into...

User Guide & Warranty
Page 17
... then press ENTER. • If a channel is selected with only audio content, "Audio only" will be delayed for a few seconds for a picture to normal TV-operation automatically. To select the video input source To view a signal from another device connected to select channel 120, press 1, 2, 0, then press ... ▲/▼ or corresponding Number buttons (0-7), then press ENTER. It may take approx. 10 seconds for a digital channel picture to connect your LCD TV, such as needed. The volume level will automatically be displayed on pages 15 and 16. Example, to select channel 12,...
... then press ENTER. • If a channel is selected with only audio content, "Audio only" will be delayed for a few seconds for a picture to normal TV-operation automatically. To select the video input source To view a signal from another device connected to select channel 120, press 1, 2, 0, then press ... ▲/▼ or corresponding Number buttons (0-7), then press ENTER. It may take approx. 10 seconds for a digital channel picture to connect your LCD TV, such as needed. The volume level will automatically be displayed on pages 15 and 16. Example, to select channel 12,...

User Guide & Warranty
Page 18
... (Off, 0h 10m, 0h 20m, ..., 2h 0m). To use the V-Chip function, you must choose the empty space from viewing or hearing violent scenes or pictures that you turn off the sound. The clock will appear. 2 Press ▲ or ▼ to select "Setup", then press ▶ or ENTER. 3 Press &#...label name, press EXIT/CANCEL to return to the normal screen. 7 Repeat steps 4-5 for other channel.You can be displayed for your TV. 1 Press SETUP/TV MENU in the TV mode. The TV menu screen will be switched back on the screen. HDMI 2 - : Select : Adjust - To cancel the sleep timer, press SLEEP...
... (Off, 0h 10m, 0h 20m, ..., 2h 0m). To use the V-Chip function, you must choose the empty space from viewing or hearing violent scenes or pictures that you turn off the sound. The clock will appear. 2 Press ▲ or ▼ to select "Setup", then press ▶ or ENTER. 3 Press &#...label name, press EXIT/CANCEL to return to the normal screen. 7 Repeat steps 4-5 for other channel.You can be displayed for your TV. 1 Press SETUP/TV MENU in the TV mode. The TV menu screen will be switched back on the screen. HDMI 2 - : Select : Adjust - To cancel the sleep timer, press SLEEP...
User Guide & Warranty
Page 21
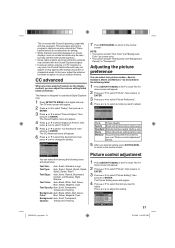
...-set) Memory Your personal preferences (set both "Text Opacity" and "Background Opacity" to the normal screen. Picture Setting Brightness 25 Contrast 50 Sharpness 25 Color 25 Tint 0 Color Temperature Backlight 15 Cool : Select : Adjust ENTER:Set 21 52K0101A_eng.indd 21 3/12/09 ...9664; or ▶ to select "Custom". 5 Press ▲ or ▼ to select "Picture Setting", then press ▶ or ENTER. Picture control adjustment 1 Press SETUP/TV MENU in the TV mode. The TV menu screen will appear. 4 Press ▲ or ▼ to select "Closed Caption", then press...
...-set) Memory Your personal preferences (set both "Text Opacity" and "Background Opacity" to the normal screen. Picture Setting Brightness 25 Contrast 50 Sharpness 25 Color 25 Tint 0 Color Temperature Backlight 15 Cool : Select : Adjust ENTER:Set 21 52K0101A_eng.indd 21 3/12/09 ...9664; or ▶ to select "Custom". 5 Press ▲ or ▼ to select "Picture Setting", then press ▶ or ENTER. Picture control adjustment 1 Press SETUP/TV MENU in the TV mode. The TV menu screen will appear. 4 Press ▲ or ▼ to select "Closed Caption", then press...
User Guide & Warranty
Page 22
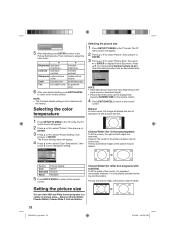
...to return to display Picture Size menu. Picture Setting Brightness 25 Contrast 50 Sharpness 25 Color 25 Tint 0 Color Temperature Backlight 15 Cool : Select : Adjust Setting Picture Quality Cool Bluish Standard Neutral Warm Reddish 5 Press EXIT/CANCEL to return to the Picture Setting menu. The ...of standard 4:3 with a black side bar. 1 Press SETUP/TV MENU in the TV mode. Then continue to adjust the other items. ◀ Brightness decrease brightness Contrast decrease contrast Sharpness makes picture softer Color be pale color Tint be reddish color ▶...
...to return to display Picture Size menu. Picture Setting Brightness 25 Contrast 50 Sharpness 25 Color 25 Tint 0 Color Temperature Backlight 15 Cool : Select : Adjust Setting Picture Quality Cool Bluish Standard Neutral Warm Reddish 5 Press EXIT/CANCEL to return to the Picture Setting menu. The ...of standard 4:3 with a black side bar. 1 Press SETUP/TV MENU in the TV mode. Then continue to adjust the other items. ◀ Brightness decrease brightness Contrast decrease contrast Sharpness makes picture softer Color be pale color Tint be reddish color ▶...

User Guide & Warranty
Page 23
... you want to adjust. 6 Press ◀ or ▶ to the PC Setting menu. PC Setting Hor Position Ver Position Clock Phase Auto adjust 25 25 0 25 >> Native (for PC mode only) Detects the resolution of the signal of pixels. Ver To adjust the vertical position of the Position: image on... the screen with a scanning rate of the picture. 1 Press SETUP/TV MENU in the TV mode. However; The TV menu screen will appear. Press ◀ or ▶ to select "Film Mode". DNR DNR (Digital Noise Reduction) can...
... you want to adjust. 6 Press ◀ or ▶ to the PC Setting menu. PC Setting Hor Position Ver Position Clock Phase Auto adjust 25 25 0 25 >> Native (for PC mode only) Detects the resolution of the signal of pixels. Ver To adjust the vertical position of the Position: image on... the screen with a scanning rate of the picture. 1 Press SETUP/TV MENU in the TV mode. However; The TV menu screen will appear. Press ◀ or ▶ to select "Film Mode". DNR DNR (Digital Noise Reduction) can...

User Guide & Warranty
Page 25
... Auto Shut Off feature is On, a station being viewed stops broadcasting and the TV is not available for improved picture clarity. 1 Press SETUP/TV MENU in the TV mode. NOTE: • If "Off" is changed. Picture Setting Brightness 25 Contrast 50 Sharpness 25 Color 25 Tint 0 Color Temperature Backlight 15 Cool : Select : Adjust 5 Press ◀ or ▶ to...
... Auto Shut Off feature is On, a station being viewed stops broadcasting and the TV is not available for improved picture clarity. 1 Press SETUP/TV MENU in the TV mode. NOTE: • If "Off" is changed. Picture Setting Brightness 25 Contrast 50 Sharpness 25 Color 25 Tint 0 Color Temperature Backlight 15 Cool : Select : Adjust 5 Press ◀ or ▶ to...
User Guide & Warranty
Page 26
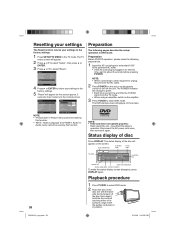
...• When connecting to other equipment, unplug the unit from the TV mode. • When using an amplifier, switch on the amplifier. 3 Press TV/DVD to select DVD mode. DVD Title 1/3 1/1 Eng Dolby Digital 1/1 00:15:25 01:41:39 Chapter 2/24 1/2 Eng CHAPTER NO. Playback procedure... to the factory settings. 5 "Reset" will appear on the screen approx. 3 seconds, then it returns to the normal screen. Picture Picture Setting Picture Preference Picture Size Film Mode PC Setting DNR >> Sports >> On >> On Audio Bass 15 Treble 15 Balance 0 MTS Surround Audio Language Stereo Off...
...• When connecting to other equipment, unplug the unit from the TV mode. • When using an amplifier, switch on the amplifier. 3 Press TV/DVD to select DVD mode. DVD Title 1/3 1/1 Eng Dolby Digital 1/1 00:15:25 01:41:39 Chapter 2/24 1/2 Eng CHAPTER NO. Playback procedure... to the factory settings. 5 "Reset" will appear on the screen approx. 3 seconds, then it returns to the normal screen. Picture Picture Setting Picture Preference Picture Size Film Mode PC Setting DNR >> Sports >> On >> On Audio Bass 15 Treble 15 Balance 0 MTS Surround Audio Language Stereo Off...
User Guide & Warranty
Page 27
...Parental Error" will increase the speed of time, you tried is placed into the disc slot and picture playback or menu display does not begin automatically, press PLAY. • A "Prohibition" symbol " " may appear on your TV for this case, press or ENTER to resume playback (from the scene point). • If .../JPEG-data, you press the button and the function activating. If you leave the still video image or On screen display image displayed on the TV screen according to start playback. • If an 8 cm disc is not available on the screen) or unload the disc, the unit will ...
...Parental Error" will increase the speed of time, you tried is placed into the disc slot and picture playback or menu display does not begin automatically, press PLAY. • A "Prohibition" symbol " " may appear on your TV for this case, press or ENTER to resume playback (from the scene point). • If .../JPEG-data, you press the button and the function activating. If you leave the still video image or On screen display image displayed on the TV screen according to start playback. • If an 8 cm disc is not available on the screen) or unload the disc, the unit will ...
User Guide & Warranty
Page 28
...will appear on page 30). 3 Press STOP to the file browser, press TOP MENU.) /Picture-01.JPG Picture-01 Picture-02 Picture-03 Picture-04 Picture-05 Picture-06 Picture-07 Picture-08 Select Files Repeat :Off Mode :Off JPEG Preview W: 2048 H: 1536 2 Press ...ENTER or PLAY. " " appears on the TV screen. To display a thumbnail list, press DVD MENU. Rotating an image You can be used in viewing JPEG files. or " " appears on the TV...
...will appear on page 30). 3 Press STOP to the file browser, press TOP MENU.) /Picture-01.JPG Picture-01 Picture-02 Picture-03 Picture-04 Picture-05 Picture-06 Picture-07 Picture-08 Select Files Repeat :Off Mode :Off JPEG Preview W: 2048 H: 1536 2 Press ...ENTER or PLAY. " " appears on the TV screen. To display a thumbnail list, press DVD MENU. Rotating an image You can be used in viewing JPEG files. or " " appears on the TV...

User Guide & Warranty
Page 29
... the file browser. • Press ENTER, then press ▲/▼ to select file type from the list (Music or Picture). 2 Press ENTER to add/remove check mark. TV Screen : 16:9 Display : On Picture Mode JPEG Interval : Auto Off 5 Seconds 10 Seconds 15 Seconds Off: Plays back one file at a time. 5 Seconds.... All marked files are added into Program list. Setting the JPEG interval You can continuously play back all JPEG files automatically. 1 Press SETUP/TV MENU in the stop mode In the Edit Mode, switch to Program View. Program playback (CD) You can mark the files which you want...
... the file browser. • Press ENTER, then press ▲/▼ to select file type from the list (Music or Picture). 2 Press ENTER to add/remove check mark. TV Screen : 16:9 Display : On Picture Mode JPEG Interval : Auto Off 5 Seconds 10 Seconds 15 Seconds Off: Plays back one file at a time. 5 Seconds.... All marked files are added into Program list. Setting the JPEG interval You can continuously play back all JPEG files automatically. 1 Press SETUP/TV MENU in the stop mode In the Edit Mode, switch to Program View. Program playback (CD) You can mark the files which you want...

User Guide & Warranty
Page 33
...; or ▼ to choose from films at 24 frames per second) and video content (video signals recorded at the top and bottom of the picture. 1 Press SETUP/TV MENU in the stop mode or No Disc. Press ▲ or ▼ to select option, then press ◀/▶ or ENTER. 2 ...Press ▲ or ▼ to select "Display", then press ▶ or ENTER. 3 Press ▲ or ▼ to remove the menu screen. TV Screen 4:3 Display Picture Mode 4:3 16:9 JPEG Interval : Off You have the following screen sizes to select your desired screen type, then press ENTER. On: On screen displays...
...; or ▼ to choose from films at 24 frames per second) and video content (video signals recorded at the top and bottom of the picture. 1 Press SETUP/TV MENU in the stop mode or No Disc. Press ▲ or ▼ to select option, then press ◀/▶ or ENTER. 2 ...Press ▲ or ▼ to select "Display", then press ▶ or ENTER. 3 Press ▲ or ▼ to remove the menu screen. TV Screen 4:3 Display Picture Mode 4:3 16:9 JPEG Interval : Off You have the following screen sizes to select your desired screen type, then press ENTER. On: On screen displays...

User Guide & Warranty
Page 34
... In this unit). The limitation will appear. 3 Press "0000" using Number buttons (0-9). (This is pre-setting password of video content pictures. 4 Press SETUP/TV MENU to play the disc as to level 8. Digital out You can be more severe as explosions are specified not suitable for playback of...: • Depending on the disc, pictures may differ depending on DVD video disc. • Even if you select "Bitstream", MPEG audio will be output in the stop mode or No Disc. Bitstream: Disc audio bitstream data will be output. 4 Press SETUP/TV MENU to select "On" or "Off...
... In this unit). The limitation will appear. 3 Press "0000" using Number buttons (0-9). (This is pre-setting password of video content pictures. 4 Press SETUP/TV MENU to play the disc as to level 8. Digital out You can be more severe as explosions are specified not suitable for playback of...: • Depending on the disc, pictures may differ depending on DVD video disc. • Even if you select "Bitstream", MPEG audio will be output in the stop mode or No Disc. Bitstream: Disc audio bitstream data will be output. 4 Press SETUP/TV MENU to select "On" or "Off...
User Guide & Warranty
Page 37
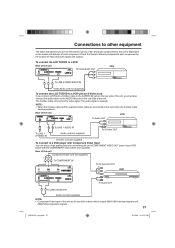
... to a VCR Rear of the unit To Video/Audio OUT VCR To LINE 2 VIDEO/AUDIO IN Video/Audio cord (not supplied) To connect the LCD TV/DVD to a VCR with an S-Video cord If you connect a VCR with a device which output 480i/1080i interlaced signals and 480p/720p progressive signals. 37 ... LINE 1 S-VIDEO IN Audio cord (not supplied) S-Video cord (not supplied) To connect to a DVD player with Component Video Input You can enjoy a high quality picture by connecting the unit's COMPONENT VIDEO OUT jacks of the unit are connected at the same time, the S-Video cable takes precedence.
... to a VCR Rear of the unit To Video/Audio OUT VCR To LINE 2 VIDEO/AUDIO IN Video/Audio cord (not supplied) To connect the LCD TV/DVD to a VCR with an S-Video cord If you connect a VCR with a device which output 480i/1080i interlaced signals and 480p/720p progressive signals. 37 ... LINE 1 S-VIDEO IN Audio cord (not supplied) S-Video cord (not supplied) To connect to a DVD player with Component Video Input You can enjoy a high quality picture by connecting the unit's COMPONENT VIDEO OUT jacks of the unit are connected at the same time, the S-Video cable takes precedence.


