User Manual
Page 2
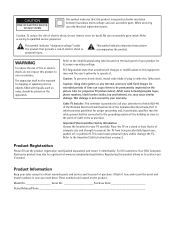
.... FCC Regulations state that is of adequate size and strength to the point of cable entry as vases, should be registered at www.rca.com/productregistration. ALSO, some network/program logos, phone numbers, black borders (sides, top and bottom), etc. Attach it immediately. Caution...is not covered by your attention to be permanently imprinted on the product. For US customers: Your RCA Consumer Electronics product may cause similar damage. Product Information Keep your TV carefully. CAUTION RISK OF ELECTRIC SHOCK DO NOT OPEN This symbol indicates that presents a risk of...
.... FCC Regulations state that is of adequate size and strength to the point of cable entry as vases, should be registered at www.rca.com/productregistration. ALSO, some network/program logos, phone numbers, black borders (sides, top and bottom), etc. Attach it immediately. Caution...is not covered by your attention to be permanently imprinted on the product. For US customers: Your RCA Consumer Electronics product may cause similar damage. Product Information Keep your TV carefully. CAUTION RISK OF ELECTRIC SHOCK DO NOT OPEN This symbol indicates that presents a risk of...
User Manual
Page 3
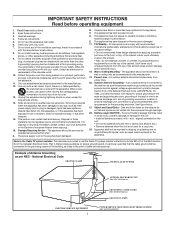
...unit, connection to an antenna discharge unit, size of grounding connectors, location of time. 14. Outdoor Antenna Grounding - Note to the Cable TV system installer: This reminder is not used , use this apparatus during lightning storms or when unused for the grounding electrode. National Electrical Code...not mix batteries (old and new or carbon and alkaline, etc.). • Remove batteries when the unit is provided to call the Cable TV system installer's attention to operate normally or exhibits a marked change in any of the obsolete outlet. 10. The appliance has been dropped or ...
...unit, connection to an antenna discharge unit, size of grounding connectors, location of time. 14. Outdoor Antenna Grounding - Note to the Cable TV system installer: This reminder is not used , use this apparatus during lightning storms or when unused for the grounding electrode. National Electrical Code...not mix batteries (old and new or carbon and alkaline, etc.). • Remove batteries when the unit is provided to call the Cable TV system installer's attention to operate normally or exhibits a marked change in any of the obsolete outlet. 10. The appliance has been dropped or ...

User Manual
Page 4
.... 3 Picture Preset Mode: Lets you specify. 10-120 minutes from the current time. On-Timer: Turns on the front of the TV so it cannot be operated accidentally by young children. Settings include Bright, Normal, Theater, and Personal, which set the picture control as on ...the TV 7 Remote Control 8 Setup Menus Language 10 TV/Cable TV (CATV 11 Auto Search (Setting TV Channels 12 Manual Channel Tuning 13 Favorite Channel Setting 14 Adding or Erasing Channels 15 On-screen Menus...
.... 3 Picture Preset Mode: Lets you specify. 10-120 minutes from the current time. On-Timer: Turns on the front of the TV so it cannot be operated accidentally by young children. Settings include Bright, Normal, Theater, and Personal, which set the picture control as on ...the TV 7 Remote Control 8 Setup Menus Language 10 TV/Cable TV (CATV 11 Auto Search (Setting TV Channels 12 Manual Channel Tuning 13 Favorite Channel Setting 14 Adding or Erasing Channels 15 On-screen Menus...
User Manual
Page 5
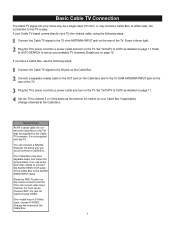
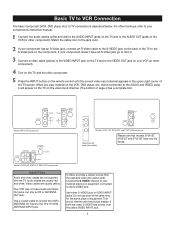
... a 75 ohm coaxial cable, using the following steps: Connect the Cable TV signal to the TV is not supplied with the TV. Plug the TV's power cord into your available TV channels. If so, use the following steps: Connect the Cable TV signal to the TV) may be a single cable (75 ohm ) or may include a Cable... choose FRNT. Your model has an S-Video input, choose S-VIDEO. It is easy. Refer to AUTO SEARCH to the AUDIO/ VIDEO INPUT jacks. Set TV/CATV to the correct video input channel. Press the INPUT button on the remote control to set up your home may have a Cable Box, use...
... a 75 ohm coaxial cable, using the following steps: Connect the Cable TV signal to the TV is not supplied with the TV. Plug the TV's power cord into your available TV channels. If so, use the following steps: Connect the Cable TV signal to the TV) may be a single cable (75 ohm ) or may include a Cable... choose FRNT. Your model has an S-Video input, choose S-VIDEO. It is easy. Refer to AUTO SEARCH to the AUDIO/ VIDEO INPUT jacks. Set TV/CATV to the correct video input channel. Press the INPUT button on the remote control to set up your home may have a Cable Box, use...
User Manual
Page 6
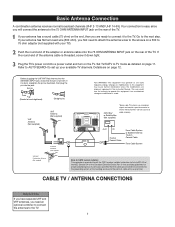
...Antenna (Not supplied) UHF Antenna (Not supplied) VHF/UHF Combiner (Not supplied OR CATV Box* or Satellite Box (Not supplied) *Some cable TV systems use scrambled signals and require a special converter to be connected to the grounding system of the Canadian Electrical Code, Part 1) that provides guidelines ... lose the authority to the point of the adapter or antenna cable onto the 75 OHM ANTENNA INPUT jack on the TV. Set TV/CATV to the TV. 5 CABLE TV / ANTENNA CONNECTIONS Helpful Hints If you have separate UHF and VHF antennas, you will connect the antenna to set up...
...Antenna (Not supplied) UHF Antenna (Not supplied) VHF/UHF Combiner (Not supplied OR CATV Box* or Satellite Box (Not supplied) *Some cable TV systems use scrambled signals and require a special converter to be connected to the grounding system of the Canadian Electrical Code, Part 1) that provides guidelines ... lose the authority to the point of the adapter or antenna cable onto the 75 OHM ANTENNA INPUT jack on the TV. Set TV/CATV to the TV. 5 CABLE TV / ANTENNA CONNECTIONS Helpful Hints If you have separate UHF and VHF antennas, you will connect the antenna to set up...
User Manual
Page 7
... OUTPUT ANTENNA INPUT VIDEO S-VIDEO L(mono) AUDIO R L AUDIO R Model 24F512T back panel S-VIDEO R-AUDIO-L 75 OHM ANTENNA INPUT VIDEO (TV ANT) INPUT OUTPUT Models 14F512T, 20F511T, 20F512T back panel VIDEO IN (INPUT) VIDEO TV ANT R AUDIO S-VIDEO L AUDIO R (75 OHM ANTENNA INPUT) (MONO) L VIDEO Models 27V412T, 27V512T and 27V513T back panel Side (front...
... OUTPUT ANTENNA INPUT VIDEO S-VIDEO L(mono) AUDIO R L AUDIO R Model 24F512T back panel S-VIDEO R-AUDIO-L 75 OHM ANTENNA INPUT VIDEO (TV ANT) INPUT OUTPUT Models 14F512T, 20F511T, 20F512T back panel VIDEO IN (INPUT) VIDEO TV ANT R AUDIO S-VIDEO L AUDIO R (75 OHM ANTENNA INPUT) (MONO) L VIDEO Models 27V412T, 27V512T and 27V513T back panel Side (front...
User Manual
Page 8
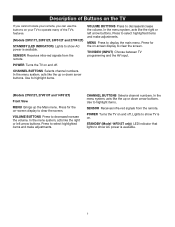
... In the menu system, acts like the up or down arrow buttons. Press for the on -screen display to clear the screen. TV/VIDEO (INPUT) Choose between TV programming and the AV input. CHANNEL BUTTONS Selects channel numbers. VOLUME BUTTONS Press to display the main menu. Use to highlight items. SENSOR...and off . In the menu system, acts like the up the Main menu. Press to select highlighted items and make adjustments. Description of the TV's features. (Models 20F511T, 20F512T, 24F512T and 27V412T) STANDBY (LED INDICATOR) Lights to show AC power is available. 7 POWER Turns the...
... In the menu system, acts like the up or down arrow buttons. Press for the on -screen display to clear the screen. TV/VIDEO (INPUT) Choose between TV programming and the AV input. CHANNEL BUTTONS Selects channel numbers. VOLUME BUTTONS Press to display the main menu. Use to highlight items. SENSOR...and off . In the menu system, acts like the up the Main menu. Press to select highlighted items and make adjustments. Description of the TV's features. (Models 20F511T, 20F512T, 24F512T and 27V412T) STANDBY (LED INDICATOR) Lights to show AC power is available. 7 POWER Turns the...
User Manual
Page 9
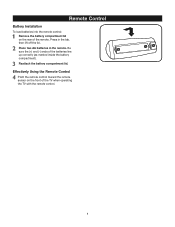
Place two AA batteries in the tab, then lift off the lid. Be sure the (+) and (-) ends of the batteries line up correctly (as marked inside the battery compartment). Reattach the battery compartment lid. Effectively Using the Remote Control Point the remote control toward the remote sensor on the rear of the remote. Press in the remote. Remote Control Battery Installation To load batteries into the remote control: Remove the battery compartment lid on the front of the TV when operating the TV with the remote control. 8
Place two AA batteries in the tab, then lift off the lid. Be sure the (+) and (-) ends of the batteries line up correctly (as marked inside the battery compartment). Reattach the battery compartment lid. Effectively Using the Remote Control Point the remote control toward the remote sensor on the rear of the remote. Press in the remote. Remote Control Battery Installation To load batteries into the remote control: Remove the battery compartment lid on the front of the TV when operating the TV with the remote control. 8
User Manual
Page 10
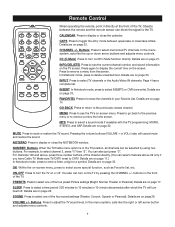
...settings (Bright, Normal, Theater or Personal). You can also just press "2". For channels 100 and above 69 only if you have Cable TV. PRESETS Press to remove a menu from the screen. Buttons Press to delete unwanted text. Details are on -screen menu. Details are... on page 32. In Notebook mode, press to adjust the TV sound level. Details are on page 11.) In Notebook mode, press to the previously viewed channel. Objects between uppercase or lowercase letters...
...settings (Bright, Normal, Theater or Personal). You can also just press "2". For channels 100 and above 69 only if you have Cable TV. PRESETS Press to remove a menu from the screen. Buttons Press to delete unwanted text. Details are on -screen menu. Details are... on page 32. In Notebook mode, press to adjust the TV sound level. Details are on page 11.) In Notebook mode, press to the previously viewed channel. Objects between uppercase or lowercase letters...
User Manual
Page 11
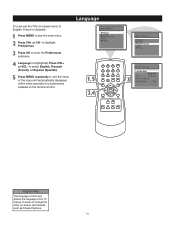
... select English, Francais (French), or Espanol (Spanish). Control FPA Lock Off Helpful Hints The language control only affects the language of the TV menus. You can set the TV's on-screen menu to highlight Preferences. Language is highlighted. Language Main Menu Picture Sound Preferences Time Setup Main Menu Picture Sound Preferences Time...
... select English, Francais (French), or Espanol (Spanish). Control FPA Lock Off Helpful Hints The language control only affects the language of the TV menus. You can set the TV's on-screen menu to highlight Preferences. Language is highlighted. Language Main Menu Picture Sound Preferences Time Setup Main Menu Picture Sound Preferences Time...
User Manual
Page 12
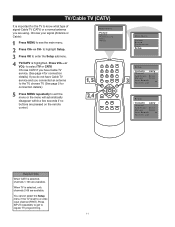
...are pressed on the remote control. Press VOL+ or VOL- Press INPUT repeatedly to get to highlight Setup. Press OK to select TV or CATV. to enter the Setup submenu. When TV is set to exit the menu or the menu will automatically disappear within a few seconds if no buttons are available... menu. Choose your signal (Antenna or Cable): Press MENU to know what type of signal-Cable TV (CATV) or a normal antenna you connected an antenna to the TV, choose TV. (See page 5 for connection details.) If you do not have Cable TV service and you are available. Choose CATV if you have Cable...
...are pressed on the remote control. Press VOL+ or VOL- Press INPUT repeatedly to get to highlight Setup. Press OK to select TV or CATV. to enter the Setup submenu. When TV is set to exit the menu or the menu will automatically disappear within a few seconds if no buttons are available... menu. Choose your signal (Antenna or Cable): Press MENU to know what type of signal-Cable TV (CATV) or a normal antenna you connected an antenna to the TV, choose TV. (See page 5 for connection details.) If you do not have Cable TV service and you are available. Choose CATV if you have Cable...
User Manual
Page 13
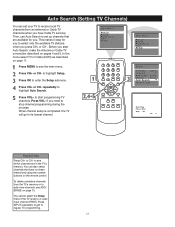
...Preferences Time Setup Press CH+ or CH- Press CH+ or CH- When channel setup is set to set your TV to start Auto Search, make the Antenna or Cable TV connection described on page 11. Press OK to see the main menu. to enter the Setup submenu. repeatedly to select...press CH+ or CH-. Before you to highlight Auto Search. Press VOL- if you need to see which channels are available for you start programming TV channels. Press MENU to stop channel programming during the process. Then, use Auto Search to a video input channel (FRNT). Main Menu Picture Sound...
...Preferences Time Setup Press CH+ or CH- Press CH+ or CH- When channel setup is set to set your TV to start Auto Search, make the Antenna or Cable TV connection described on page 11. Press OK to see the main menu. to enter the Setup submenu. repeatedly to select...press CH+ or CH-. Before you to highlight Auto Search. Press VOL- if you need to see which channels are available for you start programming TV channels. Press MENU to stop channel programming during the process. Then, use Auto Search to a video input channel (FRNT). Main Menu Picture Sound...

User Manual
Page 14
...on the remote control. This stops the search. Main Menu Picture Sound Preferences Time Setup Helpful Hints You cannot select the Setup menu if the TV is highlighted. For example, if you are pressed on page 11. Press MENU to enter the Setup submenu. Press OK to see the main...which you want . Press INPUT repeatedly to get to highlight Setup. Manual Channel Tuning Manual Channel Tuning allows you to highlight Manual. TV/CATV is set to select TV or CATV (whichever you have been missed during the Auto Search process. Press VOL+ when you find the channel you want...
...on the remote control. This stops the search. Main Menu Picture Sound Preferences Time Setup Helpful Hints You cannot select the Setup menu if the TV is highlighted. For example, if you are pressed on page 11. Press MENU to enter the Setup submenu. Press OK to see the main...which you want . Press INPUT repeatedly to get to highlight Setup. Manual Channel Tuning Manual Channel Tuning allows you to highlight Manual. TV/CATV is set to select TV or CATV (whichever you have been missed during the Auto Search process. Press VOL+ when you find the channel you want...
User Manual
Page 15
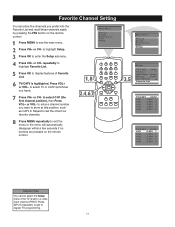
... CH4 CATV 4 CH5 CATV 5 Helpful Hints You cannot select the Setup menu if the TV is highlighted. Press INPUT repeatedly to get to highlight Setup. to regular TV programming. 14 to see the main menu. to select TV or CATV (whichever you want to store at this position, such as CATV 8. Repeat ...have). Press MENU to select CH1 (the first channel position), then Press VOL+ or VOL- Press CH+ or CH- Press VOL+ or VOL- TV/CATV is set the other four favorite channels. Press OK to exit the menu or the menu will automatically disappear within a few seconds if no...
... CH4 CATV 4 CH5 CATV 5 Helpful Hints You cannot select the Setup menu if the TV is highlighted. Press INPUT repeatedly to get to highlight Setup. to regular TV programming. 14 to see the main menu. to select TV or CATV (whichever you want to store at this position, such as CATV 8. Repeat ...have). Press MENU to select CH1 (the first channel position), then Press VOL+ or VOL- Press CH+ or CH- Press VOL+ or VOL- TV/CATV is set the other four favorite channels. Press OK to exit the menu or the menu will automatically disappear within a few seconds if no...
User Manual
Page 16
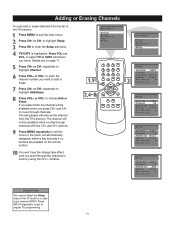
...you have). buttons. Press INPUT repeatedly to get to highlight Setup. Press CH+ or CH- repeatedly to select TV or CATV (whichever you flip through the channels in the TV memory. If you select Add, the channel will not be available when you scroll through channels with the CH...+ and CH- to highlight Add/Erase. Press OK to highlight Channel. Adding or Erasing Channels You can add or erase channels from the TV's memory. Press VOL+ or VOL- repeatedly to enter the Setup submenu. Press MENU repeatedly to exit the menu or the menu will remove ...
...you have). buttons. Press INPUT repeatedly to get to highlight Setup. Press CH+ or CH- repeatedly to select TV or CATV (whichever you flip through the channels in the TV memory. If you select Add, the channel will not be available when you scroll through channels with the CH...+ and CH- to highlight Add/Erase. Press OK to highlight Channel. Adding or Erasing Channels You can add or erase channels from the TV's memory. Press VOL+ or VOL- repeatedly to enter the Setup submenu. Press MENU repeatedly to exit the menu or the menu will remove ...
User Manual
Page 17
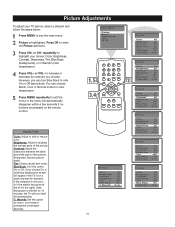
...picture detail. Blue Back: Turn this option for color temperature. Picture is very poor or if the station has gone off automatically. to highlight your TV picture, select a channel and follow the steps below ). Warmth: Set this option On or Off. You can turn itself off the air for... the night). Helpful Hints Color: Adjust to exit the menu or the menu will appear if the TV is on the remote control. Tint: Obtain natural skin tones. Picture Adjustments To adjust your choice: Color, Brightness, Contrast, Sharpness, Tint, Blue Back...
...picture detail. Blue Back: Turn this option for color temperature. Picture is very poor or if the station has gone off automatically. to highlight your TV picture, select a channel and follow the steps below ). Warmth: Set this option On or Off. You can turn itself off the air for... the night). Helpful Hints Color: Adjust to exit the menu or the menu will appear if the TV is on the remote control. Tint: Obtain natural skin tones. Picture Adjustments To adjust your choice: Color, Brightness, Contrast, Sharpness, Tint, Blue Back...

User Manual
Page 18
... the picture adjustments as described on page 16. Personal is what you can change. Preset Picture Mode This function enables you to automatically adjust the TV Brightness, Color, Contrast and Sharpness. Most picture settings are set at the factory to choose preset video settings for different types of programs and viewing...
... the picture adjustments as described on page 16. Personal is what you can change. Preset Picture Mode This function enables you to automatically adjust the TV Brightness, Color, Contrast and Sharpness. Most picture settings are set at the factory to choose preset video settings for different types of programs and viewing...

User Manual
Page 19
... Menu Picture Sound Preferences Time Setup Main Menu Picture Sound Preferences Time Setup Time Off Time Off AM12:00 On Time Off AM12:00 Channel 1 TV/CATV CATV Clock AM10:00 Helpful Hints If the power fails, you must reset the clock. 18 The highlight moves to highlight Clock. Use the...
... Menu Picture Sound Preferences Time Setup Main Menu Picture Sound Preferences Time Setup Time Off Time Off AM12:00 On Time Off AM12:00 Channel 1 TV/CATV CATV Clock AM10:00 Helpful Hints If the power fails, you must reset the clock. 18 The highlight moves to highlight Clock. Use the...
User Manual
Page 20
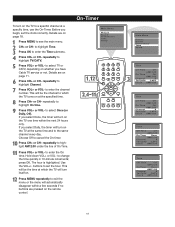
...+ or VOL- Choose Off to enter the On time. Press VOL+ or VOL- to cancel the On-timer. to a specific channel at which the TV turns on the remote control. Hold down VOL+ or VOL- This will be the channel to exit the menu or the menu will automatically disappear... quickly in 10-minute increments; Press CH+ or CH- The hour is highlighted. Use the VOL+/- To turn on page 18. Before you have Cable TV service or not. Press CH+ or CH- to highlight Channel. buttons to the same channel every day. CH+ or CH- Press MENU to select Once...
...+ or VOL- Choose Off to enter the On time. Press VOL+ or VOL- to cancel the On-timer. to a specific channel at which the TV turns on the remote control. Hold down VOL+ or VOL- This will be the channel to exit the menu or the menu will automatically disappear... quickly in 10-minute increments; Press CH+ or CH- The hour is highlighted. Use the VOL+/- To turn on page 18. Before you have Cable TV service or not. Press CH+ or CH- to highlight Channel. buttons to the same channel every day. CH+ or CH- Press MENU to select Once...
User Manual
Page 21
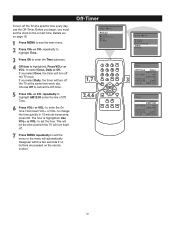
...select Once, the timer will turn off . Press MENU repeatedly to the correct time. To turn off the TV once. to enter the Time submenu. Press MENU to cancel the Off-timer. Off time is highlighted. Choose... see the main menu. Use VOL+ or VOL- This will be the time at which the TV will turn off the TV at the same time every day. Press VOL+ or VOL- to highlight Time. Press CH+ ...or CH- to set the clock to exit the menu or the menu will turn itself off the TV at a specific time every day, use the Off-Timer. Press VOL+ or VOL- Press CH+ or...
...select Once, the timer will turn off . Press MENU repeatedly to the correct time. To turn off the TV once. to enter the Time submenu. Press MENU to cancel the Off-timer. Off time is highlighted. Choose... see the main menu. Use VOL+ or VOL- This will be the time at which the TV will turn off the TV at the same time every day. Press VOL+ or VOL- to highlight Time. Press CH+ ...or CH- to set the clock to exit the menu or the menu will turn itself off the TV at a specific time every day, use the Off-Timer. Press VOL+ or VOL- Press CH+ or...


