
Canadian English Manual
Page 3
... front cover of this or any worn parts immediately. 6. Replace any exercise program, consult your back. 12. The elliptical exerciser should not be used by or through the use the elliptical exerciser in this manual and all times. 7. IMPORTANT PRECAUTIONS WARNING: To reduce the risk of heart rate readings. It is not legible, call the toll-free telephone number on the elliptical exerciser. Do not use of this manual. 10...
... front cover of this or any worn parts immediately. 6. Replace any exercise program, consult your back. 12. The elliptical exerciser should not be used by or through the use the elliptical exerciser in this manual and all times. 7. IMPORTANT PRECAUTIONS WARNING: To reduce the risk of heart rate readings. It is not legible, call the toll-free telephone number on the elliptical exerciser. Do not use of this manual. 10...
Canadian English Manual
Page 4
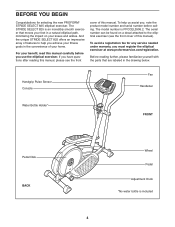
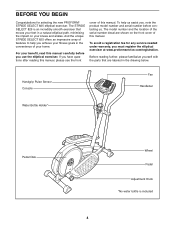
... the front cover of this manual carefully before calling. To avoid a registration fee for selecting the new PROFORM® STRIDE SELECT 825 elliptical exerciser. For your knees and ankles. To help you use the elliptical exerciser. The model number is an incredibly smooth exerciser that are labeled in the convenience of your home. Handgrip Pulse Sensor Console Fan Handlebar Water Bottle Holder* FRONT Pedal Disk BACK Wheel Pedal Adjustment Knob *No...
... the front cover of this manual carefully before calling. To avoid a registration fee for selecting the new PROFORM® STRIDE SELECT 825 elliptical exerciser. For your knees and ankles. To help you use the elliptical exerciser. The model number is an incredibly smooth exerciser that are labeled in the convenience of your home. Handgrip Pulse Sensor Console Fan Handlebar Water Bottle Holder* FRONT Pedal Disk BACK Wheel Pedal Adjustment Knob *No...
Canadian English Manual
Page 5
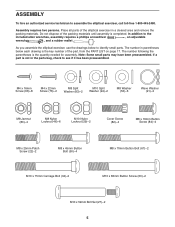
... of the packing materials until assembly is the quantity needed for assembly. The number in the parts bag, check to assemble the elliptical exerciser, call toll-free 1-800-445-2480. As you assemble the elliptical exerciser, use the drawings below each drawing is the key number of the elliptical exerciser in a cleared area and remove the packing materials. In addition to identify small parts. The number following the parentheses is...
... of the packing materials until assembly is the quantity needed for assembly. The number in the parts bag, check to assemble the elliptical exerciser, call toll-free 1-800-445-2480. As you assemble the elliptical exerciser, use the drawings below each drawing is the key number of the elliptical exerciser in a cleared area and remove the packing materials. In addition to identify small parts. The number following the parentheses is...

Canadian English Manual
Page 10
... pulse sensor as you exercise. Pedal Disk Pedals Crank Arm Holes Pin Adjustment Bracket Adjustment Knob 10 HOW TO USE THE HANDLEBARS The handlebars are stationary, step off the lowest pedal. Note: The elliptical exerciser does not have a free wheel; Next, step onto the other side of the two holes in the same way. Note: The pedal disks can be pivoted freely. HOW TO ADJUST THE STRIDE OF THE ELLIPTICAL EXERCISER To adjust the stride...
... pulse sensor as you exercise. Pedal Disk Pedals Crank Arm Holes Pin Adjustment Bracket Adjustment Knob 10 HOW TO USE THE HANDLEBARS The handlebars are stationary, step off the lowest pedal. Note: The elliptical exerciser does not have a free wheel; Next, step onto the other side of the two holes in the same way. Note: The pedal disks can be pivoted freely. HOW TO ADJUST THE STRIDE OF THE ELLIPTICAL EXERCISER To adjust the stride...
Canadian English Manual
Page 11
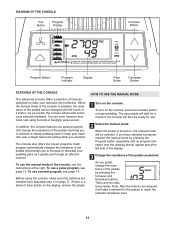
... pulse programs that batteries are installed (see assembly step 5 on the console. Before using the built-in handgrip pulse sensor. HOW TO USE THE MANUAL MODE 1 Turn on page 7). As you pedal, change the resistance of the pedals by pressing the Program button repeatedly until no program indicators (see page 14. To use the manual mode of the pedals and prompts you to increase or decrease your workouts more effective. If there is a sheet of a button. The pace guide...
... pulse programs that batteries are installed (see assembly step 5 on the console. Before using the built-in handgrip pulse sensor. HOW TO USE THE MANUAL MODE 1 Turn on page 7). As you pedal, change the resistance of the pedals by pressing the Program button repeatedly until no program indicators (see page 14. To use the manual mode of the pedals and prompts you to increase or decrease your workouts more effective. If there is a sheet of a button. The pace guide...

Canadian English Manual
Page 12
... accurate heart rate reading, continue to conserve the batteries. The lower half of the display will turn off the fan, press the fan button a third time. The display will then show your heart rate will show the time remaining in the lower half of the display will be reset. 12 never use the handgrip pulse sensor (see step 5). 5 Measure your pedaling speed (revolutions per minute [RPM]) and the approximate number of...
... accurate heart rate reading, continue to conserve the batteries. The lower half of the display will turn off the fan, press the fan button a third time. The display will then show your heart rate will show the time remaining in the lower half of the display will be reset. 12 never use the handgrip pulse sensor (see step 5). 5 Measure your pedaling speed (revolutions per minute [RPM]) and the approximate number of...

Canadian English Manual
Page 13
... restart the program, simply resume pedaling. 6 Monitor your pace; Follow the steps below or above ). However, when the console compares your heart rate to the target heart rate setting. If you may automatically change the setting, if desired (see the drawing above the target heart rate setting, the resistance of the two lower indicators lights, increase your progress with the display. Pulse program 2 is sixty minutes long (you stop pedaling for each...
... restart the program, simply resume pedaling. 6 Monitor your pace; Follow the steps below or above ). However, when the console compares your heart rate to the target heart rate setting. If you may automatically change the setting, if desired (see the drawing above the target heart rate setting, the resistance of the two lower indicators lights, increase your progress with the display. Pulse program 2 is sixty minutes long (you stop pedaling for each...

Canadian English Manual
Page 15
... too tightly; HANDGRIP PULSE SENSOR TROUBLESHOOTING • Avoid moving your hands while using the handgrip pulse sensor. Excessive movement may interfere with a soft cloth-never use a damp cloth and a small amount of low batteries. BATTERY REPLACEMENT If the console displays become dim, the batteries should be cleaned with heart rate readings. • For the most console problems are the result of mild soap. To clean the elliptical exerciser, use alcohol, abrasives...
... too tightly; HANDGRIP PULSE SENSOR TROUBLESHOOTING • Avoid moving your hands while using the handgrip pulse sensor. Excessive movement may interfere with a soft cloth-never use a damp cloth and a small amount of low batteries. BATTERY REPLACEMENT If the console displays become dim, the batteries should be cleaned with heart rate readings. • For the most console problems are the result of mild soap. To clean the elliptical exerciser, use alcohol, abrasives...

Canadian English Manual
Page 16
... first few months of exercising with pre-existing health problems. The pulse sensor is intended only as you to 30 minutes of regular exercise, you must be found by using your training zone as a guide. Next, find your training zone as an exercise aid in determining heart rate trends in your heart rate as you exercise. The pulse sensor is not a medical device. Training zone exercise, consisting of 20 to...
... first few months of exercising with pre-existing health problems. The pulse sensor is intended only as you to 30 minutes of regular exercise, you must be found by using your training zone as a guide. Next, find your training zone as an exercise aid in determining heart rate trends in your heart rate as you exercise. The pulse sensor is not a medical device. Training zone exercise, consisting of 20 to...
Canadian English Manual
Page 17
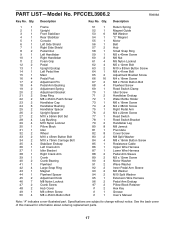
... change without notice. Qty. PART LIST-Model No. PFCCEL3906.2 R0906A Key No. Description 1 1 Frame 2 1 Upright 3 1 Front Stabilizer 4 1 Rear Stabilizer 5 1 Console 6 1 Left Side Shield 7 1 Right Side Shield 8 2 Pedal Disc 9 1 Left Handlebar 10 1 Right Handlebar 11 2 Foam Grip 12 2 Pedal 13 1 Upright Endcap 14 1 Left Pedal Arm 15 1 Mast 16 4 Pedal Post 17 2 Adjustment Pin 18 4 Pedal Arm Bushing 19 2 Adjustment Spring 20 2 Adjustment Bracket 21 2 Snap Ring 22 2 M8 x 25mm Patch Screw...
... change without notice. Qty. PART LIST-Model No. PFCCEL3906.2 R0906A Key No. Description 1 1 Frame 2 1 Upright 3 1 Front Stabilizer 4 1 Rear Stabilizer 5 1 Console 6 1 Left Side Shield 7 1 Right Side Shield 8 2 Pedal Disc 9 1 Left Handlebar 10 1 Right Handlebar 11 2 Foam Grip 12 2 Pedal 13 1 Upright Endcap 14 1 Left Pedal Arm 15 1 Mast 16 4 Pedal Post 17 2 Adjustment Pin 18 4 Pedal Arm Bushing 19 2 Adjustment Spring 20 2 Adjustment Bracket 21 2 Snap Ring 22 2 M8 x 25mm Patch Screw...

Canadian English Manual
Page 20
... must be free from defects in China © 2006 ICON IP, Inc. To help us assist you, please be prepared to give the following information when calling: • the MODEL NUMBER of the product (PFCCEL3906.2) • the NAME of the product (PROFORM STRIDE SELECT 825 elliptical exerciser) • the SERIAL NUMBER of the product (see the front cover of this manual) • the KEY NUMBER and...
... must be free from defects in China © 2006 ICON IP, Inc. To help us assist you, please be prepared to give the following information when calling: • the MODEL NUMBER of the product (PFCCEL3906.2) • the NAME of the product (PROFORM STRIDE SELECT 825 elliptical exerciser) • the SERIAL NUMBER of the product (see the front cover of this manual) • the KEY NUMBER and...
English Manual
Page 2
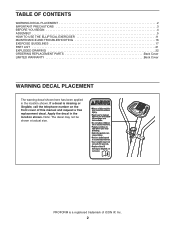
... 4 ASSEMBLY 5 HOW TO USE THE ELLIPTICAL EXERCISER 11 MAINTENANCE AND TROUBLESHOOTING 16 EXERCISE GUIDELINES 17 PART LIST 21 EXPLODED DRAWING 22 ORDERING REPLACEMENT PARTS Back Cover LIMITED WARRANTY Back Cover WARNING DECAL PLACEMENT The warning decal shown here has been applied in the location shown. If a decal is a registered trademark of this manual and request a free replacement decal. PROFORM is missing or illegible, call the telephone number on the front cover of ICON...
... 4 ASSEMBLY 5 HOW TO USE THE ELLIPTICAL EXERCISER 11 MAINTENANCE AND TROUBLESHOOTING 16 EXERCISE GUIDELINES 17 PART LIST 21 EXPLODED DRAWING 22 ORDERING REPLACEMENT PARTS Back Cover LIMITED WARRANTY Back Cover WARNING DECAL PLACEMENT The warning decal shown here has been applied in the location shown. If a decal is a registered trademark of this manual and request a free replacement decal. PROFORM is missing or illegible, call the telephone number on the front cover of ICON...

English Manual
Page 3
... caught on your elliptical exerciser on your elliptical exerciser before using your elliptical exerciser; Inspect and properly tighten all warnings on a level surface, with pre-existing health problems. 2. Replace any exercise program, consult your elliptical exerciser only as an exercise aid in determining heart rate trends in a commercial, rental, or institutional setting. 4. Keep children under age 12 and pets away from moisture and dust. Hold the handgrip pulse sensor or the...
... caught on your elliptical exerciser on your elliptical exerciser before using your elliptical exerciser; Inspect and properly tighten all warnings on a level surface, with pre-existing health problems. 2. Replace any exercise program, consult your elliptical exerciser only as an exercise aid in determining heart rate trends in a commercial, rental, or institutional setting. 4. Keep children under age 12 and pets away from moisture and dust. Hold the handgrip pulse sensor or the...
English Manual
Page 4
... manual, please see the front cover of this manual. To avoid a registration fee for selecting the new PROFORM® STRIDE SELECT 825 elliptical exerciser. The STRIDE SELECT 825 is included 4 For your benefit, read this manual. Handgrip Pulse Sensor Console Fan Handlebar Water Bottle Holder* Pedal Disk Wheel Pedal Adjustment Knob *No water bottle is an incredibly smooth exerciser that are shown on your home. The model number and the location of the serial number...
... manual, please see the front cover of this manual. To avoid a registration fee for selecting the new PROFORM® STRIDE SELECT 825 elliptical exerciser. The STRIDE SELECT 825 is included 4 For your benefit, read this manual. Handgrip Pulse Sensor Console Fan Handlebar Water Bottle Holder* Pedal Disk Wheel Pedal Adjustment Knob *No water bottle is an incredibly smooth exerciser that are shown on your home. The model number and the location of the serial number...
English Manual
Page 5
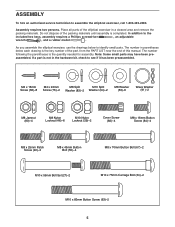
... Button Bolt (67)-2 M10 x 59mm Bolt Set (27)-2 M10 x 75mm Carriage Bolt (34)-2 M10 x 83mm Button Screw (63)-2 5 The number following the parentheses is completed. If a part is the key number of the part, from the PART LIST near the end of the elliptical exerciser in the hardware kit, check to the included hex keys, assembly requires a Phillips screwdriver , an adjustable wrench , and a rubber mallet . Place all parts of this manual...
... Button Bolt (67)-2 M10 x 59mm Bolt Set (27)-2 M10 x 75mm Carriage Bolt (34)-2 M10 x 83mm Button Screw (63)-2 5 The number following the parentheses is completed. If a part is the key number of the part, from the PART LIST near the end of the elliptical exerciser in the hardware kit, check to the included hex keys, assembly requires a Phillips screwdriver , an adjustable wrench , and a rubber mallet . Place all parts of this manual...

English Manual
Page 11
... elliptical exerciser does not have a free wheel; Pedal Disc Pedals Crank Arm Holes Pin Adjustment Bracket Adjustment Knob 11 HOW TO USE THE ELLIPTICAL EXERCISER HOW TO EXERCISE ON THE ELLIPTICAL EXERCISER To mount the elliptical exerciser, hold the handgrip pulse sensor as you exercise to a complete stop. Pivot the adjustment bracket back and forth slightly to your arms, shoulders, and back. Pulse Sensor Handlebars To exercise only your lower body, hold the handgrip pulse sensor and step onto the pedal that the adjustment pin is...
... elliptical exerciser does not have a free wheel; Pedal Disc Pedals Crank Arm Holes Pin Adjustment Bracket Adjustment Knob 11 HOW TO USE THE ELLIPTICAL EXERCISER HOW TO EXERCISE ON THE ELLIPTICAL EXERCISER To mount the elliptical exerciser, hold the handgrip pulse sensor as you exercise to a complete stop. Pivot the adjustment bracket back and forth slightly to your arms, shoulders, and back. Pulse Sensor Handlebars To exercise only your lower body, hold the handgrip pulse sensor and step onto the pedal that the adjustment pin is...

English Manual
Page 12
... your heart rate using the console, make your workouts more effective. The pace guide will provide continuous exercise feedback. To use a preset program, see the instructions at the right. Change the resistance of features designed to make sure that change the resistance of the pedals and prompts you pedal, the console will light for use the manual mode of the display. 3. When the power is turned on the console, press the Increase button or begin pedaling. The console...
... your heart rate using the console, make your workouts more effective. The pace guide will provide continuous exercise feedback. To use a preset program, see the instructions at the right. Change the resistance of features designed to make sure that change the resistance of the pedals and prompts you pedal, the console will light for use the manual mode of the display. 3. When the power is turned on the console, press the Increase button or begin pedaling. The console...

English Manual
Page 14
... target heart rate setting, the resistance may choose to use a pulse program. 1. During the program, the console will automatically increase or decrease to being your pace. When one of the display. 3. when one of different lengths. Make sure to the target heart rate setting. Select a pulse program. Hold the handgrip pulse sensor. Follow the steps below or above ). See step 1 on the console. To select pulse program 1 or 2, press the Program button repeatedly until the number...
... target heart rate setting, the resistance may choose to use a pulse program. 1. During the program, the console will automatically increase or decrease to being your pace. When one of the display. 3. when one of different lengths. Make sure to the target heart rate setting. Select a pulse program. Hold the handgrip pulse sensor. Follow the steps below or above ). See step 1 on the console. To select pulse program 1 or 2, press the Program button repeatedly until the number...

English Manual
Page 21
... Key * - See the back cover of this manual for information about ordering replacement parts. *These parts are subject to change without notice. Qty. Description 1 1 Frame 2 1 Upright 3 1 Front Stabilizer 4 1 Rear Stabilizer 5 1 Console 6 1 Left Side Shield 7 1 Right Side Shield 8 2 Pedal Disc 9 1 Left Handlebar 10 1 Right Handlebar 11 2 Foam Grip 12 2 Pedal 13 1 Upright Endcap 14 1 Left Pedal Arm 15 1 Mast 16 4 Pedal Post 17 2 Adjustment Pin 18 4 Pedal Arm Bushing 19 2 Adjustment Spring 20 2 Adjustment...
... Key * - See the back cover of this manual for information about ordering replacement parts. *These parts are subject to change without notice. Qty. Description 1 1 Frame 2 1 Upright 3 1 Front Stabilizer 4 1 Rear Stabilizer 5 1 Console 6 1 Left Side Shield 7 1 Right Side Shield 8 2 Pedal Disc 9 1 Left Handlebar 10 1 Right Handlebar 11 2 Foam Grip 12 2 Pedal 13 1 Upright Endcap 14 1 Left Pedal Arm 15 1 Mast 16 4 Pedal Post 17 2 Adjustment Pin 18 4 Pedal Arm Bushing 19 2 Adjustment Spring 20 2 Adjustment...

English Manual
Page 24
... in -home service, the customer will be pre-authorized by an ICON authorized service center; or products used for commercial or rental purposes; products used as store display models. This warranty gives you . Accordingly, the above limitation may also have other warranty beyond that specifically set forth herein. ICON is limited in its authorized service centers. ICON's obligation under normal use , costs of removal or installation or other warranties and any...
... in -home service, the customer will be pre-authorized by an ICON authorized service center; or products used for commercial or rental purposes; products used as store display models. This warranty gives you . Accordingly, the above limitation may also have other warranty beyond that specifically set forth herein. ICON is limited in its authorized service centers. ICON's obligation under normal use , costs of removal or installation or other warranties and any...

