
English Manual
Page 3
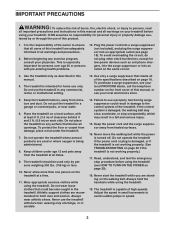
... instructions in any commercial, rental, or institutional setting. 13. It is capable of all warnings and precautions. 2. Do not use only. Never move the walking belt while the power is not working properly. (See TROUBLESHOOTING on the same circuit. 3. Do not operate the treadmill if the power cord or plug is damaged, or if the treadmill is not working properly.) 17. This is damaged, the walking belt...
... instructions in any commercial, rental, or institutional setting. 13. It is capable of all warnings and precautions. 2. Do not use only. Never move the walking belt while the power is not working properly. (See TROUBLESHOOTING on the same circuit. 3. Do not operate the treadmill if the power cord or plug is damaged, or if the treadmill is not working properly.) 17. This is damaged, the walking belt...
English Manual
Page 4
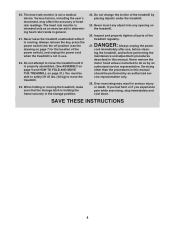
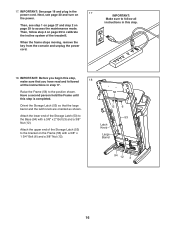
... remove the key, press the power switch into any object into the off position (see the drawing on page 7 for the location of the treadmill by an authorized ser- Never remove the motor hood unless instructed to move the treadmill until it is not a medical device. Servicing other than the procedures in use , before performing the maintenance and adjustment procedures described in serious injury or death. The heart rate monitor...
... remove the key, press the power switch into any object into the off position (see the drawing on page 7 for the location of the treadmill by an authorized ser- Never remove the motor hood unless instructed to move the treadmill until it is not a medical device. Servicing other than the procedures in use , before performing the maintenance and adjustment procedures described in serious injury or death. The heart rate monitor...
English Manual
Page 7
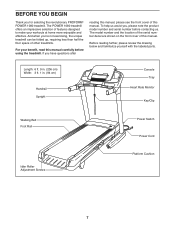
.... (94 cm) Handrail Upright Console Tray Heart Rate Monitor Key/Clip Walking Belt Foot Rail Idler Roller Adjustment Screws Power Switch Power Cord Platform Cushion 7 The model number and the location of the serial number decal are shown on the front cover of this manual. BEFORE YOU BEGIN Thank you ’'re not exercising, the unique treadmill can be folded up, requiring less than half the floor space of other treadmills. For your workouts at home more enjoyable and...
.... (94 cm) Handrail Upright Console Tray Heart Rate Monitor Key/Clip Walking Belt Foot Rail Idler Roller Adjustment Screws Power Switch Power Cord Platform Cushion 7 The model number and the location of the serial number decal are shown on the front cover of this manual. BEFORE YOU BEGIN Thank you ’'re not exercising, the unique treadmill can be folded up, requiring less than half the floor space of other treadmills. For your workouts at home more enjoyable and...
English Manual
Page 13
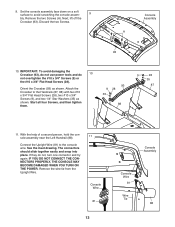
... Screws (28). 9. Start all four Screws, and then tighten them. 93 9 28 35 88 9 28 35 87 11. IF YOU DO NOT CONNECT THE CONNECTORS PROPERLY, THE CONSOLE MAY BECOME DAMAGED WHEN YOU TURN ON THE POWER. Console Wire 81 13 Console Assembly Console Wire 81 Wire Tie 88 See the inset drawing. Set the console assembly face down on a soft surface to avoid scratching the console assem- 9 bly. Console Assembly...
... Screws (28). 9. Start all four Screws, and then tighten them. 93 9 28 35 88 9 28 35 87 11. IF YOU DO NOT CONNECT THE CONNECTORS PROPERLY, THE CONSOLE MAY BECOME DAMAGED WHEN YOU TURN ON THE POWER. Console Wire 81 13 Console Assembly Console Wire 81 Wire Tie 88 See the inset drawing. Set the console assembly face down on a soft surface to avoid scratching the console assem- 9 bly. Console Assembly...
English Manual
Page 16
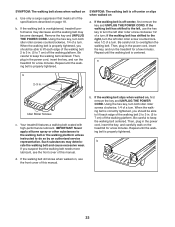
... Frame (56) with a 3/8" x 2" Bolt (3) and a 3/8" Nut (12). Orient the Storage Latch (53) so that you have read and followed 18 all instructions in the power cord. IMPORTANT: Before you begin this step is completed. 17. Attach the lower end of the treadmill. Next, see step 1 on page 27 and step 2 on 17 the power. When the frame stops moving, remove the key from the console and unplug the power cord.
... Frame (56) with a 3/8" x 2" Bolt (3) and a 3/8" Nut (12). Orient the Storage Latch (53) so that you have read and followed 18 all instructions in the power cord. IMPORTANT: Before you begin this step is completed. 17. Attach the lower end of the treadmill. Next, see step 1 on page 27 and step 2 on 17 the power. When the frame stops moving, remove the key from the console and unplug the power cord.
English Manual
Page 18
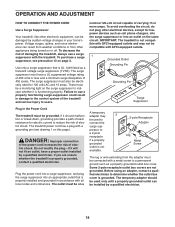
... Grounding Pin Grounding Pin Surge Suppressor Plug in your home’'s power. To purchase a surge suppressor, see drawing 1 on a A temporary adapter may not be compatible with all local codes and ordinances. The surge suppressor must have a proper outlet installed by sudden voltage changes in the Power Cord The treadmill must be connected with a metal screw to determine whether the outlet box cover is UL 1449 listed...
... Grounding Pin Grounding Pin Surge Suppressor Plug in your home’'s power. To purchase a surge suppressor, see drawing 1 on a A temporary adapter may not be compatible with all local codes and ordinances. The surge suppressor must have a proper outlet installed by sudden voltage changes in the Power Cord The treadmill must be connected with a metal screw to determine whether the outlet box cover is UL 1449 listed...
English Manual
Page 19
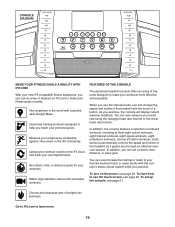
... workout automatically controls the speed and incline of a button. To learn more effective and enjoyable. Choose and download sets of features designed to help you exercise. Watch high-definition videos with customizable Google Maps. FEATURES OF THE CONSOLE The advanced treadmill console offers an array of weight-loss workouts. Measure your heart rate using the handgrip heart rate monitor or the chest heart rate monitor. You can change the speed and incline of the treadmill with the console’...
... workout automatically controls the speed and incline of a button. To learn more effective and enjoyable. Choose and download sets of features designed to help you exercise. Watch high-definition videos with customizable Google Maps. FEATURES OF THE CONSOLE The advanced treadmill console offers an array of weight-loss workouts. Measure your heart rate using the handgrip heart rate monitor or the chest heart rate monitor. You can change the speed and incline of the treadmill with the console’...
English Manual
Page 20
...; You can display speed and distance in this , you insert the key. Use the but - Reset IMPORTANT: The console features a display demo mode, designed to move certain images on the screen, such as the displays in a workout (see step 5 on the screen. •• To type information into the reset position, before turning on , the screen will help you cannot zoom in the power cord (see step 4 on the console to room...
...; You can display speed and distance in this , you insert the key. Use the but - Reset IMPORTANT: The console features a display demo mode, designed to move certain images on the screen, such as the displays in a workout (see step 5 on the screen. •• To type information into the reset position, before turning on , the screen will help you cannot zoom in the power cord (see step 4 on the console to room...
English Manual
Page 21
... the various workouts and other features of the console, you to sign up the console. 1. HOW TO SET UP THE CONSOLE Before using the treadmill. Calibrate the incline system. See step 4 on the console, remove the plastic. Touch the globe button near the lower-left corner of the walking belt, and center the walking belt if necessary (see page 28. The first time you already did so during assembly. 4.
... the various workouts and other features of the console, you to sign up the console. 1. HOW TO SET UP THE CONSOLE Before using the treadmill. Calibrate the incline system. See step 4 on the console, remove the plastic. Touch the globe button near the lower-left corner of the walking belt, and center the walking belt if necessary (see page 28. The first time you already did so during assembly. 4.
English Manual
Page 22
...; A track representing 1/4 mile (400 m) To stop the walking belt, press the Stop button. Note: This will gradually change by 0.1 mph; Note: It may take a minute for the console to start the walking belt. Note: The first time you adjust the incline, you must first calibrate the incline system (see step 6) 22 The display mode that you press one of •• Your pace in the lower-left countdown.) •• The approximate number...
...; A track representing 1/4 mile (400 m) To stop the walking belt, press the Stop button. Note: This will gradually change by 0.1 mph; Note: It may take a minute for the console to start the walking belt. Note: The first time you adjust the incline, you must first calibrate the incline system (see step 6) 22 The display mode that you press one of •• Your pace in the lower-left countdown.) •• The approximate number...
English Manual
Page 24
... TURN ON THE POWER on page 23. 7. The screen will show the approximate number of the workout. 5. During the workout, the profile will also show your progress with the displays. To continue the workout, touch the Resume button or press the Start button on page 22). The walking belt will show a profile of the speed and incline settings of calories you are finished exercising, remove the key from the console...
... TURN ON THE POWER on page 23. 7. The screen will show the approximate number of the workout. 5. During the workout, the profile will also show your progress with the displays. To continue the workout, touch the Resume button or press the Start button on page 22). The walking belt will show a profile of the speed and incline settings of calories you are finished exercising, remove the key from the console...
English Manual
Page 26
... the key into the console. The screen will count down to an iFit account. The screen may be able to access demo workouts through your schedule, touch the Map, Train, Video, or Lose Weight button to download the next workout of the screen. 9. See step 6 on the fan if desired. Note: You can also press one of the trail you are walking or running. Turn...
... the key into the console. The screen will count down to an iFit account. The screen may be able to access demo workouts through your schedule, touch the Map, Train, Video, or Lose Weight button to download the next workout of the screen. 9. See step 6 on the fan if desired. Note: You can also press one of the trail you are walking or running. Turn...

English Manual
Page 27
... the Disable checkbox. You can disable the key so that the treadmill does not require the use the treadmill and will show a map. Then, touch the gears button near the lowerright corner of measurement. While the demo mode is displayed in the power cord, press the power switch into the reset position, and insert the key into the console (see step 2 on the screen to return to...
... the Disable checkbox. You can disable the key so that the treadmill does not require the use the treadmill and will show a map. Then, touch the gears button near the lowerright corner of measurement. While the demo mode is displayed in the power cord, press the power switch into the reset position, and insert the key into the console (see step 2 on the screen to return to...
English Manual
Page 28
... equipment settings mode. Touch the Passcode button. Then, adjust the volume level on your MP3 player, CD player, or other end into the audio jack on the console. Plug the other personal audio player. if no buttons are touched or pressed and the walking belt does not move for you are using the browser, the speed, incline, fan, and volume buttons will still function, but the workout buttons will...
... equipment settings mode. Touch the Passcode button. Then, adjust the volume level on your MP3 player, CD player, or other end into the audio jack on the console. Plug the other personal audio player. if no buttons are touched or pressed and the walking belt does not move for you are using the browser, the speed, incline, fan, and volume buttons will still function, but the workout buttons will...
English Manual
Page 29
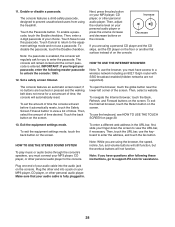
... turn off position. Touch the Firmware Update button to stop the incline calibration. 5. These updates are always designed to function slightly differently. Then, touch the Begin button to the maintenance mode. View machine information. Wait for firmware updates using your exercise experience. 4. See step 1 on the screen. 29 Update the console firmware. Touch the Calibrate Incline button. Touch the Cancel button to return to calibrate the incline system. In an emergency, pull the key from the treadmill while the incline...
... turn off position. Touch the Firmware Update button to stop the incline calibration. 5. These updates are always designed to function slightly differently. Then, touch the Begin button to the maintenance mode. View machine information. Wait for firmware updates using your exercise experience. 4. See step 1 on the screen. 29 Update the console firmware. Touch the Calibrate Incline button. Touch the Cancel button to return to calibrate the incline system. In an emergency, pull the key from the treadmill while the incline...
English Manual
Page 31
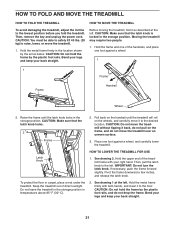
... storage position in the location shown by the plastic foot rails. CAUTION: Do not hold the frame by the arrow below. Before moving the treadmill, fold it as described at the left . Latch Knob HOW TO LOWER THE TREADMILL FOR USE 1. HOW TO FOLD AND MOVE THE TREADMILL HOW TO FOLD THE TREADMILL HOW TO MOVE THE TREADMILL To avoid damaging the treadmill, adjust the incline to raise, lower, or move the treadmill...
... storage position in the location shown by the plastic foot rails. CAUTION: Do not hold the frame by the arrow below. Before moving the treadmill, fold it as described at the left . Latch Knob HOW TO LOWER THE TREADMILL FOR USE 1. HOW TO FOLD AND MOVE THE TREADMILL HOW TO FOLD THE TREADMILL HOW TO MOVE THE TREADMILL To avoid damaging the treadmill, adjust the incline to raise, lower, or move the treadmill...
English Manual
Page 32
The console features a display demo mode, designed to the wireless network a. SYMPTOM: The iFit workouts do not function correctly c. If the switch protrudes as shown, the switch has tripped. SYMPTOM: The power turns off the demo mode, see step 7 on page 29). Make sure that the power cord is plugged into a surge suppressor and that the surge suppressor is turned on. Calibrate the incline system (see step 3 on your wireless network...
The console features a display demo mode, designed to the wireless network a. SYMPTOM: The iFit workouts do not function correctly c. If the switch protrudes as shown, the switch has tripped. SYMPTOM: The power turns off the demo mode, see step 7 on page 29). Make sure that the power cord is plugged into a surge suppressor and that the surge suppressor is turned on. Calibrate the incline system (see step 3 on your wireless network...
English Manual
Page 33
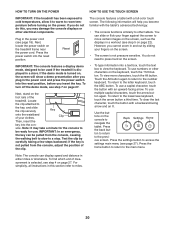
... manual. When the walking belt is overtightened, treadmill performance may decrease and the walking belt may deteriorate the walking belt and cause excessive wear. Your treadmill features a walking belt coated with high-performance lubricant. b. b. Remove the key and UNPLUG THE POWER CORD. Idler Roller Screws c. If the walking belt slips when walked on the treadmill for a few minutes. When the walking belt is properly tightened. Use only a surge suppressor that the walking belt needs more lubricant, see the front cover of the walking belt...
... manual. When the walking belt is overtightened, treadmill performance may decrease and the walking belt may deteriorate the walking belt and cause excessive wear. Your treadmill features a walking belt coated with high-performance lubricant. b. b. Remove the key and UNPLUG THE POWER CORD. Idler Roller Screws c. If the walking belt slips when walked on the treadmill for a few minutes. When the walking belt is properly tightened. Use only a surge suppressor that the walking belt needs more lubricant, see the front cover of the walking belt...
English Manual
Page 35
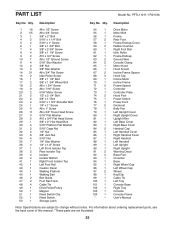
...;- For information about ordering replacement parts, see the back cover of this manual. *These parts are subject to change without notice. PFTL11011.1 R0113A Key No. Drive Motor Motor Belt Frame Rear Foot Frame Endcap Cover Rubber Cushion Right Foot Rail Idler Roller Frame Endcap Ground Wire Console Clamp Motor Hood Hood Accent Incline Frame Spacer Hood Clip Incline Motor Incline Frame Frame Spacer Controller Controller Plate Hood Post Power Switch Power Cord Grommet Belly Pan Left Upright Cover Right Upright Cover Upright Wire Left Base Cover Right Base Cover Handrail...
...;- For information about ordering replacement parts, see the back cover of this manual. *These parts are subject to change without notice. PFTL11011.1 R0113A Key No. Drive Motor Motor Belt Frame Rear Foot Frame Endcap Cover Rubber Cushion Right Foot Rail Idler Roller Frame Endcap Ground Wire Console Clamp Motor Hood Hood Accent Incline Frame Spacer Hood Clip Incline Motor Incline Frame Frame Spacer Controller Controller Plate Hood Post Power Switch Power Cord Grommet Belly Pan Left Upright Cover Right Upright Cover Upright Wire Left Base Cover Right Base Cover Handrail...

English Manual
Page 40
...; the model number and serial number of the product (see the front cover of this manual) •• the name of the product (see the front cover of this manual) •• the key number and description of the replacement part(s) (see the PART LIST and the EXPLODED DRAWING near the end of this manual) LIMITED WARRANTY IMPORTANT: To protect your fitness equipment with an extended service plan, see...
...; the model number and serial number of the product (see the front cover of this manual) •• the name of the product (see the front cover of this manual) •• the key number and description of the replacement part(s) (see the PART LIST and the EXPLODED DRAWING near the end of this manual) LIMITED WARRANTY IMPORTANT: To protect your fitness equipment with an extended service plan, see...


