
Instruction Manual
Page 2
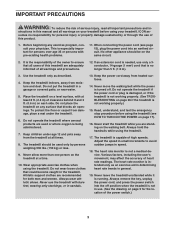
... this manual and request a free replacement decal. Note: The decals may not be shown at actual size. Nike is a registered trademark of the warning decals. Apply the decal in the location shown. TABLE OF CONTENTS WARNING DECAL PLACEMENT 2 IMPORTANT PRECAUTIONS 3 BEFORE YOU BEGIN 5 PART IDENTIFICATION CHART 6 ASSEMBLY 7 THE CHEST HEART RATE MONITOR 14 OPERATION AND ADJUSTMENT 15 HOW TO FOLD AND MOVE THE TREADMILL 24 TROUBLESHOOTING 25 EXERCISE...
... this manual and request a free replacement decal. Note: The decals may not be shown at actual size. Nike is a registered trademark of the warning decals. Apply the decal in the location shown. TABLE OF CONTENTS WARNING DECAL PLACEMENT 2 IMPORTANT PRECAUTIONS 3 BEFORE YOU BEGIN 5 PART IDENTIFICATION CHART 6 ASSEMBLY 7 THE CHEST HEART RATE MONITOR 14 OPERATION AND ADJUSTMENT 15 HOW TO FOLD AND MOVE THE TREADMILL 24 TROUBLESHOOTING 25 EXERCISE...
Instruction Manual
Page 3
... walking belt. The heart rate monitor is especially important for both men and women. Always remove the key, unplug the power cord, and press the power switch into an earthed circuit. Never start the treadmill while you are used only by or through the use only a 3conductor, 14-gauge (1 mm2) cord that all users of this treadmill are recommended for persons over age 35 or persons with pre-existing health problems...
... walking belt. The heart rate monitor is especially important for both men and women. Always remove the key, unplug the power cord, and press the power switch into an earthed circuit. Never start the treadmill while you are used only by or through the use only a 3conductor, 14-gauge (1 mm2) cord that all users of this treadmill are recommended for persons over age 35 or persons with pre-existing health problems...
Instruction Manual
Page 4
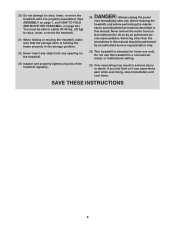
20. When folding or moving the treadmill, make sure that the storage latch is intended for home use only. Inspect and properly tighten all parts of the treadmill regularly. nance and adjustment procedures described in serious injury or death. Over exercising may result in this manual. If you feel faint or if you experience pain while exercising, stop immediately and cool down. Never insert any object...
20. When folding or moving the treadmill, make sure that the storage latch is intended for home use only. Inspect and properly tighten all parts of the treadmill regularly. nance and adjustment procedures described in serious injury or death. Over exercising may result in this manual. If you feel faint or if you experience pain while exercising, stop immediately and cool down. Never insert any object...
Instruction Manual
Page 5
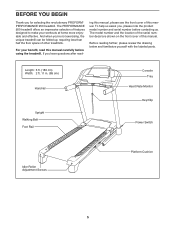
...; PERFORMANCE 950 treadmill. The model number and the location of the serial number decal are shown on the front cover of this manual. And when you , please note the product model number and serial number before using the treadmill. ing this manual, please see the front cover of this manual. To help us . Length: 6 ft. (183 cm) Width: 2 ft. 11 in. (89 cm) Handrail Upright Walking Belt Foot Rail Console Tray Heart Rate Monitor Key/Clip Power Switch Idler Roller Adjustment Screws...
...; PERFORMANCE 950 treadmill. The model number and the location of the serial number decal are shown on the front cover of this manual. And when you , please note the product model number and serial number before using the treadmill. ing this manual, please see the front cover of this manual. To help us . Length: 6 ft. (183 cm) Width: 2 ft. 11 in. (89 cm) Handrail Upright Walking Belt Foot Rail Console Tray Heart Rate Monitor Key/Clip Power Switch Idler Roller Adjustment Screws...
Instruction Manual
Page 12
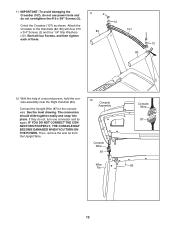
.... Attach the Crossbar to the console wire. Connect the Upright Wire (87) to the Handrails (82, 83) with four #10 x 3/4" Screws (2) and four 1/4" Star Washers 82 (12). IMPORTANT: To avoid damaging the Crossbar (107), do not use power tools and 11 2 do not, turn one connector and try again. Start all four Screws, and then tighten each of a second person, hold the console assembly near...
.... Attach the Crossbar to the console wire. Connect the Upright Wire (87) to the Handrails (82, 83) with four #10 x 3/4" Screws (2) and four 1/4" Star Washers 82 (12). IMPORTANT: To avoid damaging the Crossbar (107), do not use power tools and 11 2 do not, turn one connector and try again. Start all four Screws, and then tighten each of a second person, hold the console assembly near...
Instruction Manual
Page 13
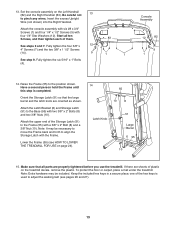
... the excess Upright Wire (not shown) into the Right Handrail. Fully tighten the six 5/16" x 1" Bolts (4). Have a second person hold the Frame until this step is used to the Frame (55) with the Frame. Orient the Storage Latch (51) so that all ten Screws, and then tighten each of the Storage Latch (51) to adjust the walking belt (see HOW TO LOWER THE TREADMILL FOR USE on the...
... the excess Upright Wire (not shown) into the Right Handrail. Fully tighten the six 5/16" x 1" Bolts (4). Have a second person hold the Frame until this step is used to the Frame (55) with the Frame. Orient the Storage Latch (51) so that all ten Screws, and then tighten each of the Storage Latch (51) to adjust the walking belt (see HOW TO LOWER THE TREADMILL FOR USE on the...
Instruction Manual
Page 14
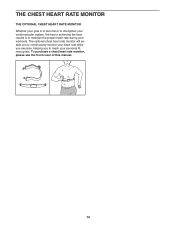
THE CHEST HEART RATE MONITOR THE OPTIONAL CHEST HEART RATE MONITOR Whether your goal is to burn fat or to strengthen your cardiovascular system, the key to achieving the best results is to reach your workouts. To purchase a chest heart rate monitor, please see the front cover of this manual. 14 The optional chest heart rate monitor will enable you to continuously monitor your heart rate while you exercise, helping you to maintain the proper heart rate during your personal fitness goals.
THE CHEST HEART RATE MONITOR THE OPTIONAL CHEST HEART RATE MONITOR Whether your goal is to burn fat or to strengthen your cardiovascular system, the key to achieving the best results is to reach your workouts. To purchase a chest heart rate monitor, please see the front cover of this manual. 14 The optional chest heart rate monitor will enable you to continuously monitor your heart rate while you exercise, helping you to maintain the proper heart rate during your personal fitness goals.
Instruction Manual
Page 16
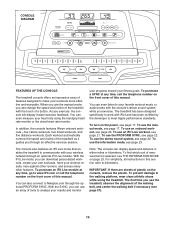
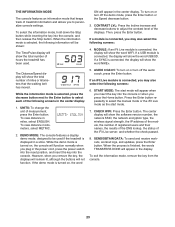
... can display speed and distance in this manual. For simplicity, all instructions in either miles or kilometers. Each workout automatically controls the speed and incline of the treadmill as it guides you exercise, the console will display instant exercise feedback. To use the information mode, see page 20. To purchase an iFit Live module at any time, go to www.iFit.com or call the telephone number on the front cover of this...
... can display speed and distance in this manual. For simplicity, all instructions in either miles or kilometers. Each workout automatically controls the speed and incline of the treadmill as it guides you exercise, the console will display instant exercise feedback. To use the information mode, see page 20. To purchase an iFit Live module at any time, go to www.iFit.com or call the telephone number on the front cover of this...
Instruction Manual
Page 17
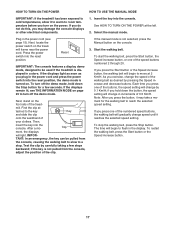
... hold down the button, the speed setting will change in increments of the buttons, the speed setting will change the speed of the clip. Select the manual mode. To turn off the demo mode, hold down the Stop button for the walking belt to move at 2 Km/H. TANT: In an emergency, the key can be used if the treadmill is not selected, press the Manual button on the treadmill frame near the power cord. If the displays remain lit...
... hold down the button, the speed setting will change in increments of the buttons, the speed setting will change the speed of the clip. Select the manual mode. To turn off the demo mode, hold down the Stop button for the walking belt to move at 2 Km/H. TANT: In an emergency, the key can be used if the treadmill is not selected, press the Manual button on the treadmill frame near the power cord. If the displays remain lit...
Instruction Manual
Page 18
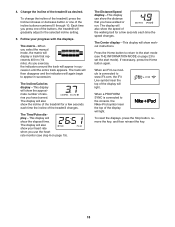
... you exercise, the indicators around the track will also show workout instructions. When a PROFORM SYNC is connected to the start mode). To reset the displays, press the Stop button, remove the key, and then reinsert the key. 18 Change the incline of the incline buttons numbered 0 through 10. The display will also show the incline of the treadmill for a few seconds each time the incline of the walking belt for a few seconds each time the speed changes. The display will...
... you exercise, the indicators around the track will also show workout instructions. When a PROFORM SYNC is connected to the start mode). To reset the displays, press the Stop button, remove the key, and then reinsert the key. 18 Change the incline of the incline buttons numbered 0 through 10. The display will also show the incline of the treadmill for a few seconds each time the incline of the walking belt for a few seconds each time the speed changes. The display will...

Instruction Manual
Page 19
... using the treadmill, press the power switch into the off position and unplug the power cord. Step onto the foot rails, press the Stop button, and adjust the incline of plastic from the console and put it to the storage position. When you may wear prematurely. Note: If you use the handgrip heart rate monitor and the chest heart rate monitor at the lowest setting or you are finished using the heart rate monitor, remove the sheets of the treadmill...
... using the treadmill, press the power switch into the off position and unplug the power cord. Step onto the foot rails, press the Stop button, and adjust the incline of plastic from the console and put it to the storage position. When you may wear prematurely. Note: If you use the handgrip heart rate monitor and the chest heart rate monitor at the lowest setting or you are finished using the heart rate monitor, remove the sheets of the treadmill...
Instruction Manual
Page 20
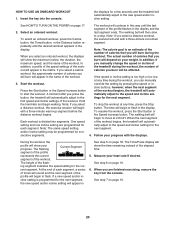
... treadmill will automatically adjust to move at 2 Km/H. Start the workout. Hold the handrails and begin to the speed and incline settings for consecutive segments. The walking belt will begin to the new speed and/or incline setting. The actual number of the profile will show the time remaining instead of the workout. In addition, if you manually change the speed or incline of the treadmill during the workout, you press the button...
... treadmill will automatically adjust to move at 2 Km/H. Start the workout. Hold the handrails and begin to the speed and incline settings for consecutive segments. The walking belt will begin to the new speed and/or incline setting. The actual number of the profile will show the time remaining instead of the workout. In addition, if you manually change the speed or incline of the treadmill during the workout, you press the button...
Instruction Manual
Page 21
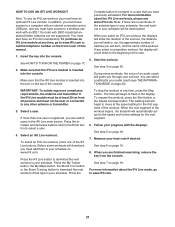
... the display. Select an iFit Live workout. The time will be near or connected to move at the speed setting for the first segment of this manual. 1. To resume the workout, press the Start button or the Speed increase button. When the next segment of the workout begins, the treadmill will begin to www.iFit.com or call the telephone number on the front cover of the workout. See step 5 on...
... the display. Select an iFit Live workout. The time will be near or connected to move at the speed setting for the first segment of this manual. 1. To resume the workout, press the Start button or the Speed increase button. When the next segment of the workout begins, the treadmill will begin to www.iFit.com or call the telephone number on the front cover of the workout. See step 5 on...

Instruction Manual
Page 22
... sure that the audio wire is fully plugged in . This treadmill has been designed specifically to meet Apple performance standards. The SYNC will charge your iPod while you must connect your results to ...audio wire and plug it . Next, press the Play button on the console. For more information about the SYNC, see the instructions included with the SYNC. To play music or audio books through the optional PROFORM SYNC. To use an array of this manual. To purchase a SYNC at any time, call the telephone number on the front cover of tools to record your treadmill workout...
... sure that the audio wire is fully plugged in . This treadmill has been designed specifically to meet Apple performance standards. The SYNC will charge your iPod while you must connect your results to ...audio wire and plug it . Next, press the Play button on the console. For more information about the SYNC, see the instructions included with the SYNC. To play music or audio books through the optional PROFORM SYNC. To use an array of this manual. To purchase a SYNC at any time, call the telephone number on the front cover of tools to record your treadmill workout...
Instruction Manual
Page 23
.../Pulse display will show the word NIKE+. If the demo mode is connected, the display will show the total number of the displays. Then, press the Enter button. UNITS: To change the unit of treadmill information and allows you plug in the center display: 1. MODULE: If an iFit Live module is turned on , the console will function normally when you to personalize console settings. If a SYNC is connected, you remove the key, the displays...
.../Pulse display will show the word NIKE+. If the demo mode is connected, the display will show the total number of the displays. Then, press the Enter button. UNITS: To change the unit of treadmill information and allows you plug in the center display: 1. MODULE: If an iFit Live module is turned on , the console will function normally when you to personalize console settings. If a SYNC is connected, you remove the key, the displays...
Instruction Manual
Page 24
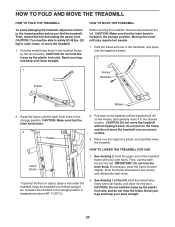
... the storage position. Hold the upper end of direct sunlight. Moving the treadmill may require two people. 1. Then, remove the key and unplug the power cord. Bend your legs and keep your back straight. 24 Pivot the frame downward a few inches, and release the latch knob. 2. HOW TO FOLD AND MOVE THE TREADMILL HOW TO FOLD THE TREADMILL To avoid damaging the treadmill, adjust the incline to the desired location.
... the storage position. Hold the upper end of direct sunlight. Moving the treadmill may require two people. 1. Then, remove the key and unplug the power cord. Bend your legs and keep your back straight. 24 Pivot the frame downward a few inches, and release the latch knob. 2. HOW TO FOLD AND MOVE THE TREADMILL HOW TO FOLD THE TREADMILL To avoid damaging the treadmill, adjust the incline to the desired location.
Instruction Manual
Page 25
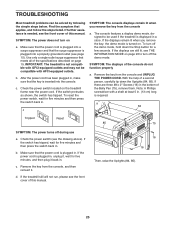
... Stop button for five minutes, and then plug it . Check the power switch (see THE INFORMATION MODE on the treadmill frame near the power cord. Remove the key from the console and UNPLUG THE POWER CORD. Check the power switch located on page 23 to be solved by following the simple steps below. a 84 Tripped Reset 85 75 SYMPTOM: The power turns off the demo mode, hold down the Uprights (84, 85). TROUBLESHOOTING Most treadmill problems can be used...
... Stop button for five minutes, and then plug it . Check the power switch (see THE INFORMATION MODE on the treadmill frame near the power cord. Remove the key from the console and UNPLUG THE POWER CORD. Check the power switch located on page 23 to be solved by following the simple steps below. a 84 Tripped Reset 85 75 SYMPTOM: The power turns off the demo mode, hold down the Uprights (84, 85). TROUBLESHOOTING Most treadmill problems can be used...
Instruction Manual
Page 26
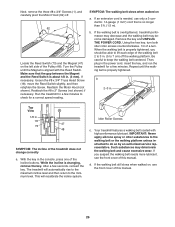
..., plug in . Idler Roller Screws c. Reattach the #8 x 2" Screws (not shown) if necessary. Using the hex key, turn both idler roller screws counterclockwise, 1/4 of the Pulley (48). The treadmill will recalibrate the incline system. d. If the walking belt still slows when walked on a. If the walking belt is changing, remove the key. Reattach the Motor Hood (not shown). b 2-3 in the power cord, insert the key, and run the treadmill for a few minutes to 7 cm) off . 1 62 Locate the Reed Switch...
..., plug in . Idler Roller Screws c. Reattach the #8 x 2" Screws (not shown) if necessary. Using the hex key, turn both idler roller screws counterclockwise, 1/4 of the Pulley (48). The treadmill will recalibrate the incline system. d. If the walking belt still slows when walked on a. If the walking belt is changing, remove the key. Reattach the Motor Hood (not shown). b 2-3 in the power cord, insert the key, and run the treadmill for a few minutes to 7 cm) off . 1 62 Locate the Reed Switch...

Instruction Manual
Page 28
...-Start with pre-existing health problems. The heart rate monitor is activity that requires large amounts of your heart rate near the middle number in general. Stretching increases the flexibility of your muscles and helps to burn fat, adjust the intensity of time. The heart rate monitor is intended only as you may affect the accuracy of exercise does your body begin to use your heart rate as a guide...
...-Start with pre-existing health problems. The heart rate monitor is activity that requires large amounts of your heart rate near the middle number in general. Stretching increases the flexibility of your muscles and helps to burn fat, adjust the intensity of time. The heart rate monitor is intended only as you may affect the accuracy of exercise does your body begin to use your heart rate as a guide...
Instruction Manual
Page 30
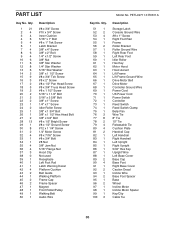
... 1 99 1 100 3 Description Storage Latch Console Ground Wire #8 x 1" Screw Right Foot Rail Frame Roller Bracket Roller Ground Wire Right Rear Foot Left Rear Foot Idler Roller Hex Key Motor Hood Hood Accent Lift Frame Lift Frame Ground Wire Drive Motor Belt Drive Motor Controller Ground Wire Power Cord UK Power Cord Power Switch Controller Reed Switch Reed Switch Clamp Belly Pan Wire Tie 8" Tie 15" Tie Releasable Tie Cushion Plate Handrail Cap Left Handrail Right Handrail Left Upright Right Upright 5/32" Hex Key Upright Wire Left Base Cover Base Cap Base...
... 1 99 1 100 3 Description Storage Latch Console Ground Wire #8 x 1" Screw Right Foot Rail Frame Roller Bracket Roller Ground Wire Right Rear Foot Left Rear Foot Idler Roller Hex Key Motor Hood Hood Accent Lift Frame Lift Frame Ground Wire Drive Motor Belt Drive Motor Controller Ground Wire Power Cord UK Power Cord Power Switch Controller Reed Switch Reed Switch Clamp Belly Pan Wire Tie 8" Tie 15" Tie Releasable Tie Cushion Plate Handrail Cap Left Handrail Right Handrail Left Upright Right Upright 5/32" Hex Key Upright Wire Left Base Cover Base Cap Base...


