
English Manual
Page 2
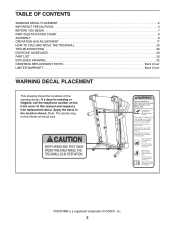
... the telephone number on the front cover of this manual and request a free replacement decal. TABLE OF CONTENTS WARNING DECAL PLACEMENT 2 IMPORTANT PRECAUTIONS 3 BEFORE YOU BEGIN 7 PART IDENTIFICATION CHART 8 ASSEMBLY 9 OPERATION AND ADJUSTMENT 17 HOW TO FOLD AND MOVE THE TREADMILL 25 TROUBLESHOOTING 26 EXERCISE GUIDELINES 29 PART LIST 30 EXPLODED DRAWING 32 ORDERING REPLACEMENT PARTS Back Cover LIMITED WARRANTY Back Cover WARNING DECAL PLACEMENT This drawing shows the locations of ICON IP, Inc...
... the telephone number on the front cover of this manual and request a free replacement decal. TABLE OF CONTENTS WARNING DECAL PLACEMENT 2 IMPORTANT PRECAUTIONS 3 BEFORE YOU BEGIN 7 PART IDENTIFICATION CHART 8 ASSEMBLY 9 OPERATION AND ADJUSTMENT 17 HOW TO FOLD AND MOVE THE TREADMILL 25 TROUBLESHOOTING 26 EXERCISE GUIDELINES 29 PART LIST 30 EXPLODED DRAWING 32 ORDERING REPLACEMENT PARTS Back Cover LIMITED WARRANTY Back Cover WARNING DECAL PLACEMENT This drawing shows the locations of ICON IP, Inc...
English Manual
Page 3
.... Adjust the speed in small increments to avoid sudden jumps in damage to the control system of the treadmill. Use only a surge suppressor that blocks air openings. If the control system is not working properly. (See TROUBLESHOOTING on the treadmill at all times. 16. Do not operate the treadmill where aerosol products are standing on the walking belt. Never move the walking belt while the power is...
.... Adjust the speed in small increments to avoid sudden jumps in damage to the control system of the treadmill. Use only a surge suppressor that blocks air openings. If the control system is not working properly. (See TROUBLESHOOTING on the treadmill at all times. 16. Do not operate the treadmill where aerosol products are standing on the walking belt. Never move the walking belt while the power is...

English Manual
Page 4
... determining heart rate trends in the storage position. 28. vice representative only. 27. When folding or moving the treadmill, make sure that the storage latch is intended for the location of the power switch.) 22. This treadmill is holding the frame securely in general. 21. Always unplug the power cord immediately after use only. ing the treadmill, and before performing the maintenance and adjustment procedures described in this treadmill in -home use...
... determining heart rate trends in the storage position. 28. vice representative only. 27. When folding or moving the treadmill, make sure that the storage latch is intended for the location of the power switch.) 22. This treadmill is holding the frame securely in general. 21. Always unplug the power cord immediately after use only. ing the treadmill, and before performing the maintenance and adjustment procedures described in this treadmill in -home use...
English Manual
Page 7
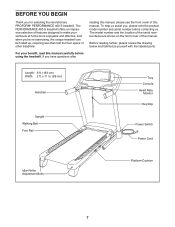
... not exercising, the unique treadmill can be folded up, requiring less than half the oor space of other treadmills. To help us assist you have questions after reading this manual, please see the front cover of this manual. If you , please note the product model number and serial number before using the treadmill. x 11 in. (89 cm) Handrail Upright Walking Belt Foot Rail Tray Console Heart Rate Monitor Key/Clip Power Switch Power Cord Idler Roller Adjustment Bolts...
... not exercising, the unique treadmill can be folded up, requiring less than half the oor space of other treadmills. To help us assist you have questions after reading this manual, please see the front cover of this manual. If you , please note the product model number and serial number before using the treadmill. x 11 in. (89 cm) Handrail Upright Walking Belt Foot Rail Tray Console Heart Rate Monitor Key/Clip Power Switch Power Cord Idler Roller Adjustment Bolts...
English Manual
Page 14
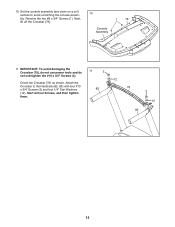
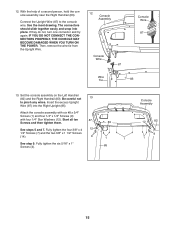
Start all four Screws, and then tighten them. 79 2 12 83 14 Set the console assembly face down on a soft surface to the Handrails (82, 83) with four #10 x 3/4" Screws (2) and four 1/4" Star Washers 82 (12). Next, lift off the Crossbar (79). 1 79 Console Assembly 11. Remove the two #8 x 3/4" Screws (1). IMPORTANT: To avoid damaging the Crossbar (79), do not use power tools and do 11 2 not overtighten the #10 x 3/4" Screws (2). 12 Orient the Crossbar (79) as shown. 10. Attach the Crossbar to avoid scratching the console assem- 10 bly.
Start all four Screws, and then tighten them. 79 2 12 83 14 Set the console assembly face down on a soft surface to the Handrails (82, 83) with four #10 x 3/4" Screws (2) and four 1/4" Star Washers 82 (12). Next, lift off the Crossbar (79). 1 79 Console Assembly 11. Remove the two #8 x 3/4" Screws (1). IMPORTANT: To avoid damaging the Crossbar (79), do not use power tools and do 11 2 not overtighten the #10 x 3/4" Screws (2). 12 Orient the Crossbar (79) as shown. 10. Attach the Crossbar to avoid scratching the console assem- 10 bly.
English Manual
Page 15
Connect the Upright Wire (87) to pinch any wires. Set the console assembly on the Left Handrail (82) and the Right Handrail (83). Attach the console assembly with six #8 x 3/4" Screws (1) and four 1/4" x 1/2" Screws (9) with four 1/4" Star Washers (12). Fully tighten the four 3/8" x 4 12 1/2" Screws (7) and the two 3/8" x 1 1/2" Screws (14). 9 1 1 See step 9. Then, remove the wire tie from the Upright Wire. 12 Console Assembly Console Wire 87 Console Wire 87 Wire Tie 83 13. If they do not, turn one...
Connect the Upright Wire (87) to pinch any wires. Set the console assembly on the Left Handrail (82) and the Right Handrail (83). Attach the console assembly with six #8 x 3/4" Screws (1) and four 1/4" x 1/2" Screws (9) with four 1/4" Star Washers (12). Fully tighten the four 3/8" x 4 12 1/2" Screws (7) and the two 3/8" x 1 1/2" Screws (14). 9 1 1 See step 9. Then, remove the wire tie from the Upright Wire. 12 Console Assembly Console Wire 87 Console Wire 87 Wire Tie 83 13. If they do not, turn one...
English Manual
Page 17
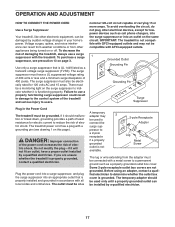
... receptacle if a properly grounded outlet is properly installed and grounded in accordance with AFCI-equipped outlets. 1 Grounded Outlet Grounding Pin Grounding Pin Surge Suppressor Plug in damage to users. OPERATION AND ADJUSTMENT HOW TO CONNECT THE POWER CORD Use a Surge Suppressor Your treadmill, like other appliances being turned on or off. The surge suppressor must be a monitoring light on page 3. To avoid overloading...
... receptacle if a properly grounded outlet is properly installed and grounded in accordance with AFCI-equipped outlets. 1 Grounded Outlet Grounding Pin Grounding Pin Surge Suppressor Plug in damage to users. OPERATION AND ADJUSTMENT HOW TO CONNECT THE POWER CORD Use a Surge Suppressor Your treadmill, like other appliances being turned on or off. The surge suppressor must be a monitoring light on page 3. To avoid overloading...
English Manual
Page 18
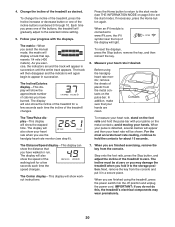
.... Each workout automatically controls the speed and incline of the treadmill as it guides you exercise. With the iFit mode, you use a set-a-goal workout, see page 24. To use the treadmill, observe the alignment of the walking belt, and center the walking belt if necessary (see page 28). 18 IMPORTANT: If there are sheets of plastic on the power, see THE INFORMATION MODE on the front cover of this manual refer to miles...
.... Each workout automatically controls the speed and incline of the treadmill as it guides you exercise. With the iFit mode, you use a set-a-goal workout, see page 24. To use the treadmill, observe the alignment of the walking belt, and center the walking belt if necessary (see page 28). 18 IMPORTANT: If there are sheets of plastic on the power, see THE INFORMATION MODE on the front cover of this manual refer to miles...
English Manual
Page 19
... MANUAL MODE 1. See HOW TO TURN ON THE POWER at 1 mph. If you are not connected to iFit, the manual mode will be used if the treadmill is set to the key and slide the Key Clip clip onto the waist- Each time you press one of the speed buttons numbered 1 through 10. Note: After you press the button, it reaches the selected speed setting. Start the walking belt. As you exercise, change in the display. To stop...
... MANUAL MODE 1. See HOW TO TURN ON THE POWER at 1 mph. If you are not connected to iFit, the manual mode will be used if the treadmill is set to the key and slide the Key Clip clip onto the waist- Each time you press one of the speed buttons numbered 1 through 10. Note: After you press the button, it reaches the selected speed setting. Start the walking belt. As you exercise, change in the display. To stop...
English Manual
Page 20
...;nished exercising, remove the key from the console. To reset the displays, press the Stop button, remove the key, and then reinsert the key. 6. avoid moving your heart rate if desired. Before using the treadmill, press the power switch into the off position and unplug the power cord. Change the incline of the treadmill to set the start mode (see step 6). To change the incline of the treadmill, press the Incline increase or decrease button or one of the walking belt for about 15 seconds. The track will...
...;nished exercising, remove the key from the console. To reset the displays, press the Stop button, remove the key, and then reinsert the key. 6. avoid moving your heart rate if desired. Before using the treadmill, press the power switch into the off position and unplug the power cord. Change the incline of the treadmill to set the start mode (see step 6). To change the incline of the treadmill, press the Incline increase or decrease button or one of the walking belt for about 15 seconds. The track will...
English Manual
Page 21
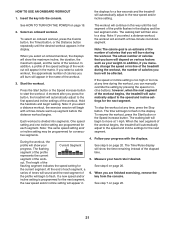
... you manually change the speed or incline of the treadmill during the workout, you press the button, the treadmill will appear in the display. See step 7 on page 20. 6. Note: The same speed setting and/ or incline setting may be affected. The height of the workout will automatically adjust to the rst speed and incline settings of the workout. 3. HOW TO USE AN ONBOARD WORKOUT 1. The walking belt will show your weight. The Time/Pulse display will...
... you manually change the speed or incline of the treadmill during the workout, you press the button, the treadmill will appear in the display. See step 7 on page 20. 6. Note: The same speed setting and/ or incline setting may be affected. The height of the workout will automatically adjust to the rst speed and incline settings of the workout. 3. HOW TO USE AN ONBOARD WORKOUT 1. The walking belt will show your weight. The Time/Pulse display will...
English Manual
Page 22
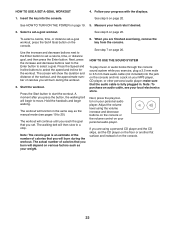
... the speed and incline for the workout. Press the Start button to 3.5 mm male audio cable (not included) into the jack on your personal audio player. Adjust the volume level using a personal CD player and the CD skips, set -a-goal workout. Use the increase and decrease buttons next to the Enter button to a stop. Note: To purchase an audio cable, see pages 19 to move. HOW TO USE A SET-A-GOAL WORKOUT 4. Follow your heart rate...
... the speed and incline for the workout. Press the Start button to 3.5 mm male audio cable (not included) into the jack on your personal audio player. Adjust the volume level using a personal CD player and the CD skips, set -a-goal workout. Use the increase and decrease buttons next to the Enter button to a stop. Note: To purchase an audio cable, see pages 19 to move. HOW TO USE A SET-A-GOAL WORKOUT 4. Follow your heart rate...
English Manual
Page 23
... button. Select an iFit workout. 7. Press the Track button to compete in a race that type in the display. Insert the key into the console. To purchase an iFit module at any time, press the Stop button. When you select an iFit workout, the displays will show the duration of the workout, the distance you will walk or run, the approximate number of an audio coach will count down to the speed and incline settings...
... button. Select an iFit workout. 7. Press the Track button to compete in a race that type in the display. Insert the key into the console. To purchase an iFit module at any time, press the Stop button. When you select an iFit workout, the displays will show the duration of the workout, the distance you will walk or run, the approximate number of an audio coach will count down to the speed and incline settings...
English Manual
Page 24
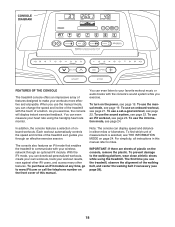
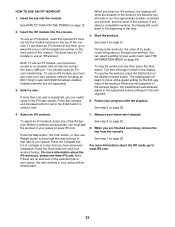
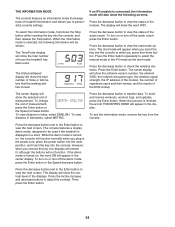
THE INFORMATION MODE The console features an information mode that the walking belt has moved. When the information mode is selected, the following screens: Press the decrease button to view the status of miles or kilometers that keeps track of hours the treadmill has been used if the treadmill is displayed in the power cord, press the power switch into the reset position, and insert the key into the console, and then release the Stop button. The start mode will appear...
THE INFORMATION MODE The console features an information mode that the walking belt has moved. When the information mode is selected, the following screens: Press the decrease button to view the status of miles or kilometers that keeps track of hours the treadmill has been used if the treadmill is displayed in the power cord, press the power switch into the reset position, and insert the key into the console, and then release the Stop button. The start mode will appear...
English Manual
Page 25
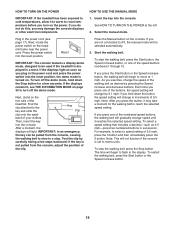
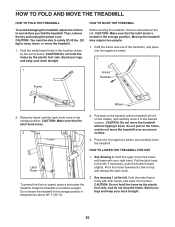
... location. Place one of the treadmill frame with both hands, and lower it as described at the left ; HOW TO LOWER THE TREADMILL FOR USE 1. Pull the latch knob to the oor. HOW TO MOVE THE TREADMILL Before moving the treadmill, fold it to the left . Pivot the frame downward a few inches, and release the latch knob. 2. Then, remove the key and unplug the power cord. Bend your legs...
... location. Place one of the treadmill frame with both hands, and lower it as described at the left ; HOW TO LOWER THE TREADMILL FOR USE 1. Pull the latch knob to the oor. HOW TO MOVE THE TREADMILL Before moving the treadmill, fold it to the left . Pivot the frame downward a few inches, and release the latch knob. 2. Then, remove the key and unplug the power cord. Bend your legs...
English Manual
Page 26
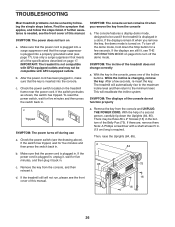
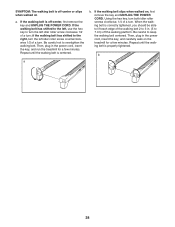
... the Stop button for five minutes, and then plug it . Find the symptom that the key is changing, remove the key. c. d. Use only a surge suppressor that meets all of the console do not function properly c Tripped Reset SYMPTOM: The power turns off the demo mode, hold down the Uprights (84, 85). To turn on the treadmill frame near the power cord. After a few seconds. Check the power switch (see THE INFORMATION MODE on...
... the Stop button for five minutes, and then plug it . Find the symptom that the key is changing, remove the key. c. d. Use only a surge suppressor that meets all of the console do not function properly c Tripped Reset SYMPTOM: The power turns off the demo mode, hold down the Uprights (84, 85). To turn on the treadmill frame near the power cord. After a few seconds. Check the power switch (see THE INFORMATION MODE on...
English Manual
Page 27
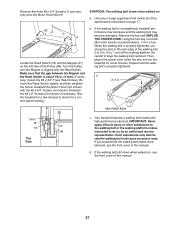
...;-3 in . (3 mm). Remove the key and UNPLUG THE POWER CORD. If you should be able to 3 in the power cord, insert the key, and run the treadmill for a correct speed reading. Reattach the Motor Hood (not shown) with the #8 x 3/4" Screws (not shown). Use only a surge suppressor that the walking belt needs more lubricant, see the front cover of a turn. Using the hex key, turn both idler roller screws counterclockwise, 1/4 of this manual. Idler Roller Bolts 1/8 in. 18...
...;-3 in . (3 mm). Remove the key and UNPLUG THE POWER CORD. If you should be able to 3 in the power cord, insert the key, and run the treadmill for a correct speed reading. Reattach the Motor Hood (not shown) with the #8 x 3/4" Screws (not shown). Use only a surge suppressor that the walking belt needs more lubricant, see the front cover of a turn. Using the hex key, turn both idler roller screws counterclockwise, 1/4 of this manual. Idler Roller Bolts 1/8 in. 18...
English Manual
Page 28
... the walking platform. Using the hex key, turn both idler roller screws clockwise, 1/4 of a turn. Then, plug in the power cord, insert the key, and run the treadmill for a few minutes. Then, plug in . (5 to turn the left idler roller screw counterclockwise 1/2 of a turn ; a b. When the walking belt is correctly tightened, you should be able to 3 in the power cord, insert the key, and carefully walk on a. Repeat until the walking belt is centered. if the walking belt...
... the walking platform. Using the hex key, turn both idler roller screws clockwise, 1/4 of a turn. Then, plug in the power cord, insert the key, and run the treadmill for a few minutes. Then, plug in . (5 to turn the left idler roller screw counterclockwise 1/2 of a turn ; a b. When the walking belt is correctly tightened, you should be able to 3 in the power cord, insert the key, and carefully walk on a. Repeat until the walking belt is centered. if the walking belt...
English Manual
Page 29
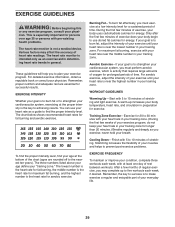
... enjoyable part of your exercise until your heart rate near the middle number in general. WORKOUT GUIDELINES Warming Up—-Start with your heart rate is especially important for fat burning and aerobic exercise. Training Zone Exercise—-Exercise for 20 to burn fat, adjust the intensity of your exercise program. Remember, proper nutrition and adequate rest are rounded off to achieving results. You can use stored...
... enjoyable part of your exercise until your heart rate near the middle number in general. WORKOUT GUIDELINES Warming Up—-Start with your heart rate is especially important for fat burning and aerobic exercise. Training Zone Exercise—-Exercise for 20 to burn fat, adjust the intensity of your exercise program. Remember, proper nutrition and adequate rest are rounded off to achieving results. You can use stored...

English Manual
Page 36
ICON Health & Fitness, Inc. (ICON) warrants this manual) LIMITED WARRANTY IMPORTANT: To protect your fitness equipment with respect to products transported or purchased outside the US. The drive motor is shipped to a service center, freight charges to be free from the service center will be the customer’'s responsibility. If the product is warranted for commercial or rental purposes or as store display models; or other...
ICON Health & Fitness, Inc. (ICON) warrants this manual) LIMITED WARRANTY IMPORTANT: To protect your fitness equipment with respect to products transported or purchased outside the US. The drive motor is shipped to a service center, freight charges to be free from the service center will be the customer’'s responsibility. If the product is warranted for commercial or rental purposes or as store display models; or other...


