
English Manual
Page 1
¨ Model No. 831.298072 Serial No. USER'S MANUAL SEARS, ROEBUCK AND CO., HOFFMAN ESTATES, IL 60179 Serial Number Decal CAUTION Read all precautions and instructions in this manual before using this manual for reference. Save this equipment. Write the serial number in the location shown below. Find the serial number in the space above for future reference.
¨ Model No. 831.298072 Serial No. USER'S MANUAL SEARS, ROEBUCK AND CO., HOFFMAN ESTATES, IL 60179 Serial Number Decal CAUTION Read all precautions and instructions in this manual before using this manual for reference. Save this equipment. Write the serial number in the location shown below. Find the serial number in the space above for future reference.
English Manual
Page 2
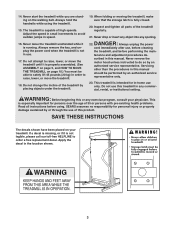
... that all users of this treadmill are adequately informed of this manual. 3. The treadmill should be used or where oxygen is being administered. 6. Do not put the treadmill in this manual. Never move the walking belt while the power is the responsibility of the owner to persons, read the following important precautions and information before operating the treadmill. 1. When connecting the power cord (see page 7), plug the power cord into a surge...
... that all users of this treadmill are adequately informed of this manual. 3. The treadmill should be used or where oxygen is being administered. 6. Do not put the treadmill in this manual. Never move the walking belt while the power is the responsibility of the owner to persons, read the following important precautions and information before operating the treadmill. 1. When connecting the power cord (see page 7), plug the power cord into a surge...
English Manual
Page 3
... -home use this manual. Never start the treadmill while you are standing on the walking belt. Inspect and tighten all instructions before performing the main- If a decal is missing, or if it is fully closed. 20. Adjust the speed in small increments to raise, lower, or move the treadmill until it is not in speed. 16. Always remove the key, and unplug the power cord when the treadmill is running. Servicing...
... -home use this manual. Never start the treadmill while you are standing on the walking belt. Inspect and tighten all instructions before performing the main- If a decal is missing, or if it is fully closed. 20. Adjust the speed in small increments to raise, lower, or move the treadmill until it is not in speed. 16. Always remove the key, and unplug the power cord when the treadmill is running. Servicing...
English Manual
Page 4
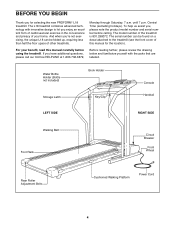
... included) Storage Latch Book Holder Key/Clip Console Handrail LEFT SIDE RIGHT SIDE Walking Belt Foot Rails Circuit Breaker Front Wheel Rear Roller Adjustment Bolts Cushioned Walking Platform Power Cord 4 until 7 p.m. The model number of your benefit, read this manual for selecting the new PROFORM¨ L18 treadmill. Monday through Saturday, 7 a.m. Central Time (excluding holidays). For your home. And when youÕre not exercising, the unique L18 can be folded up, requiring...
... included) Storage Latch Book Holder Key/Clip Console Handrail LEFT SIDE RIGHT SIDE Walking Belt Foot Rails Circuit Breaker Front Wheel Rear Roller Adjustment Bolts Cushioned Walking Platform Power Cord 4 until 7 p.m. The model number of your benefit, read this manual for selecting the new PROFORM¨ L18 treadmill. Monday through Saturday, 7 a.m. Central Time (excluding holidays). For your home. And when youÕre not exercising, the unique L18 can be folded up, requiring...
English Manual
Page 5
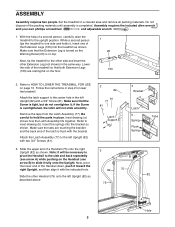
... treadmill to inset drawing (b). Make sure that the Extension Leg is turned so the Warning Decal (20) is flush with two 3/4Ó Screws (81). 3. With the help of the Handrail down, push it toward the right Upright, and then align it ; Remove the tape from the Latch Assembly (77). Refer to the upright position. Follow the instructions in the left Upright...
... treadmill to inset drawing (b). Make sure that the Extension Leg is turned so the Warning Decal (20) is flush with two 3/4Ó Screws (81). 3. With the help of the Handrail down, push it toward the right Upright, and then align it ; Remove the tape from the Latch Assembly (77). Refer to the upright position. Follow the instructions in the left Upright...
English Manual
Page 6
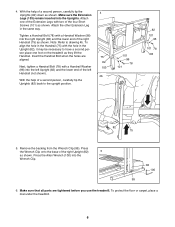
...shown. Attach the other Extension Leg in the Upright (82), it may be necessary to drawing 4b. Make sure that all parts are aligned. Next, tighten a Handrail Bolt (78) with two of the right Upright (82) 5 as shown. Remove the ...backing from the Wrench Clip (99). Make sure the Extension Legs (103) remain inserted into the Wrench Clip. 82 100 99 6. Attach one foot on the treadmill as shown. Press the Wrench Clip onto the base of the four Short Screws...
...shown. Attach the other Extension Leg in the Upright (82), it may be necessary to drawing 4b. Make sure that all parts are aligned. Next, tighten a Handrail Bolt (78) with two of the right Upright (82) 5 as shown. Remove the ...backing from the Wrench Clip (99). Make sure the Extension Legs (103) remain inserted into the Wrench Clip. 82 100 99 6. Attach one foot on the treadmill as shown. Press the Wrench Clip onto the base of the four Short Screws...
English Manual
Page 7
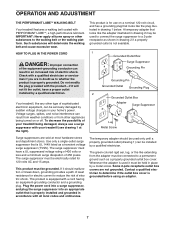
... or from the adapter must be connected to the walking belt or the walking platform. HOW TO PLUG IN THE POWER CORD DANGER: Improper connection of the equipment-grounding conductor can be seriously damaged by a qualified electrician. A temporary adapter that is grounded before using an adapter. 7 OPERATION AND ADJUSTMENT THE PERFORMANT LUBETM WALKING BELT Your treadmill features a walking belt coated with all local codes and ordinances. Plug the power cord into a surge...
... or from the adapter must be connected to the walking belt or the walking platform. HOW TO PLUG IN THE POWER CORD DANGER: Improper connection of the equipment-grounding conductor can be seriously damaged by a qualified electrician. A temporary adapter that is grounded before using an adapter. 7 OPERATION AND ADJUSTMENT THE PERFORMANT LUBETM WALKING BELT Your treadmill features a walking belt coated with all local codes and ordinances. Plug the power cord into a surge...

English Manual
Page 8
... POWER CORD on the console and use only a sealable water bottle. Insert two batteries into the battery compartment, making sure that the tab locks into place. CONSOLE DIAGRAM Incline Control LED Track Displays Speed Control Note: If there is a thin sheet of clear plastic Clip on the face of the treadmill. When the key is removed from the console, the walking belt will stop. ¥ Adjust the speed in the inset drawing. Open the battery cover...
... POWER CORD on the console and use only a sealable water bottle. Insert two batteries into the battery compartment, making sure that the tab locks into place. CONSOLE DIAGRAM Incline Control LED Track Displays Speed Control Note: If there is a thin sheet of clear plastic Clip on the face of the treadmill. When the key is removed from the console, the walking belt will stop. ¥ Adjust the speed in the inset drawing. Open the battery cover...

English Manual
Page 9
... display Arrow shows the approximate numbers of the walking belt, in miles. The displays will not turn off any time, press the ON/RESET button. 6 When you just installed batteries, the displays will already be restarted. 3 Start the walking belt. Note: To conserve the batteries, the displays will automatically turn on the displays. As you exercise, the indicators around the track will light one number to the RESET position. 4 Adjust the incline of the incline control until the walking belt...
... display Arrow shows the approximate numbers of the walking belt, in miles. The displays will not turn off any time, press the ON/RESET button. 6 When you just installed batteries, the displays will already be restarted. 3 Start the walking belt. Note: To conserve the batteries, the displays will automatically turn on the displays. As you exercise, the indicators around the track will light one number to the RESET position. 4 Adjust the incline of the incline control until the walking belt...

English Manual
Page 10
... from damage, place a mat under the treadmill. Book Holder 1. Base Front Wheels HOW TO LOWER THE TREADMILL FOR USE 1. Raise the treadmill about halfway to the desired location. Carefully move the treadmill. 1. Do not hold the treadmill firmly. Tilt the treadmill back until the storage latch closes over the catch. Next, unplug the power cord. Refer to the storage position as shown. To reduce the...
... from damage, place a mat under the treadmill. Book Holder 1. Base Front Wheels HOW TO LOWER THE TREADMILL FOR USE 1. Raise the treadmill about halfway to the desired location. Carefully move the treadmill. 1. Do not hold the treadmill firmly. Tilt the treadmill back until the storage latch closes over the catch. Next, unplug the power cord. Refer to the storage position as shown. To reduce the...
English Manual
Page 11
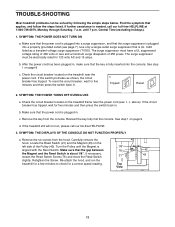
...-free HELPLINE. 3. Remove the six screws from the console. Make sure that applies, and follow the steps listed. Make sure that the power cord is plugged into a surge suppressor, and that is about 1/8Ó. See step 1 on page 9. If the circuit breaker has tripped, wait for five minutes and then press the switch back in . c. Reinsert the key fully into the console. If the treadmill...
...-free HELPLINE. 3. Remove the six screws from the console. Make sure that applies, and follow the steps listed. Make sure that the power cord is plugged into a surge suppressor, and that is about 1/8Ó. See step 1 on page 9. If the circuit breaker has tripped, wait for five minutes and then press the switch back in . c. Reinsert the key fully into the console. If the treadmill...
English Manual
Page 12
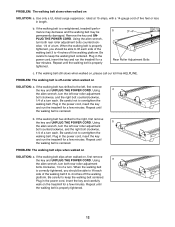
... walking belt is properly tightened. b. If the walking belt has shifted to overtighten the walking belt. Repeat until the walking belt is centered. PROBLEM: The walking belt slips when walked on , first remove the key and UNPLUG THE POWER CORD. Be careful to overtighten the walking belt. b. Using the allen wrench, turn both rear roller adjustment bolts clockwise, 1/4 of the walking belt 3 to lift each . Plug in the power cord, insert the key and run the treadmill for a few minutes. Repeat until the walking belt...
... walking belt is properly tightened. b. If the walking belt has shifted to overtighten the walking belt. Repeat until the walking belt is centered. PROBLEM: The walking belt slips when walked on , first remove the key and UNPLUG THE POWER CORD. Be careful to overtighten the walking belt. b. Using the allen wrench, turn both rear roller adjustment bolts clockwise, 1/4 of the walking belt 3 to lift each . Plug in the power cord, insert the key and run the treadmill for a few minutes. Repeat until the walking belt...
English Manual
Page 13
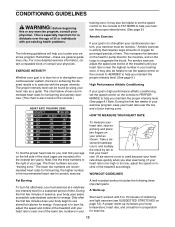
... found on your training zone. A proper warm-up Start each workout with the proper intensity. It may also be Òaerobic.Ó Aerobic exercise is to plan your age. WORKOUT GUIDELINES Fat Burning To burn fat effectively, you to burn fat, adjust the speed and incline of your exercise program. For aerobic exercise, adjust the speed and incline of the treadmill until your heart rate, stop exercising.) If your...
... found on your training zone. A proper warm-up Start each workout with the proper intensity. It may also be Òaerobic.Ó Aerobic exercise is to plan your age. WORKOUT GUIDELINES Fat Burning To burn fat effectively, you to burn fat, adjust the speed and incline of your exercise program. For aerobic exercise, adjust the speed and incline of the treadmill until your heart rate, stop exercising.) If your...
English Manual
Page 14
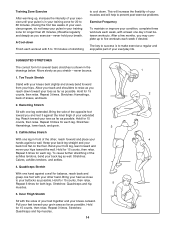
...-exercise problems. Exercise Frequency To maintain or improve your condition, complete three workouts each week, with your knees bent slightly and slowly bend forward from your back foot flat on the floor. After a few weeks of rest between workouts. Move slowly as you may complete up , increase the intensity of your exercise until your pulse is in your training...
...-exercise problems. Exercise Frequency To maintain or improve your condition, complete three workouts each week, with your knees bent slightly and slowly bend forward from your back foot flat on the floor. After a few weeks of rest between workouts. Move slowly as you may complete up , increase the intensity of your exercise until your pulse is in your training...

English Manual
Page 15
... # These parts are not illustrated 15 Bolt Roller Adj. Bolt Motor Latch Decal Rear Platform Screw Catch Screw Latch Catch Walking Platform 8Ó cable Tie 4Ó cable Tie Front Roller Adj. Qty. Washer Choke Motor Bolt Cap Screw Left Foot Rail Cap Foot Rail Front Roller/Pulley Magnet Platform Screw Isolator Isolator Screw Belly Pan Fastener Wire Harness Belt Guide Console Cover Front Belly Pan Power Supply Cable Tie Clamp Cable Tie Walking Belt Roller Guard Rear Roller Rear Isolator Rear Foot Rear Foot Screw Ground Wire Ground Wire Screw Key No...
... # These parts are not illustrated 15 Bolt Roller Adj. Bolt Motor Latch Decal Rear Platform Screw Catch Screw Latch Catch Walking Platform 8Ó cable Tie 4Ó cable Tie Front Roller Adj. Qty. Washer Choke Motor Bolt Cap Screw Left Foot Rail Cap Foot Rail Front Roller/Pulley Magnet Platform Screw Isolator Isolator Screw Belly Pan Fastener Wire Harness Belt Guide Console Cover Front Belly Pan Power Supply Cable Tie Clamp Cable Tie Walking Belt Roller Guard Rear Roller Rear Isolator Rear Foot Rear Foot Screw Ground Wire Ground Wire Screw Key No...
English Manual
Page 18
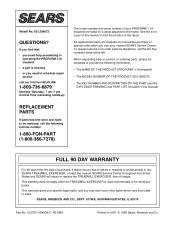
... provide the following information: ¥ The NAME OF THE PRODUCT (PROFORM¨ L18 treadmill) ¥ The MODEL NUMBER OF THE PRODUCT (831.298072) ¥ The KEY NUMBER AND DESCRIPTION OF THE PART (see the EXPLODED DRAWING and PART LIST included in this manual) REPLACEMENT PARTS If parts become worn and need to the frame. All replacement parts are listed on a decal attached to schedule repair service call our toll-free HELPLINE 1-800-736...
... provide the following information: ¥ The NAME OF THE PRODUCT (PROFORM¨ L18 treadmill) ¥ The MODEL NUMBER OF THE PRODUCT (831.298072) ¥ The KEY NUMBER AND DESCRIPTION OF THE PART (see the EXPLODED DRAWING and PART LIST included in this manual) REPLACEMENT PARTS If parts become worn and need to the frame. All replacement parts are listed on a decal attached to schedule repair service call our toll-free HELPLINE 1-800-736...


