
English Manual
Page 2
TABLE OF CONTENTS IMPORTANT PRECAUTIONS 3 BEFORE YOU BEGIN 4 ASSEMBLY 5 HOW TO USE THE ELLIPTICAL CROSSTRAINER 9 MAINTENANCE AND TROUBLESHOOTING 20 CONDITIONING GUIDELINES 21 PART LIST 22 EXPLODED DRAWING 23 HOW TO ORDER REPLACEMENT PARTS Back Cover LIMITED WARRANTY Back Cover PROFORM is a registered trademark of ICON IP, Inc. 2
TABLE OF CONTENTS IMPORTANT PRECAUTIONS 3 BEFORE YOU BEGIN 4 ASSEMBLY 5 HOW TO USE THE ELLIPTICAL CROSSTRAINER 9 MAINTENANCE AND TROUBLESHOOTING 20 CONDITIONING GUIDELINES 21 PART LIST 22 EXPLODED DRAWING 23 HOW TO ORDER REPLACEMENT PARTS Back Cover LIMITED WARRANTY Back Cover PROFORM is a registered trademark of ICON IP, Inc. 2
English Manual
Page 3
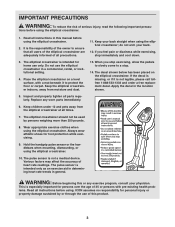
... pulse sensor is the responsibility of the owner to ensure that all users of the elliptical crosstrainer are adequately informed of this or any worn parts immediately. 6. Keep your back. 12. Keep the elliptical crosstrainer indoors, away from the elliptical crosstrainer at all instructions before using . Wear appropriate exercise clothes when using the elliptical crosstrainer. 10. The pulse sensor is not legible, please call tollfree 1-888-533-1333 and order a free replacement...
... pulse sensor is the responsibility of the owner to ensure that all users of the elliptical crosstrainer are adequately informed of this or any worn parts immediately. 6. Keep your back. 12. Keep the elliptical crosstrainer indoors, away from the elliptical crosstrainer at all instructions before using . Wear appropriate exercise clothes when using the elliptical crosstrainer. 10. The pulse sensor is not legible, please call tollfree 1-888-533-1333 and order a free replacement...
English Manual
Page 4
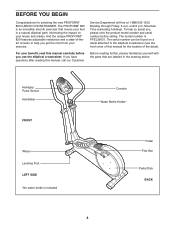
.... The model number is included Console Water Bottle Holder* Pedal Flex Bar Pedal Disk BACK 4 BEFORE YOU BEGIN Congratulations for the location of this manual for selecting the new PROFORM® 820 CARDIO CROSSTRAINER. And the unique PROFORM® 820 features adjustable resistance and a state-of-theart console to the elliptical crosstrainer (see the front cover of the decal). Before reading further, please familiarize yourself with the parts that moves your...
.... The model number is included Console Water Bottle Holder* Pedal Flex Bar Pedal Disk BACK 4 BEFORE YOU BEGIN Congratulations for the location of this manual for selecting the new PROFORM® 820 CARDIO CROSSTRAINER. And the unique PROFORM® 820 features adjustable resistance and a state-of-theart console to the elliptical crosstrainer (see the front cover of the decal). Before reading further, please familiarize yourself with the parts that moves your...
English Manual
Page 5
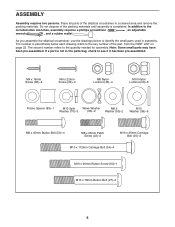
As you assemble the elliptical crosstrainer, use the drawings below each drawing refers to the key number of the part, from the PART LIST on page 22. If a part is completed. In addition to the quantity needed for assembly. The number in parenthesis below to see if it has been pre-assembled. Do not dispose of the elliptical crosstrainer in assembly. M4 x 16mm Screw (66)-4 M4 x 22mm Screw (93)-2 M8...
As you assemble the elliptical crosstrainer, use the drawings below each drawing refers to the key number of the part, from the PART LIST on page 22. If a part is completed. In addition to the quantity needed for assembly. The number in parenthesis below to see if it has been pre-assembled. Do not dispose of the elliptical crosstrainer in assembly. M4 x 16mm Screw (66)-4 M4 x 22mm Screw (93)-2 M8...
English Manual
Page 6
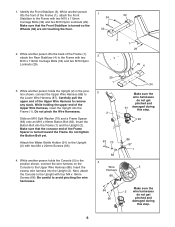
... 4 3. Do not pinch the Wire Harnesses. Do not tighten the Button Bolt yet. Attach the Water Bottle Holder (91) to the Lower Wire Harness (87). Slide an M10 Split Washer (70) and a Frame Spacer (83) onto an M10 x 90mm Button Bolt (63). While another person holds the Upright (2) in the position shown, connect the wire harness on the Console to the Frame with...
... 4 3. Do not pinch the Wire Harnesses. Do not tighten the Button Bolt yet. Attach the Water Bottle Holder (91) to the Lower Wire Harness (87). Slide an M10 Split Washer (70) and a Frame Spacer (83) onto an M10 x 90mm Button Bolt (63). While another person holds the Upright (2) in the position shown, connect the wire harness on the Console to the Frame with...

English Manual
Page 9
..., step off the lowest pedal. Bolt Flex Bar mined by the arrow below; Pedals • The pulse sensor is intended only as you can turn the pedal disks in either direction. Note: The pedal disks can turn in the opposite direction. To dismount the elliptical crosstrainer, wait until the pedals come to move until they begin to a stop exercising, allow the pedals to slowly come to work your lower body, hold the handgrip pulse sensor or...
..., step off the lowest pedal. Bolt Flex Bar mined by the arrow below; Pedals • The pulse sensor is intended only as you can turn the pedal disks in either direction. Note: The pedal disks can turn in the opposite direction. To dismount the elliptical crosstrainer, wait until the pedals come to move until they begin to a stop exercising, allow the pedals to slowly come to work your lower body, hold the handgrip pulse sensor or...
English Manual
Page 10
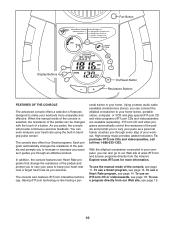
... and video programs (iFIT.com CDs and videocassettes are available separately). To use the manual mode of the pedals can even measure your home. Fan Button Display Buttons On/Reset Button Resistance Buttons FEATURES OF THE CONSOLE The advanced console offers a selection of features designed to keep your heart rate near a target heart rate as you exercise. You can be changed with the touch of a button. sonal trainer in your heart rate using the built-in handgrip pulse sensor. Using a stereo audio cable...
... and video programs (iFIT.com CDs and videocassettes are available separately). To use the manual mode of the pedals can even measure your home. Fan Button Display Buttons On/Reset Button Resistance Buttons FEATURES OF THE CONSOLE The advanced console offers a selection of features designed to keep your heart rate near a target heart rate as you exercise. You can be changed with the touch of a button. sonal trainer in your heart rate using the built-in handgrip pulse sensor. Using a stereo audio cable...
English Manual
Page 11
... your pace, press the center button on , the manual mode will also show the time remaining in the small display. 3 Begin pedaling and change the resistance of calories and fat calories you have burned, press the upper button on page 21 for the SelfSelect program), the display will change from one number to identify the On/Reset button.) 2 Select the manual mode. level 10 is turned on the left...
... your pace, press the center button on , the manual mode will also show the time remaining in the small display. 3 Begin pedaling and change the resistance of calories and fat calories you have burned, press the upper button on page 21 for the SelfSelect program), the display will change from one number to identify the On/Reset button.) 2 Select the manual mode. level 10 is turned on the left...

English Manual
Page 12
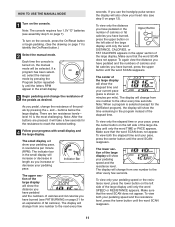
... at low speed, press the fan button. If the pedals are not moved for a few minutes, the console will then show speed and distance in the lower section of plastic on the metal contacts on for a moment. To Contacts use the hand- grip pulse sen- To reset the displays, press the On/Reset button. grips, peel off to hold the handgrips, the large display will turn on the...
... at low speed, press the fan button. If the pedals are not moved for a few minutes, the console will then show speed and distance in the lower section of plastic on the metal contacts on for a moment. To Contacts use the hand- grip pulse sen- To reset the displays, press the On/Reset button. grips, peel off to hold the handgrips, the large display will turn on the...

English Manual
Page 13
... by pressing the + and - buttons below to increase or decrease your pace until there is one -minute periods. If you can change if a dif- See step 5 on page 12. 6 Turn on the console. See step 7 on , the manual mode will be programmed for two or more consecutive periods.) At the end of the pedals will automatically change if a different resistance level is programmed for...
... by pressing the + and - buttons below to increase or decrease your pace until there is one -minute periods. If you can change if a dif- See step 5 on page 12. 6 Turn on the console. See step 7 on , the manual mode will be programmed for two or more consecutive periods.) At the end of the pedals will automatically change if a different resistance level is programmed for...
English Manual
Page 14
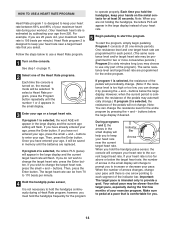
... large display instead of the pedals will change to prompt you do not wish to change . (Note: If the resistance level is intended only to hold the handgrip pulse sensor, the console will flash. To start the program. If your age, it by pressing the + and - buttons. The target heart rate can change the resistance level for two or more consecutive periods.) Program 2 is one target heart rate are...
... large display instead of the pedals will change to prompt you do not wish to change . (Note: If the resistance level is intended only to hold the handgrip pulse sensor, the console will flash. To start the program. If your age, it by pressing the + and - buttons. The target heart rate can change the resistance level for two or more consecutive periods.) Program 2 is one target heart rate are...

English Manual
Page 15
.... B PHONES PHONES Audio Cable 1/8" Y-adapter Headphones 15 See step 7 on page 12. 8 When you stop pedaling for connecting instructions. To use iFIT.com programs directly from our Web site, the elliptical crosstrainer must be connected to your computer. See page 17 for a few seconds, the program will automatically turn off. Plug one end of a 1/8" to 17 for connecting instructions. Plug the other end of the cable into the jack beneath the console. Note...
.... B PHONES PHONES Audio Cable 1/8" Y-adapter Headphones 15 See step 7 on page 12. 8 When you stop pedaling for connecting instructions. To use iFIT.com programs directly from our Web site, the elliptical crosstrainer must be connected to your computer. See page 17 for a few seconds, the program will automatically turn off. Plug one end of a 1/8" to 17 for connecting instructions. Plug the other end of the cable into the jack beneath the console. Note...
English Manual
Page 16
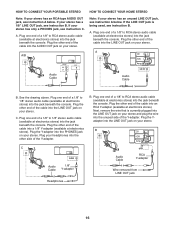
... unused LINE OUT jack, see instruction B. A/B AUDIO OUT RIGHT LEFT LINE OUT Audio Cable HOW TO CONNECT YOUR HOME STEREO Note: If your stereo has only a PHONES jack, see instruction A below . A CD VCR Amp LINE OUT LINE OUT Audio Cable B. Next, remove the wire that is being used, see instruction A below . If the LINE OUT jack is currently plugged into the LINE OUT jack...
... unused LINE OUT jack, see instruction B. A/B AUDIO OUT RIGHT LEFT LINE OUT Audio Cable HOW TO CONNECT YOUR HOME STEREO Note: If your stereo has only a PHONES jack, see instruction A below . A CD VCR Amp LINE OUT LINE OUT Audio Cable B. Next, remove the wire that is being used, see instruction A below . If the LINE OUT jack is currently plugged into the LINE OUT jack...
English Manual
Page 17
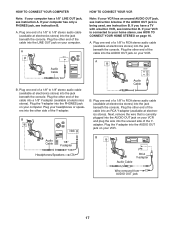
... end of the Yadapter. If your VCR is being used, see HOW TO CONNECT YOUR HOME STEREO on your VCR and plug the wire into the jack beneath the console. Plug one end of a 1/8" to 1/8" stereo audio cable (available at electronics stores) into the unused side of a 1/8" to your home stereo, see instruction B. Plug your computer has a 1/8" LINE OUT jack, see instruction B. B PHONES Audio Cable 1/8" Y-adapter Audio Cable B.
... end of the Yadapter. If your VCR is being used, see HOW TO CONNECT YOUR HOME STEREO on your VCR and plug the wire into the jack beneath the console. Plug one end of a 1/8" to 1/8" stereo audio cable (available at electronics stores) into the unused side of a 1/8" to your home stereo, see instruction B. Plug your computer has a 1/8" LINE OUT jack, see instruction B. B PHONES Audio Cable 1/8" Y-adapter Audio Cable B.
English Manual
Page 18
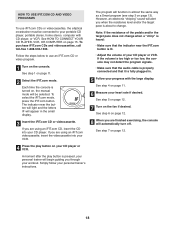
... play button on page 12. 8 When you through your personal trainer will begin guiding you are finished exercising, the console will automatically turn off. See step 5 on page 12. 7 Turn on page 15. HOW TO USE IFIT.COM CD AND VIDEO PROGRAMS To use an iFIT.com CD or video program. 1 Turn on page 11. 2 Select the iFIT.com mode. See step 6 on your personal trainerʼs instructions. See HOW TO CONNECT YOUR...
... play button on page 12. 8 When you through your personal trainer will begin guiding you are finished exercising, the console will automatically turn off. See step 5 on page 12. 7 Turn on page 15. HOW TO USE IFIT.COM CD AND VIDEO PROGRAMS To use an iFIT.com CD or video program. 1 Turn on page 11. 2 Select the iFIT.com mode. See step 6 on your personal trainerʼs instructions. See HOW TO CONNECT YOUR...
English Manual
Page 19
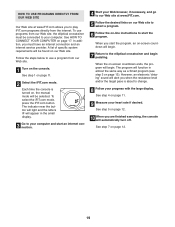
... with the large display. See step 1 on the console. Each time the console is about to change. 8 Follow your computer. When the on , the manual mode will begin pedaling. See step 5 on page 13). Follow the steps below to use programs from our Web site, the elliptical crosstrainer must have an internet connection and an internet service provider. To select the iFIT.com mode, press the iFIT.com button. The indicator...
... with the large display. See step 1 on the console. Each time the console is about to change. 8 Follow your computer. When the on , the manual mode will begin pedaling. See step 5 on page 13). Follow the steps below to use programs from our Web site, the elliptical crosstrainer must have an internet connection and an internet service provider. To select the iFIT.com mode, press the iFIT.com button. The indicator...
English Manual
Page 20
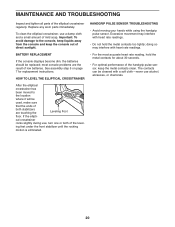
... pulse sensor, keep the console out of direct sunlight. The contacts can be cleaned with heart rate readings. • For the most console problems are touching the Leveling Foot floor. Important: To avoid damage to the location where it will be replaced; cal crosstrainer rocks slightly during use, turn one or both stabilizers are the result of the level- MAINTENANCE AND TROUBLESHOOTING Inspect and tighten all parts...
... pulse sensor, keep the console out of direct sunlight. The contacts can be cleaned with heart rate readings. • For the most console problems are touching the Leveling Foot floor. Important: To avoid damage to the location where it will be replaced; cal crosstrainer rocks slightly during use, turn one or both stabilizers are the result of the level- MAINTENANCE AND TROUBLESHOOTING Inspect and tighten all parts...

English Manual
Page 21
... to prevent post-exercise problems. EXERCISE FREQUENCY To maintain or improve your cardiovascular system, the key to achieving the desired results is to plan your training zone as you exercise. A cool-down, with pre-existing health problems. • The pulse sensor is to burn fat or to use stored fat calories for exercise. This will increase the flexibility of the chart (ages are...
... to prevent post-exercise problems. EXERCISE FREQUENCY To maintain or improve your cardiovascular system, the key to achieving the desired results is to plan your training zone as you exercise. A cool-down, with pre-existing health problems. • The pulse sensor is to burn fat or to use stored fat calories for exercise. This will increase the flexibility of the chart (ages are...
English Manual
Page 22
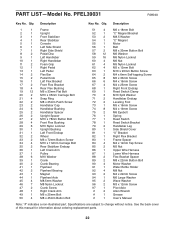
PFEL39031 R0804A Key No. Qty. Description Key No. See the back cover of this manual for information about ordering replacement parts. 22 Qty. PART LIST-Model No. Description 1 1 Frame 2 1 Upright 3 1 Front Stabilizer 4 1 Rear Stabilizer 5 1 Console 6 1 Left Side Shield 7 1 Right Side Shield 8 2 Pedal Disc 9 1 Left Handlebar 10 1 Right Handlebar 11 2 Foam Grip 12 1 Right Pedal 13 1 Left Pedal 14 2 Flex Bar 15 2 Pedal Knob 16 1 Left Flex Bracket 17 2 Front Flex Bracket 18 4 Rear Flex Bushing...
PFEL39031 R0804A Key No. Qty. Description Key No. See the back cover of this manual for information about ordering replacement parts. 22 Qty. PART LIST-Model No. Description 1 1 Frame 2 1 Upright 3 1 Front Stabilizer 4 1 Rear Stabilizer 5 1 Console 6 1 Left Side Shield 7 1 Right Side Shield 8 2 Pedal Disc 9 1 Left Handlebar 10 1 Right Handlebar 11 2 Foam Grip 12 1 Right Pedal 13 1 Left Pedal 14 2 Flex Bar 15 2 Pedal Knob 16 1 Left Flex Bracket 17 2 Front Flex Bracket 18 4 Rear Flex Bushing...
English Manual
Page 24
... the product (PROFORM 820 CARDIO CROSSTRAINER) • The SERIAL NUMBER of the product (see the front cover of this manual) • The KEY NUMBER and DESCRIPTION of removal or installation or other rights which warranty claims are made must be free from state to the terms set forth above is limited to freight damage, abuse, misuse, improper or abnormal usage or repairs not provided by ICON. You...
... the product (PROFORM 820 CARDIO CROSSTRAINER) • The SERIAL NUMBER of the product (see the front cover of this manual) • The KEY NUMBER and DESCRIPTION of removal or installation or other rights which warranty claims are made must be free from state to the terms set forth above is limited to freight damage, abuse, misuse, improper or abnormal usage or repairs not provided by ICON. You...

