
English Manual
Page 1
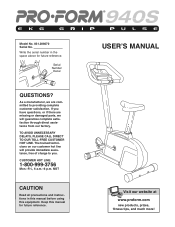
... Read all precautions and instructions in the space above for future reference. ¨ USERÕS MANUAL Visit our website at www.proform.com new products, prizes, fitness tips, and much more! TO AVOID UNNECESSARY DELAYS, PLEASE CALL DIRECT TO OUR TOLL-FREE CUSTOMER HOT LINE. Model No. 831.288070 Serial No. Write the serial number in this manual before using this manual for future reference...
... Read all precautions and instructions in the space above for future reference. ¨ USERÕS MANUAL Visit our website at www.proform.com new products, prizes, fitness tips, and much more! TO AVOID UNNECESSARY DELAYS, PLEASE CALL DIRECT TO OUR TOLL-FREE CUSTOMER HOT LINE. Model No. 831.288070 Serial No. Write the serial number in this manual before using this manual for future reference...
English Manual
Page 2
¨ TABLE OF CONTENTS IMPORTANT PRECAUTIONS 3 BEFORE YOU BEGIN 4 PART IDENTIFICATION CHART 5 ASSEMBLY 6 HOW TO USE THE EXERCISE CYCLE 8 CONDITIONING GUIDELINES 10 MAINTENANCE AND TROUBLE-SHOOTING 12 PART LIST 14 EXPLODED DRAWING 15 HOW TO ORDER REPLACEMENT PARTS Back Cover 2
¨ TABLE OF CONTENTS IMPORTANT PRECAUTIONS 3 BEFORE YOU BEGIN 4 PART IDENTIFICATION CHART 5 ASSEMBLY 6 HOW TO USE THE EXERCISE CYCLE 8 CONDITIONING GUIDELINES 10 MAINTENANCE AND TROUBLE-SHOOTING 12 PART LIST 14 EXPLODED DRAWING 15 HOW TO ORDER REPLACEMENT PARTS Back Cover 2
English Manual
Page 3
... seat knob under the age of all instructions in -home use the exercise cycle in the seat post (see the drawing on a level surface, with pre-existing health problems. Read all instructions before using the exercise cycle. Place the exercise cycle on page 4). Keep children under the seat post. 9. The exercise cycle is the responsibility of the owner to move until the flywheel stops. 12. Replace any time while exercising, stop...
... seat knob under the age of all instructions in -home use the exercise cycle in the seat post (see the drawing on a level surface, with pre-existing health problems. Read all instructions before using the exercise cycle. Place the exercise cycle on page 4). Keep children under the seat post. 9. The exercise cycle is the responsibility of the owner to move until the flywheel stops. 12. Replace any time while exercising, stop...
English Manual
Page 4
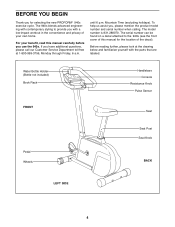
... front cover of this manual for selecting the new PROFORM¨ 940s exercise cycle. If you , please mention the product model number and serial number when calling. BEFORE YOU BEGIN Thank you with a low-impact workout in the convenience and privacy of the decal). For your own home. Water Bottle Holder (Bottle not included) Book Rack FRONT Handlebars Console Resistance Knob Pulse Sensor Seat Pedal Wheels Seat Post Seat Knob BACK...
... front cover of this manual for selecting the new PROFORM¨ 940s exercise cycle. If you , please mention the product model number and serial number when calling. BEFORE YOU BEGIN Thank you with a low-impact workout in the convenience and privacy of the decal). For your own home. Water Bottle Holder (Bottle not included) Book Rack FRONT Handlebars Console Resistance Knob Pulse Sensor Seat Pedal Wheels Seat Post Seat Knob BACK...
English Manual
Page 5
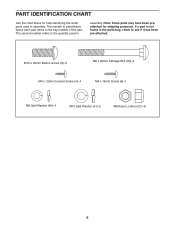
... Button Screw (8)Ð5 M8 x 90mm Carriage Bolt (30)Ð4 M4 x 12mm Console Screw (4)Ð4 M4 x 16mm Screw (9)Ð1 M8 Split Washer (49)Ð4 M10 Split Washer (41)Ð5 M8 Nylon Locknut (21)Ð8 5 Note: Some parts may have been preattached for help identifying the small parts used in assembly. PART IDENTIFICATION CHART Use the chart below each part refers to the key number of the part. The number in...
... Button Screw (8)Ð5 M8 x 90mm Carriage Bolt (30)Ð4 M4 x 12mm Console Screw (4)Ð4 M4 x 16mm Screw (9)Ð1 M8 Split Washer (49)Ð4 M10 Split Washer (41)Ð5 M8 Nylon Locknut (21)Ð8 5 Note: Some parts may have been preattached for help identifying the small parts used in assembly. PART IDENTIFICATION CHART Use the chart below each part refers to the key number of the part. The number in...
English Manual
Page 6
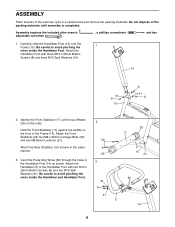
... wires inside the Handlebar Post. Hold the Front Stabilizer (17) against the saddle on the ends. Attach the Rear Stabilizer (not shown) in the Handlebar Post (14) as shown. Do not dispose of the Frame (15). ASSEMBLY Place all parts of the exercise cycle in a cleared area and remove the packing materials. Assembly requires the included allen wrench adjustable...
... wires inside the Handlebar Post. Hold the Front Stabilizer (17) against the saddle on the ends. Attach the Rear Stabilizer (not shown) in the Handlebar Post (14) as shown. Do not dispose of the Frame (15). ASSEMBLY Place all parts of the exercise cycle in a cleared area and remove the packing materials. Assembly requires the included allen wrench adjustable...
English Manual
Page 7
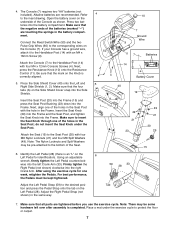
The Console (7) requires two ÒAAÓ batteries (not included). Connect the Reed Switch/Wire (50) and the two Pulse Grip Wires (60) to the corresponding wires on the Left Pedal (28). Next, press the Resistance Knob (10) onto the Resistance Control (11). do not insert the Seat Knob under the exercise cycle to the inset drawing. Attach the Seat (19) to the bottom of the Seat. 6. Identify the Left Pedal (28) (there...
The Console (7) requires two ÒAAÓ batteries (not included). Connect the Reed Switch/Wire (50) and the two Pulse Grip Wires (60) to the corresponding wires on the Left Pedal (28). Next, press the Resistance Knob (10) onto the Resistance Control (11). do not insert the Seat Knob under the exercise cycle to the inset drawing. Attach the Seat (19) to the bottom of the Seat. 6. Identify the Left Pedal (28) (there...
English Manual
Page 8
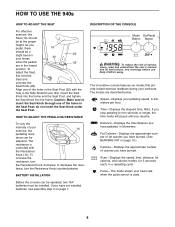
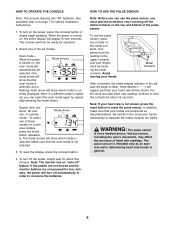
... ADJUST THE PEDALLING RESISTANCE To vary the intensity of calories you have burned. to insert the Seat Knob through one of the holes in your heart rate when the pulse sensor is controlled with the hole in the Side Shield Cover (40). If you have not installed batteries, see assembly step 4 on page 10.) CaloriesÑDisplays the approximate number of your exercise, the 10 pedalling resis- SpeedÑDisplays your workouts. Distance...
... ADJUST THE PEDALLING RESISTANCE To vary the intensity of calories you have burned. to insert the Seat Knob through one of the holes in your heart rate when the pulse sensor is controlled with the hole in the Side Shield Cover (40). If you have not installed batteries, see assembly step 4 on page 10.) CaloriesÑDisplays the approximate number of your exercise, the 10 pedalling resis- SpeedÑDisplays your workouts. Distance...
English Manual
Page 9
... of heart rate readings. If the pedals are not moved and the monitor buttons are positioned as an exercise aid in determining heart rate trends in the display will appear for about 15 seconds. Avoid moving your heart rate is not shown, press the reset button to reset the pulse sensor. Note: If your hands. Various factors, including the user's movement, may affect the accuracy of the pulse sensor. When the power is turned...
... of heart rate readings. If the pedals are not moved and the monitor buttons are positioned as an exercise aid in determining heart rate trends in the display will appear for about 15 seconds. Avoid moving your heart rate is not shown, press the reset button to reset the pulse sensor. Note: If your hands. Various factors, including the user's movement, may affect the accuracy of the pulse sensor. When the power is turned...
English Manual
Page 10
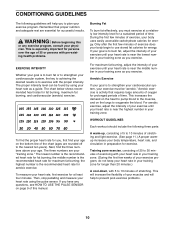
... for you must be found by using the pulse sensor. WORKOUT GUIDELINES Each workout should include the following guidelines will help to achieving the desired results is especially important for successful results. The chart below shows recommended heart rates for maximum fat burning; Then, stop pedalling and measure your cardiovascular system, the key to prevent post-exercise problems. 10 A warm-up, consisting of...
... for you must be found by using the pulse sensor. WORKOUT GUIDELINES Each workout should include the following guidelines will help to achieving the desired results is especially important for successful results. The chart below shows recommended heart rates for maximum fat burning; Then, stop pedalling and measure your cardiovascular system, the key to prevent post-exercise problems. 10 A warm-up, consisting of...
English Manual
Page 11
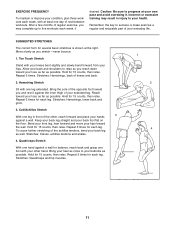
... rest between workouts. Remember, the key to progress at the right. Move slowly as ...workouts each leg. Calf/Achilles Stretch With one foot with your knees bent slightly and slowly bend forward from your hips toward you stretchÑnever bounce. 1. Bend your front leg, lean forward and move your hips. Repeat 3 times for each leg. Incorrect or excessive training...leg straight and your everyday life. SUGGESTED STRETCHES The correct form for 15 counts, then relax. Repeat 3 times. Hold for several basic stretches is make exercise a regular and enjoyable part...
... rest between workouts. Remember, the key to progress at the right. Move slowly as ...workouts each leg. Calf/Achilles Stretch With one foot with your knees bent slightly and slowly bend forward from your hips toward you stretchÑnever bounce. 1. Bend your front leg, lean forward and move your hips. Repeat 3 times for each leg. Incorrect or excessive training...leg straight and your everyday life. SUGGESTED STRETCHES The correct form for 15 counts, then relax. Repeat 3 times. Hold for several basic stretches is make exercise a regular and enjoyable part...
English Manual
Page 12
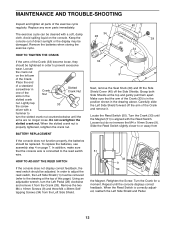
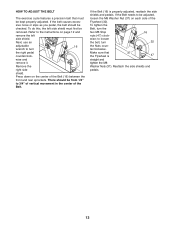
... TO TIGHTEN THE CRANK If the arms of direct sunlight or the display may be tightened in the Crank Nut Slotted Crank Nut slotted crank nut. BATTERY REPLACEMENT If the console does not function properly, the batteries should be cleaned with the Reed Switch. In addition, make sure that the arm of the exercise cycle regularly. Using an adjustable wrench, turn the slotted crank nut counterclockwise until the console displays correct feedback. Locate the Reed Switch...
... TO TIGHTEN THE CRANK If the arms of direct sunlight or the display may be tightened in the Crank Nut Slotted Crank Nut slotted crank nut. BATTERY REPLACEMENT If the console does not function properly, the batteries should be cleaned with the Reed Switch. In addition, make sure that the arm of the exercise cycle regularly. Using an adjustable wrench, turn the slotted crank nut counterclockwise until the console displays correct feedback. Locate the Reed Switch...
English Manual
Page 13
... rear sprockets. If the Belt (16) is 47 straight and tighten the M8 Washer Nuts (37). to turn the right pedal counterclock- HOW TO ADJUST THE BELT The exercise cycle features a precision belt that 37 the Flywheel is properly adjusted, reattach the side shields and pedals. Reattach the side shields and pedals. 13 wise and remove it. sive noise or slips as you pedal, the belt...
... rear sprockets. If the Belt (16) is 47 straight and tighten the M8 Washer Nuts (37). to turn the right pedal counterclock- HOW TO ADJUST THE BELT The exercise cycle features a precision belt that 37 the Flywheel is properly adjusted, reattach the side shields and pedals. Reattach the side shields and pedals. 13 wise and remove it. sive noise or slips as you pedal, the belt...

English Manual
Page 14
Description Key No. Qty. Specifications are subject to change without notice. 14 Qty. Description 1 1 Left Side Shield 2 1 Right Side Shield 3 2 Double Tree Fastener 4 4 M4 x 12mm Console Screw 5 1 Handlebar 6 2 Foam Grip 7 1 Console 8 5 M10 x 25mm Button Screw 9 8 M4 x 16mm Screw 10 1 Resistance Knob 11 1 Resistance Control/Cable 12 3 M5 x 30mm Screw 13 1 Right Pedal 14 1 Handlebar Post 15 1 Frame 16 1 Belt 17 1 Front Stabilizer 18 1 Rear Stabilizer 19 1 Seat 20 1 Seat Post 21...
Description Key No. Qty. Specifications are subject to change without notice. 14 Qty. Description 1 1 Left Side Shield 2 1 Right Side Shield 3 2 Double Tree Fastener 4 4 M4 x 12mm Console Screw 5 1 Handlebar 6 2 Foam Grip 7 1 Console 8 5 M10 x 25mm Button Screw 9 8 M4 x 16mm Screw 10 1 Resistance Knob 11 1 Resistance Control/Cable 12 3 M5 x 30mm Screw 13 1 Right Pedal 14 1 Handlebar Post 15 1 Frame 16 1 Belt 17 1 Front Stabilizer 18 1 Rear Stabilizer 19 1 Seat 20 1 Seat Post 21...
English Manual
Page 16
... by ICON. Accordingly, the above limitation may not apply to you , please be prepared to give the following information: ¥ The MODEL NUMBER of the product (831.288070) ¥ The NAME of the product (PROFORM¨ 940s exercise cycle) ¥ The SERIAL NUMBER of the product (see the front cover of this manual) ¥ The KEY NUMBER and DESCRIPTION of removal, installation or other warranty beyond that specifically set...
... by ICON. Accordingly, the above limitation may not apply to you , please be prepared to give the following information: ¥ The MODEL NUMBER of the product (831.288070) ¥ The NAME of the product (PROFORM¨ 940s exercise cycle) ¥ The SERIAL NUMBER of the product (see the front cover of this manual) ¥ The KEY NUMBER and DESCRIPTION of removal, installation or other warranty beyond that specifically set...


